
Managing Shipping
The shipping method of your package is a key element to the management and success of your store. To configure your shipping, head to the “Shipping” tab of your Back Office.

Right from the Shipping page, you can set some first options.
- Handling: Enter the handling expenses, and the price or weight after which your customers receive free shipping. A message will appear to your customers indicating how much more money they need to spend in order to receive free shipping. If you don’t want this message to appear, type 0 into the fields.
- Billing: Choose whether you are calculating the shipping costs by total weight or price.
The fees section enables you too see the shipping for each of the carriers added to your store.
Carriers
You must have carriers added to your store – that is, a clear indicator of who will deliver the product. It might be just yourself or your shop (for instance if you are selling downloadable files, or work locally), but as soon as you are actually send packages using stamps and a 3rd-party delivery service (be it your country's national postal service), or FedEx, UPS and such, then you must have their details added to your store's database. This will enable you and your customers to better choose which carrier to use, based on their ranges, fees and such.
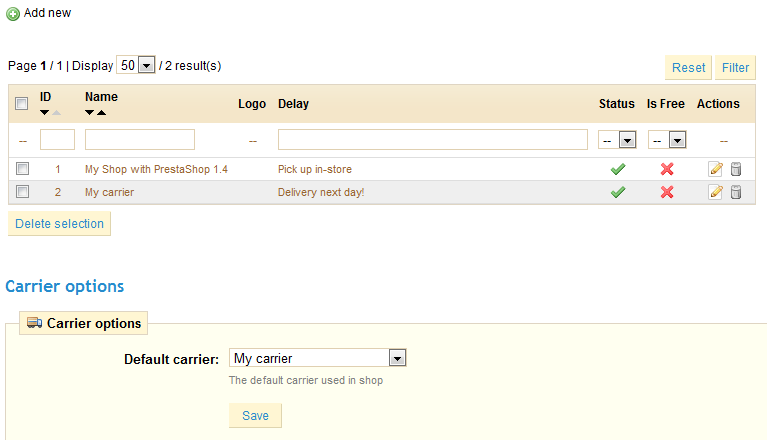
By default, you only have one carrier in your database: your own store. It's up to you to add new carriers depending on which ones you have access to.
We are going to create a sample carrier, from A to Z.
Note: A lot of the details asked by PrestaShop's forms should be provided by your carriers once you have a contract with them. Check with them in order to make sure everything is set right.
Creating a New Carrier
Click on the “Carrier” sub-tab. You will see the form below.
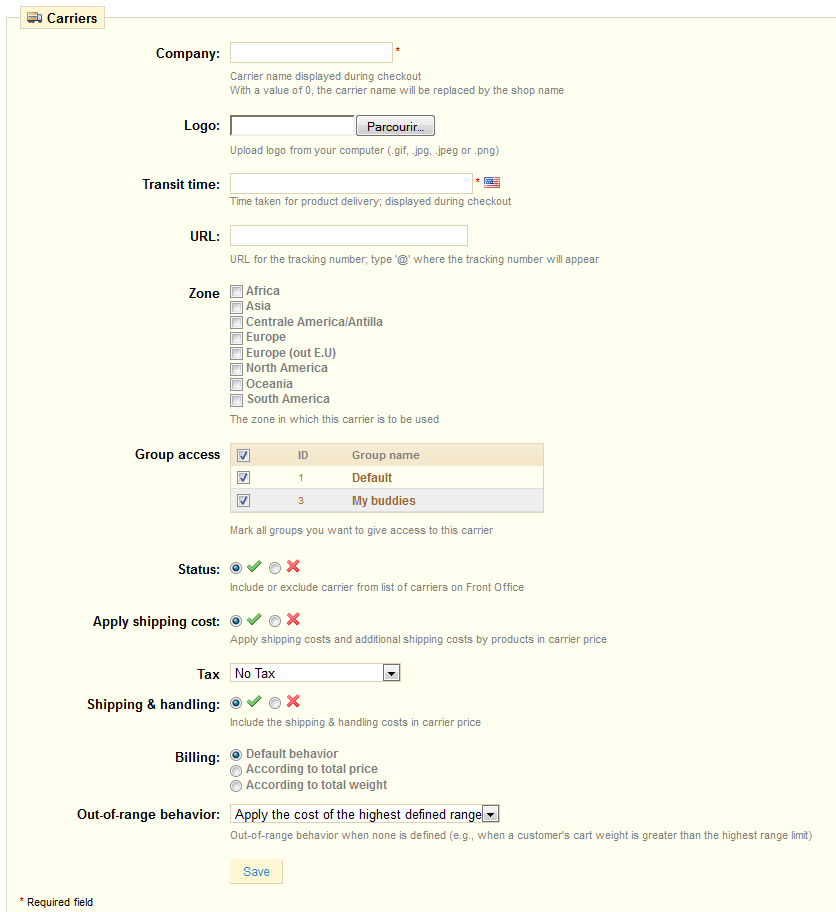
Let’s examine all of the information you need to enter:
- Company: Fill out this field with the name of your carrier and/or a description of the service (for instance, you could fill in “PrestaPost — only 500 lbs and over”)
- *Logo-: Add a logo so that your customers can easily choose between different carriers.
- Transit time: This is displayed to customers during checkout. It will help them select their carrier according to the amount of time they have to wait until they receive their product.
- URL: This field must be filled with the tracking URL provided by your carrier. For example, France’s postal service (La Poste) offers this URL: http://www.colissimo.fr/portail_colissimo/suivreResultat.do?parcelnumber=@ . When customers select their carrier, they will be sent the URL that you enter into this field, which they can click on in order to track their delivery.
- Zone: indicate the customer's zones in which the carrier is available (in short, the zones where the carrier can make deliveries).
- Group Access: Select which groups have access to this carrier.
- Status: Include or exclude this carrier in your shop's list of carriers.
- Shipping & handling: Include the shipping & handling costs in the carrier's price
- Tax: Indicate if this carrier requires a tax in order to deliver to a certain zone.
- Shipping & Handling: Include or exclude shipping & handling costs in this carrier's price.
- Out-of-range behavior In case you have left out a range for an order, you can indicate how the software should react. You have two options:
- If the software doesn’t find the range it needs, it will take the largest configuration and apply these conditions.
- Otherwise, it will not offer this carrier because it can’t deliver this order.
- Finally, save your newly-created carrier.
Here is an example of out-of-range behavior: Let's say you have set up a weight range from 0 to 10 lbs. Your customer wants to place an order that is 15 lbs, and no behavior has been configured. By choosing “Apply the cost of the highest defined range”, PrestaShop will apply the price conditions that you have set up for orders from 5-10 lbs If you choose “Deactivate the carrier”, then this carrier will not be offered to the customer in this case.
States
By "states", PrestaShop calls administrative divisions of a country. In the United-States, they are called "states"; in Italy, it's "province" (singular: "provincia"); in France, it's "départements" (departments); in the United-Kingdom, it's "counties".
Have states properly defined in your database helps with the carriers