
Servicio de atención al cliente
PrestaShop le permite centralizar todas las solicitudes de los clientes dentro de sus confines. Esto le ayuda a mantener un seguimiento de los temas de discusión que necesita responder, en lugar de tener que consultar todas las bandejas de salida de sus cuentas de correo para ver si ha respondido a ellas, o lo ha hecho ya algún otro miembro de su equipo.
En practica, el formulario de contacto de su tienda, disponible en el enlace "Contacte con nosotros" en la parte inferior de su front-office, presenta al cliente dos contactos por defecto: "Webmaster" y "Servicio de Atención al cliente". El cliente sólo tiene que elegir con quién contactar, y a continuación rellenar el resto de campos. El mensaje es guardado posteriormente, en la herramienta de servicio al cliente de PrestaShop.

Los temas de discusión sólo son almacenados en la herramienta de servicio al cliente, si éste tiene la opción "¿Guardar en servicio al cliente?" habilitada. Puede cambiar esta configuración, o añadir más contactos, dirigiéndose a la página de "Contacto", bajo el menú "Clientes". Esta página se explica con detalle en la siguiente sección de este capítulo de la Guía del usuario de PrestaShop.
Si la opción está deshabilitada para el contacto que elija el cliente, el mensaje será simplemente enviado a la dirección de correo electrónico del contacto, y no será almacenado en PrestaShop.
También es necesario configurar correctamente su configuración IMAP, para que así PrestaShop pueda recibir respuestas de los clientes de los emails que fueron enviados desde la herramienta de servicio al cliente. Esto se realiza en la sección "Opciones de servicio al cliente".
En esta página, cada contacto tiene su propio cuadro, donde pueden ver rápidamente si hay mensajes nuevos (es decir, aquellos que aún no han sido leídos). Por defecto hay dos, y si añadimos más contactos las cajas "Significado del estado" y "Servicio cliente: Estadísticas" se moverán más a la izquierda y hacía abajo.
Estos dos últimos cuadros son muy útiles cuando necesite gestionar los nuevos mensajes recibidos en el día:
- Significado del estado. Un simple recordatorio de los códigos de color que su equipo se puede aplicar a un hilo de discusión.
- Servicio cliente: estadísticas. Una visión general de la actividad global de su servicio de atención al cliente desde el nacimiento de su tienda.
Más abajo se encuentra el listado de los mensajes recibidos, tanto antiguos como nuevos.
Puede editar un par de opciones en la parte inferior de la página, que se aplicarán a todos los contactos:
- Autorizar el envío de ficheros. Donde el cliente puede adjuntar un archivo al mensaje. Esto puede ser útil en caso de problemas gráficos en su tienda, ya que el cliente puede enviar capturas de pantalla.
- Mensaje predefinido. La plantilla predeterminada para la respuesta de sus empleados. Componga un mensaje simple, de modo que pueda adaptarse a muchas situaciones, realizando las mínimas modificaciones.
Finalmente, en la parte inferior de la página se presenta la sección "Opciones de servicio al cliente", donde puede configurar muchas opciones relacionadas con su servidor de correo (IMAP).
Gestionar los mensajes del Servicio de atención al cliente
Cada conversación con un cliente puede ser gestionada enteramente a través de la completa interfaz de PrestaShop, sin tener que utilizar un cliente de correo electrónico como Outlook o Thunderbird.

En la lista de conversación, haga clic sobre una fila para visualizar los detalles de la conversación:
- Puede aplicar un puñado de acciones a una discusión, con el fin de ordenarlas y así gestionarlas más rápidamente. Hay 4 estados disponibles:
- Mark as "handled" or "Re-open". Changes the discussion's status to "Closed" or "Open".
- Mark as "pending 1" and Mark as "pending 2". These two statuses are internal: their meaning is up to your team. You may even choose to not use them, and only rely on "Closed" and "Open".
- Forward this discussion to another employee. From the moment an employee has started replying to a customer message, he becomes in charge of the customer's request. If during the discussion it turns out another employee should handle it instead of you, you can use that button to attribute it through a drop-down list. That other employee will receive a notification about it. If the person you want to forward this discussion to is not available in the list, choose "Someone else" in the dropdown list and two options will appear, enabling you to indicate the email address of the recipient and a comment about your message.
- Reply to the next unanswered message in this thread.
Essential details are available:
- Customer name and email, which you can click on to access the customer's information
- Number of orders, total amount spent and date of registration for the customer.
- Time and date of the message.
- Finally, the message itself.
To reply to this thread, simply use the form with your default message (as set in "Contact options" section of the "Customer service" page), and click "Send".
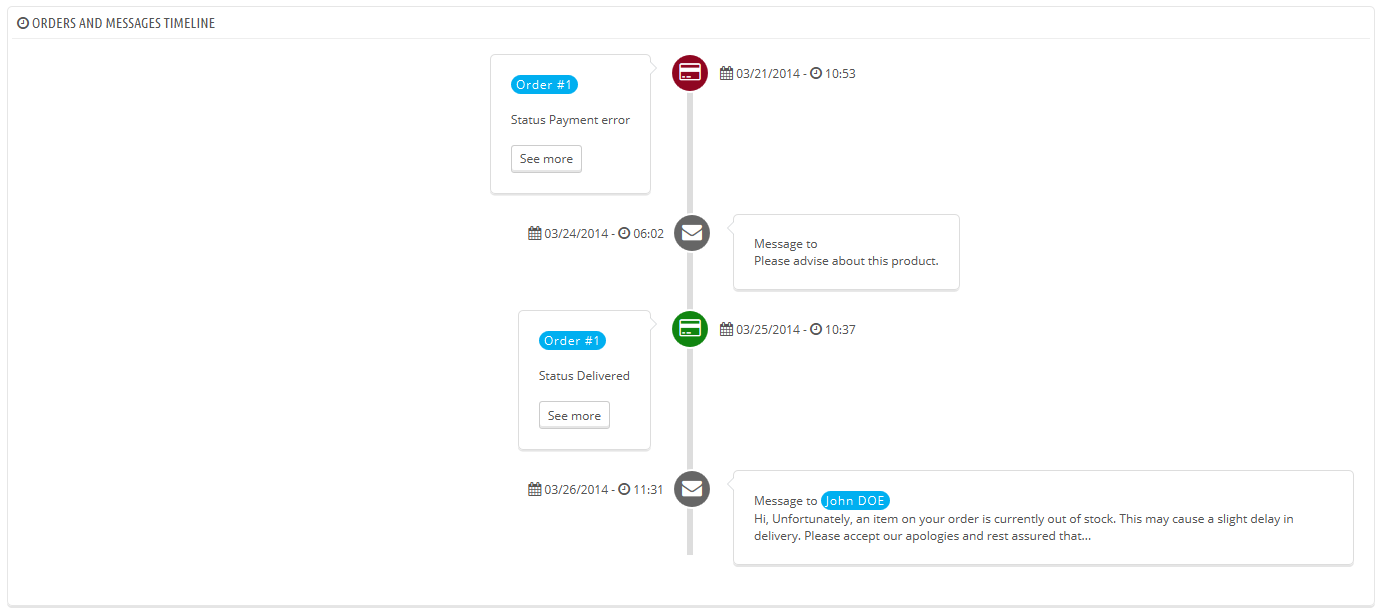
At the bottom of the page, the "Orders and messages timeline" gives you a clear chronological view of the events pertaining to this discussion thread.
Customer Service Options
This section basically enables you to precisely configure PrestaShop's access to your e-mail server through its IMAP interface. You should make sure all fields are filled in order for the customer service tool to work properly. Most of this information should be provided by your webhost.
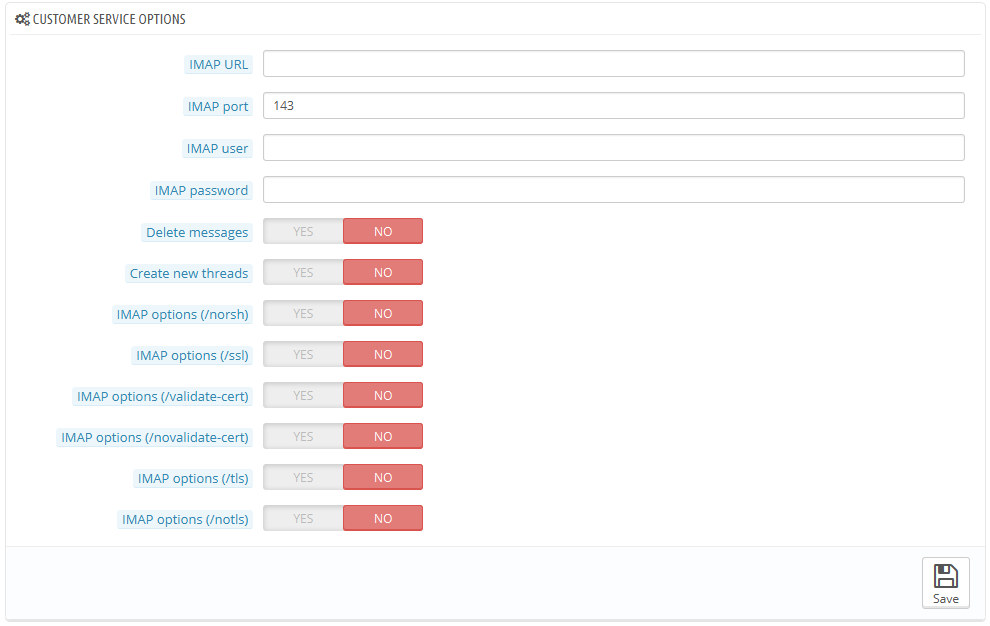
- IMAP URL, IMAP port, IMAP user and IMAP password. Essential details to access the e-mail server using the IMAP protocol.
- Delete message. If enabled, messages on the server will be deleted as soon as PrestaShop has retrieved them. Use with caution: this would make your messages unavailable to other e-mail clients.
- /norsh. If enabled, the connection to your e-mail server will not pre-authenticated. Not recommended.
- /ssl. If enabled, the connection to your e-mail server will not be encrypted. Not recommended.
- /validate-cert. If enabled, PrestaShop will force the validation of the server's TLS/SSL certificate.
- /novalidate-cert. If enabled, PrestaShop will never try to validate the server's TLS/SSL certificate. Essential for servers with self-signed certificates.
- /tls. If enabled, PrestaShop will force use of StartTLS to encrypt the connection. Servers that do not support StartTLS will be rejected.
- /notls. If enabled, PrestaShop will not use StartTLS to encrypt the session, even with servers that support it.