Creating a first module
File structure for a PrestaShop module
A module is made of a lot of files, all stored in a folder that bears the same name as the module, that folder being in turn stored in the /modules folder at the root of the main PrestaShop folder: /modules/name_of_the_module/.
Here are the possible files and folders for a PrestaShop 1.6 module:
| File/folder name | Description | Details |
|---|---|---|
name_of_the_module.php | Main file. | The main PHP file should have the same name as the module's root folder.
|
config.xml | Cache configuration file. | If it does not exist yet, this file is automatically generated by PrestaShop when the module is first installed. |
| Icon files representing this module in the back-office. | PrestaShop 1.4: 16*16 pixels Gif or Jpeg file. PrestaShop 1.5: 32*32 pixels PNG file. If your module works on both PrestaShop 1.4 and PrestaShop 1.5+, you should have both a logo.gif AND a logo.png file. |
/views | This folder contains the View files. | |
/views/templates | This folder contains your module's template files (.tpl). | If the module needs to work with PrestaShop 1.4, the template files should be placed either directly at at the root of the module's folder, or in a /template folder at the root of the module's folder. |
/views/templates/admin | Sub-folder for template files used by the module's administration controllers. | |
/views/templates/front | Sub-folder for template files used by the module's front-office controllers. | |
/views/templates/hook | Sub-folder for template files used by the module's hooks. | |
/views/css | Sub-folder for CSS files used. | If the module needs to work with PrestaShop 1.4, the CSS files should be placed in a /css folder at the root of the module's folder. |
/views/js | Sub-folder for JavaScript files. | If the module needs to work with PrestaShop 1.4, the JavaScript files should be placed in a /js folder at the root of the module's folder. |
/views/img | Sub-folder for image files. | If the module needs to work with PrestaShop 1.4, the image files should be placed in a /img folder at the root of the module's folder. |
/controllers | This folder contains the Controller files. | You can use the same sub-folder paths as for the View files. For instance, /modules/bankwire/controllers/front/payment.php . |
/override | Sub-folder for the class-overriding code. | This is very useful when you need to change some of the default PrestaShop code. Since you must not do so, you can override the default code. For instance, /modules/gsitemap/override/classes/Shop.php extends the default ShopCore class. |
/translations | Sub-folder for the translation files. | fr.php, en.php, es.php, etc. |
/themes/[theme_name]/modules | Sub-folder for overriding .tpl files and languages files, if necessary. | This folder is essential during modifications of an existing module, so that you can adapt it without having to touch its original files. Notably, it enables you to handle the module's template files in various ways, depending on the current theme. |
/upgrade | Sub-folder for upgrade files | When releasing a new version of the module, the older might need an upgrade of its data or files. This can be done using this folder. |
Only the three first are necessary for a basic module: the main file, the cache configuration file (which is autogenerated by PrestaShop anyway) and the icon file. All the other ones can be used if necessary, but a module can work without them.
The module can also as many other files and folders as necessary: /css, /img, /js, etc.
If wish to use an external library, it should be put in a dedicated folder.
That folder can use one of these names: 'lib', 'libs', 'libraries', 'sdk', 'vendor', 'vendors'.
Choose the most appropriate one for your library (indeed, 'libraries' doesn't not have the same meaning as 'sdk'). You can have more than one such folder, for instance /lib and /sdk.
The PrestaShop coding convention
Before you start writing code for your PrestaShop module, you should be aware that the PrestaShop team uses a specific set of coding convention (or coding standards, coding norm, etc.).
As Wikipedia puts it, "Coding conventions are a set of guidelines for a specific programming language that recommend programming style, practices and methods for each aspect of a piece program written in this language", and "Good procedures, good methodology and good coding standards can be used to drive a project such that the quality is maximized and the overall development time and development and maintenance cost is minimized." (See http://en.wikipedia.org/wiki/Coding_conventions).
PrestaShop's own standards is available at this page: http://doc.prestashop.com/display/PS16/Coding+Standards. You should read it in order to make sure that the code you produce fits correctly with the overall code of the PrestaShop project. The PHPCodeSniffer can help you make sure you follow the standard properly.
Creating a first module
Let's create a simple first module; this will enable us to better describe its structure. We will name it "My module".
First, create the module's folder, in the /modules folder. It should have the same name as the module, with no space, only alphanumerical characters, the hyphen and the underscore, all in lowercase: /mymodule.
This folder must contain the main file, a PHP file of the same name as the folder, which will handle most of the processing: mymodule.php.
That is enough for a very basic module, but obviously more files and folders can be added later.
The constant test
The main mymodule.php file must start with the following test:
<?php
if (!defined('_PS_VERSION_'))
  exit;
This checks for the existence of an always-existing PrestaShop constant (its version number), and if it does not exist, it stops the module from loading. The sole purpose of this is to prevent malicious visitors to load this file directly.
Note that, as required by the PrestaShop Coding Standards (see above), we do not use a PHP closing tag.
The main class
The main file must contain the module's main class (along with other classes if needed). PrestaShop uses Object-Oriented programming, and so do its modules.
That class must bear the same name as the module and its folder, in CamelCase (see http://en.wikipedia.org/wiki/CamelCase). In our example: MyModule.
Furthermore, that class must extend the Module class, in order to inherit all its methods and attributes.
<?php
if (!defined('_PS_VERSION_'))
  exit;

class MyModule extends Module
{
}
It can just as well extend any class derived from Module, for specific needs: PaymentModule, ModuleGridEngine, ModuleGraph, etc.
At this stage, if you place the module's folder on the /modules folder, the module can already be seen in the "Modules" page in the back office, in the "Other modules" section – albeit with no real name nor thumbnail.
The constructor method
Now, let's fill the class' code block with the essential constructor lines. A constructor is a function in a class that is automatically called when you create a new instance of a class with new. In the case of a PrestaShop, the constructor class is the first method to be called when the module is loaded by PrestaShop. This is therefore the best place to set most of its details.
<?php
if (!defined('_PS_VERSION_'))
  exit;

class MyModule extends Module
{
  public function __construct()
  {
    $this->name = 'mymodule';
    $this->tab = 'front_office_features';
    $this->version = '1.0.0';
    $this->author = 'Firstname Lastname';
    $this->need_instance = 0;
    $this->ps_versions_compliancy = array('min' => '1.6', 'max' => _PS_VERSION_);
    $this->bootstrap = true;

    parent::__construct();

    $this->displayName = $this->l('My module');
    $this->description = $this->l('Description of my module.');

    $this->confirmUninstall = $this->l('Are you sure you want to uninstall?');

    if (!Configuration::get('MYMODULE_NAME'))
      $this->warning = $this->l('No name provided');
  }
}
Let's examine each line from this first version of the MyModule class...
public function __construct()
This line defines the class' constructor function.
$this->name = 'mymodule';
$this->tab = 'front_office_features';
$this->version = '1.0';
$this->author = 'Firstname Lastname';
This section assigns a handful of attributes to the class instance (this):
- 'name' attribute. This attributes serves as an internal identifier. The value MUST be the name of the module's folder. Do not use special characters or spaces, and keep it lower-case.
- 'tab' attribute. The title for the section that shall contain this module in PrestaShop's back office modules list. You may use an existing name, such as
seo,front_office_featuresoranalytics_stats, or a custom one. In this last case, a new section will be created with your identifier. We chose "front_office_features" because this first module will mostly have an impact on the front-end.Here is the list of available "Tab" attributes, and their corresponding section in the "Modules" page:
"Tab" attribute Module section administrationAdministration advertising_marketingAdvertising & Marketing analytics_statsAnalytics & Stats billing_invoicingBilling & Invoices checkoutCheckout content_managementContent Management dashboardDashboard emailingE-mailing exportExport front_office_featuresFront Office Features i18n_localizationI18n & Localization market_placeMarket Place merchandizingMerchandizing migration_toolsMigration Tools mobileMobile othersOther Modules payments_gatewaysPayments & Gateways payment_securityPayment Security pricing_promotionPricing & Promotion quick_bulk_updateQuick / Bulk update search_filterSearch & Filter seoSEO shipping_logisticsShipping & Logistics slideshowsSlideshows smart_shoppingSmart Shopping social_networksSocial Networks - 'version' attribute. The version number for the module, displayed in the modules list. It is a string, so that you may use such variation as "1.0b", "3.07 beta 3" or "0.94 (not for production use)".
- 'author' attribute. This is displayed as-is in the PrestaShop modules list.
Let's continue with the next line in this block of code:
$this->need_instance = 0;
$this->ps_versions_compliancy = array('min' => '1.5', 'max' => '1.6');
$this->bootstrap = true;
This section handles the relationship with the module and its environment (namely, PrestaShop):
need_instance. Indicates whether to load the module's class when displaying the "Modules" page in the back office. If set at 0, the module will not be loaded, and therefore will spend less resources to generate the "Modules" page. If your module needs to display a warning message in the "Modules" page, then you must set this attribute to 1.ps_versions_compliancy. Indicates which version of PrestaShop this module is compatible with. In the example above, we explicitly write that this module will only work with PrestaShop 1.5.x, and no other major version.bootstrap. Indicates that the module's template files have been built with PrestaShop 1.6's bootstrap tools in mind – and therefore, that PrestaShop should not try to wrap the template code for the configuration screen (if there is one) with helper tags.
Next, we call the constructor method from the parent PHP class:
parent::__construct();
This will trigger a lot of actions from PrestaShop that you do not need to know about at this point.
Calling the parent constuctor method must be done after the creation of the $this->name variable and before any use of the $this->l() translation method.
The next section deals with text strings, which are encapsulated in PrestaShop's translation method, l():
$this->displayName = $this->l('My module');
$this->description = $this->l('Description of my module.');

$this->confirmUninstall = $this->l('Are you sure you want to uninstall?');

if (!Configuration::get('MYMODULE_NAME'))
    $this->warning = $this->l('No name provided.');
These lines respectively assign:
- A name for the module, which will be displayed in the back office's modules list.
- A description for the module, which will be displayed in the back office's modules list.
- A message, asking the administrator if he really does want to uninstall the module. To be used in the installation code.
- A warning that the module doesn't have its
MYMODULE_NAMEdatabase value set yet (this last point being specific to our example, as we will see later).
The constructor method is now complete. You are free to add more to it later if necessary, but this the bare minimum for a working module.
Now go to your back office, in the Modules page: the module is visible in the modules list, with its information displayed – and no icon for now.
You can install the module, but it does not do anything yet.
When you click on the "Install" button for your module, it will display a module window saying that your module is Untrusted.
The only way to make your module Trusted is to distribute it through the PrestaShop Addons marketplace (with a unique identifying key), or to become a PrestaShop partner. Other trusted modules are the native ones.
To install the module, click the "Proceed with installation" on this screen.
Building the install() and uninstall() methods
Some modules have more needs than just using PrestaShop's features in special ways. Your module might need to perform actions on installation, such as checking PrestaShop's settings or to registering its own settings in the database. Likewise, if you changed things in the database on installation, it is highly recommended to change them back (or remove them) when uninstalling the module.
The install() and uninstall() methods make it possible to control what happens when the store administrator installs or uninstalls the module. They must be included in the main class' block of code (in our example, the MyModule class) – at the same level as the constructor method.
The install() method
Here is the bare minimum for the install() method:
public function install()
{
  if (!parent::install())
    return false;
  return true;
}
In this first and extremely simplistic incarnation, this method does the minimum needed: return true returned by the Module class' install() method, which returns either true if the module is correctly installed, or false otherwise. As it is, if we had not created that method, the superclass' method would have been called instead anyway, making the end result identical.
Nevertheless, we must mention this method, because it will be very useful once we have to perform checks and actions during the module's installation process: creating SQL tables, copying files, creation configuration variables, etc.
So for example how you can expand the install() method to perform installation checks. In the following example, we perform the following tasks during installation:
- Check that the Multistore feature is enabled, and if so, set the current context to all shops on this installation of PrestaShop.
- Check that the module parent class is installed.
- Check that the module can be attached to the
leftColumnhook. - Check that the module can be attached to the
headerhook. - Create the
MYMODULE_NAMEconfiguration setting, setting its value to "my friend".
public function install()
{
  if (Shop::isFeatureActive())
    Shop::setContext(Shop::CONTEXT_ALL);

  if (!parent::install() ||
    !$this->registerHook('leftColumn') ||
    !$this->registerHook('header') ||
    !Configuration::updateValue('MYMODULE_NAME', 'my friend')
  )
    return false;

  return true;
}
If any of the lines in the testing block fails, the method returns false and the installation does not happen.
The uninstall() method
Here is the bare minimum for the uninstall() method:
public function uninstall()
{
  if (!parent::uninstall())
    return false;
  return true;
}
Building on this foundation, we want an uninstall() method that would delete the data added to the database during the installation ( MYMODULE_NAME configuration setting). This method would look like this:
public function uninstall()
{
  if (!parent::uninstall() ||
    !Configuration::deleteByName('MYMODULE_NAME')
  )
    return false;

  return true;
}
The Configuration object
As you can see, our three blocks of code (__construct(), install() and uninstall()) all make use of a new object, Configuration.
This is a PrestaShop-specific object, built to help developers manage their module settings. It stores these settings in PrestaShop's database without require to use SQL queries. Specifically, this object handles data from the ps_configuration database table.
The main methods
So far, we've used three methods, to which we'll add a fourth one in the list below:
Configuration::get('myVariable'): retrieves a specific value from the database.Configuration::getMultiple(array('myFirstVariable', 'mySecondVariable', 'myThirdVariable')): retrieves several values from the database, and returns a PHP array.Configuration::updateValue('myVariable', $value): updates an existing database variable with a new value. If the variable does not yet exist, it creates it with that value.Configuration::deleteByName('myVariable'): deletes the database variable.
There are many more, such as getInt() or hasContext(), but these four are the ones you will use the most.
Note that when using updateValue(), the content of $value can be anything, be it a string, a number, a serialized PHP array or a JSON object. As long as you properly code the data handling function, anything goes. For instance, here is how to handle a PHP array using the Configuration object:
// Storing a serialized array.
Configuration::updateValue('MYMODULE_SETTINGS', serialize(array(true, true, false)));

// Retrieving the array.
$configuration_array = unserialize(Configuration::get('MYMODULE_SETTINGS'));
As you can see, this in a very useful and easy-to-use object, and you will certainly use it in many situations. Most native modules use it too for their own settings.
Multistore
By default, all these methods work within the confines of the current store context, whether PrestaShop is using the multistore feature or not.
However, it is possible to work outside of the current context and impact other known stores. This is done using three optional parameters, which are not presented in the list above:
id_lang: enables you to force the language with which you want to work.id_shop_group: enables you to indicate the shop group of the target store.id_shop: enables you to indicate the id of the target store.
By default, these three parameters use the values of the current context, but you can use them to target other stores.
Note that it is not recommended to change the default values of these variables, even more so if the module you are writing is to be used on other stores than your own. They should only be used if the module is for your own store, and you know the id and shop group of all of your shops.
Retrieving external values from the ps_configuration data table
You are not limited to your own variables: PrestaShop stores all its own configuration settings in the ps_configuration table. There are literally hundreds of settings, and you can access them just as easily as you would access your own. For instance:
Configuration::get('PS_LANG_DEFAULT'): retrieves the ID for the default language.Configuration::get('PS_TIMEZONE'): retrieves the name of the current timezone, in standard TZ format (see: http://en.wikipedia.org/wiki/List_of_tz_database_time_zones).Configuration::get('PS_DISTANCE_UNIT'): retrieves the default distance unit ("km" for kilometers, etc.).Configuration::get('PS_SHOP_EMAIL'): retrieves the main contact e-mail address.Configuration::get('PS_NB_DAYS_NEW_PRODUCT'): retrieves the number of days during which a newly-added product is considered "New" by PrestaShop.
Dive into the ps_configuration table in order to discover many other settings!
The Shop object
Another of install()'s lines is thus:
if (Shop::isFeatureActive())
  Shop::setContext(Shop::CONTEXT_ALL);
As said earlier, here we check that the Multistore feature is enabled, and if so, set the current context to all shops on this installation of PrestaShop.
The Shop object helps you manage the multistore feature. We will not dive in the specifics here, but will simply present the two methods that are used in this sample code:
Shop::isFeatureActive(): This simply checks whether the multistore feature is active or not, and if at least two stores are presently activated.Shop::setContext(Shop::CONTEXT_ALL): This changes the context in order to apply coming changes to all existing stores instead of only the current store.
The Context is explained in more details in the "Using the Context Object" chapter of this Developer Guide.
The icon file
To put the finishing touch to this basic module, you should add an icon, which will be displayed next to the module's name in the back-office modules list.
In case your module is made for a prominent service, having that service's logo visible brings trust.
Make sure you do not use a logo already used by one of the native modules, or without authorization from the owner of the logo/service.
The icon file must respect these requirements:
- It must be placed on the module's main folder.
- 32*32 PNG image.
- Named
logo.png. - Tip: There are many free 32*32 icon libraries available. Here are a few: http://www.fatcow.com/free-icons (very close to the FamFamFam one) or http://www.iconarchive.com/show/danish-royalty-free-icons-by-jonas-rask.html (Danish Royalty Free),
Installing the module
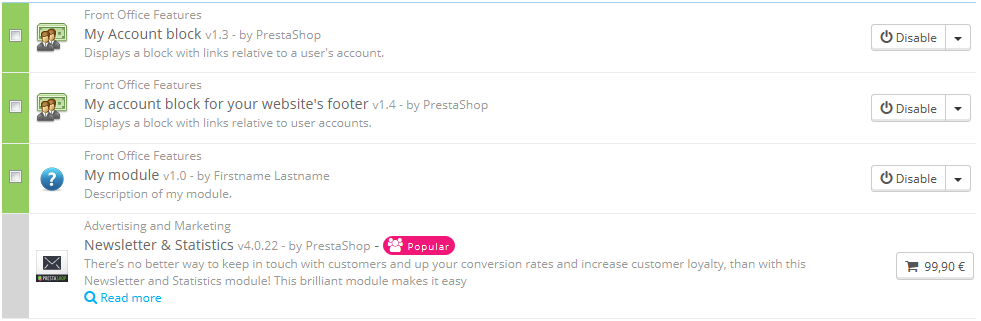
Now that all basics are in place, reload the back office's "Modules" pages, in the "Front office features" section, you should find your module. Install it (or reset it if it is already installed).
During the module's installation, PrestaShop automatically creates a small config.xml file in the module's folder, which stores the configuration information. You should be very careful when editing by hand.
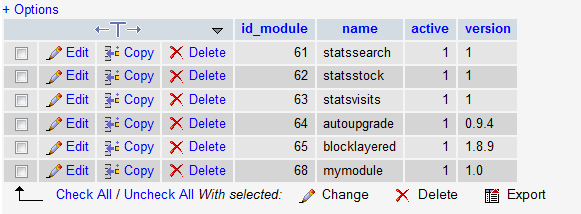
PrestaShop also adds a row to the ps_module SQL table during the module installation: