
Obsługa klienta
PrestaShop pozwala Ci na centralizację wszystkich zapytań Twoich klientów. To narzędzie ma za zadanie pomóc Ci w łatwy sposób rozpoznać, które z zapytań pozostały jeszcze bez odpowiedzi aniżeli na sprawdzenie czy jeden z odbiorców maila już na niego odpowiedział.
W rzeczywistości, formularz kontaktowy Twojego sklepu dostępny poprzez link “Kontakt” umieszczony na dole fornt-office, domyślnie wyświetla się z danymi do “Serwisu klienta” oraz danymi do “Webmastera”. Klient może wybrać tylko osobę lub serwis, z którym chce się skontaktować, a następnie wypełnić informacje w pozostałych polach. Zatem wiadomośc zostaje zapisana w narzędziu obsługi klienta PrestaShop.

Wątki dyskusyjne znajdują się tylko w narzędziu zarządzania klientem, pod warunkiem że w użytym kontakcie została aktywowana opcja “Zapisać wiadomość?” Ta opcja może zostać aktywowana przechodząc na stronę “Kontakty” z menu “Klienci”. Ta strona jest szczegółowo omówiona w kolejnej sekcji tego rozdziału.
Jeśli opcja zapisywania wiadomości jest dezaktywowana dla kontaktu wybranego przez kontaktu, wiadomość zostanie wysłana tylko na adres email wprowadzony do kontaktu i nie będzie przechowywana w PrestaShop.
Musisz również poprawnie skonfigurować opcję IMAP, żeby PrestaShop mógł zbierać odpowiedzi klientów na maile, które zostały im wysłane poprzez narzędzie obsługi klienta. Odbywa się to w sekcji "Opcje obsługi klienta" na stronie “Obsługa klienta” z menu “klienci, znajdującej się na dole strony.
Na stronie “Obsługa klienta” każdy kontakt posiada swoją własną sekcję, z której to możesz szybko odczytać informacje dotyczące nowych wiadomości (w tym wiadomości nieprzeczytanych). Domyślnie istnieje dwóch klientów, jednakże jeśli dodasz ich więcej to sekcja “Znaczenie statusu” i “Statystyki” będą znajdować się na dole po lewej stronie.
Te dwie ostatnie sekcje są bardzo praktyczne z punktu widzenia codziennego zarządzania nowymi wiadomościami:
- Znaczenie statusu. Proste przypomnienie kodów kolorystycznych, które zespół może zastosować do wątków dyskusji.
- Serwis klienta: Statystyki. Globalny podgląd działalności obsługi klienta od samego początku.
Nieco poniżej znajdziesz listę wiadomości zarówno tych starych jak i nowych.
U dołu strony masz dostęp do dwóch opcji, które mają zastosowanie do wszystkich kontaktów:
- Autoryzacja przesyłania plików. Tu ustalisz czy klient może dołączyć plik do wiadomości. Może to być bardzo przydatne w przypadku wystąpienia problemów graficznych w Twoim sklepie, ponieważ wtedy klient będzie w stanie dołączyć PrintScrean.
- Predefiniowana wiadomość. Domyślny szablon odpowiedzi Twoich pracowników. Stwórz prostą wiadomość, tak aby mogła ona znaleźć zastosowanie w jak największej ilości przypadków z jak najmniejszą ilością zmian.
Na dole strony znajduje się sekcja “Opcje obsługi klienta”, w której możesz zamieścić wszelkie zasady dotyczące Twojego serwera wiadomości (IMAP).
Handling Customer Service Messages
Each conversation with a customer can be entirely handled through PrestaShop's complete interface, without having to use an e-mail client such as Outlook or Thunderbird.

In the conversation list, click on a row to view the conversation's details:
- You can apply a handful of actions to a discussion, in order to quickly sort them and thus handle them quicker. There are 4 available actions:
- Mark as "handled" or "Re-open". Changes the discussion's status to "Closed" or "Open".
- Mark as "pending 1" and Mark as "pending 2". These two statuses are internal: their meaning is up to your team. You may even choose to not use them, and only rely on "Closed" and "Open".
- Forward this discussion to another employee. From the moment an employee has started replying to a customer message, he becomes in charge of the customer's request. If during the discussion it turns out another employee should handle it instead of you, you can use that button to attribute it through a drop-down list. That other employee will receive a notification about it. If the person you want to forward this discussion to is not available in the list, choose "Someone else" in the dropdown list and two options will appear, enabling you to indicate the email address of the recipient and a comment about your message.
- Reply to the next unanswered message in this thread.
Essential details are available:
- Customer name and email, which you can click on to access the customer's information
- Number of orders, total amount spent and date of registration for the customer.
- Time and date of the message.
- Finally, the message itself.
To reply to this thread, simply use the form with your default message (as set in "Contact options" section of the "Customer service" page), and click "Send".
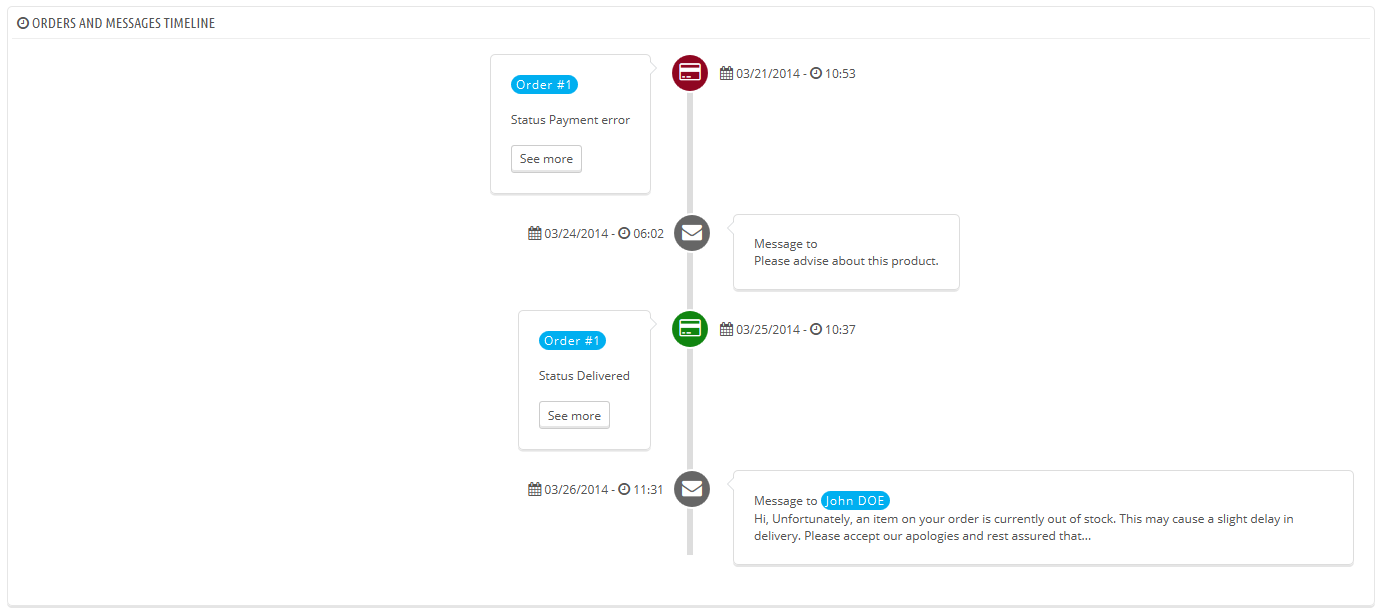
At the bottom of the page, the "Orders and messages timeline" gives you a clear chronological view of the events pertaining to this discussion thread.
Customer Service Options
This section basically enables you to precisely configure PrestaShop's access to your e-mail server through its IMAP interface. You should make sure all fields are filled in order for the customer service tool to work properly. Most of this information should be provided by your webhost.
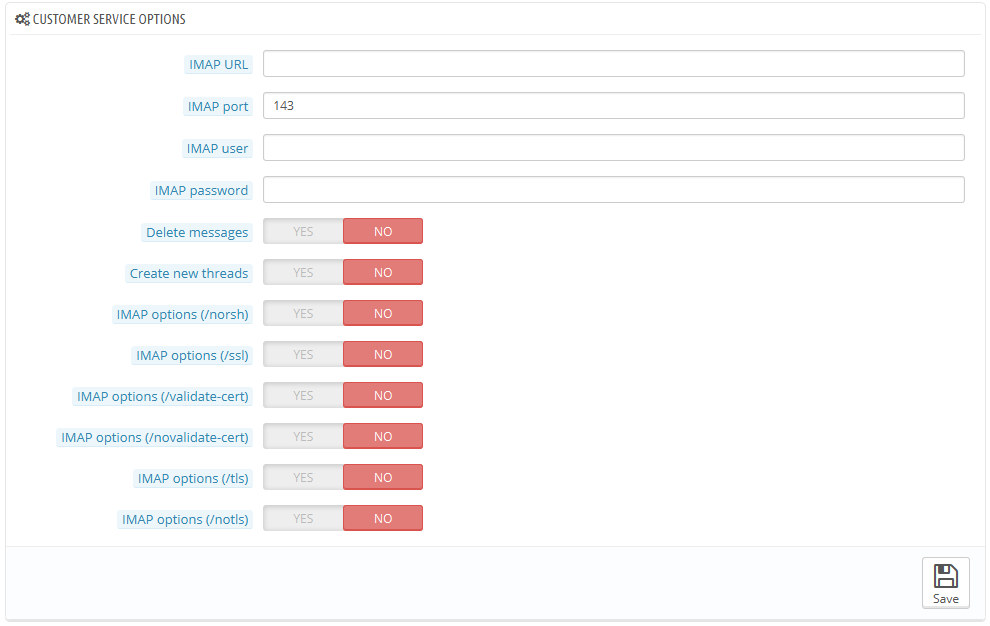
- IMAP URL, IMAP port, IMAP user and IMAP password. Essential details to access the e-mail server using the IMAP protocol.
- Delete message. If enabled, messages on the server will be deleted as soon as PrestaShop has retrieved them. Use with caution: this would make your messages unavailable to other e-mail clients.
- /norsh. If enabled, the connection to your e-mail server will not pre-authenticated. Not recommended.
- /ssl. If enabled, the connection to your e-mail server will not be encrypted. Not recommended.
- /validate-cert. If enabled, PrestaShop will force the validation of the server's TLS/SSL certificate.
- /novalidate-cert. If enabled, PrestaShop will never try to validate the server's TLS/SSL certificate. Essential for servers with self-signed certificates.
- /tls. If enabled, PrestaShop will force use of StartTLS to encrypt the connection. Servers that do not support StartTLS will be rejected.
- /notls. If enabled, PrestaShop will not use StartTLS to encrypt the session, even with servers that support it.