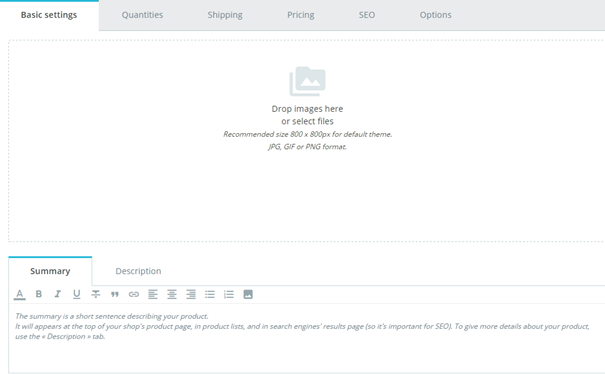
Tabs
Type of product
Product List
Footer
Basic settings
Images
Summary and Description
Feature
Brand
Related produt
Combinations
Quantity
Price
Categories
Quantities
Managing Product Quantities
Product quantities are managed in a single tab. The way it works is quite easy: the page presents you with a table of all the combinations for the current product (if there are no combinations, the table simply has a single row). It is up to you to set the initial stock for all the combinations. PrestaShop will use this to determine when a product is soon out-of-stock or unavailable anymore.
Standard Product
Quantity
Minimum quantity
- Minimum quantity. You might prefer this combination to only be sold in bulk. Use this field to set the number of items to be sold in bulk.
Pack of Product
Pack quantities (A REPORTER EN 1.6)
- Decrement pack only.
- Decrement products in pack only.
- Decrement both.
- Default. Decrecement pack only.
Virtual Product
Associated file
When you're creating a virtual product, the second tab is renamed "Virtual Product" and it has a specific option "Does this product have an associated file?".
When you click "Yes", PrestaShop opens a new form within the tab, from which you can upload the file you intend to sell:
- File. Click the "Browse" button to find the file on your hard drive. As soon as you have selected a file, the upload begins.
The maximum file-upload size setting depends on your server's settings, and cannot be increased from PrestaShop.
If you have access to your server's
php.inifile, these are the values you should change:upload_max_filesize = 20Mpost_max_size = 20M
If you do not have access to the
php.inifile, contact your web host about this.
Availability preferences
Behavior when out of stock
...
You should compress your file in zip format, in order to avoid the browser misinterpreting
.exeor.jpgfile formats. Browsers automatically download zip files for the customer, no question asked.If you are selling a high resolution image, uploading it using this form does not prevent you from uploading its thumbnail in the "Images" tab on the left.
- Filename. The name of the file. This field is automatically filled after the file has been uploaded. It is not recommended to change it to another value.
- Number of allowed downloads. You can set the number of time the file can be downloaded once the customer has bought it. You might prefer to limit this to 1, or 5. If you want to keep it unlimited, set the text field to 0.
- Expiration date. Virtual files can be of promotional nature, or lose their selling value after a certain date. If so, you can set the expiry date after which the product will not be available on your shop anymore. Leave it blank if there is no expiry date.
- Number of days. You can set the number of days after which the download link becomes non-functioning. If there is no limit, set the text field to 0.
Once you are done with the "Virtual Product" options, click on "Save" you can edit all the other available tabs as if you would for a regular product.
Product with Combinations
Combination generator
Availability preferences
Out of stock behavior
The "Behavior when out of stock" option enables you to set PrestaShop behavior when the product is out of stock:-
- Deny orders (the product is not available for sale anymore)
...
- .
...
- Allow
...
- order (in essence, you are doing pre-sales).
...
- Use default behavior (Deny orders). This third and default option
...
- simple uses the global default setting ("Preferences" menu, "Products" page, "Product Stock" section, "Allow ordering of out-of-stock products" option).
Labels
- Label when in-stock. Enables you to display a message to your visitors when your product is in stock, for example "Item available". It reassures them that your shop can immediately send them the product.
- Label when out of stock and back-order active. Enables you to display a message to your visitors when your product is out of stock but they can still order it (as set using the "When out of stock" selector)
...
- , for example "Pre-order now!". It reassures them that your shop will send them the product immediately once it is in stock.
You can also configure the general settings applied to all of your products: the default option is to deny orders, but this can be modified under the "Products Settings" in the "Shop Parameters section" ("Allow ordering of out-of-stock products" option), which is fully explained in the "Understanding the Preferences" chapter of this guide.
- Minimum quantity. You might prefer this combination to only be sold in bulk. Use this field to set the number of items to be sold in bulk.
...
Note: the "Default" radio buttons are unavailable by default. In order to select them, you must first click the "Save and stay" button" in order to select another supplier as default.
Managing Product Quantities
Product quantities are managed in a single tab. The way it works is quite easy: the page presents you with a table of all the combinations for the current product (if there are no combinations, the table simply has a single row). It is up to you to set the initial stock for all the combinations. PrestaShop will use this to determine when a product is soon out-of-stock or unavailable anymore.
Availability preferences
Behavior when out of stock
(The "When out of stock" area enables you to set PrestaShop behavior when the product is out of stock:
- Deny orders (the product is not available for sale anymore) or
- Allow orders (in essence, you are doing pre-sales). The third and default option simply uses the global default setting ("Preferences" menu, "Products" page, "Product Stock" section, "Allow ordering of out-of-stock products" option).
- Use default behavior (deny)
- Minimum quantity. You might prefer this combination to only be sold in bulk. Use this field to set the number of items to be sold in bulk.
Retail price. The price of your product before taxes.
...
- File fields. Puts the indicated number of file upload buttons on the order page. Each button accepts only one file, so put as many field as you allow your customers to upload.
- Text fields. Puts the indicated number of text fields on the order page. You can add as many text fields as necessary.
Example: If you allow your customer to use a 5-line text with each line limited to 14 characters, you can add 5 fields and indicate the number of allowed characters in the field's label. You cannot limit the number of characters in the string.
Attached files
PrestaShop enables you to make some files available to your customers before their purchase.
For example, let's say you sell electronics, and you would like to urge your customers to read a document on how a product works. You can upload a document for that purpose.
You could also simply have the product's PDF manual directly available for download right on the product page.
Adding an attachment is really quick:
- Fill out the file name of your attachment (it doesn't have to be the same as the original file name).
- Give it a description. This will help you distinguish between your uploaded files with certainty.
- Click on "Add file" to select a file on your computer to upload. As soon as you choose the file, PrestaShop uploads it, then displays it in the list
- The attachment appears in the "Available attachments" list: you have to select it then click on "Add" to move it to the "Attachments for this product" list.
- Save your product with either the "Save" button or the "Save and stay" one.
Now the "Download" tab will appear on the product's page (if the theme supports it), and your customers can download the file(s) that you just uploaded.
If you need to remove an attachment, select it in the "Attachments for this product" selector and click on the " Remove" button. The file will be moved to the "Available attachments" selector if you need to set it back online later on.
You can view all of your store's attached files, add some more and remove some, by going to the "Attachments" page under the "Catalog" menu. This also makes it possible to use the attachments that you already uploaded for other files: if you need to apply the associated one file with many products, you will thus only have to upload it once.
Suppliers
Indicating the product's supplier is not really important to your customers (very much less so than its manufacturer in any case), but it may turn out to be an essential part of your own internal management, not the least when managing your stock: you simply need to know who you bought the product from. The supplier of the current product is to be set from the "Suppliers" tab on the left.
...