Front office Positions
| Table of Contents |
|---|
A modules can have to aspectsviews: one on the back - office (its options, or even a configuration screen), and one on the front - office. The front - office view is how and where the module is displayed within your shop's theme.
...
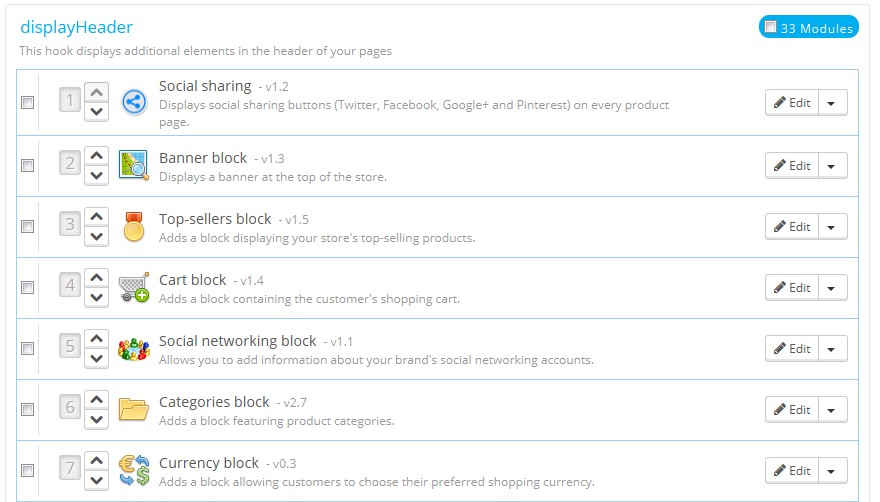
The "Positions" page displays all the available hooks, and their attached modules. Many are empty by default, but some of the most useful ones have a dozen of modules (the Header displayHeader hook has 27 33 modules by default).
At the top of the page, a drop-down menu enables you to only display the hook in which you are interested.
By default, this page only displays the hooks on which you can position functions. Checking the "Display non-positionable hooks" box below displays all the hooks, even those where you cannot position something.
...
The modules are displayed in the order in which they appear in the hook.
Moving a module within a hook
You have two ways of changing a module's position within a hook:
- Click the up or down arrow. The page will reload and display the new order.
- Drag and drop the module's row itself:
- Place the mouse cursor between the moving arrows and the module's name on the position number to have it change into a "move item" cursor.
- Click and hold while moving the cursor over the row/position where you want the module to be: the module's row changes position accordingly.
- Release the mouse button: the current position for the module is saved.
For most modules, transplantation can easily be done directly via the back-officeback office. Some modules require you to alter their code in order to transplant them.
Attaching a module to a hook: Transplanting
In PrestaShop, "transplanting" is the action of attaching a module to a hook. You can add a module to more than one hook.
...
- Go to the "Modules" menu, and its "Positions" page.
- Click the "Transplant a module" button at the top right. The transplanting interface appears.
- In the "Module" drop-down list, select the module you want to transplant.
- In the "Hook into" drop-down list, select where you want to transplant the module to. There are many available hooks. You can change your setting later if needed.
- In the "Exceptions" field, type the name of the file(s) of the pages in which you do not want the module to appear.
You can perform a multiple selection simply by clicking on the file names while keeping the Ctrl key pressed. You can deselect files in the same manner: Ctrl+click. - Do not forget to save your changes.
![]()
The "Hook into" drop-down menu gives you a good idea where module can be placed.
Even though the "Hook into" drop-down list gives a comprehensive overview of the available hooks, it might not always be clear which is the one to which you want to attach your module. Do not hesitate to try another hook if the result of your selection if not what you expect.
The list gives some detail: both some hook have a description after the hook name and a quick description of what it does's name, for instance "Before carrier list" known as "displayBeforeCarrier"Add fields to the form 'attribute value'" for displayAttributeForm. Peruse them all in order to choose your hook correctly.
Editing an attached module
Each module has two icons on the right side of its row: one to edit its settings, the other to delete the module.
Editing a module's setting uses the same interface as the one used for the transplanting a module. The major difference is that you cannot change the "Module" and "Hook into" settings, as they are disabled, and thus grayed out. You can only edit the exception setting, which works just as described in the "Attaching a module to a hook" method above.
While you cannot edit the "Module" and "Hook into" settings, they can serve as a handy reminder of their current position, should you want to put them back there later on.
![]()
If you want to move a module to another hook, you must use the transplanting interface:
...
Always check your front-office to make sure the module is indeed where you intended it to be.
Removing a module from a hook
There are two ways to remove a module from a hook:
- Removing a single module: click the trashcan icon on the right of the module's row.
- Removing a batch of modules: select the modules by checking the box on the right of their row, and then click the "Unhook" button, found at the top and the bottom of the list of hooks.
...
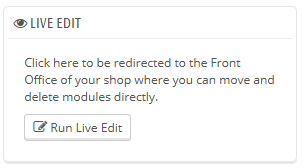
Moving a module visually: Live Edit
Another way to move modules around on the shop's homepage is the Live Edit mode, which embeds said homepage into a tool that lets you visually decide where to place your modules. You can access it from the "Position" page, by clicking the "Run LiveEditLive Edit" button.
When clicked, PrestaShop opens the homepage in a new browser windows/tab, with the Live Edit script on top:
- All module blocks have a dotted red border, enabling you to see which blocks you can move.
- At their top left side, a block-specific icon appears, along with the block's name, enabling you to always find your way among blocks.
- At their top right side, they have two icons:
- A "move" icon: click on it to start moving the module around.
- A "trash" icon: click it to remove the block from the home.
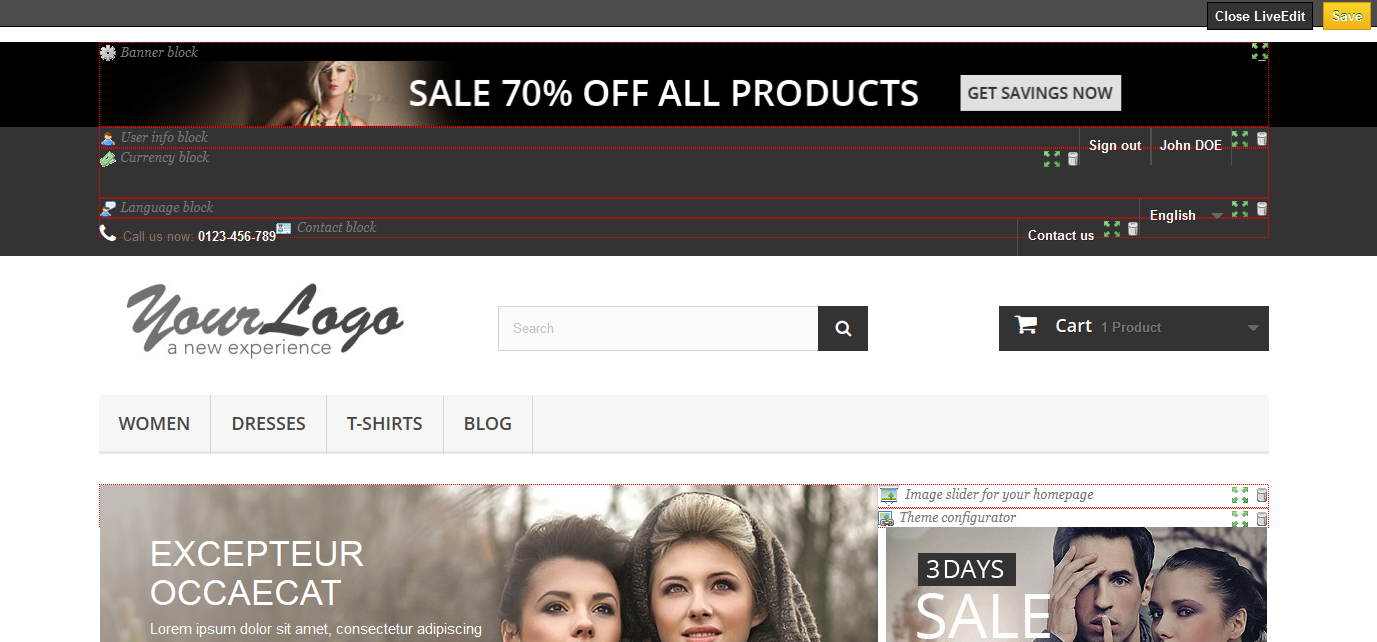
At the top of the Live Edit mode, a toolbar presents you with two buttons: "Close Live Edit" and "Save".
...
| Warning |
|---|
Once you have removed a module, if you want to bring it back, you will have to go to the "Positions" page and use the "Transplant a module" form. |
Where to move modules?
Modules cannot be moved just about anywhere: it depends on both the theme's hooks, and each module's hook support (as seen in the above section). Therefore, you mostly can only move modules within their understood context: column modules can be moved within a column as well as from one column to the other (right to left, for instance), while regular homepage modules (the ones at the center) can only be moved within their specific column.
In order to give you a visual hint about where a given module can be moved, it will display an empty green block if the location is correct, and an empty red block if not.
Transplanting a module by modifying its code
| Info |
|---|
This is for experts only: you must have a good knowledge of PHP and HTML before attempting anything with the code of a module. |
...