Configurar la URL de una tienda
Cada tienda puede tener su propia URL – o incluso varias URLs – totalmente independiente de la tienda principal.
Debe definir al menos una URL para cada tienda.
Dos tiendas no pueden compartir la misma URL. Si trata de dar a una nueva tienda una URL que ya está siendo usada por otra tienda, PrestaShop mostrará un error en pantalla.
Por otra parte, puede tener tantas tiendas como desee en el mismo dominio:
Utilizando subcarpetas: http://www.ejemplo.com/hombres/, http://www.ejemplo.com/mujeres/, http://www.ejemplo.com/niños/, http://www.ejemplo.com/mascotas/, etc.
En el caso de utilizar subcarpetas, ¡asegúrese de crear dos direcciones URL para cada tienda: una utilizando "www.", y otra sin ellas!
Por ejemplo: http://www.ejemplo.com/hombres/ y http://ejemplo.com/hombres/
De lo contrario, los clientes que traten de acceder a su tienda sin utilizar las "www." en la URL serán redireccionados a su tienda principal.
- Utilizando subdominios: http://hombres.ejemplo.com/, http://mujeres.ejemplo.com/, http://niños.ejemplo.com/, http://mascotas.ejemplo.com/, etc.
No cree ninguna subcarpeta o dominio por usted mismo, ya sea en su servidor o en su equipo: PrestaShop se encarga de crear la ruta absoluta para usted en su servidor. Cuando los visitantes accedan a esta URL, PrestaShop los dirigirá a la tienda correcta automáticamente.
Por supuesto, una tienda también puede tener su propio nombre de dominio.
Utilizar un nombre dominio
En caso de que desee utilizar un nombre de dominio diferente para su tienda suplementaria en lugar de un subdominio / subcarpeta, debe configurar su dominio para que apunte a la carpeta donde se encuentra PrestaShop. La reescritura URL será realizada por el propio PrestaShop.
Alternativamente, puede crear un alias para su nombre de dominio que redireccione a la URL absoluta donde se encuentra instalado PrestaShop. La manera de lograr esto depende del panel de control y de las opciones que su empresa de hosting le proporcione: "Alias" para Plesk, "Forward" para CPanel, "Aliasdomain" para ISPConfig, etc.
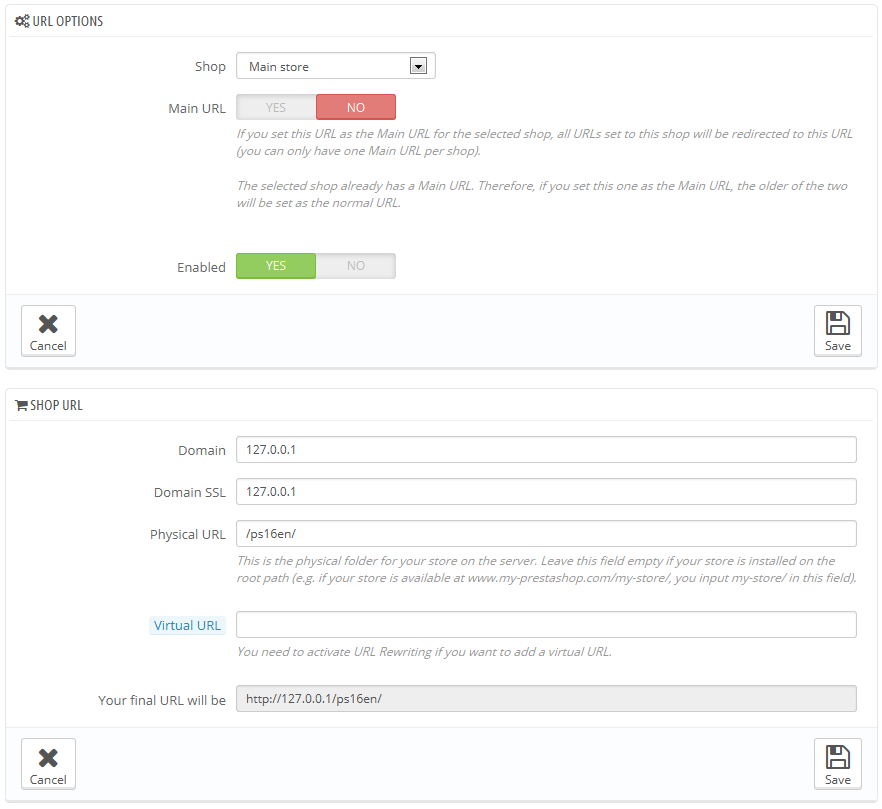
Para añadir una dirección URL a una tienda, seleccione la tienda en el selector "Árbol Multitienda", y a continuación haga clic en el botón "Añadir nueva URL". PrestaShop cargará una pantalla con dos secciones y ocho opciones:
- URL options.
- Shop. A reminder of the shop to which you are adding a URL. You may also simply switch to another shop.
- Main URL. By enabling this, you indicate that you want all the other URLs for this shop to redirect to this main URL (this will switch any other Main URL to be a normal URL).
- Status. You can disable and enable a URL at any time.
- Shop URL.
- Domain. The shop's domain name itself. It does not have to be limited to the domain name: you can indicate a sub-domain if you need to. Just make sure to not add '
http://', or any '/'. Example:www.example.comorkids.example.com. - Domain SSL. If your SSL domain is different from your main domain, be sure to indicate it in that field. Example:
www.example.comorkids.example.com. - Physical URI. Here you must set the physical path to your actual installation on your server. If the shop is at the root of the domain or subdomain, leave this field empty. Example:
/or/kids/. - Virtual URI. You can make the shop transparently available to customers using this option: through the power of URL rewriting, you can have your shop be displayed without the need to create a sub-folder. Of course, URL rewriting must be enabled in PrestaShop (meaning Friendly URLs, see the "SEO & URLs" page of the "Traffic" menu, in "Shop Parameters"). Example:
/shoes/. Note that this only works for subfolder shops, not subdomain shops. - Your final URL will be. Gives you the impact that your URL settings above will have on the complete web address to your shop.
- Domain. The shop's domain name itself. It does not have to be limited to the domain name: you can indicate a sub-domain if you need to. Just make sure to not add '