
Zarządzanie Produktami
Możesz zarządzać produktami w twoim sklepie korzystając ze strony "Produkty" w menu "Katalog"
Ten podrozdział podzielony jest na następujące podrozdziały:
Listy produktów
Naciśnij na stronę "Produkty" w menu "Katalog", aby przejść do listy Twoich produktów, która wyświetla podstawowe informacje: ID, zdjęcie, indeks, kategorię etc.
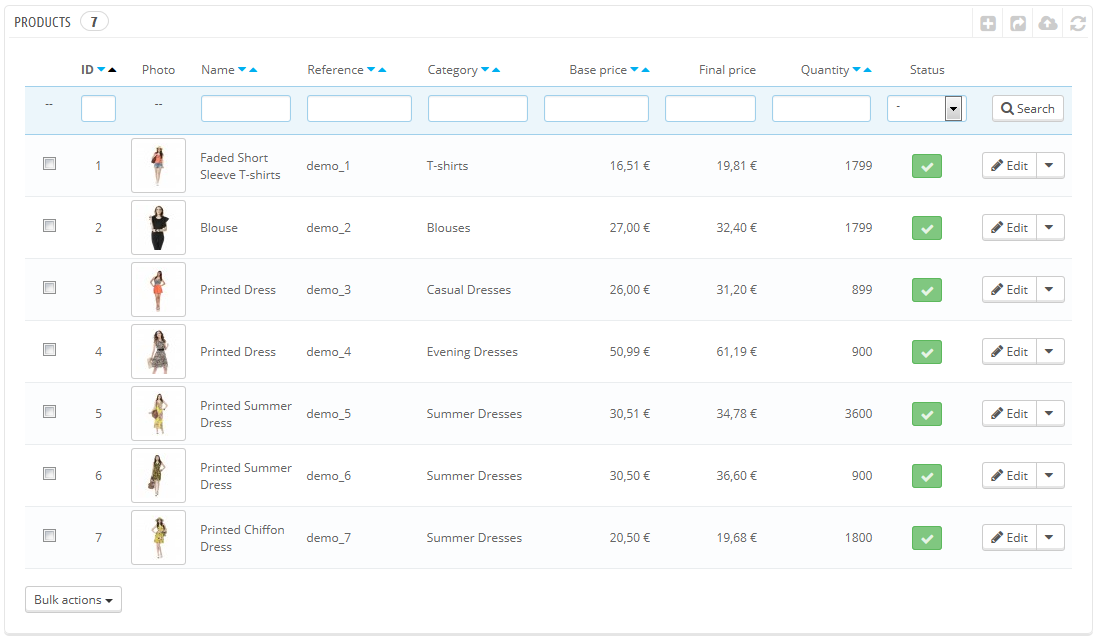
Oprócz listy na stronie widać statystyki Twojego sklepu:
- Procent produktów dostępnych w magazynie
- Procent średniej marży brutto
- Procent sprzedaży w ciągu ostatnich 30 dni
- Ilość wyłączonych produktów
"Filtruj wg kategorii" pozwala Ci na wyświetlanie produktów należących do wybranej kategorii, jak i na zmianę organizacji wyświetlania tych produktów w ramach kategorii.
Pozycja produktu
Nie możesz przeorganizować całej listy produktów. Produkty są wyświetlane tak, jak w sklepie (wg rosnącego numeru ID), a klient może wybrać produkt posługując się dostępnymi narzędziami sortowania: wg najniższej/najwyższej ceny, według nazwy rosnąco/malejąco, według trafności największej/najmniejszej.
Możesz zorganizować produkty według kategorii korzystając z opcji "Filtruj wg kategorii". To uruchomi małe menu, gdzie wymienione będą wszystkie kategorie i podkategorie. Zaznaczenie jednej kategorii automatycznie filtruje listę wyświetlanych produktów do wybranej kategorii. Ponadto pojawia się kolumna "Pozycja", która pozwala Ci określić położenie produktu na stronie kategorii. Możesz zmienić położenie produktu naciskając na krzyżyk w kolumnie "Pozycja" i przeciągając produkt na właściwe miejsce.
Kolejność wyświetlania produktów może być zmieniona przez klientów korzystających z narzędzi sortowania.
Zwróc uwagę, że kiedy zmienisz sortowanie produktów na liście w back-office (klikając na strzałkę przy którejś z kolumn), to z kolumny "Pozycja" zniknie "krzyżyk" i zmiana pozycji produktów nie będzie możliwa. Aby przywrócić tę opcję ustaw sortowanie rosnąco w kolumnie "Pozycja".
W górnym prawym rogu listy produktu dostępne są 4 przyciski:
![]()
- Dodaj nowy. Tworzy nowy produkt.
- Eksportuj. Tworzy plik eksportu w formacie CSV wszystkich produktów Twojego katalogu.
- Importuj. Przenosi Cię do strony "Import CSV", gdzie możesz importować produkty.
- Odśwież listę. Przeładowuje listę produktów, aby wyświetlić ostatnie zmiany.
Możesz dodać produkt, naciskając przycisk "Dodaj nowy", pojawi się formularz, z kilkoma zakładkami po lewej stronie.
Przyciski globalne strony kreacji produktu
Domyślnie strona kreacji produktu posiada dwa przyciski, które dostępne są również na innych stronach administracyjnych "Rekomendowane moduły" oraz "Pomoc".
Na dole stronie kreacji są dostępne trzy przyciski:
- Zapisz. To zachowuje wszelkie wprowadzone zmiany i przekierowuje Cię na listę produktów.
- Zapisz i zostań. Zapisuje wprowadzone zmiany i pozostawia Cię na aktualnie otwartej zakładce. To jest bardzo przydatne, keidy chcesz przechodzić między zakładkami bez utraty wprowadzonych danych.
- Anuluj. Przenosi Cię na listę produktów bez zachowywania jakichkolwiek zmian.
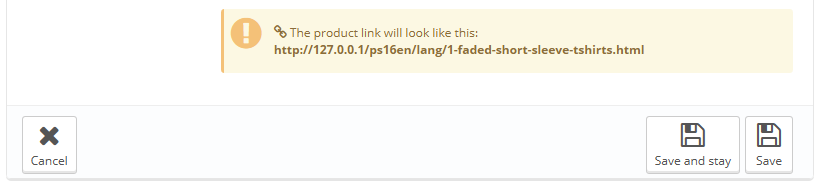 Jak tylko nazwiesz swój produkt i naciśniesz "Zapisz i zostań", pojawi się więcej przycisków u góry strony:
- Podgląd. Wyświetla stronę Front-Office Twojego produktu. Jest to bardzo przydatne i działa nawet wtedy, gdy twój produkt jest wyłączony (Zakładka "Infromacja").
Skopiuj. Tworzy idealną kopię produktu/ Jest to szczególnie przydatne, gdy chcesz wykorzystać bieżący produkt jako szablon pod kolejny produkt, a ni chcesz wpisywać wszystkich danych ręcznie.
Na przykład dwa produkty mogą być całkiem różne, ale mieć podobne powiązania, przewoźników, dostawców etc.
Nie duplikuj za dużo!
Jeśli potrzebujesz stworzyć kilka wersji tego samego produktu ze względu na różnorodność kolorów, pojemność, rozmiar etc, to powinienś stworzyć kombinacje produktów, zmaiast duplikować go x razy. Zobacz zakładkę "Kombinacje", która jest objaśniona w części "Dodawanie Kombinacji produktów" tego rozdziału.
- Sprzedaż produktu. Przekierowuje Cię na stronę "Szczegóły produktu" w dziale "Statystyki", co daje Ci dostęp do wykresów wizyt na stronie produktu, oraz jego sprzedaży.
- Usuń ten produkt. Usuwa wszystkie dane dotyczące tego produktu, także jego zdjęcia, kombinacje etc.
![]()
Wypełnianie Informacji o produkcie
Pierwsza zakładka zawiera podstawowe informacje o produkcie.
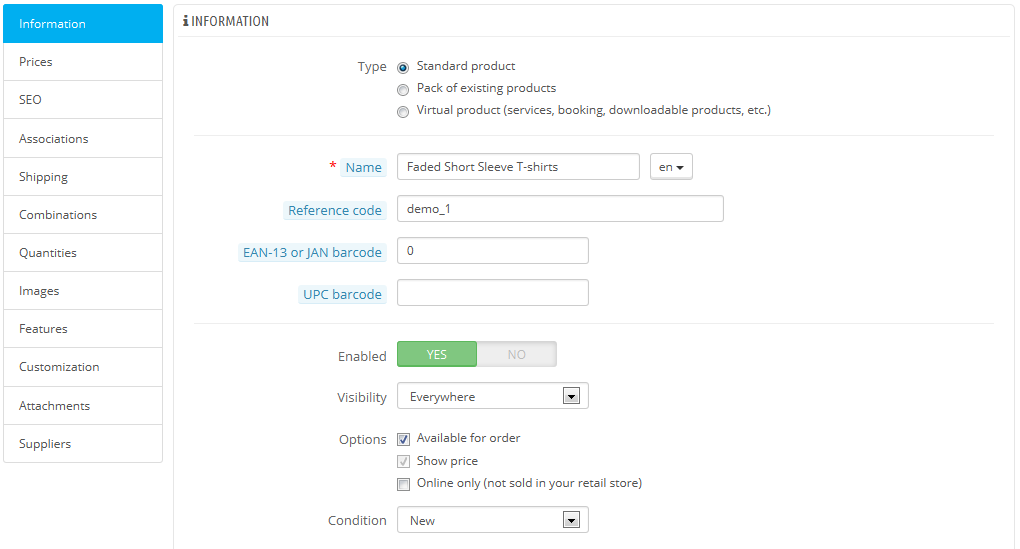
Pierwsza opcja jest najważniejsz, określa ona bowiem, czy produkt występuje jako zestaw (paczka - kombinacja dwóch już istniejących produktów), czy jako produkt wirtualny (pobieralny, usługa etc.), czy po prostu jako produkt standradowy, taki, który można wysłać pocztą. Na tę chwilę zajmiemy się tym ostatnim przykładem, pozostałe są omówione w innych częściach tego rozdziału.
Jest wiele innych opcji powiązanych z produktami, które znajdują się na stronie Preferencje->Produkty:
- Ile dni produkt jest oznaczany jako nowy
- Domyślny porządek produktów.
- Uruchamianie zaawansowanej obsługi magazynu
- itd.
Powinieneś sprawdzić, czy te globalne ustawienia są skonfigurowane w taki sposób, jak sobie tego życzysz.
Rozpoczynasz z 4 polami tekstowymi:
Nazwa. Pierwszą rzeczą jest nadanie nazwy produktowi, który będzie widoczny w wynikach wyszukiwania w internecie. Obok znajduje się kod języka, który pozwoli Ci na wybranie języka, dla którego chcesz wprowadzić, lub zminić nazwę produktu.
Musisz podać nazwę produktu przynajmniej w języku domyślnym, aby go zachować. Nie będziesz wstanie go zachować bez podania nazwy - a wiele zakładek wymaga tego, aby produkt był najpierw zachowany, by następnie móc wprowadzać na nich zmiany. Upewnij się, że przetłumaczyłeś każde pole na każdy język, który wspiera twój sklep.
- Kod produktu. To jest twoje wewnętrzne oznaczenie, może to być numer, , odniesienie do miejsca składowania, numer podany przez dostawcę, albo cokolwiek unikalnego.
- Kod kreskowy EAN-13 lub JAN. Są to numery kodu rozpowszechnione na całym świecie, które służą do dokładnej identyfikacji produktu. Możesz użyć kodu EAN albo JAN.
- EAN 13 składa się 13 cyfr, więcej na ten temat: http://pl.wikipedia.org/wiki/EAN
- Kod JAN jest specyficzny dla Japonii, ale jest również kompatybilny z kodem EAN: http://en.wikipedia.org/wiki/Japanese_Article_Number
- Kod kreskowy UPC. Kod 12 cyfrowy rozpowszechniony szczególnie w Północnej Ameryce, Wielkiej Brytanii, Australii i Nowej Zelandii, więcej na ten temat: http://pl.wikipedia.org/wiki/Universal_Product_Code
Następnie masz do dyspozycji 4 opcje:
- Włączony. Określ status przedmiotu, jeśli na przykład nie chcesz, aby był on od razu widoczny dla Twoich klientów, zaznacz "NIE".
- Widoczność. Możesz określić widoczność produktu w różnych kanałach:
- Wszędzie. Klient może dotrzeć do produktu poprzez katalog, wyszukiwanie nazwy produktu, albo wchodząc bezpośrednio w adres URL.
- Tylko katalog. Klient może dotrzeć do produktu poprzez katalog, albo wchodząc bezpośrednio w adres URL.
- Tylko wyszukiwanie. Klient może dotrzeć do produktu poprzez wyszukiwanie nazwy produktu, albo wchodząc bezpośrednio w adres URL.
- Nigdzie. Klient może dotrzeć do produktu wyłącznie wchodząc bezpośrednio w adres URL. Nie znajdzie go w katalogu, albo wyszukując jego nazwę/ To świetne narzędzie dla prywatnych, szczególnych produktów, gdzie tylko wybrani będą mogli dotrzeć(nawet tymczasowo, zawsze możesz to zmienić).
- Opcje
- Sprzedaż (tryb katalogu jeśli nieaktywne). Jeśli to odznaczysz, to klienci nie będą mogli dodać tego produktu do koszyka. Przypomina to "tryb katalogu" na jeden produkt.
- Pokaż cenę. Jeśli pierwsza opcja zostanie odchaczona, to możesz mimo wszystko wyświetlać cenę, chociaż klienci nie będą mogli tego kupić.
- Tylko Online (nie sprzedawany w Twoim sklepie stacjonarnym). Może być to szczególnie przydatne, gdy posiadasz sklepy stacjonarne, gdzie nie ma miejsca na prezentację pełnego asortymentu Twojego sklepu.
- Stan. Nie wszystkie sklepy sprzedają nowe produkty. Ta opcja pozwoli Ci wskazać stan produktu:
- Nowy. Produkt jest nowy i w oryginalnym opakowaniu.
- Używany. Ten produkt był już sprzedany i używany przez kogoś innego. Powinno być wraz oryginalnym opakowaniem, które będzie zaklejone taśmą.
- Odświeżony. Produkt został zwrócony z różnych powodów, ale jego stan jest bliski nowemu, więc można go sprzedać po niższej cenie. Na ten temat: http://en.wikipedia.org/wiki/Refurbishment_%28electronics%29
Po wprowadzeniu tych informacji możesz rozpocząć edycję opisów produktu.
Dobry opis to podstawa dla Twojego klienta (im więcej rzetelnych i dobrych informacji, tym lepiej), ale także dla wyszukiwarek internetowych (pozwoli to na lepsze pozycjonowanie Twojego sklepu i Twoich produktów)
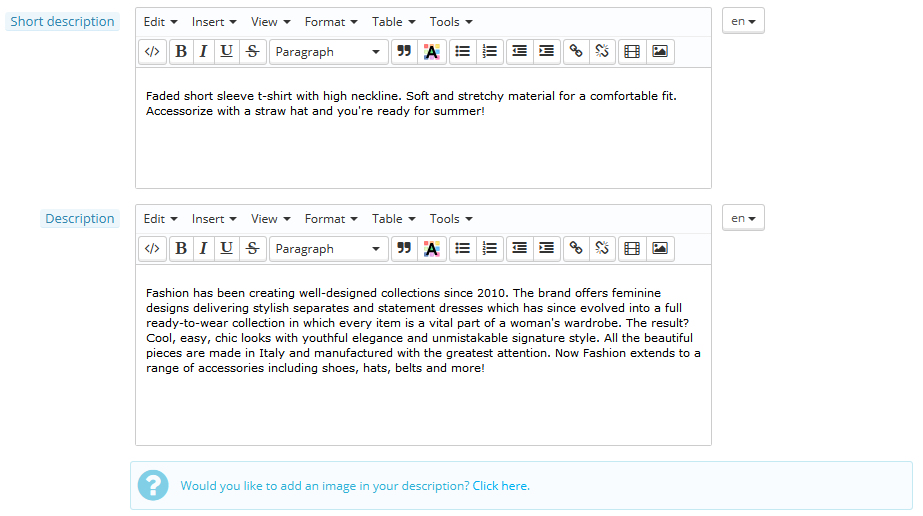
Dwa różne pola opisów, służą różnym celom:
Krótki opis, pozwala Ci na wprowadzenie krótkiego opisu, który będzie pojawiać się wyszukiwarkach internetowych i w opisie kategorii produktu. Pole to jest domyślnie ograniczone do 400 znaków, jeśli przekroczysz to ograniczenie, PrestaShop ostrzeże Cie odpowiednio. Możesz zmienić to ograniczenie na stronie Preferencje->Produkty, pod opcją "Maksymalny rozmiar krótkiego opisu".
- Opis pozwala Ci na kompletne opisanie Twojego produktu. Edytor tekstowy oferuje Ci szeroki wachlarz opcji w tworzeniu atrakcyjnie wyglądającego opisu (czcionka, rozmiar, kolor tekstu etc)
To pole nie ma limitu i nie ma czegoś takiego jak zbyt dużo infomracji, to jednak staraj się przedstawiać informacje w sposób interesujący i spójny, a wszystko będzie dobrze
Poniżej tych dwóch pól znajduje się małe narzędzie do dodawania zdjęć do opisu (które przypisałeś do tego produktu w zakładce "Zdjęcia") za pomocą tagów. Naciśnij na "Kliknij tuaj", aby je otworzyć.
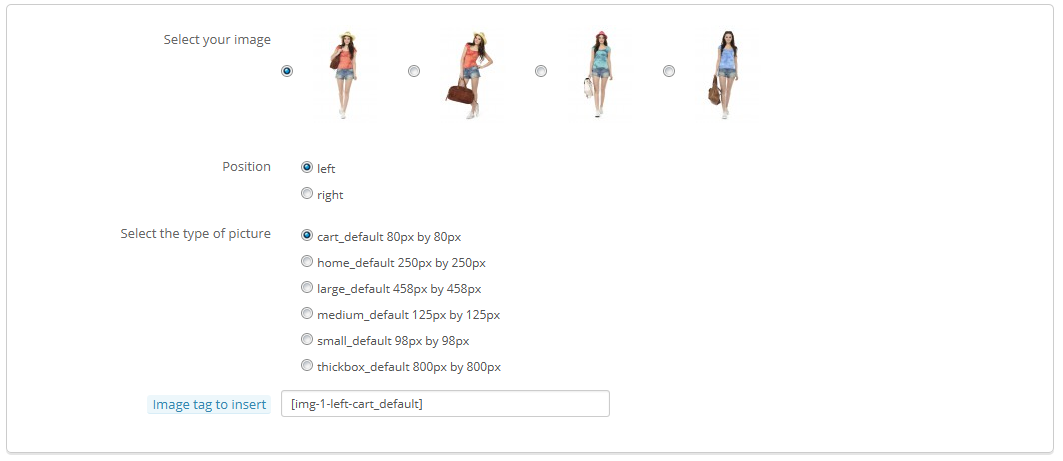
Po prostu zaznacz zdjęcie, które chcesz, wybierz jego pozycję odnośnie tekstu oraz jego rozmiar, a PrestaShop wygeneruje "Tag zdjęcia do wstawienia", który nastęnie możesz wkleić w treść opisu (najlepiej pomiędzy dwoma paragrafami, albo na początku paragrafu).
W polu "Tagi" wprowadź pojęcia i słowa kluczowe, które pomogą Twoim klientom łatwo odnaleźć to, czego szukają.
![]()
Będą one wyświetlone na stronie w bloku "Tagi"(jeśli dostępne). Jeśli nie chcesz wyświetlać bloku tagów, po prostu wyłącz moduł "Blok tagów" na stronie Moduły->Moduły.
Różnice z wersją PrestaShop 1.4.
PrestaShop 1.4 pozwalało Ci na wprowadzenie Producenta bezpośrednio z poziomu tej zakładki. Od wersji 1.5, to ustawienie możesz znaleźć w zakładce "Powiązania". To samo dotyczy pola "domyślna kategoria", powiązanych kategorii, oraz pola "Akcesoria".
Wersja 1.4 pozwalała również na wprowadzenie rozmiaru i wagi produktu. Od wersji 1.5 dane te są dostępne w zakładce "Wysyłka".
Pole "Lokalizacja" z wersji 1.4 znajduje się w opcjach zakładki "Magazyny", która jest widoczna dopiero jeśli aktywowałeś Zaawansowane zarządzanie magazynem (Preferencje->Produkty, część "Stan produktów".
Gdy tylko wypełnisz wszystkie pola, zachowaj swoją pracę naciskając na "Zapisz i zostań", jeśli chcesz dalej uzupełniać informacje, albo na "Zapisz", aby wrócić do listy produktów.
Określanie ceny produktów
Wszystko to odbywa się w zakładce "Ceny". Ta sekcja może być nieco onieśmielająca ze wszystkimi polami wpłwywającymi na siebie, podatkami etc, ale własciwie jest dość prosta.

Ustal cenę, któa pojawi się w Twoim sklepie postępując według poniższych instrukcji:
- Cena hurtowa netto. Pozwala Ci się dowiedzieć jaki będzie koszt netto, koszt fabryczny produktu, i dzięki porównaniu z Twoją ceną sprzedaży pozwoli Ci łatwo obliczyć Twój zysk.
- Cena sprzedaży netto. Cena produktu przed nałożeniem podatków.
- Reguła podatku. To podatek nakładany na produkt, wybierz pomiędzy różnymi zapisanymi stawkami.
Jeśli potrzebujesz utworzyć nowy podatek, naciśnij "Utwórz nowy podatek". Tworzenie podatku odbywa się na stronie Lokalizacja->Podatki i jest całkowicie wyjaśnione w rozdziale "Zrozumieć ustawienia lokalne" tego podręcznika. - Podatek ekologiczny (brutto). Wartość podatku ekologicznego za ten produkt. Ta wartość zostanie wliczona w Cenę sprzedaży netto.
Uwaga to pole nie jest domyślnie wyświetlane. Jeśli chcesz dodać podatek ekologiczny, musisz najpierw go włączyć na stronie Lokalizacja->Podatki, część "Opcje podatku" i zaznacz "Tak" przy "Użyj podatku ekologicznego". - Cena sprzedaży z podatkiem. Wyświetla cenę produktu wraz z podatkami. Możesz edytować tę wartość a cena sprzedaży netto będzie automatycznie uaktualniona na podstawie ruguły podatkowej, z której korzystasz.
- Cena jednostkowa. Pozwala Ci na dostosowanie się do lokalnych zarządeń prawnych, które wymagają, aby produkt był wyświetlany wraz z jego ceną jednostkową.
Na przykład, jeśli sprzedajesz 6 puszek napoju, wtedy powinieneś wypełnić to pole wartością za puszkę i wpisać "Puszkę" w polu "za". Opis zostanie automatycznie wzbogacony o tę linię. - Wyświetl ikonę "wyprzedaż" na stronie produktu oraz tekst na listingu produktów. Zaznacz to pole, aby wyświetlić informację o wyprzedaży produktu, na stronie produktu oraz na liście produktów. Ikona "Wyprzedaż" pojawi się pod produktem. Możesz zmienić to logo zmieniając plik w katalogu:
themes/default/img/onsale_en.gif - Cena końcowa. Ta cena, wraz z nałożonymi podatkami, będzie aktualizowana na bieżąco.
Możesz wypełnić "Cenę sprzedaży z podatkiem" oraz wybrać podatek, a pole Ceny sprzdaży netto będzie automatycznie przekalkulowane, to samo działa w drugą stronę.
W tym miejscu skończyłeś z podstawowymi informacjami dla podstawowego produktu. Możesz go zachować i będzie on natychmiast dostępny w Twoim sklepie!
Ale czytaj dalej, ponieważ jest jeszcze wiele kwestii, które mogą sprawić, że Twój produkt będzie jeszcze bardziej atrakcyjny dla klientów.
Specyficzne ceny: Obsługa rabatów ilościowych
Możesz zmienić cenę całkowitą produktu w zależności od ilości produktów, które chce kupić Twój klient, grupa klientów, kraj pochodzenia. Możesz to zrobić w częsci "Specyficzne ceny". Naciśnij na "Dodaj nową cenę", aby wyświetlić formularz.
To bardzo proste, aby utworzyć cenę rabatową dla produktu i jego kombinacji.
Click "Add a New specific price", and a form appears.
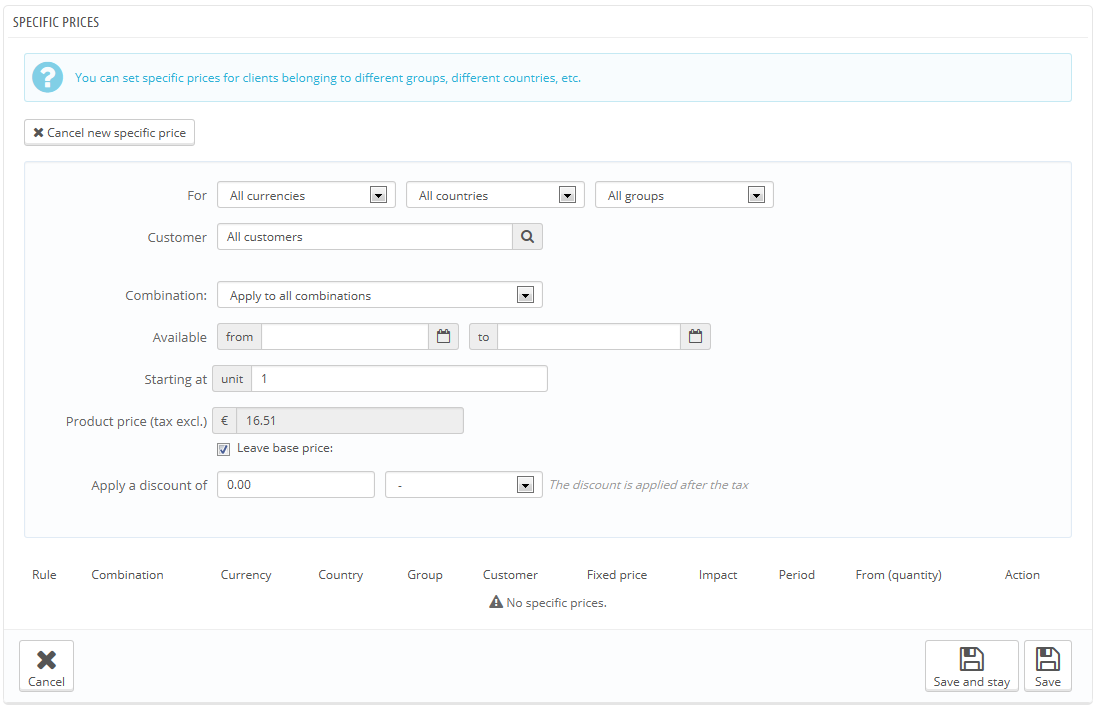
Naciśnij "Dodaj nową cenę", aby wyświetlić formularz:
- Za. Pozwala Ci bardzo konkretnie określić różne grupy dla których cena będzie obowiązywać, wliczając w to waluty, państwa, a nawet grupy klientów (co omówimy dalej).
- Klient. Możesz określić dokładnie, czy dotyczy to wszystkich klientów, a może konretnych. Zacznij pisać pierwsze litery imienia, lub nazwiska, a konta, które możesz dodać, zaczną się pojawiać.
- Kombinacja. Możesz określić czy ta specyficzna cena ma dotyczyć wszystkich kombinacji produktu, czy tylko jednej. Jeśli chcesz utworzyć dla kilku różnych kombinacji, ale nie wszystkich, to niestety musisz utworzyć specyficzną cenę dla każdego z kombinacji.
- Dostępny od.. do. Możesz określić przedział czasowy, kiedy cena rabatowa będzie wyświetlana. Pod każdym polem jest dostępny kalendarz, który znacznie upraszcza proces.
- Już od x sztuki. Możesz określić od jakiej ilości przedmiotu cena ma zostać przyznana.
- Cena produktu netto. Tu możesz podać cenę netto, niezależną od kalkulacji ceny regularnej. Wpisz "0" jeśli chcesz zachować cenę domyślną
Pozostaw cenę bazową. Zaznacz to, aby wyczyścić pole "Cena produktu netto" i zapobiec przed edytowaniem jej.. - Zastosuj zniżkę. Zniżka zostanie zastosowana po określeniu ilości produktu przez klienta. Wybier typ zniżki (albo konkretna kwoa, albo stosunek procentowy od ceny zakupu).
Po wprowadzeniu wybranych danych, niciśnij "Zapisz i zostań", a pojawi się podsumowanie ustawień zniżek. Zniżka będzie natychmiast widoczna w twoim sklepie.
Jeśli chcesz usunąć specyficzną cenę, to naciśnj ikonę kosza przy wybranej cenie na liście.
Jeśli chcesz zbudować bardziej słożone zniżki, przeczytaj rozdział o "Regułach cenowych" w rozdziale "Tworzenie reguł cenowych oraz zniżek" tego przewodnika.
Zarządzanie priorytetami cenowymi
Czasami jeden klient może pasować do kilku specyficznych warunków cenowych, nawet jeśli je bardzo wyszczególniłeś, dlatego Prestashop korzysta z zestawów priorytetów, które możesz nadać dla takich klientów, aby nadać mu jedną specyficzną cenę. Na przykład możesz chcieć, aby użytkownicy grupy, byli ważniejsi, aniżeli na przykład waluta.
Możesz to ustalić korzystając z ustawień "Zarządzania priorytetami".
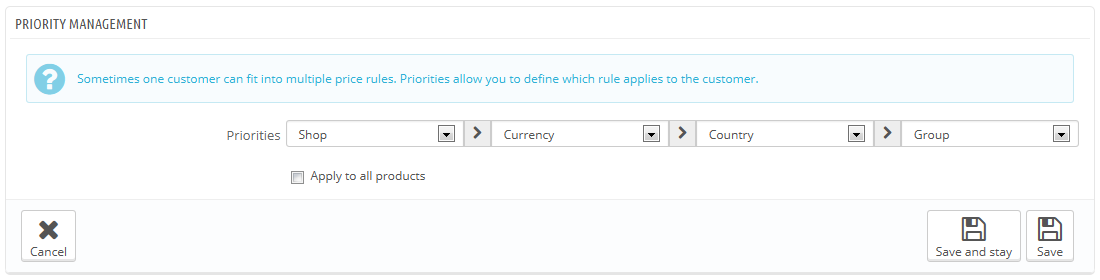
Domyślny porządek stosowania priorytetów jest następujący:
- Sklep (jeśli Multistore jest aktywny)
- Waluta
- Kraj
- Grupa
Pole poniżej pozwala Ci na określnie tych priorytetów dla wszystkich produktów w sklepie, jeśli pole będzie odznaczone, to będzie to te priorytety będą dotyczyć wyłącznie tego produktu.
Optymalizacja pozycjonowania (SEO) twojego produktu
Aby poprawić wyświetlanie produktu, oraz widoczność twojego sklepu sugerujemy, abyś dokładnie wypełnił różne pola dotyczące SEO: tytuły meta, opisy meta, słowa kluczowe etc.
Skrót "SEO" oznacza Search Engine Optimization. przeczytaj więcej na Wikipedii: http://pl.wikipedia.org/wiki/Optymalizacja_dla_wyszukiwarek_internetowych
Get to know the best SEO practices for e-commerce! Download and read PrestaShop's free "Complete Guide to SEO": http://www.prestashop.com/en/white-paper-seo
Aby dostac się do informacji SEO, otwórz zakładkę Optymalizacja SEO po lewej.
Pola dostępne w tej zakładce pozwolą Ci na optymailzację widocznośći Twojego katalogu w wynikach wyszukiwań.
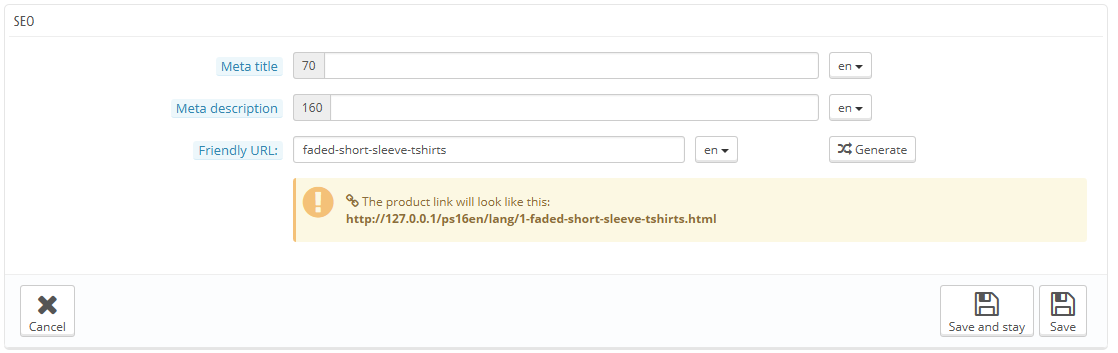
- Meta title. This is the most important field, as the title that will appear on all search engines. Be very factual: you must convince the search engine user to click your link, not one from another site. Make sure the title is unique to this product within your site.
- Good example: "Levi's 501® Original Jeans - Tidal Blue - Original Fit".
- Bad example: "Item #02769869B bestseller".
- Meta description. A presentation of the product in just a couple lines (ideally, less than 155 characters), intended to capture a customer's interest. This will appear in results for some search engines, depending on the search request: some search engine might choose to display the searched keywords directly in the context of the page content. Make sure the description is unique to this product within your site.
- Friendly URL. This is another extremely important field. It enables you to rewrite the web addresses of your products as you wish. For example, instead of having an address such as
http://www.myprestashop.prestashop.com/index.php?id_product=8&controller=product
you can have:
http://www.myprestashop.prestashop.com/8-name-of-the-product.html.
All you need to do is indicate in the "Friendly URL" field the words that you wish to see appear instead of the default name, separated by dashes.
The "Generate" button makes it easy to produce a proper friendly URL based on the product name. Once generated, you can edit the URL produced if necessary.
Friendly URLs will only work if URL rewriting is enabled. You can do this in "SEO & URLs" preference page, in its "Set up URLs" section.
You will find more information on the "SEO & URLs" preference page in the "Understanding the Preferences" chapter of this guide.
Managing the Product's Associations
Creating associations for your product means pairing it with other content in your database:
- Product categories.
- Other products (accessories).
- Manufacturer.
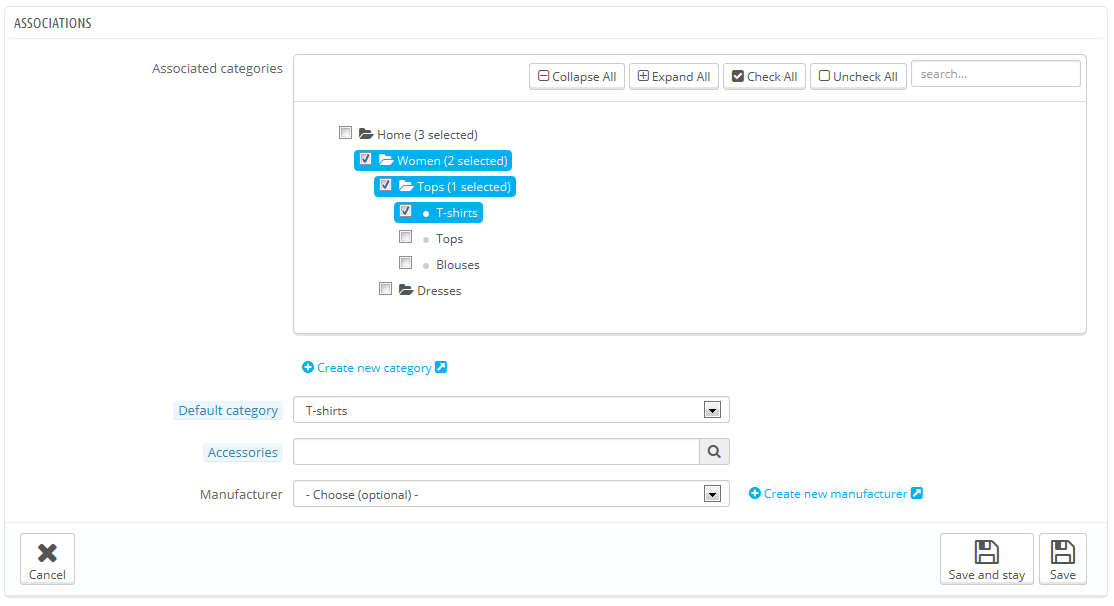
Product categories
The "Associated categories" section enables you to select in which category the product should appear. You can select more than one, but keep in mind that it is better for the customer if the category only contains equivalent and comparable products. Therefore, you should prevent from selecting root categories, and prefer child categories.
For instance, the "telephone" category can feature sub-categories of "brands" (Apple, Samsung, Nokia, etc.) and as well as "characteristics" (smart-phone, flip-phone, etc.). It is up to you to indicate the category most useful to your customers.
If you feel you need to add a category, save the current state of your product before clicking the "Create new category" button. Category creation is explained in another section of this guide.
The "Default category" selector is useful when an article is filed under several categories. It serves mainly to clarify which category to use in case your customer arrives at your site from a search engine, since the name of the category will appear in the product's URL.
Featured List
Checking the "Home" box enables you to highlight the product on your shop's homepage, provided your theme supports it. To remove a product from the Featured list, simply uncheck the "Home" box.
Accessories
The "Accessories" field gives you the option of choosing relevant products to associate with this product, to suggest them to your customers when the visit the product's page (if the theme supports it). Type in the first letters of product and select it. The product is then added at the bottom of the field.

You can associate a product with as many other products as you deem necessary. Click on the cross to delete the product association.
An association goes one way only: the associated product will not feature an association to the current product in its setting page.
Accessories addition/removal is not automatically saved! Do not forget to click on the "Save" button.
Manufacturer
A product can only be associated with one manufacturer. Choose one in the dropdown menu, or create a new manufacturer if it is needed (but do save your current product before clicking the "Create a new manufacturer" link).
Evaluating Shipping Cost: Size, Weight, Carrier
Shipping costs are not be neglected: they can easily double the final cost of an order, and you should be very upfront about them – customers hate bad surprises.

The "Shipping" tab on the left enables you to give some precious details about your product's package:
Package width, height, depth & weight. You should strive to fill each field, because knowing the exact size and weight of a package is not only useful to you, but PrestaShop can also direct specific sizes/weights to specific carriers automatically, based on these settings. The order's final price will appear to the customer once PrestaShop (or the customer) has selected a carrier.
These values use the default weight, volume, distance and dimension units, as set in the "Localization" page of the "Localization" menu.
These values do not have to be integers. If your products weight less than 1 lbs, you can simply use a period (.) to indicate the fractions:
- 123 lbs
- 1.23 lbs
- 0.23 lbs (equals 3.68 oz)
- etc.
- Additional shipping fees. This can prove very useful to you for specific products that are particularly tricky to package, or really heavy.
- Carriers. You can choose to have the current product only be shipped by a selection of carriers. If no carrier is selected then all the carriers will be available for customer orders.
Adding Product Combinations
You will often sell the same product under different versions: they share the same overall name, but they might differ by their color, their capacity, their screen size, and other attributes. Most of the time, these attributes come together: you could have the red version of the product available with either 1 Gb capacity or 2 Gb, or with 12'' screen or a 15'' screen. This is why PrestaShop calls these versions "combinations": your stock of products can be made of several variations of a single product, which in effect are simply its attributes combined in specific ways.
You cannot create combinations if you do not already have product attributes properly set in PrestaShop.
Also, you should not create combination for features that your customers should not be able to choose from.
Attributes creation is done in the "Product Attributes" page from the "Catalog" menu, and is explained in details in the chapter of the same name of this guide.
How your product attributes are combined into combinations is up to you, and PrestaShop gives you two methods to achieve this.
Manual method
This method helps you create combinations one after the other. Therefore, it is to be reserved to either products with few combinations, or products with very specific combinations that can't be created reliably using the automatic method (see next section).
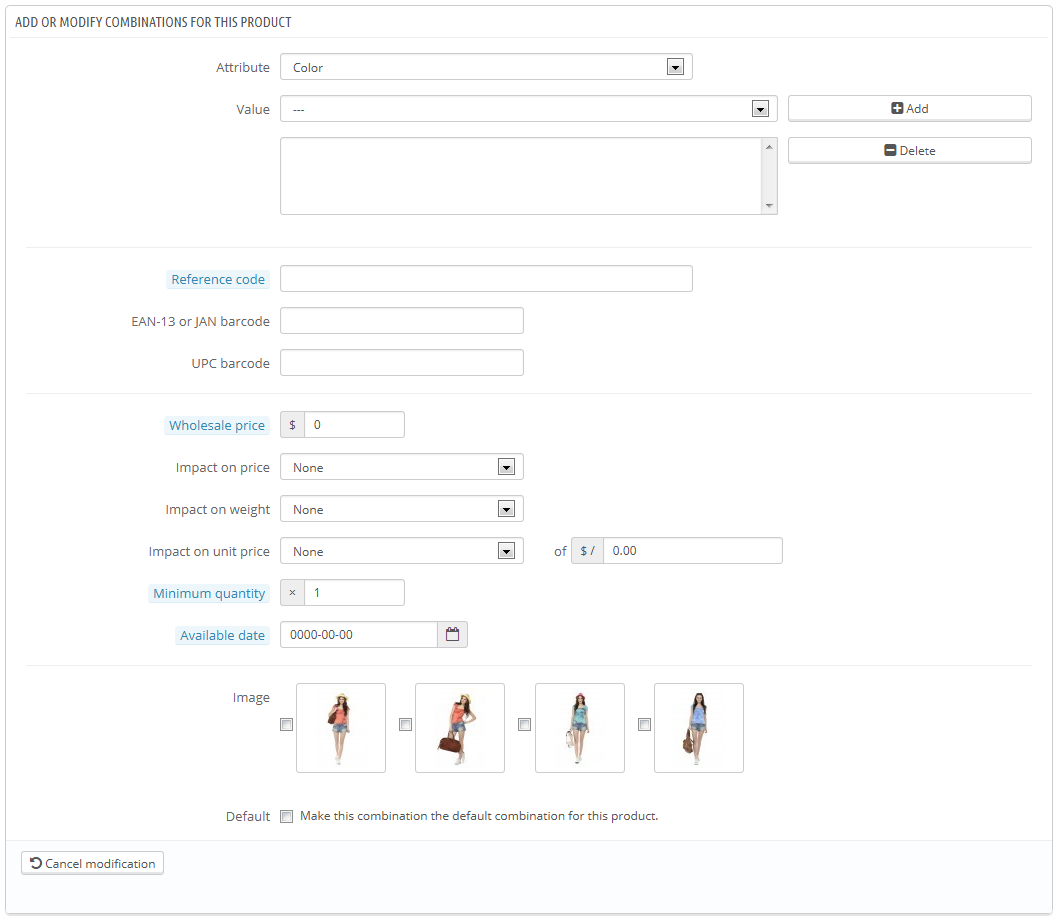
Adding a new variation to your product takes just a few steps. Click on the "New Combination" button at the bottom of the page, next to the "Save" buttons. A form appears:
- Attribute-value pair.
- From the drop-down menu, choose a group of attributes, such as "Color" for example. The content of the "Value" dropdown list updates accordingly.
- Choose the attribute value that you would like to include, for example "Blue".
- Click on the "Add" button and it will appear in the selector.
You can add as many attribute-value pairs as necessary to one combination.
You can only add one pair per attribute to one combination: it is impossible to have both "Color: Blue" and "Color: Red" in your pairs; if this is necessary, you will have to create new attributes, for instance "Primary color" and "Secondary color".
You can delete an attribute-value pair by selecting it and clicking on the "Delete" button.
- Reference, EAN-13 & UPC. If necessary, indicate the combination's reference, EAN-13 and/or UPC numbers into each field, as if you were creating a brand new product in PrestaShop. These numbers may be used by your warehouse or your carrier, so make sure to fill these fields, they are often essential to your business.
- Wholesale price. This field is useful if the original price of the product changes simply because this is a combination.
- Impact on price/weight/unit price. If the combination is supposed to have an impact on the product's original price/weight/unit price, choose the appropriate dropdown menu, select "Increase" or "Reduction" depending on the context, and fill the field that appears with the value of that impact.
- Ecotax. The specific ecotax for this combination (if the ecotax option is enabled).
- Minimum quantity. You might prefer this combination to only be sold in bulk. Use this field to set the number of items to be sold in bulk.
- Available date. If this product is out of stock, you can indicate when the product will be available again.
- Image. The images that are linked to the original product (as uploaded using the form in the "Images" tab on the left) are displayed. Check the box for the images that best represent this combination.
- Default. Check this box if you want the combination you are creating to actually be the main one for this product.
When you have set all of the combination's details, save your product changes using the "Save and stay" button. Your combination will appear in the attributes list at the bottom of the screen.
Differences with PrestaShop 1.4
In PrestaShop 1.4, there used to be a "Color picker" form at the bottom of the list of combinations, where you could choose to display a color picker or not on the product page.
Since PrestaShop 1.5, this option has been moved and improved. When creating a new attribute (in the "Catalog" menu, "Attributes & Values" page), you can use the "Attribute type" drop-down list to choose whether the front-page should display it as a drop-down list, a radio button list, or a color picker.
Automatic method
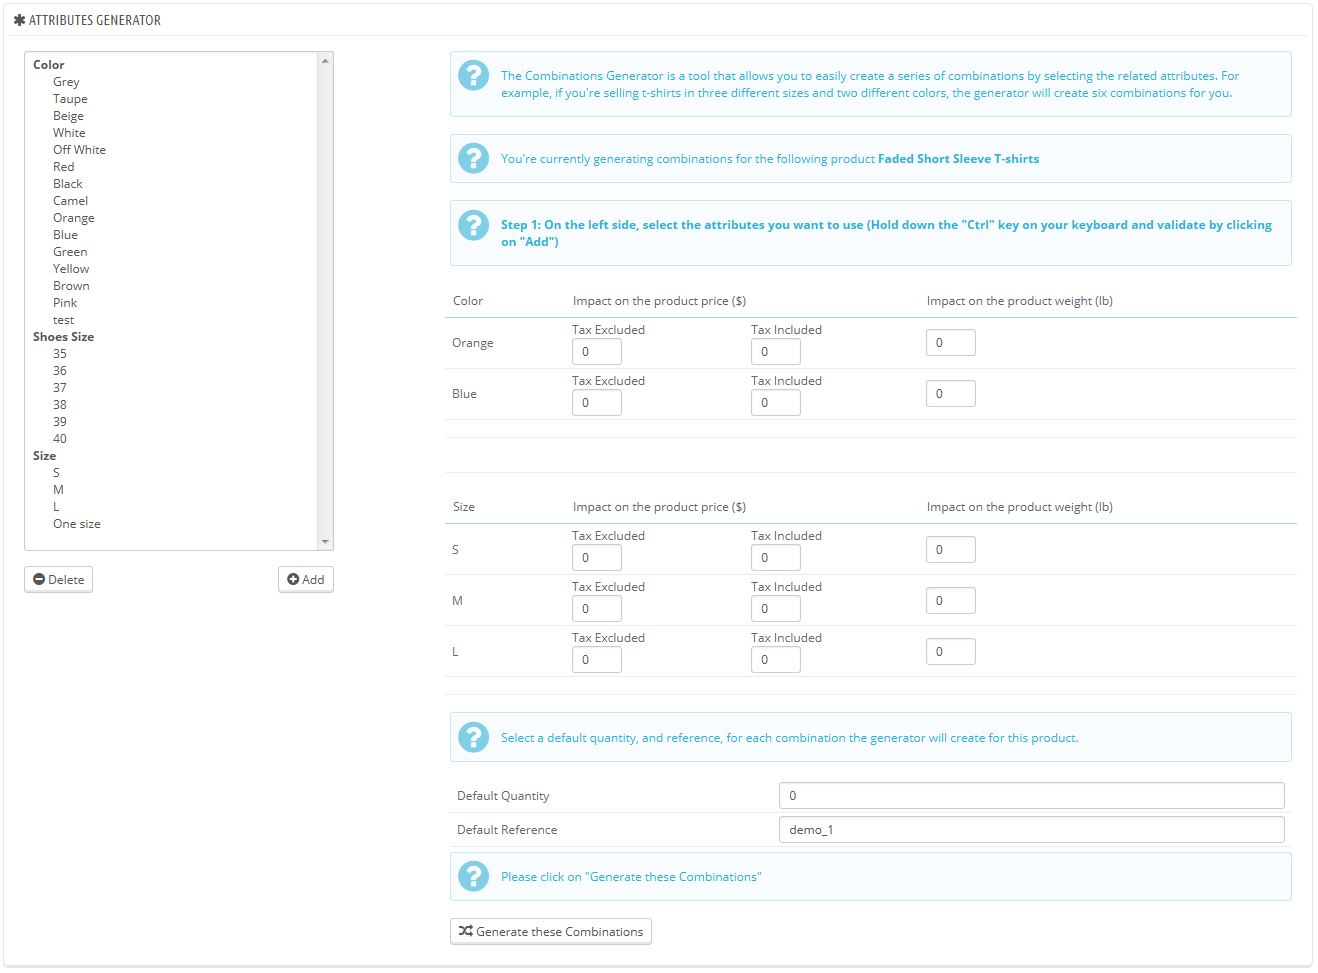
If you have too many different products versions or varieties, you can use the "Product Combinations Generator." This tool allows you to automatically generate all of the combinations and possibilities.
Clicking the "Product combinations generator" takes you to the complete form.
A warning window might appear, saying "You will lose all unsaved modifications. Are you sure that you'd like to proceed?" This means your product already had some combinations created. If you agree to this, this will delete the combinations that have not yet been saved. Be careful, and always save your work before using the generator!
On the left side of this page are your attributes and their values. Select the combinations by clicking on the value names (if want to select more than one value, hold the Ctrl key while clicking), then click on "Add".
For example, you might select the "Blue", "S, M, L" values.
To remove an existing attribute selection, simply select their values and click on "Delete".
Once the varieties have been selected, you can edit the impact on product price and on product weight for each selection. You do not have to: they might simply be the same price and weight.
Insert the quantity of each product in the "Default quantity" field at the bottom. Be careful, it needs to be the same for every combination. For instance, 200 products in each combination = 2 colors * 1 size * 200 = 400 items in all.
You may add a default reference for this combination if it serves your administrative needs.
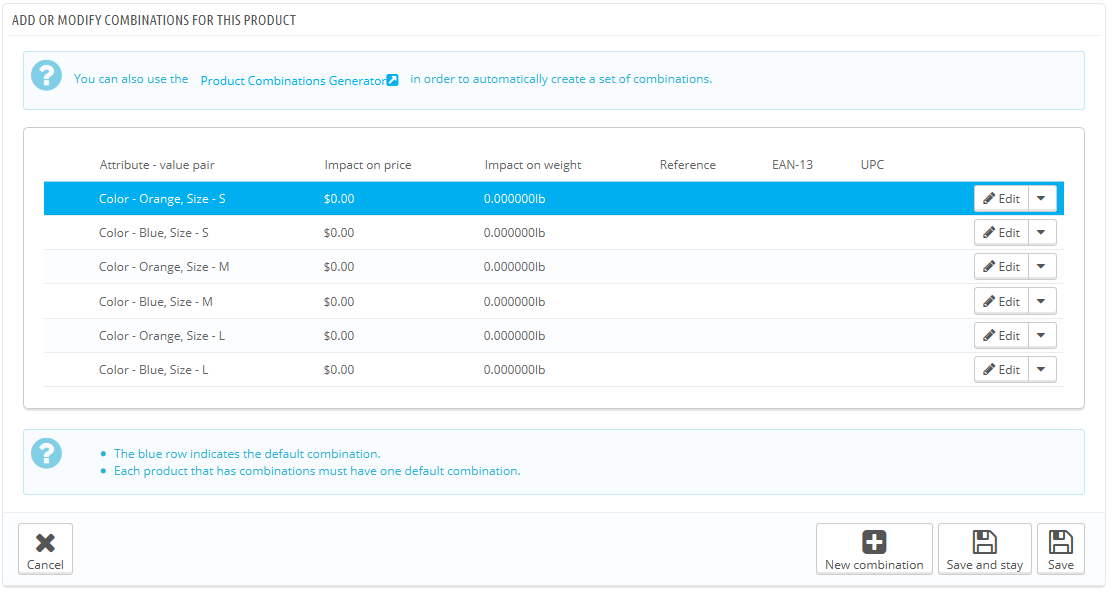
Click the "Generate these Combinations" button, and PrestaShop sends you back to the "Combinations" tab, with all the generated combinations. If you need to, you can now edit them one by one.
As you can see, the combination generator helps you save a lot of time when you have numerous attributes to assemble, such as sizes and materials. It automatically creates all of the possible combinations, which will then appear under the product's public page, in the "Combinations" tab (if the theme supports it).
If you do not want to keep all generated combinations or if they are in fact not all exactly the same (different references, prices, available dates...), you can delete them (trashcan icon) or modify them (file icon) from the product's combination list. The star icon turns the selected combination into the default one – in which case it is highlighted in blue.
Managing Product Quantities
Product quantities are managed in a single tab. The way it works is quite easy: the page presents you with a table of all the combinations for the current product (if there are no combinations, the table simply has a single row). It is up to you to set the initial stock for all the combinations. PrestaShop will use this to determine when a product is soon out-of-stock or unavailable anymore.
Stock Management Options
The quantities tab supports the advanced stock management feature, if activated. This means that if the current product's combinations are distributed among several storage locations, PrestaShop is able to handle the exact location of each combination, even within a given warehouse.
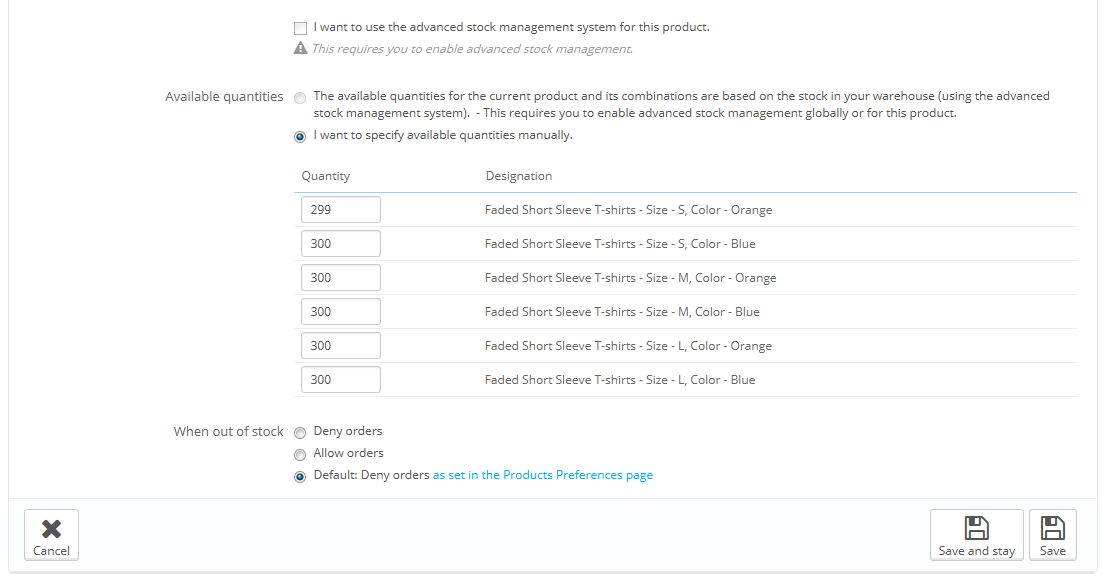
By default, you have to manage the current product's quantities by hand, for each combination, from this page. With the advanced stock management feature activated, you can rely on PrestaShop's stock management feature to handle this.
To use advanced stock management for the current product, checking the box for "I want to use the advanced stock management system for this product". Once this is done, an option becomes available: "Available quantities for current product and its combinations are based on warehouse stock". Click it, and you cannot edit the current product's quantities from the "Quantities" page anymore: it has new become dependent of your stock management.
When out of stock
The "When out of stock" option enables you to set PrestaShop behavior when the product is out of stock: deny orders (the product is not available for sale anymore) or allow order (in essence, you are doing pre-sales). The third and default option simple uses the global default setting ("Preferences" menu, "Products" page, "Product Stock" section, "Allow ordering of out-of-stock products" option).
Availability Settings
At the bottom of the page, you can set the exact behavior of PrestaShop depending on the availability of the current product.
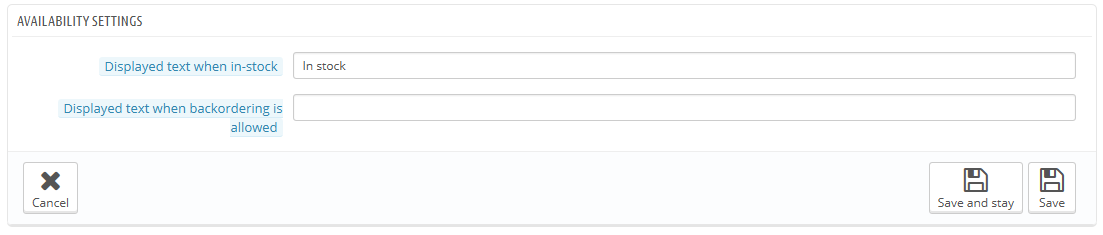
The options are:
- Displayed text when in-stock. Enables you to display a message to your visitors when your product is in stock, for example "Item available". It reassures them that your shop can immediately send them the product.
- Displayed text when allowed to be back-ordered. Enables you to display a message to your visitors when your product is out of stock but they can still order it (as set using the "When out of stock" selector), for example "Pre-order now!". It reassures them that your shop will send them the product immediately once it is in stock.
You can also configure the general settings applied to all of your products: the default option is to deny orders, but this can be modified under the "Products" preference ("Allow ordering of out-of-stock products" option), which is fully explained in the "Understanding the Preferences" chapter of this guide.
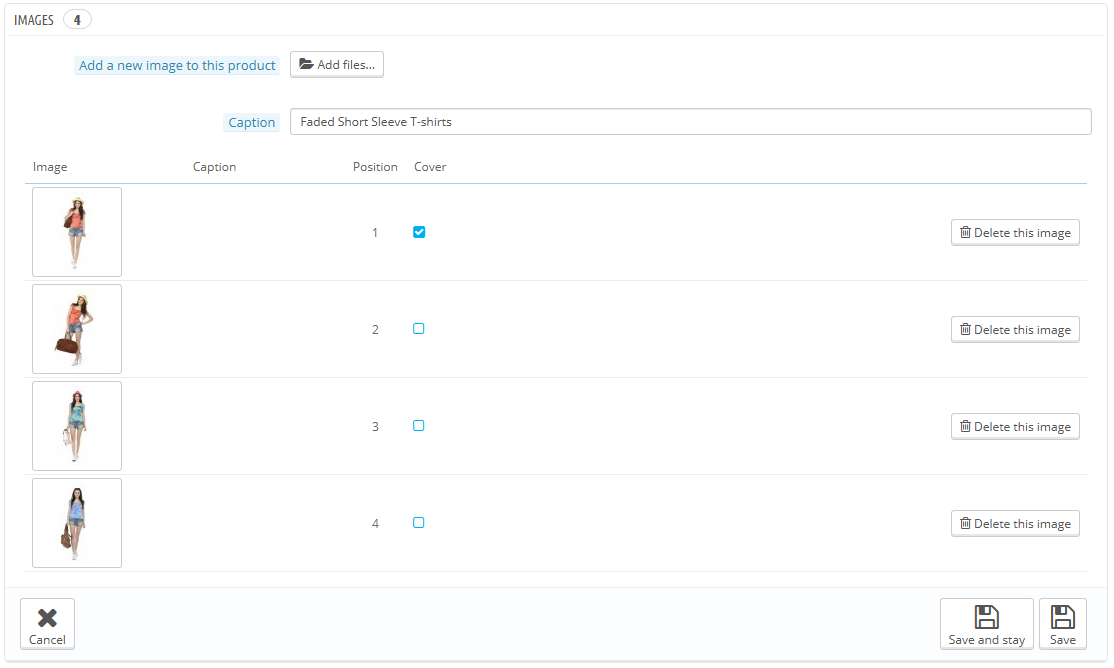
Configuring the Product's Images
The "Images" tab on the left is for including photos on your product page. You should upload all the images for this product, including all of its combinations (color, size, shape, etc.).
To add one or more images to your product:
- Click the "Add files" button and then select at least one image file from your computer to upload. You can select as many images as necessary by keeping the Ctrl-key pressed while selecting files, or you can make your selection one by one. PrestaShop will display the chosen images in a list, with their size and a button to remove some.
The default maximal size for an image file is set by PrestaShop according to your server's PHP settings. This size can be lowered in the "Images" preference page, "Product images" section. - Give the image a caption. It will be displayed if the image cannot be displayed – which can be very good for your search engine optimization.
- Click on the upload button to put your file online.
- The uploaded images appear in a table below the button. If you have more than one image, you can choose which image is to be used as the default/cover image by clicking on the red "no entry" button and turn it into a checkmark. That cover image will also appear automatically on the product page of your shop.
You can click on a thumbnail to display the image in full size.
Once you have uploaded all your product images, you can modify the image order by drag-and-dropping each table row when the mouse cursor changes to a "movable" cursor.
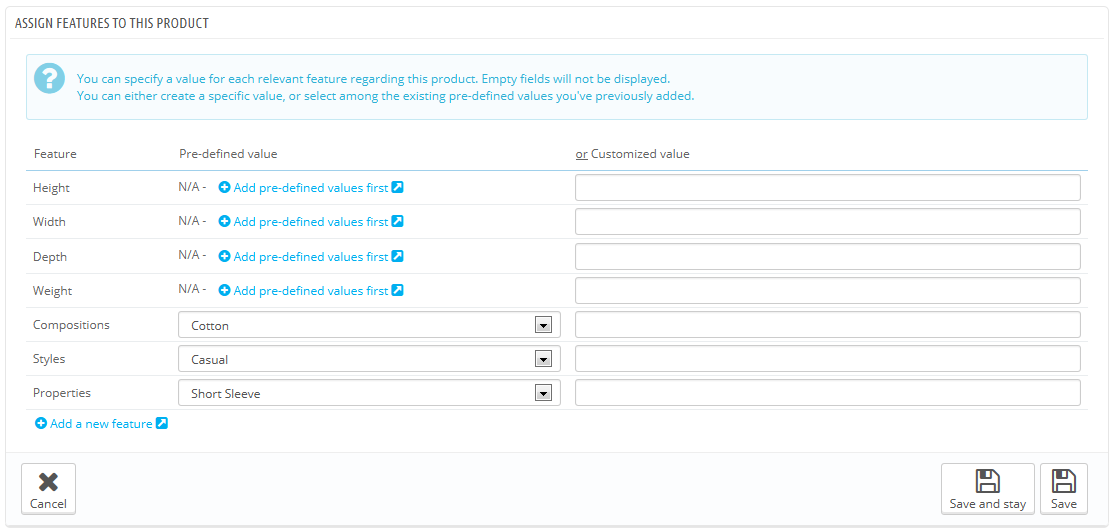
Configuring Product Features
The "Features" tab is where you specify your products' features (i.e. weight, material, country of origin, etc.).
When you create features and values (i.e. wool knit and micro-fiber materials), you assign them to the products when it is appropriate. This means that you do not have to fill out the features fields for each of your products but instead simply fill in the necessary values and apply them later.
PrestaShop's comparison engine relies entirely on product features: this is what gets compared.
Also, since product comparison works on a per-category basis, you should make sure that all the products in a given category do share the same features, with various values to be compared between each other.
Be aware that contrary to the combinations, these values do not change, and are valid for the general product (meaning: all your combinations will share these same features).
Creating a feature
Before adding a feature to a product, you must create it for general use in your shop. You either go to the "Features" page of the "Catalog" menu, or directly click on the "Add a new feature" button. A warning will appear, "You will lose all unsaved modifications. Are you sure that you'd like to proceed?" – make sure all your changes are saved before validating.
Feature and feature value creation are explained in details in the dedicated section of the guide.
Assigning a value and feature to a product
We will assume here that you have already set all your features and feature values.
In the current product's "Features" tab on the left, a table is displayed, listing all of your shop's features. Not all of them pertain to this product: PrestaShop will only take as relevant the features where you actually set a value.
You can either set a value manually, in the field on the far right a feature's row, or you can use one of the pre-defined values (as set when creating the feature) if there are any available.
If no value is available for a feature, the mention "N/A" appears (short for "not available" or "not applicable"), followed by a "Add pre-defined values first" button.
If you choose to use a custom value, do not forget to set it for every language that your shop supports. Use the language code selector to change language.
If there are pre-defined values available, they will appear in a dropdown list. Simply click it and choose the correct value.
Once you have set all the relevant features, save your changes to see them immediately applied in the front-page.
Remember: If a feature does not have any value assigned to it, it will not be taken into account for this product, and will not be visible on your shop.
Managing Customization
PrestaShop makes it possible for your customers to customize the product that they will buy.
Example: You are a jewelry retailer and your customers have the possibility to engrave their jewelry with a text or an image. Your customers can submit the text and/or the image when they place their order.
The advantage of this function is that it offers your customers a personal service, which they will without a doubt appreciate!
Let's look at how to configure this function. In the "Customization" tab on the left, you can indicate what type of context (file and/or text) can be personalized.
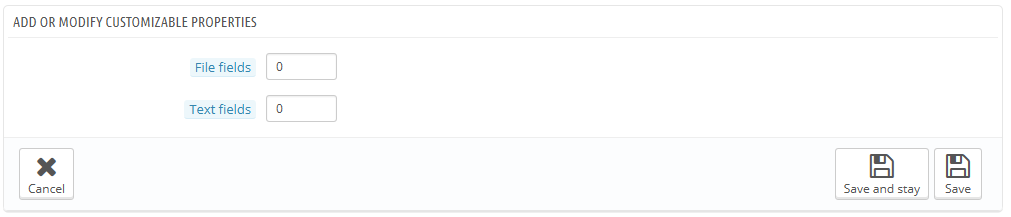
- File fields. Puts the indicated number of file upload buttons on the order page. Each button accepts only one file, so put as many field as you allow your customers to upload.
- Text fields. Puts the indicated number of text fields on the order page. You can add as many text fields as necessary.
Example: If you allow your customer to use a 5-line text with each line limited to 14 characters, you can add 5 fields and indicate the number of allowed characters in the field's label. You cannot limit the number of characters in the string.
Once you have added the needed number for each field, click "Save and stay". The page will reload and display as many text fields as necessary. Fill every one of them with the appropriate public label: this will be an indicator for the customer, so be very specific about what you expect.
For instance, if you allow images for a book cover, you could use the following:
- "Front cover (20.95 x 27.31 cm, color)".
- "Back cover (20.95 x 27.31 cm, black and white)".
- "Spine (20.95 x 1.716 cm, color)".
Same for text: if customers can engrave words to a product, you could use the following:
- "First line (24 chars)".
- "Second line (24 chars)".
- "Last line, signature (16 chars)".
Removing fields. If in the end you added too many fields, simply change the number of needed fields for each of the two types and click "Save and stay". The page will reload with the right number of fields, with the first ones preserved.
Once all the label fields have been filled, do not forget to save your changes.
On the customer's side
Once a product has customizable properties set, its front-end product page has a new tab, next to the "More info" tab: "Product customization".
The customer must choose the file(s) and/or add some text and save them before they add the product in the cart.
The custom image(s) and text(s) will appear in the final cart.
The rest of the purchase process is the same as usual.
On the merchant's side
Once the order has been validated by the customer, the merchant gets a notification of the order in the back-office.
He can then check on the order, which will indicate the image(s) and the text(s) in the list of products, for each product. The merchant then simply has to download the image(s) (simply by clicking on the image in the order) or copy/paste the text and use that in its customization tool.
The rest of the order and delivery process is the same as usual.
Managing Attachments
PrestaShop enables you to make some files available to your customers before their purchase. This is done in the "Attachments" tab on the left.

For example, let's say you sell electronics, and you would like to urge your customers to read a document on how a product works. You can upload a document for that purpose.
You could also simply have the product's PDF manual directly available for download right on the product page.
Adding an attachment is really quick:
- Fill out the file name of your attachment (it doesn't have to be the same as the original file name).
- Give it a description. This will help you distinguish between your uploaded files with certainty.
- Click on "Add file" to select a file on your computer to upload. As soon as you choose the file, PrestaShop uploads it, then displays it in the list
- The attachment appears in the "Available attachments" list: you have to select it then click on the "Add" to move it to the "Attachments for this product" list.
- Save your product with either the "Save" button or the "Save and stay" one.
Now the "Download" tab will appear on the product's page (if the theme supports it), and your customers can download the file(s) that you just uploaded.
If you need to remove an attachment, select it in the "Attachments for this product" selector and click on the "<- Remove" button. The file will be moved to the "Available attachments" selector if you need to set it back online later on.
You can view all of your store's attached files, add some more and remove some, by going to the "Attachments" page under the "Catalog" menu. This also makes it possible to use the attachments that you already uploaded for other files: if you need to apply the associated one file with many products, you will thus only have to upload it once.
Setting the Product's Supplier
Indicating the product's supplier is not really important to your customers (very much less so than its manufacturer in any case), but it may turn out to be an essential part of your own internal management, not the least when managing your stock: you simply need to know who you bought the product from. The supplier of the current product is to be set from the "Suppliers" tab on the left.
You cannot use this feature if you do not already have at least one supplier registered in your shop. Suppliers are created from the "Suppliers" page, under the "Catalog" menu.
The complete supplier registration process in explained in details in the current chapter of this guide.
You can access the creation page directly by clicking on the "Create a new supplier" button.
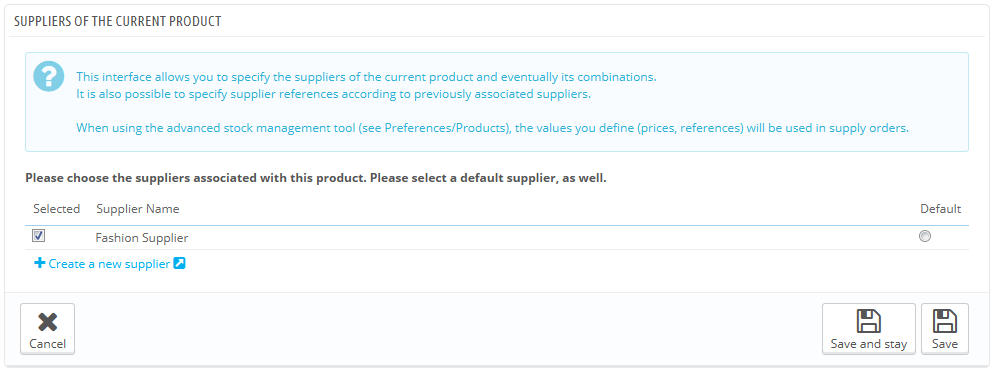
Associating the current product with one or more suppliers is really easy: simply click the box corresponding to the supplier, and save your changes.
If the product is associated with more than one supplier, you can choose which one should be the default one using the radio button on the right.
Note: the "Default" radio buttons are unavailable by default. In order to select them, you must first click the "Save and stay" button" in order to select another supplier as default.
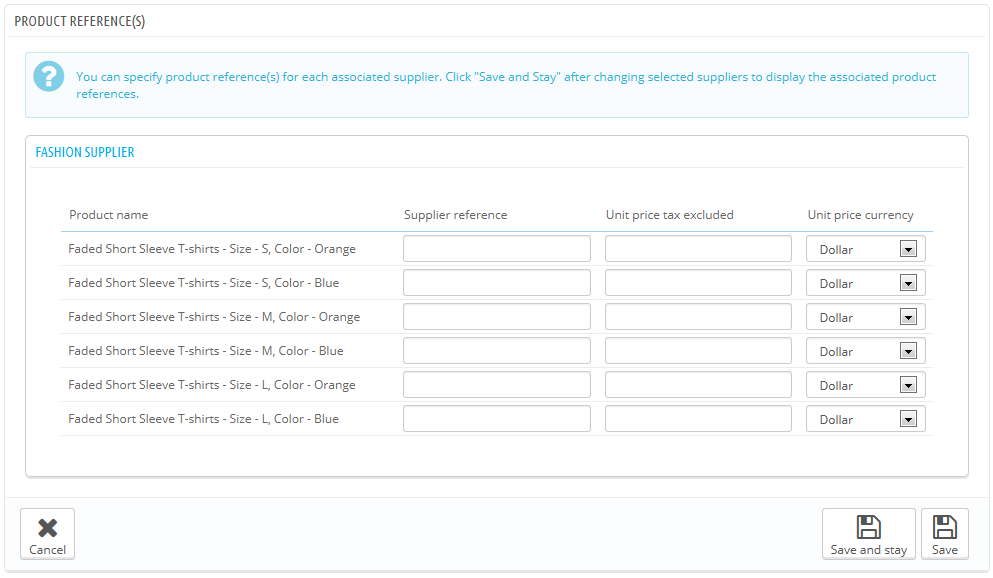
Product reference(s)
The product's supplier page also features a table that enables you to set the precise reference and unit price/currency for each product combination. If the product has more than one supplier, the table only opens the combination tied to the first supplier, the others being closed by default. Click on a supplier's name in order to open its references table, and close the others.
Managing Warehouses (advanced)
Once you have enabled the advanced stock management option (in the "Products" preference page), this new tab gets available for all products, and enables you to indicate in which warehouse the current product is stored.
You cannot use this feature if you do not already have at least one warehouse registered in your shop. Warehouses are created from the "Warehouses" page, under the "Stock" menu.
The complete warehouse registration process in explained in details in another chapter of this guide, "Managing Stock".
You can access the creation form by clicking on the "Create a new warehouse" button.
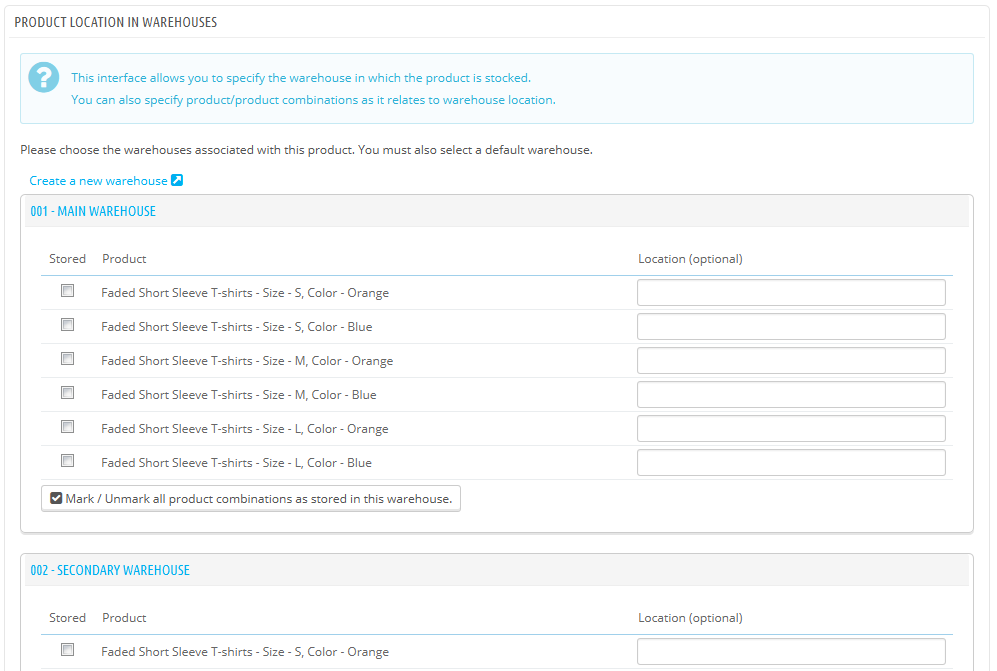
The "Warehouses" tab presents you with a table that enables you to set the precise location for each product combination (if any) in each warehouse. If you have registered more than one warehouse, the table only shows the first one by default, the others being closed by default. Click on a warehouse's name in order to open its sub-table, and close the others.
For each warehouse, you can set which combination of the current product is stored, and a text field enables you to indicate precisely where it is stored in that warehouse. You can write anything in that field: "Aisle 5", "Next to the Radiohead albums", "A07 E08 H14", or anything that helps you or your packaging team to find the product as quickly as possible.
Creating a Pack of Products
You may wish to sell a pack of products made of several items. I.e.: a computer start-up pack composed of the computer itself, a monitor, and a printer. PrestaShop makes it easy for you to create a "pack" product and add other products from your catalog to this pack.
Packs enable you to simplify preparing orders. They also allow customers to take advantage of special prices and offers.
You cannot currently add combinations or virtual products to a pack.
If you need to have packs with combinations, you will have to create single products for each combination. This is a known limitation that will be fixed in a coming version of PrestaShop.
You cannot add an existing pack within a new pack, or import the content of an existing pack into a new pack.
The process to create a pack is similar to the one for creating a regular product:
- Go to the "Products" page, under the "Catalog" menu.
- Click the "Add New" button.
- From the "Information" tab on the left, change the product type to "Pack of existing products ".
A new tab appears on the left, titled "Pack". This tab only features two text fields and a button:
- The first field is used to search for products that are already registered in your shop.
- The second field is used to indicate the quantity of chosen product should be added to the pack.
- The button adds the product to the pack.
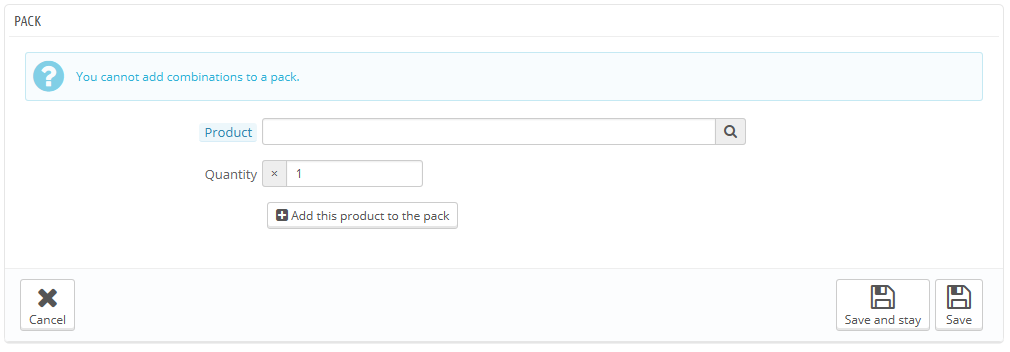
You can add as many products as you would like to the pack.
You can remove a product from the pack simply by clicking the trashcan icon next to it.
Once you are done with the "Pack" tab, you can edit the content of all the other available tabs as if you would for a regular product.
Creating a Virtual Product
Your shop may feature (partly or exclusively) virtual products – that is, products that are not shipped, but rather downloaded: entertainment tickets, e-books/PDF files, real-life services...
PrestaShop makes it easy for you to create a virtual product
The process to do this is similar to the one for creating a simple product:
- Go to the "Products" page, under the "Catalog" menu.
- Click the "Add New" button.
- From the "Information" tab on the left, change the product type to "Virtual Product".
The tabs on the left change:
- The "Virtual Product" tab appears, to which you will be redirected as soon as you change the product type.
- The "Shipping product" tab disappears.
The new tab only features one option at first: it asks if the virtual product you are creating has a file attached (i.e., if your customer will pay to download something).
- If not, leave it at that: you are selling a service, and nothing needs to be downloaded.
- If yes, click the "Yes" option.
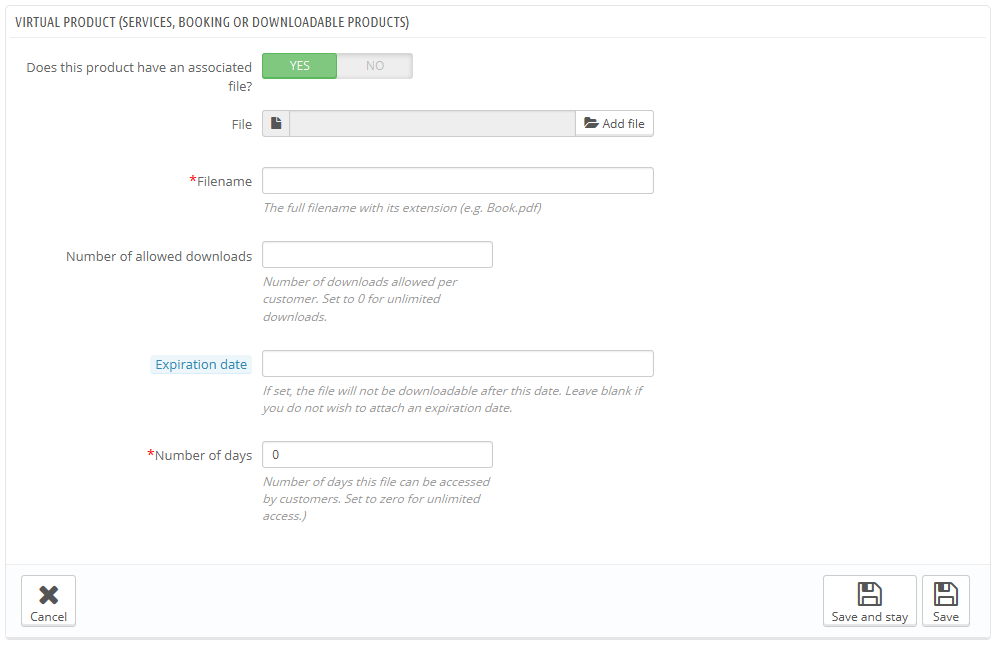
When you click "Yes", PrestaShop opens a new form within the tab, from which you can upload the file you intend to sell:
- Filename. The name of the file. This field is automatically filled after the file has been uploaded. It is not recommended to change it to another value.
File. Click the "Browse" button to find the file on your hard drive. As soon as you have selected a file, the upload begins.
The maximum file-upload size setting depends on your server's settings, and cannot be increased from PrestaShop.
If you have access to your server's
php.inifile, these are the values you should change:upload_max_filesize = 20Mpost_max_size = 20M
If you do not have access to the
php.inifile, contact your web host about this.You should compress your file in zip format, in order to avoid the browser misinterpreting
.exeor.jpgfile formats. Browsers automatically download zip files for the customer, no question asked.If you are selling a high resolution image, uploading it using this form does not prevent you from uploading its thumbnail in the "Images" tab on the left.
- Number of allowed downloads. You can set the number of time the file can be downloaded once the customer has bought it. You might prefer to limit this to 1, or 5. If you want to keep it unlimited, set the text field to 0.
- Expiration date. Virtual files can be of promotional nature, or lose their selling value after a certain date. If so, you can set the expiry date after which the product will not be available on your shop anymore. Leave it blank if there is no expiry date.
- Number of days. You can set the number of days after which the download link becomes non-functioning. If there is no limit, set the text field to 0.
Once you are done with the "Virtual Product" tab, you can edit all the other available tabs as if you would for a regular product.