Puoi gestire i prodotti del tuo negozio usando la pagina “Prodotti” nel menu “Catalogo”.
Sezioni in questo capitolo:
Per creare un nuovo prodotto, dalla pagina “Catalogo” clicca su "Nuovo prodotto" (o clicca su CTRL + P): si aprirà quella che è chiamata pagina prodotto per creare prodotti o modificare quelli esistenti.
In PrestaShop 1.7, la pagina prodotti è organizzata in schede:

Il primo campo da compilare è il nome del prodotto che apparirà nei risultati del motore di ricerca e nell'apposito URL del prodotto. Accanto al campo è disponibile un selettore di lingua che consente di scegliere la lingua in cui si desidera modificare o creare il prodotto.

Devi dare al prodotto un nome almeno nella lingua predefinita prima di poterlo salvare. Non potrai salvare fino a quando non gli avrai dato un nome. Assicurati di tradurre ogni campo in ogni lingua che il tuo negozio supporta. Per fare ciò, clicca sul selettore di lingua accanto al campo del tipo di prodotto e scegli la lingua in cui desideri modificare il prodott |
Questa seconda opzione è essenziale: indica se il prodotto è un pacchetto (una combinazione di almeno due prodotti esistenti), un prodotto virtuale (file scaricabile, servizio, ecc.) o semplicemente un prodotto classico inviato via posta. Per ora esploreremo esclusivamente il prodotto standard senza combinazioni e ci occuperemo di prodotti con combinazioni, pacchi e prodotti virtuali nelle apposite sezioni di questo capitolo.
Potresti aver attivato diverse lingue nel tuo negozio per vendere in più Paesi. Se desideri collaborare con i tuoi clienti all'estero, tutti i tuoi contenuti (descrizione prodotti, didascalie, ecc.) devono essere tradotti in queste lingue.
Per tradurre il contenuto del prodotto in un'altra lingua, seleziona la lingua in cui desideri lavorare accanto al selettore prodotti. La pagina del prodotto si aggiornerà con il contenuto disponibile nella lingua selezionata. È possibile passare da una lingua all'altra senza dover salvare il lavoro nel mentre. Accertati di modificare il contenuto nella lingua giusta.
Per impostazione predefinita, la pagina del prodotto mostrerà i contenuti nella lingua predefinita del negozio.
Per aggiungere nuove lingue al tuo negozio, vai alla sezione Internazionale. Puoi aggiungere solo una lingua in "Traduzioni" oppure aggiungere un pacchetto di localizzazione in "Localizzazione". Ulteriori informazioni si trovano nella sezione internazionale della documentazione. |

Vendite. Ti reindirizza alla pagina "Dettagli del prodotto" del pannello delle statistiche (menu "Statistiche"), che fornisce un grafico sia delle visite della pagina di quel prodotto che delle sue vendite
Elenco prodotti. Novità di PrestaShop 1.7. Mostra l’elenco di tutti i prodotti per consentirti una veloce navigazione da un prodotto a un altro.
Aiuto. Apre il supporto contestuale in una colonna con la pagina della Guida per l’Utente corrispondente alla pagina prodotto.
In fondo alla pagina sono disponibili diverse azioni:
Elimina (icona cestino). Rimuove tutti i dati del prodotto corrente e lo elimina, incluse le immagini, le combinazioni, le funzioni, ecc.
Anteprima. Mostra la pagina del front office del tuo prodotto. È molto utile, perché funziona anche se il prodotto è disattivato.
Online / Offline. È qui che attivi o disattivi il prodotto. Per impostazione predefinita è disabilitato, in modo che i tuoi clienti non posanno vederlo nel tuo negozio.
Duplica. Salva il prodotto corrente, quindi crea una copia esatta del prodotto e ti porta alla nuova pagina prodotto. È molto utile quando si desidera utilizzare i dati del prodotto corrente come modello per un altro prodotto senza inserire manualmente tutti i dati del nuovo prodotto. Ad esempio, due prodotti potrebbero essere molto diversi, ma potrebbero condividere le stesse associazioni, corrieri o impostazioni fornitore.
Se è necessario creare diverse versioni dello stesso prodotto, per la varietà di colori, capacità, dimensioni, ecc., occorre creare una combinazione di prodotti piuttosto che duplicarlo X volte. Vedi l'opzione "Combinazioni" nella scheda "Impostazioni di base", spiegata nella sezione "Creazione di un prodotto con combinazioni" di questo capitolo. |
Vai al catalogo Consente di salvare tutte le modifiche apportate, qualsiasi dato del prodotto e ti riporta all'elenco dei prodotti.
Aggiungi nuovo prodotto. Salva qualsiasi modifica apportata a qualsiasi dato del prodotto e apre una nuova pagina per creare un nuovo prodotto.

Tasti rapidi Alcuni tasti di scelta rapida sono stati introdotti con PrestaShop 1.7 per aiutarti a risparmiare tempo quando crei diversi prodotti nella stessa riga. Il comportamento è lo stesso descritto sopra e funziona per le seguenti opzioni:
|
La pagina prodotto, che è stata ridisegnata in PrestaShop 1.7, rende più semplice creare un prodotto grazie alle schede avanzate.
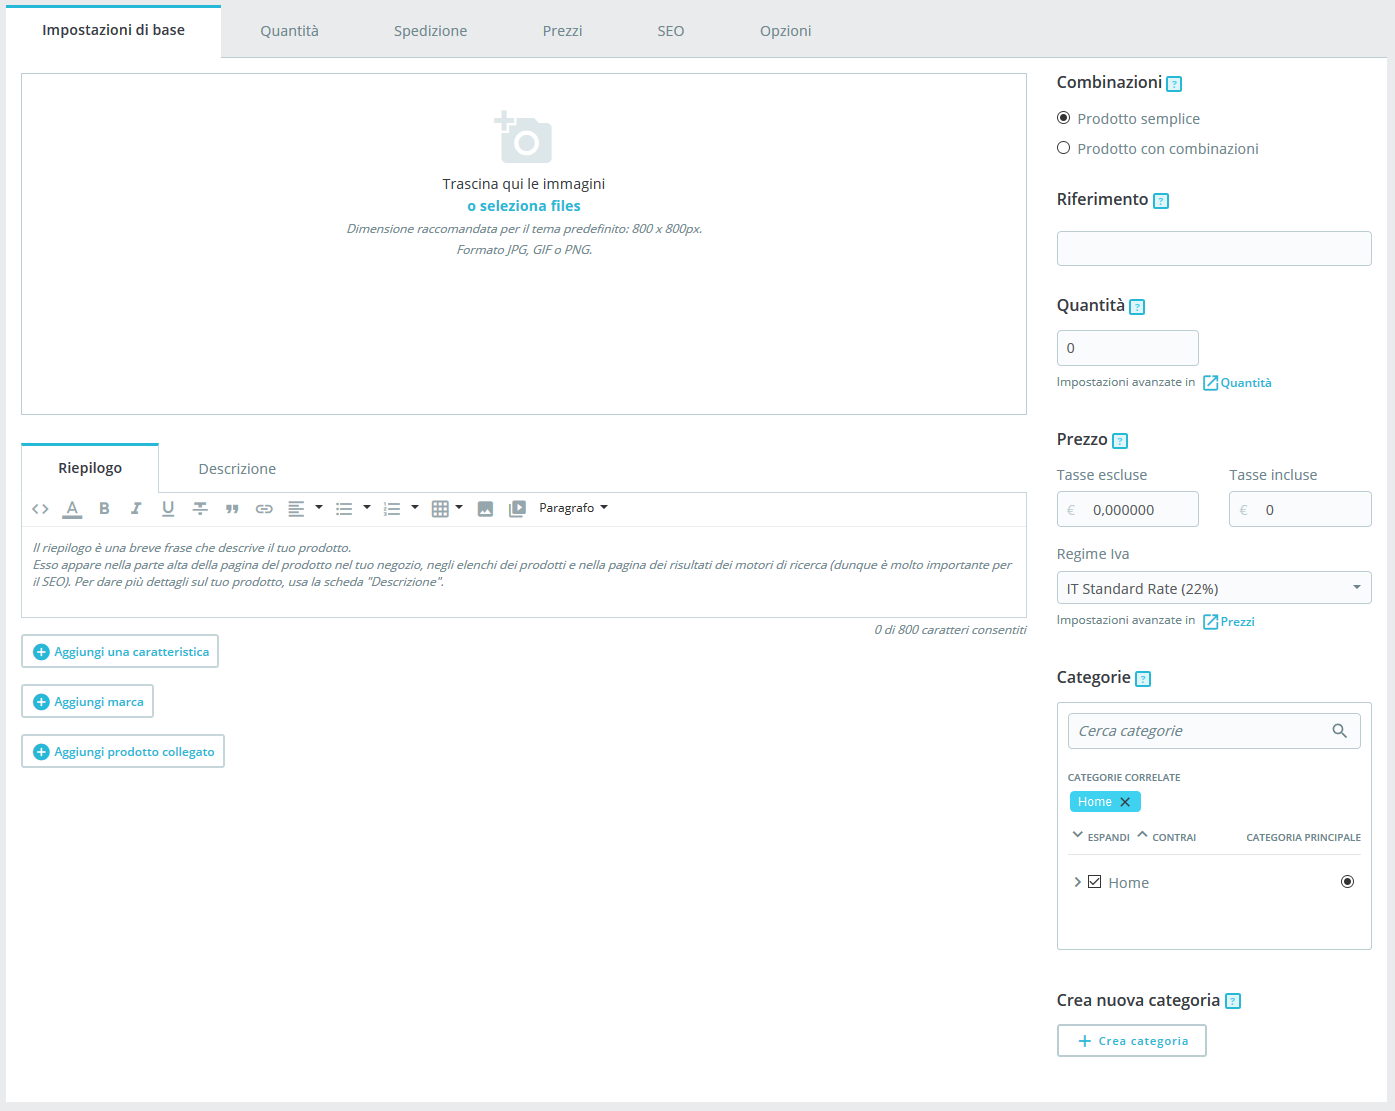
La scheda "Impostazioni di base" fornisce le opzioni principali necessarie per creare un prodotto di base: in pochi click sarai in grado di creare un nuovo prodotto. Da lì puoi anche consultare le altre schede per aggiungere ulteriori dettagli al tuo prodotto.
La sezione immagini si trova nella parte superiore sinistra della scheda "Impostazioni di base". Dovresti caricare tutte le immagini del prodotto, comprese tutte le sue combinazioni (colore, dimensione, forma, ecc.).
Per aggiungere una o più immagini al prodotto:
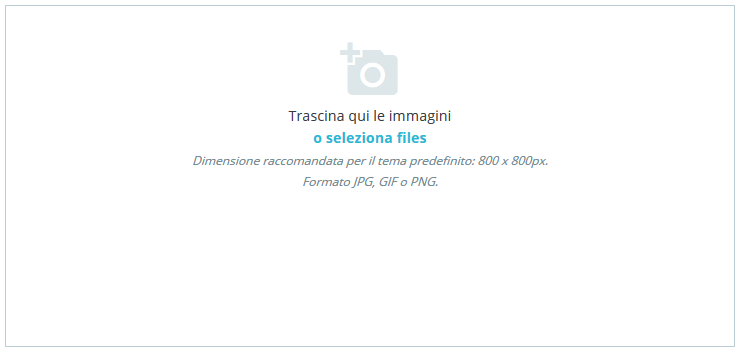
Trascina e rilascia le tue immagini direttamente dalla tua cartella o clicca su "seleziona i file" (o in qualsiasi punto della sezione dell’immagine) per aprire la cartella delle tue immagini. È possibile selezionare le immagini necessarie tenendo premuto il tasto Ctrl durante la selezione dei file oppure è possibile selezionarne una per volta. La dimensione massima predefinita di un file immagine viene impostata da PrestaShop in base alle impostazioni PHP del server. Questa dimensione può essere ridotta nella pagina preferenze “Immagini” nella sezione “Immagini Prodotto”.
Le immagini caricate vengono visualizzate come anteprime. La prima sarà quella predefinita/copertina del prodotto che apparirà automaticamente anche nella pagina del tuo negozio.
È possibile modificare l'immagine di copertina cliccando sulla miniatura dell'immagine: appariranno le impostazioni per quella immagine. Lì è possibile controllare o deselezionare l'opzione "Copertina" per scegliere se usarla come cover o meno.
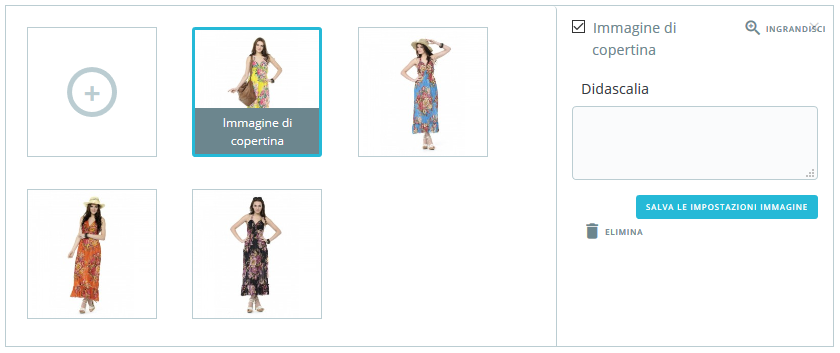
Quando si clicca su "Zoom", l'immagine appare nel suo formato reale, nel caso in cui si desidera esaminarla più da vicino.
Ogni immagine può avere una didascalia: utilizzala per descrivere brevemente l'immagine (e il prodotto). Se usi più lingue, non dimenticare di tradurla!
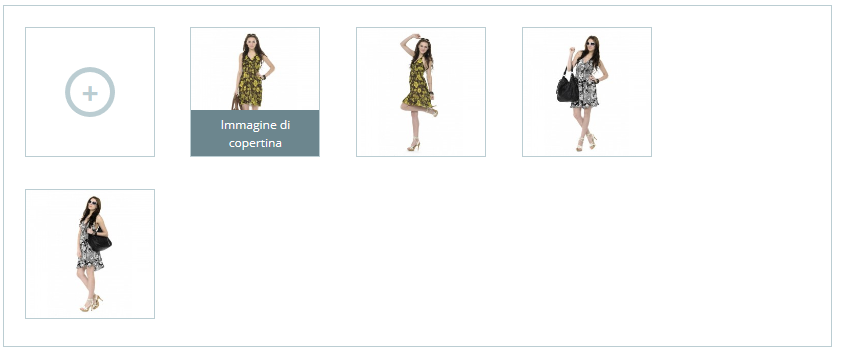
Una volta caricate tutte le immagini del prodotto, puoi modificare l'ordine trascinando ogni immagine. Puoi anche aggiungere altre immagini cliccando sull'icona "+".
Descrivere bene il tuo prodotto è essenziale sia per il cliente (più informazioni ci sono meglio è) sia per i motori di ricerca (aiuterà il tuo negozio a comparire in più risultati di ricerca).
Nella parte inferiore dello schermo, i due campi di descrizione hanno ciascuno scopi diversi:
Il campo "Riepilogo" consente di scrivere una breve descrizione che verrà mostrata nei motori di ricerca e nella descrizione del prodotto.
Questo campo è limitato a 400 caratteri per impostazione predefinita: se superi tale limite, PrestaShop ti avviserà con un messaggio in rosso sotto il campo. Puoi modificare tale limite nella pagina delle preferenze "Prodotti", dove troverai l'opzione "Massima dimensione riepilogo prodotti".
Il campo "Descrizione” consente di scrivere una descrizione completa del prodotto che verrà visualizzata direttamente nella pagina del prodotto. L'editor di testo offre una vasta gamma di opzioni per creare descrizioni visivamente attraenti (carattere, dimensione, colore del testo, ecc.). Questo secondo campo non ha limiti, ma meglio non eccedere e fornire le informazioni essenziali in modo convincente.

Sotto le descrizioni dei prodotti, puoi scegliere diverse opzioni. L'opzione "Aggiungi una caratteristica" serve a specificare le caratteristiche dei tuoi prodotti (es. peso, materiale, Paese di origine, ecc.).
Quando crei funzioni e valori (es. maglie in lana e materiali in microfibra), li assegni ai prodotti ove necessario. Non c’è quindi bisogno di compilare i campi delle funzioni per ciascuno dei tuoi prodotti, ma semplicemente compilare i valori necessari e applicarli in un secondo momento.
Tieni presente che differentemente dalle combinazioni, questi valori non cambiano e valgono per il prodotto generico (vale a dire: tutte le tue combinazioni condivideranno le stesse caratteristiche).
Prima di aggiungere una funzione a un prodotto devi crearla per un uso generale del tuo negozio. Dovresti andare alla pagina "Attributi & funzioni" nel menu "Catalogo".
Le funzioni e la creazione dei relativi valori sono spiegate nel dettaglio nella pagina dedicata nella guida utente.

Supponiamo che hai già impostato tutte le tue funzioni e i relativi valori.
Quando clicchi su "Aggiungi una funzione", visualizzi un menu a discesa che elenca tutte le funzioni del tuo negozio. Seleziona quella da aggiungere. Successivamente, è possibile assegnare uno dei valori predefiniti (come impostato durante la creazione della funzione) se disponibile o impostare manualmente un valore nel campo "valore personalizzato".
Se non è disponibile alcun valore per una funzione si visualizzrà il messaggio "Nessun risultato trovato".
Se scegli di utilizzare un valore personalizzato, non dimenticare di impostarlo per ogni lingua che il tuo negozio supporta. Utilizza il selettore di codice di lingua nella parte superiore della pagina per modificarla.
Se sono disponibili valori predefiniti, verranno visualizzati in un elenco a discesa. Basta cliccare su di esso e scegliere il valore corretto.
Una volta impostate tutte le funzioni pertinenti, salva per visualizzare immediatamente le modifiche nel front office.
Ricorda: se una funzione non ha alcun valore assegnato, non verrà presa in considerazione per quel prodotto e non sarà visibile sul tuo negozio.
Nello stesso modo in cui puoi aggiungere una funzione, puoi aggiungere una marca. Clicca su "Aggiungi una marcha" e scegli una marca dal menu a discesa.
Se il marchio desiderato non è disponibile nel menu a discesa, vai alla pagina "Marchi & fornitori" per creare una nuova marca.
Un prodotto può essere associato solo ad una marca.

Il campo "Aggiungi un prodotto correlato" consente di scegliere i prodotti pertinenti da associare a quel prodotto e li mostra ai clienti quando visitano la pagina del prodotto (se il tema lo supporta). Clicca su "Aggiungi un prodotto collegato", digita le prime lettere del prodotto e selezionalo. Il prodotto viene quindi aggiunto in fondo al campo.

Puoi associare un prodotto a quanti altri prodotti ritieni necessari. Clicca sull'icona del cestino per eliminare l'associazione dei prodotti.
Un'associazione va in una sola direzione: il prodotto associato non presenta un'associazione con il prodotto corrente nella sua pagina impostazioni.
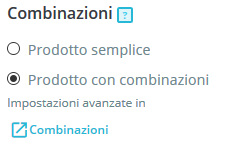 Spesso venderai lo stesso prodotto in diverse versioni: condividono lo stesso nome, ma potrebbero differire per il colore, per la capacità, per la dimensione dello schermo e per altri attributi. Nella maggior parte dei casi questi attributi si uniscono: si potrebbe avere la versione rossa del prodotto disponibile con capacità di 1 Gb o 2 Gb oppure uno schermo 12 '' o 15 ''. È per questo che PrestaShop chiama queste versioni "combinazioni": il tuo stock di prodotti può essere composto da diverse varianti di un singolo prodotto, che in effetti sono semplicemente i suoi attributi combinati in modi specifici.
Se hai bisogno di combinazioni per il tuo prodotto, seleziona "Prodotto con combinazioni". La scheda "Quantità" della pagina del prodotto verrà rinominata "Combinazioni" e ti permetterà di creare le tue combinazioni.
Non è possibile creare combinazioni se non si dispone già degli attributi di prodotto impostati correttamente in PrestaShop. Inoltre, non dovresti creare una combinazione per funzioni che i tuoi clienti non possono di scegliere. La creazione di attributi si effettua tramite la pagina "Attributi & Funzioni" dal menu "Catalogo" ed è spiegata in dettaglio nel relativo capitolo della documentazione |
Per scoprire di più sulle Combinazioni, leggi la sezione dedicata alla fine di questo capitolo.
Indica quanti prodotti sono disponibili per la vendita.
Questa opzione non verrà visualizzata se si sta creando un prodotto con combinazioni: le quantità per le combinazioni vengono gestite nella scheda "Combinazioni", in quanto ogni combinazione può avere un valore diverso.
Altre opzioni di quantità sono disponibili nella scheda "Quantità".
 Definisci a quanto vuoi vendere un prodotto.
Prezzo – Tasse escluse. È qui che devi impostare tuo prezzo, indipendentemente dal calcolo dalle tasse e dagli altri prezzi.
Prezzo – Tasse incluse. Mostra il prezzo del prodotto con le tasse incluse. Puoi modificare il valore e si aggiornerà automaticamente il campo "Tasse escluse" in base alla regola fiscale che hai scelto.
Regole fiscali. La tassa applicabile al prodotto. Scegli tra le diverse imposte che hai registrato. Quando cambia la regola fiscale, il prezzo cambia di conseguenza.
Altre opzioni di prezzo sono disponibili nella scheda "Prezzi". Se si modifica il prezzo nelle "Impostazioni di base" o nella scheda "Prezzi" è uguale, poiché le schede sono sincronizzate.
Le regole fiscali possono essere gestite nel menu "Internazionale", nella pagina "Imposte".
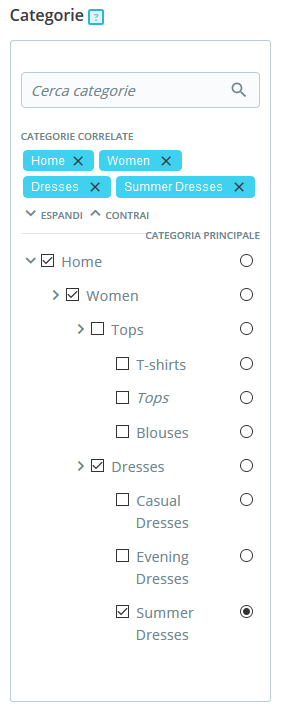
La sezione "Categorie" consente di scegliere in quale categoria deve apparire il prodotto. Puoi selezionarne più di una, ma tieni presente che è meglio per il cliente che la categoria contienga solo prodotti equivalenti e comparabili. Pertanto, si dovrebbe evitare di selezionare categorie radice e preferire categorie secondarie.
Ad esempio, la categoria "telefono" può contenere sotto categorie di "marche" (Apple, Samsung, HTC, ecc.) così come "caratteristiche" (dual sim, Android, ecc.). Sta a te indicare la categoria più utile ai tuoi clienti.
Per associare una categoria al prodotto, puoi utilizzare la barra di ricerca oppure espandere l'elenco delle categorie e selezionare ciò che desideri associare.
Utilizzando la barra di ricerca. Digita le prime lettere della categoria e la barra mostrerà tutte le categorie corrispondenti e il percorso per accedervi. Scegli la categoria e clicca su di essa. Sarà mostrata nella sezione "Categorie associate".
Utilizzando l'elenco delle categorie. Cliccando su "Espandi", vedrai l'albero di categoria e da lì potrai selezionare le categorie da associare.
Nell'elenco delle categorie associate, passando con il mouse su una categoria specifica, vedrai il percorso che porta alla categoria. Può essere utile se hai più categorie con lo stesso nome (come "Scarpe" che può essere sottocategoria sia di "Bambini" che di donne "Donna")
Il selettore "categoria principale" è utile quando un articolo viene salvato in diverse categorie. Serve principalmente per chiarire quale categoria deve essere utilizzata nel caso in cui il tuo cliente arrivi sul tuo sito da un motore di ricerca, poiché il nome della categoria apparirà nell'URL del prodotto.
Se ritieni necessario aggiungere una categoria, salva lo stato attuale del prodotto prima di cliccare sul pulsante "Crea nuova categoria".
Cliccando su "Crea una categoria" verranno visualizzate le opzioni di categoria. Compila il nome della categoria e seleziona la categoria genitore. Cliccando su Crea, verrà creata la nuova categoria e verrà associata automaticamente al prodotto.
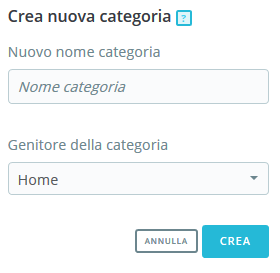
Non dimenticare di passare alla pagina "Categorie" per completare i dettagli di questa nuova categoria. Per ulteriori informazioni sulle categorie vai alla relativa sezione della documentazione.
| La nuova categoria non apparirà automaticamente nel menu del negozio. Per visualizzarlo, è necessario modificare il menu con il modulo "Menu principale" (se si utilizza il tema predefinito) o qualsiasi modulo personalizzato di gestione menu. |
A questo punto hai inserito le informazioni essenziali per una pagina base prodotto. Salva. Per renderlo immediatamente disponibile e in vendita, clicca su "Offline": il suo stato cambierà in "Online" e sarà visibile sul tuo negozio.
Tuttavia, dovresti continuare a leggere, poiché ci sono molti altri dettagli che puoi aggiungere al tuo prodotto per renderlo più attraente per i clienti!
Product quantities are managed in a single tab. PrestaShop will use this to determine when a product is soon out-of-stock or unavailable anymore.
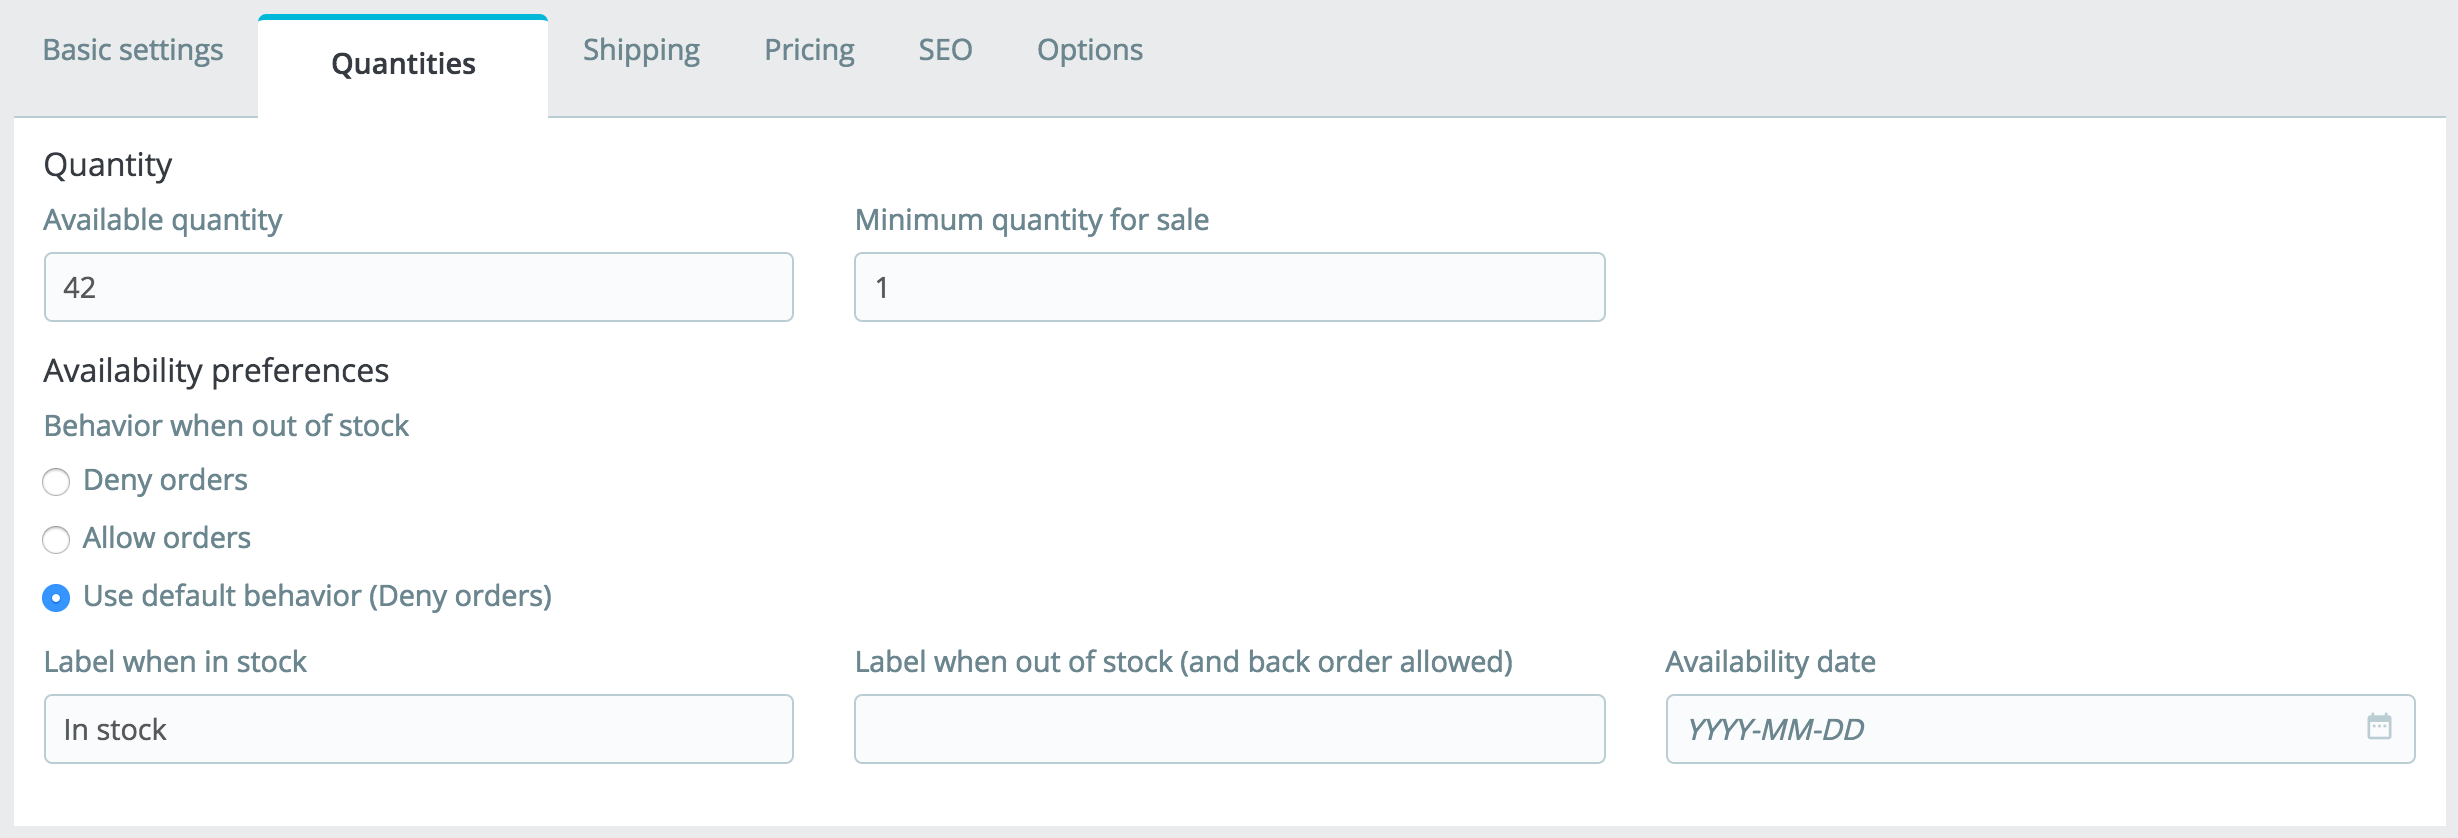
For a standard product you only have two fields:
The way it works is quite easy: the page presents you with a table of all the combinations for the current product (if there are no combinations, the table simply has a single row). It is up to you to set the initial stock for all the combinations.
For more information on product combinations, read the dedicated section at the end of the page.
| Packs and virtual product have different stock settings, you will find all you need at the end of this chapter. |
The "Behavior when out of stock" option enables you to set PrestaShop behavior when the product is out of stock:
You can also configure the general settings applied to all of your products: the default option is to deny orders, but this can be modified under the "Products Settings" in the "Shop Parameters section" ("Allow ordering of out-of-stock products" option).
The "Shipping" tab enables you to give some precious details about your product's package. It isn't available in the case of a virtual product.
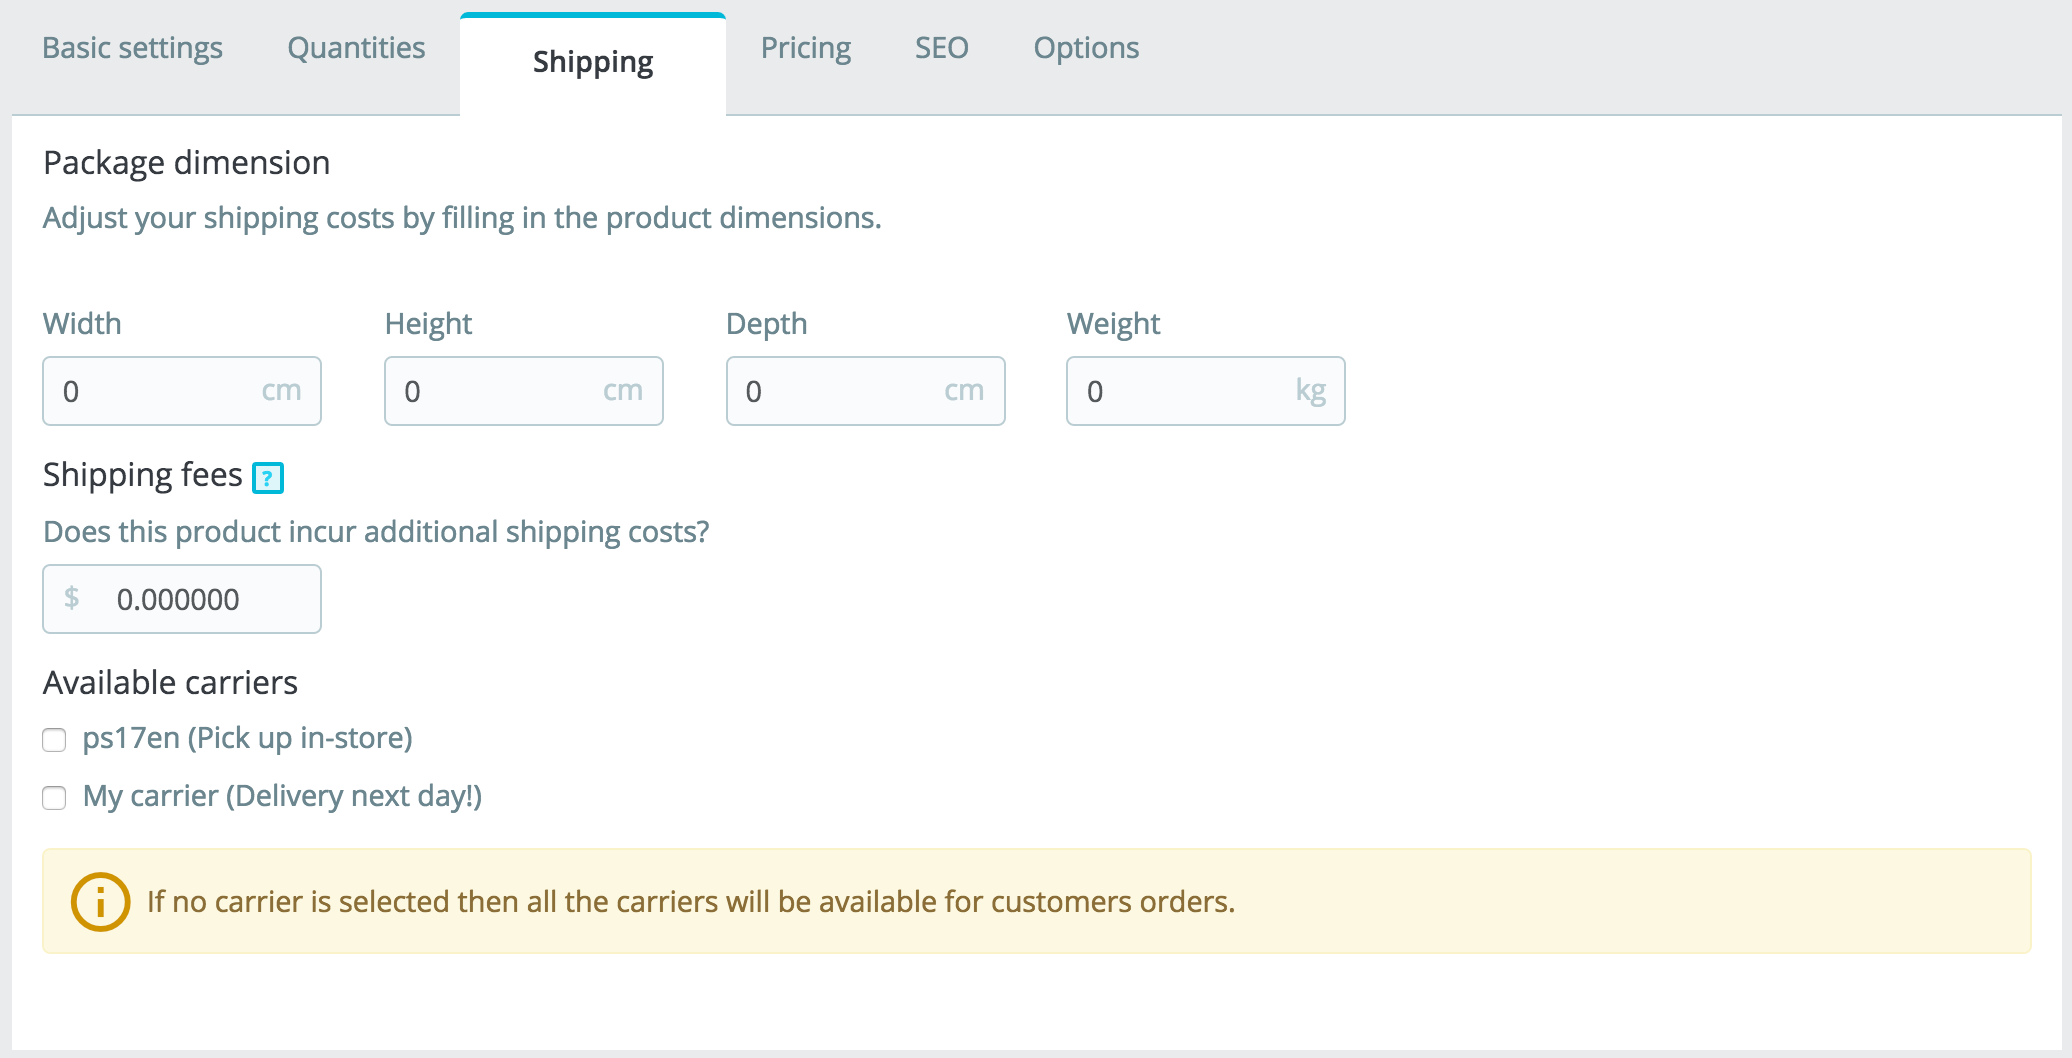
Package dimension (width, height, depth & weight). You should strive to fill each field, because knowing the exact size and weight of a package is not only useful to you, but PrestaShop can also direct specific sizes/weights to specific carriers automatically, based on these settings. The order's final price will appear to the customer once PrestaShop (or the customer) has selected a carrier.
These values use the default weight, volume, distance and dimension units, as set in the "Localization" page of the "Localization" menu.
These values do not have to be integers. If your products weight less than 1 lbs, you can simply use a period (.) to indicate the fractions:
The pricing tab makes it possible to refine your pricing strategy, either by using alternative prices (price per unit), or by creating some price rules specific to the product.
The price of your product before taxes.
themes/default/img/onsale_en.gifYou can fill out the "Price - tax excluded" field and choose the tax rate to apply, and the field will automatically calculate the retail price with taxes. The opposite operation is also available.
Enter the price you paid for the product (how much it cost you to acquire or manufacture the product), it will allow you to compare it to your selling price in order to easily calculate your profit.
The cost price should be lower than your retail price.
You can change the total price of the product depending on the quantity of products your customer buys, the user group, the country, etc. This is done with the "Specific prices" section of the "Pricing" tab. Click on the "Add a specific price" button to reveal the creation form:
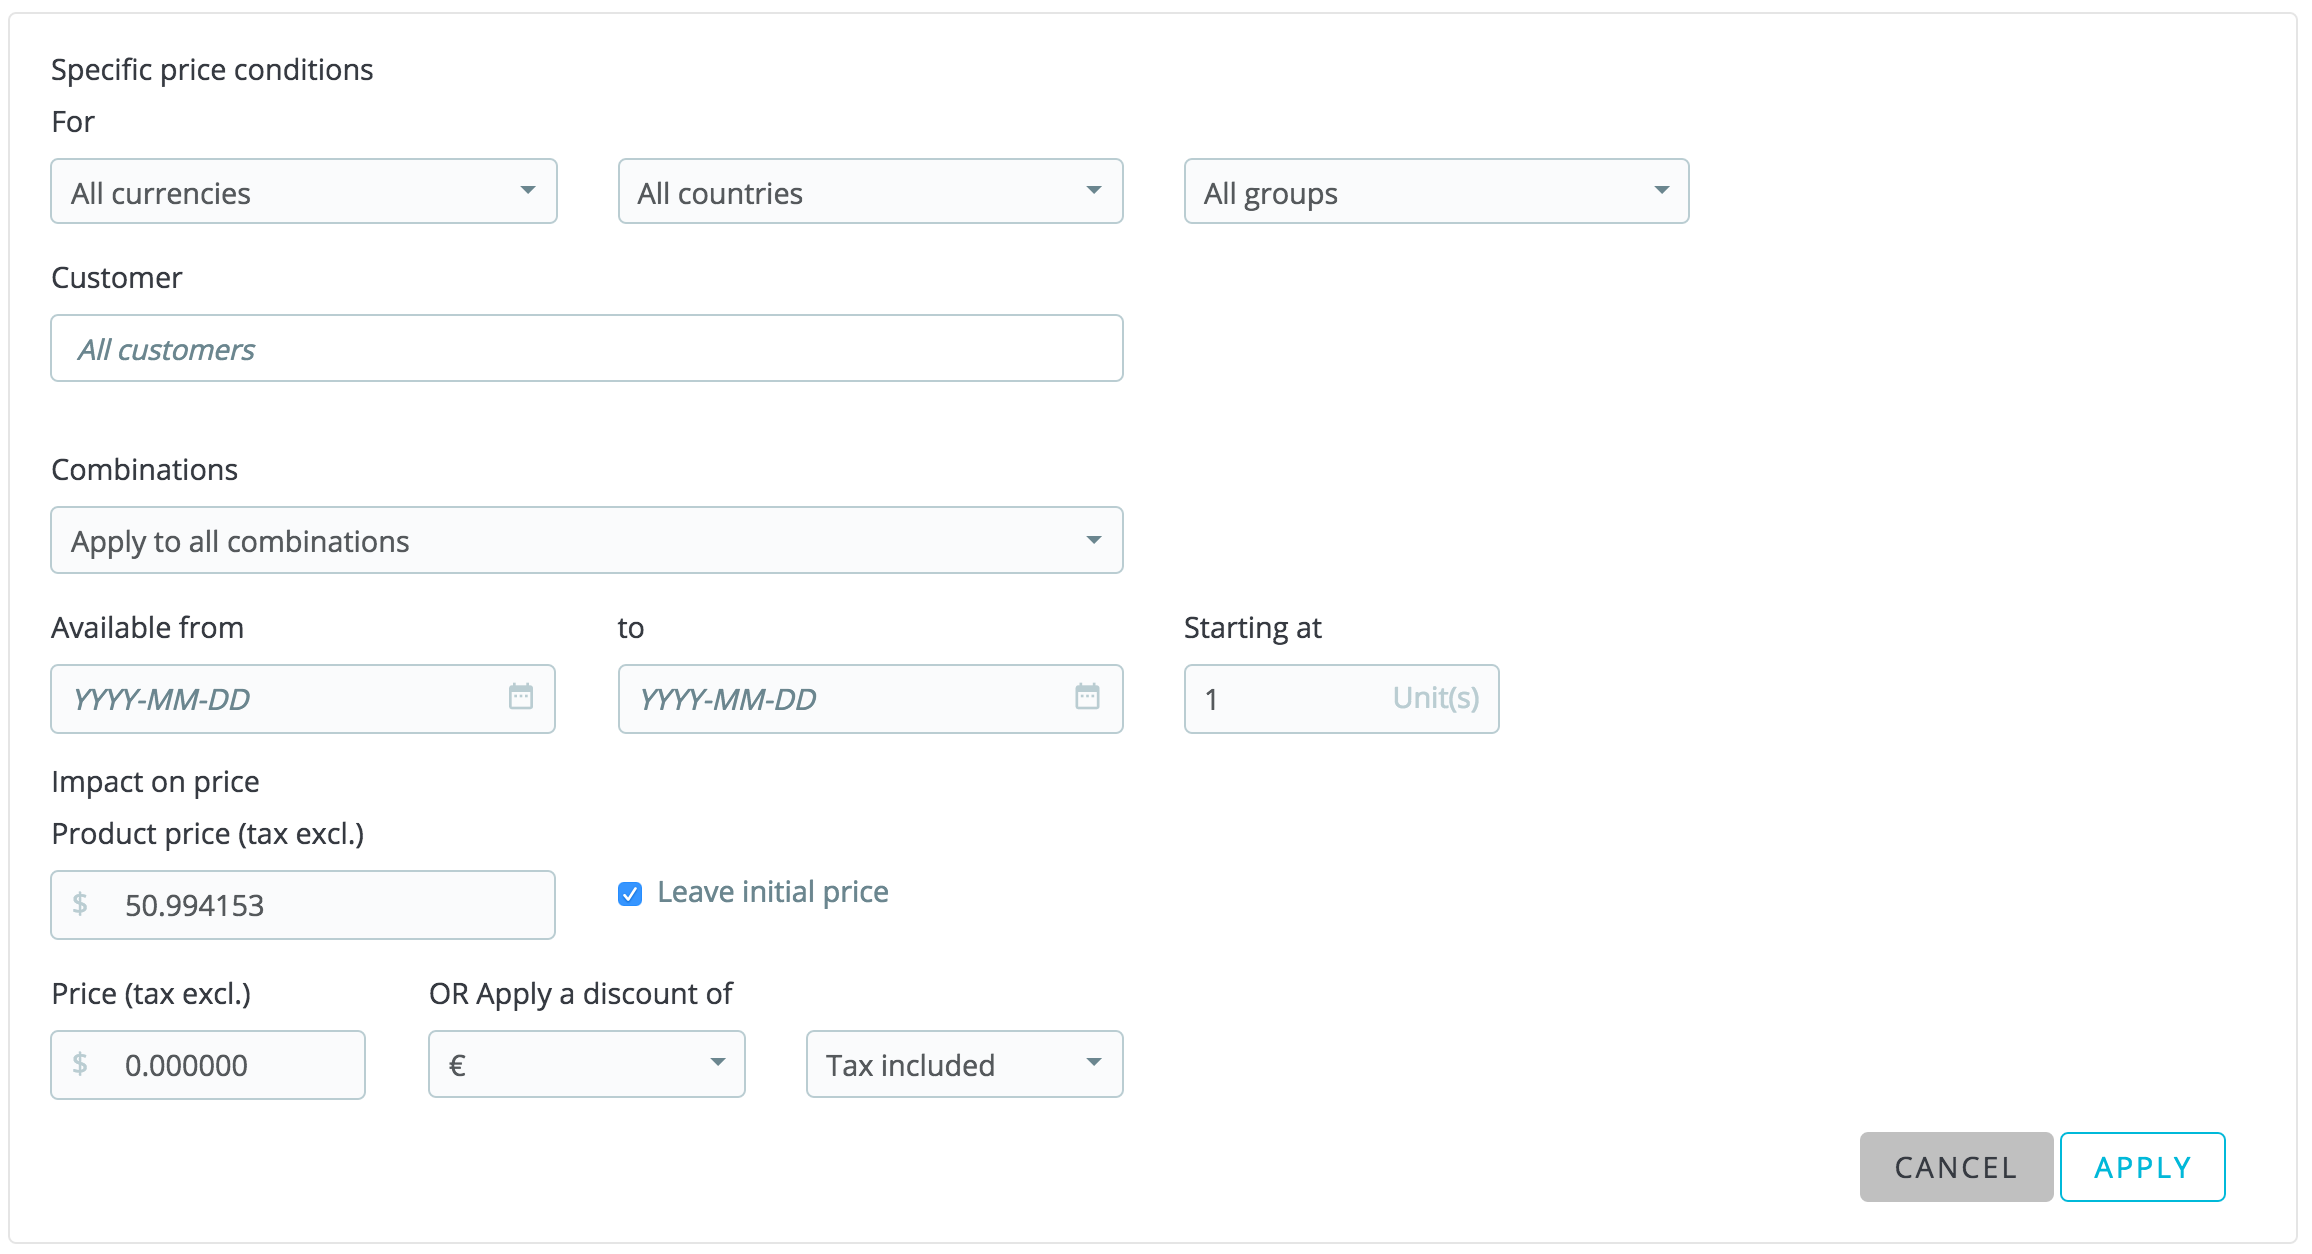
This is a very easy way to create a discount price for this product (and all its combinations).
Once you have chosen your values, click on "Apply": the summary of your discount settings appears below. The discount will be immediately visible on the store.
If you wish to delete a value, click on the trashcan icon in the table.
If you want to build more complex discounts, go read about the "Discounts" menu in the "Managing Discounts" chapter of this guide.
A customer might fit into multiple prices or discount rules, even when you have set detailed prices and quantity discounts, with custom groups and shops (if in a multistore context). PrestaShop therefore uses a set of priorities in order to apply a single price rule to such customers. You might want the user group to be more important than the currency, for instance.
You can change PrestaShop default settings using the "Priority Management" section.

The default order of importance is:
A checkbox at the bottom enables you to update the settings for all products. If the checkbox remains unchecked, then your changes only apply to the current product.
To improve your product listing as well as increase your store's visibility we suggest that you carefully fill out the various SEO fields: meta titles, meta descriptions, and keywords and friendly URLs.
"SEO" itself stands for "Search Engine Optimization. Read more on Wikipedia: http://en.wikipedia.org/wiki/Search_engine_optimization Get to know the best SEO practices for e-commerce! Download and read PrestaShop's free "Complete Guide to SEO": http://www.prestashop.com/en/white-paper-seo |
To access the product's SEO information, go to the "SEO" tab.
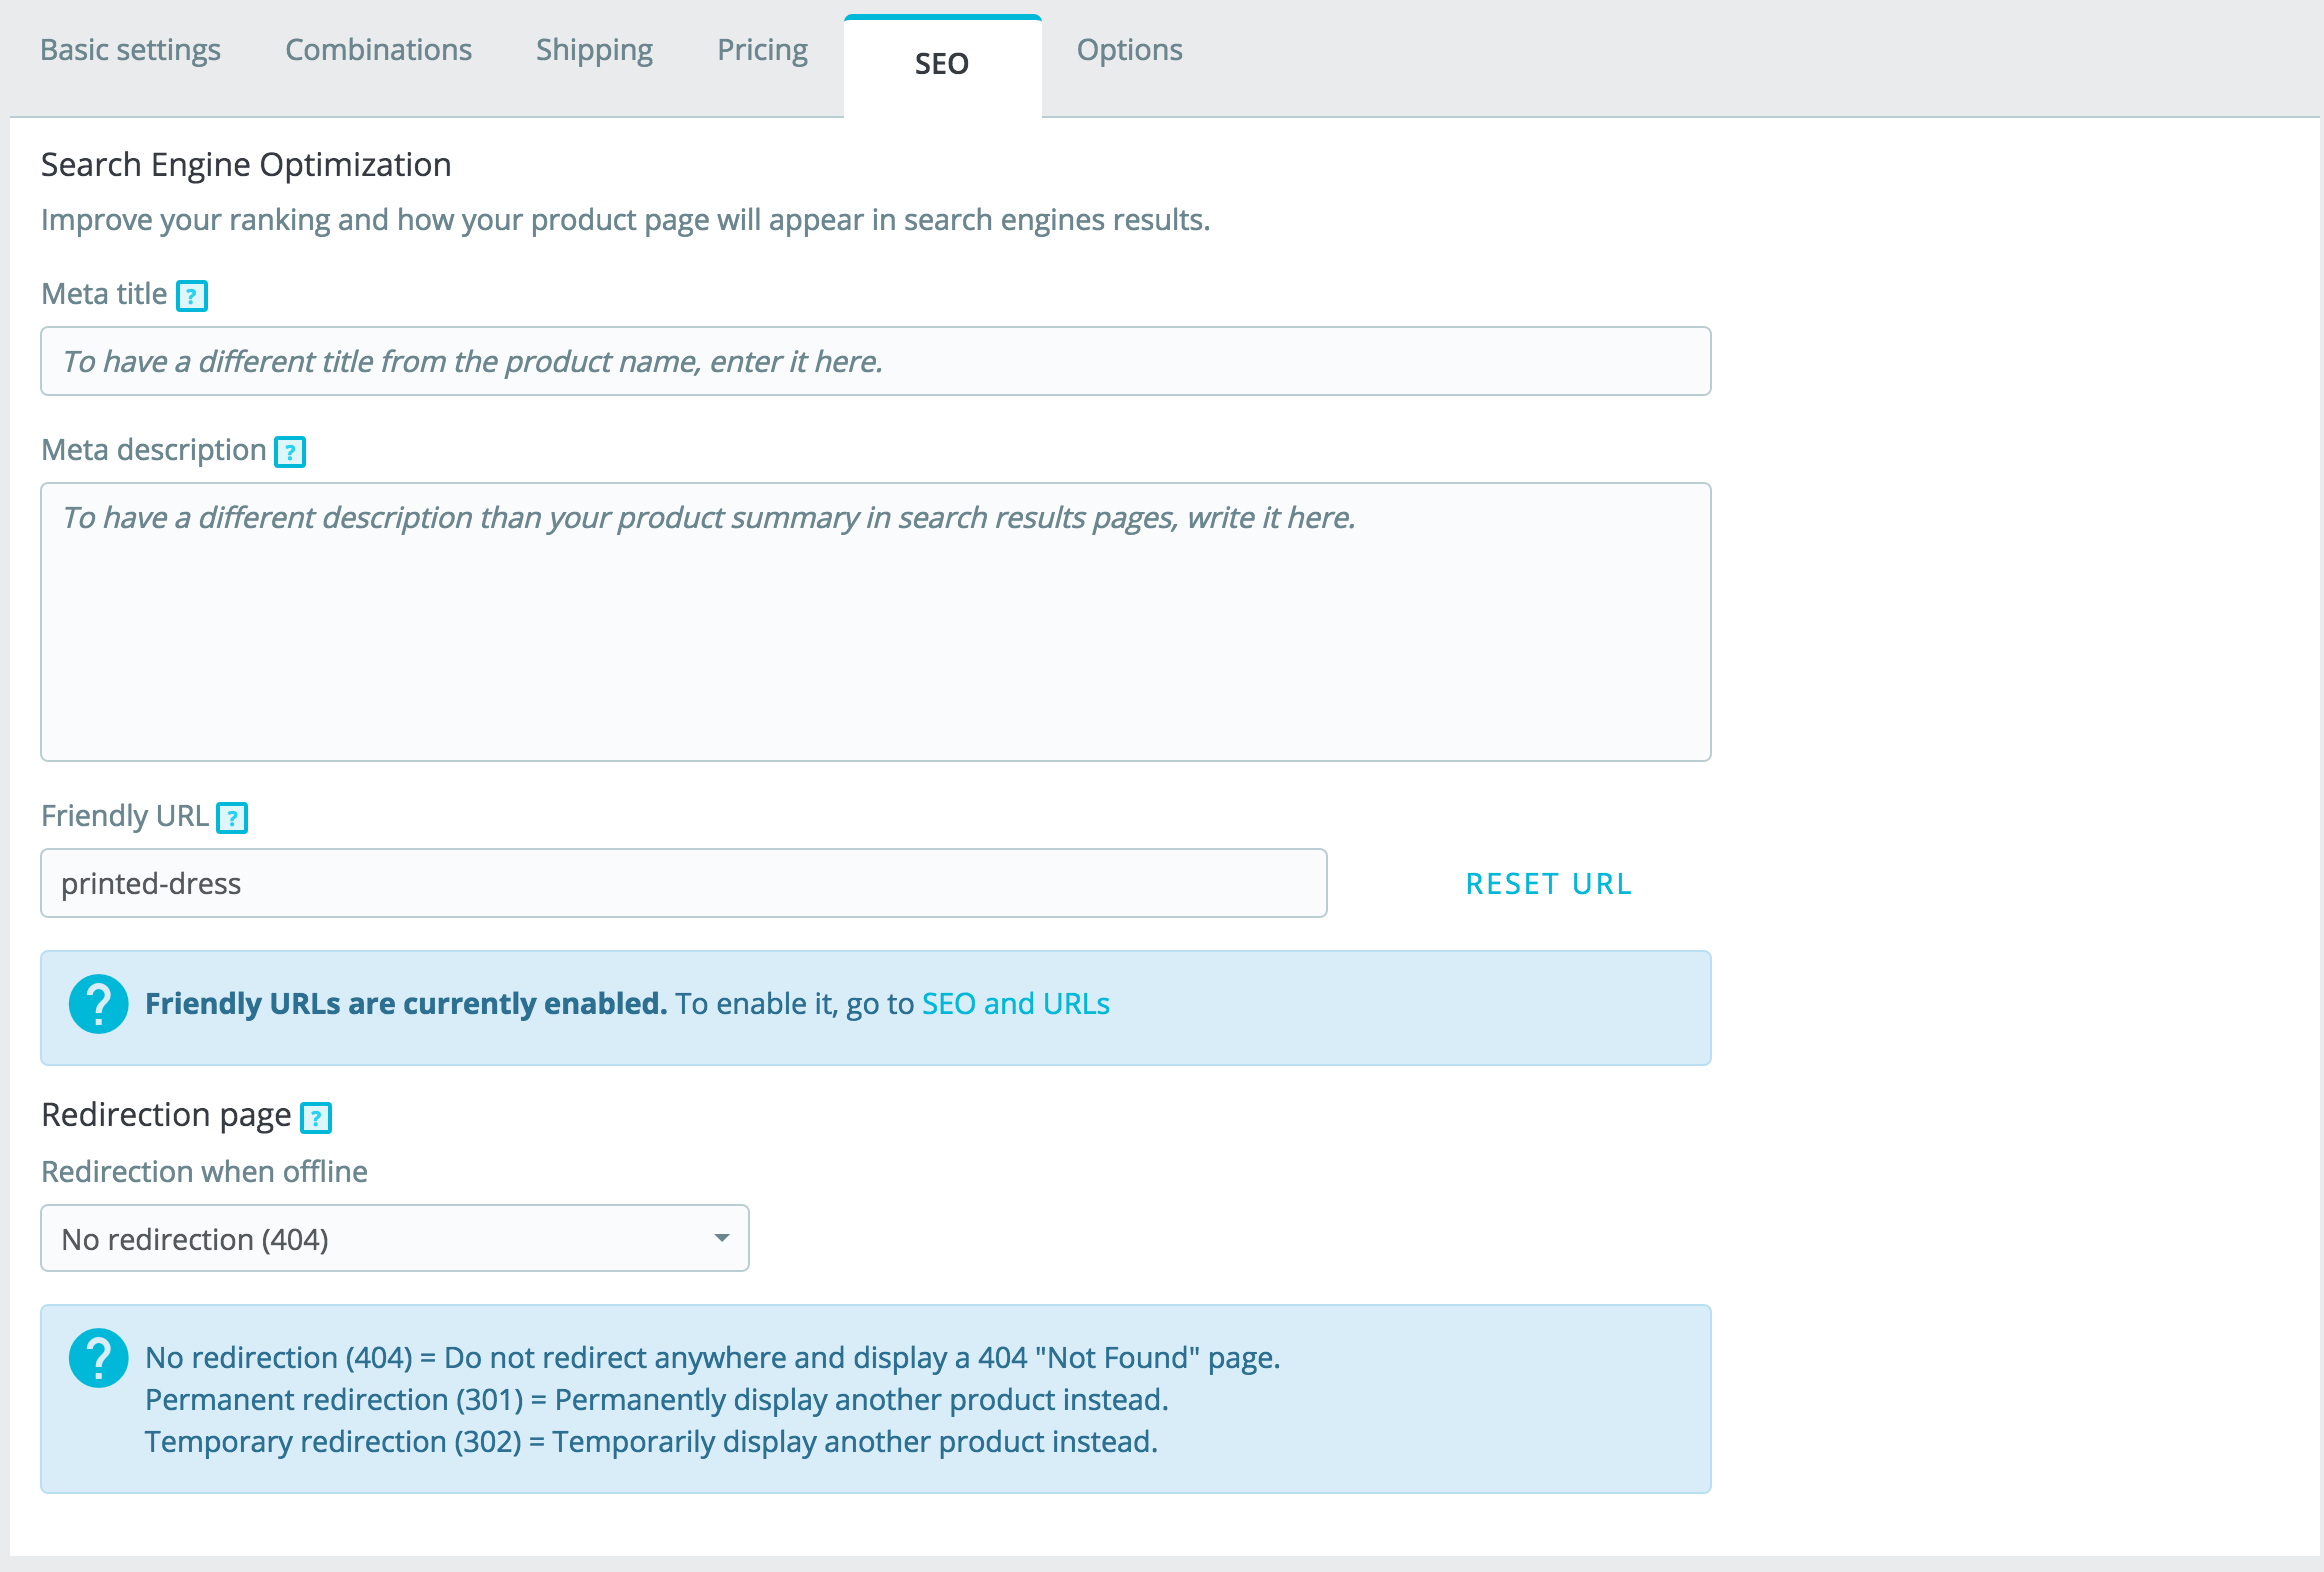
The fields in this page enable you to directly optimize your catalog's visibility on search engines.
Friendly URLs will only work if URL rewriting is enabled. You can do this in "SEO & URLs" preference page (in the "Traffic" menu), in its "Set up URLs" section. You will find more information on the "SEO & URLs" preference page in the "Traffic" chapter of this guide. |
When your product is offline, its product page will no longer available on your shop. You have to decide what you want to show to your visitors instead:
The "Options" tab provides additional settings to manage product references, suppliers, product customization, visibility and files.
You can choose to have the product available through different channels:
Options. A couple of specific options.
Tags are terms and keywords that will help your customers easily find what they are looking for. When they use the search bar to browse your catalog, they will type some specific keywords. Choose the most relevant keywords to your product, to make sure the product shows in results when a visitor search for it.
To add several tags, simply separate them by a comma. For example : "dinner plate, dinnerware, stoneware" for a dinner plate.

All the tags can be seen in the "Search" page, under the "Shop Parameters" menu. You will find more information on tag management in this dedicated chapter.
Products tags are not the same as page keywords: they have no direct impact on search engine placement. |
Condition. Not all shops sell new product and some marketplaces require this information from you. This option enables you to indicate the condition of the product:
New. The product is brand new, sealed in its original packaging.
PrestaShop makes it possible for your customers to customize the product that they will buy.
Example: You are a jewelry retailer and your customers have the possibility to engrave their jewelry with a text or an image. Your customers can submit the text and/or the image when they place their order.
The advantage of this function is that it offers your customers a personal service, which they will without a doubt appreciate!
Let's look at how to configure this function. Click on "Add a customization field" to indicate what type of context (file and/or text) can be personalized. You can put as many fields as you allow your customers to upload.
Example 1: the customer can personalize a book cover, by providing 3 images. You can have 3 customization fields :
| Label | Type |
|---|---|
| Front cover (20.95 x 27.31 cm, color) | Image |
| Back cover (20.95 x 27.31 cm, black and white) | Image |
| Spine (20.95 x 1.716 cm, color) | Image |
Example 2: if customers can engrave words to a product, you could use the following:
| Label | Type |
|---|---|
| First line (24 chars) | Text |
| Second line (24 chars) | Text |
| Last line, signature (16 chars) | Text |
Once all the label fields have been filled, do not forget to save your changes.
Once a product has customizable properties set, its front-end product page has a new blockb, below the description: "Product customization".
The customer must choose the file(s) and/or add some text and save them before they add the product in the cart.
The custom image(s) and text(s) will appear in the final cart.
The rest of the purchase process is the same as usual.
Once the order has been validated by the customer, the merchant gets a notification of the order in the back office.
He can then check on the order, which will indicate the image(s) and the text(s) in the list of products, for each product. The merchant then simply has to download the image(s) (simply by clicking on the image in the order) or copy/paste the text and use that in its customization tool.
The rest of the order and delivery process is the same as usual.
PrestaShop enables you to make some files available to your customers before their purchase.
For example, let's say you sell electronics, and you would like to urge your customers to read a document on how a product works. You can upload a document for that purpose.
You could also simply have the product's PDF manual directly available for download right on the product page. The customer can access it even if they didn't purchase the product.
If you already uploaded some files to be attached, you will see here the list of the files available to be attached to the product. Simply select the file you want to attach to the product.
If you haven't attached any file yet, you can upload a new file directly on this page:
A new tab will appear on the product's page, next to "Product Details", where your customers can download the file(s) that you just uploaded..
If you need to remove an attachment from this product page, you simply have to unselect it in the "Attached files" table.
You can view all of your store's attached files, add some more and remove some, by going to the "Files" page under the "Catalog" menu. This also makes it possible to use the files that you already uploaded for other products: if you need to apply the associated one file with many products, you will thus only have to upload it once.
Indicating the product's supplier is not really important to your customers (very much less so than its brand in any case), but it may turn out to be an essential part of your own internal management, not the least when managing your stock: you simply need to know who you bought the product from. The supplier of the current product is to be set from the "Suppliers" section of the "Options" tab.
You cannot use this feature if you do not already have at least one supplier registered in your shop. Suppliers are created from the "Brands & Suppliers" page, under the "Catalog" menu. The complete supplier registration process is explained in details in a dedicated chapter of this guide. Associating the current product with one or more suppliers is really easy: simply check the box corresponding to the supplier, and save your changes. |
The supplier's section also features a table that enables you to set the precise reference and unit price/currency for each product combination, per supplier. If the product has more than one supplier, the table will display each supplier one after the other.
There are many more product-related options in the "Product settings" page from the "Shop parameters" menu:
You should really check that these global settings are set as you wish. |
To enable product combinations, you must first choose the "Product with combinations" option from the "Basic Settings" tab. You will see the "Quantities" tab change to "Combinations", and this is where you will be able to manage your product combinations.
Combinations cannot be created for pack of product or virtual products: it is only available for standard products.
You cannot create combinations if you do not already have product attributes properly set in PrestaShop. Attributes creation is done in the "Product Attributes" page from the "Catalog" menu, and is explained in details in the chapter of the same name of this guide. |
How your product attributes are combined into combinations is up to you, and PrestaShop gives you two methods to achieve this.
This method helps you create combinations one after the other. Therefore, it is to be reserved to either products with few combinations, or products with very specific combinations that can't be created reliably using the automatic method (see next section).
Adding a new variation to your product takes just a few steps.
For example, if you need to create a combination for a t-shirt, size M and color red, you should enter "size m color red". As you type in, you will see suggestions appearing below the bar, simply select the attributes and values you need.
You can add as many attribute-value pairs as necessary to one combination.
You can only add one pair per attribute to one combination: it is impossible to have both "Color: Blue" and "Color: Red" in your pairs; if this is necessary, you will have to create new attributes, for instance "Primary color" and "Secondary color".
You can delete an attribute-value pair by clicking on the cross in its grey box.
2. When you have all the needed attributes, click on "Generate" on the right.
3. The combination will appear in a table below.
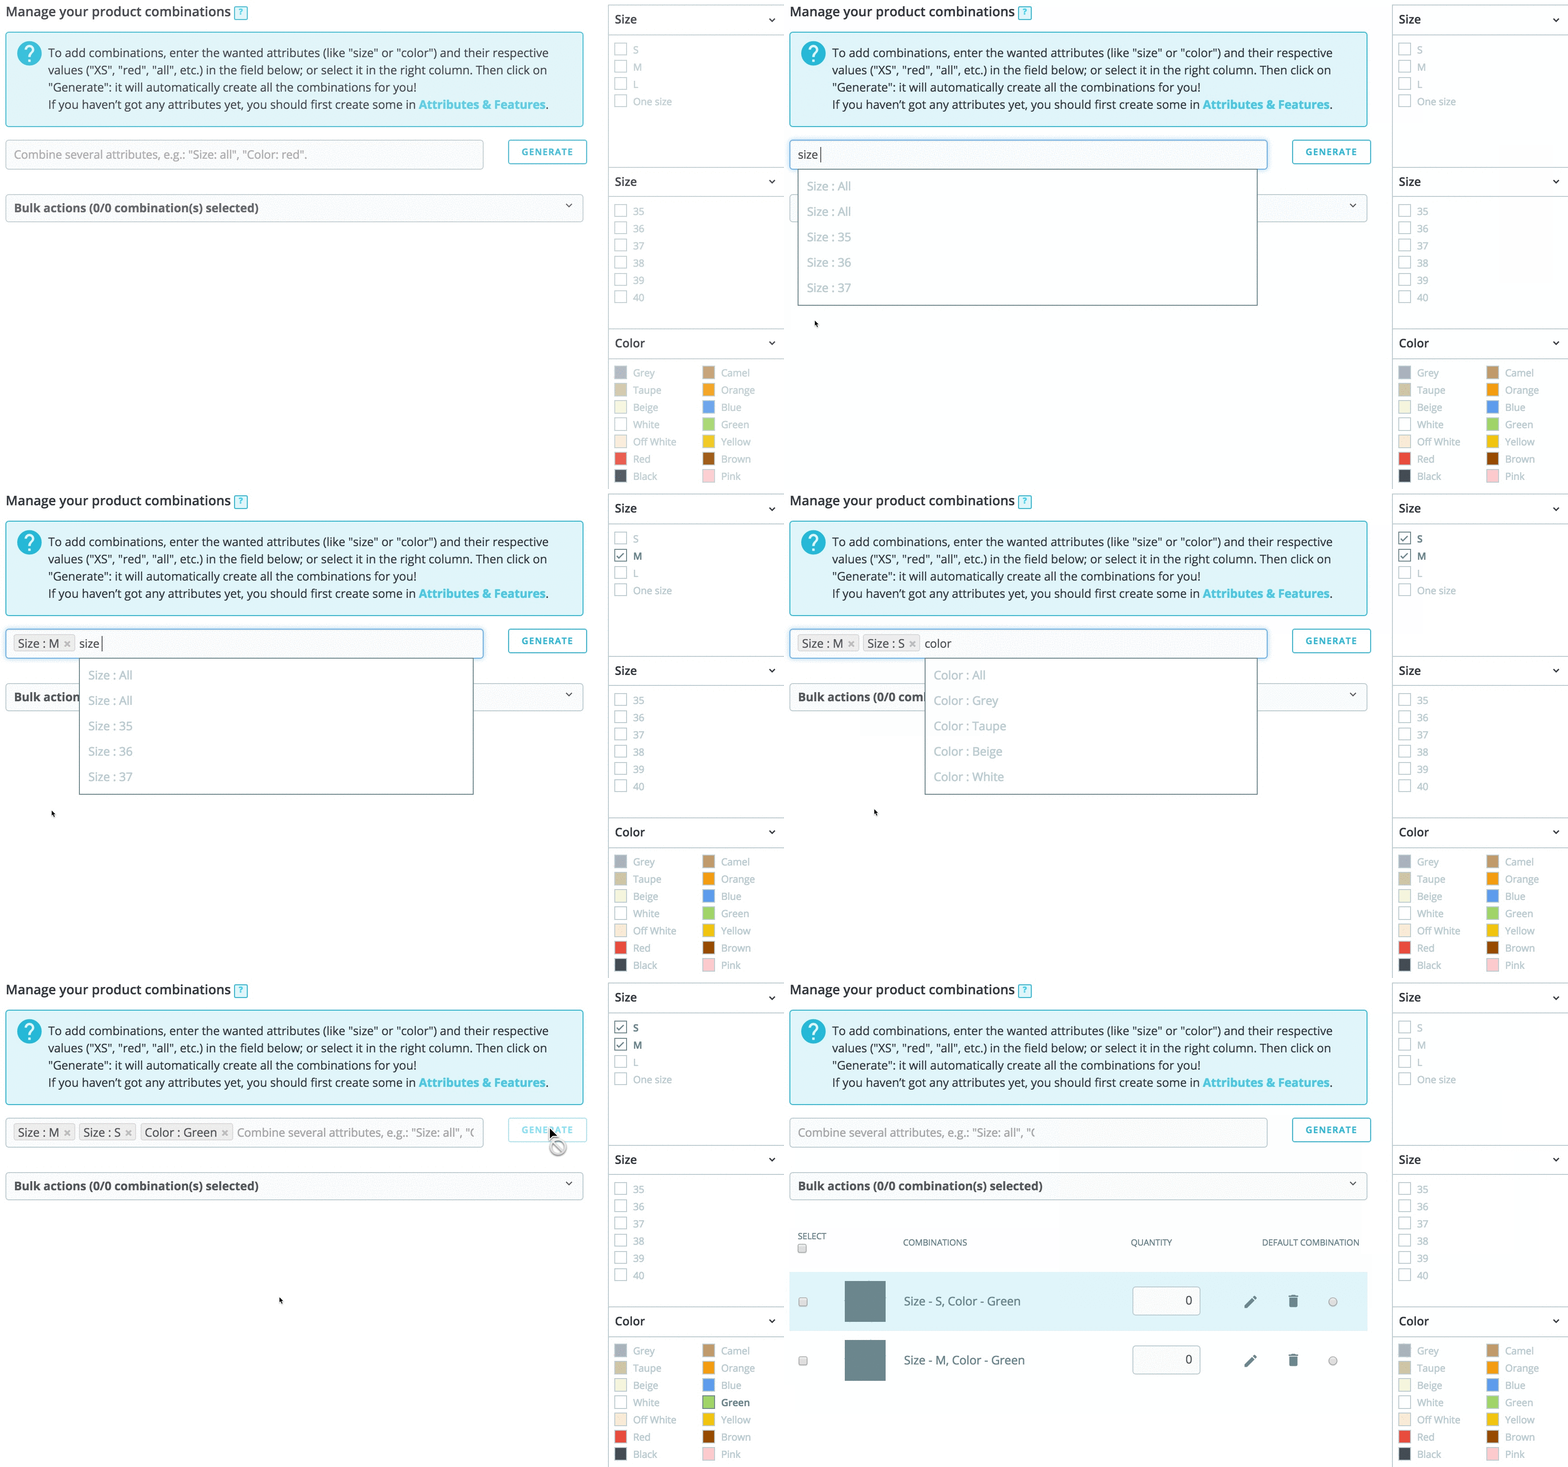
If you have too many different products versions or varieties, you can use the "Product Combinations Generator." This tool allows you to automatically generate all of the combinations and possibilities.
Instead of typing each combination you want, you can use the selector on the right side of the page. It lists all the attributes and their corresponding values.
Here's how you should do:
For a single combination, you can edit its quantity directly in the table, edit it (by clicking on the pencil icon) or delete it (with the trash icon).
When you have several combinations available, you should choose which combinations will be the default combination. It will be the combination your customers see when they arrive on the product sheet. If they want to purchase another combination, they will have to select it themselves (by either changing the color, size or any attribute you may have).
Each combination can be further managed by clicking on the edit icon. It will open a small window when you can change the details for this specific combination.
Once you finished editing a combination, you can either:
You can change the details for all or several combinations at once.
If you want to delete all the combinations you've selected, click on "Delete combinations".
When you have set all of the combination's details, save your product changes using the "Save and stay" button. Your combination will appear in the attributes list at the bottom of the screen.
Your shop may feature (partly or exclusively) virtual products – that is, products that are not shipped, but rather downloaded: entertainment tickets, e-books/PDF files, real-life services...
PrestaShop makes it easy for you to create a virtual product.
The process to do this is similar to the one for creating a simple product:
The page organization will change:
The "Virtual Product" tab only features one option at first: it asks if the virtual product you are creating has a file attached (i.e., if your customer will pay to download something).
When you click "Yes", PrestaShop opens a new form within the tab, from which you can upload the file you intend to sell:
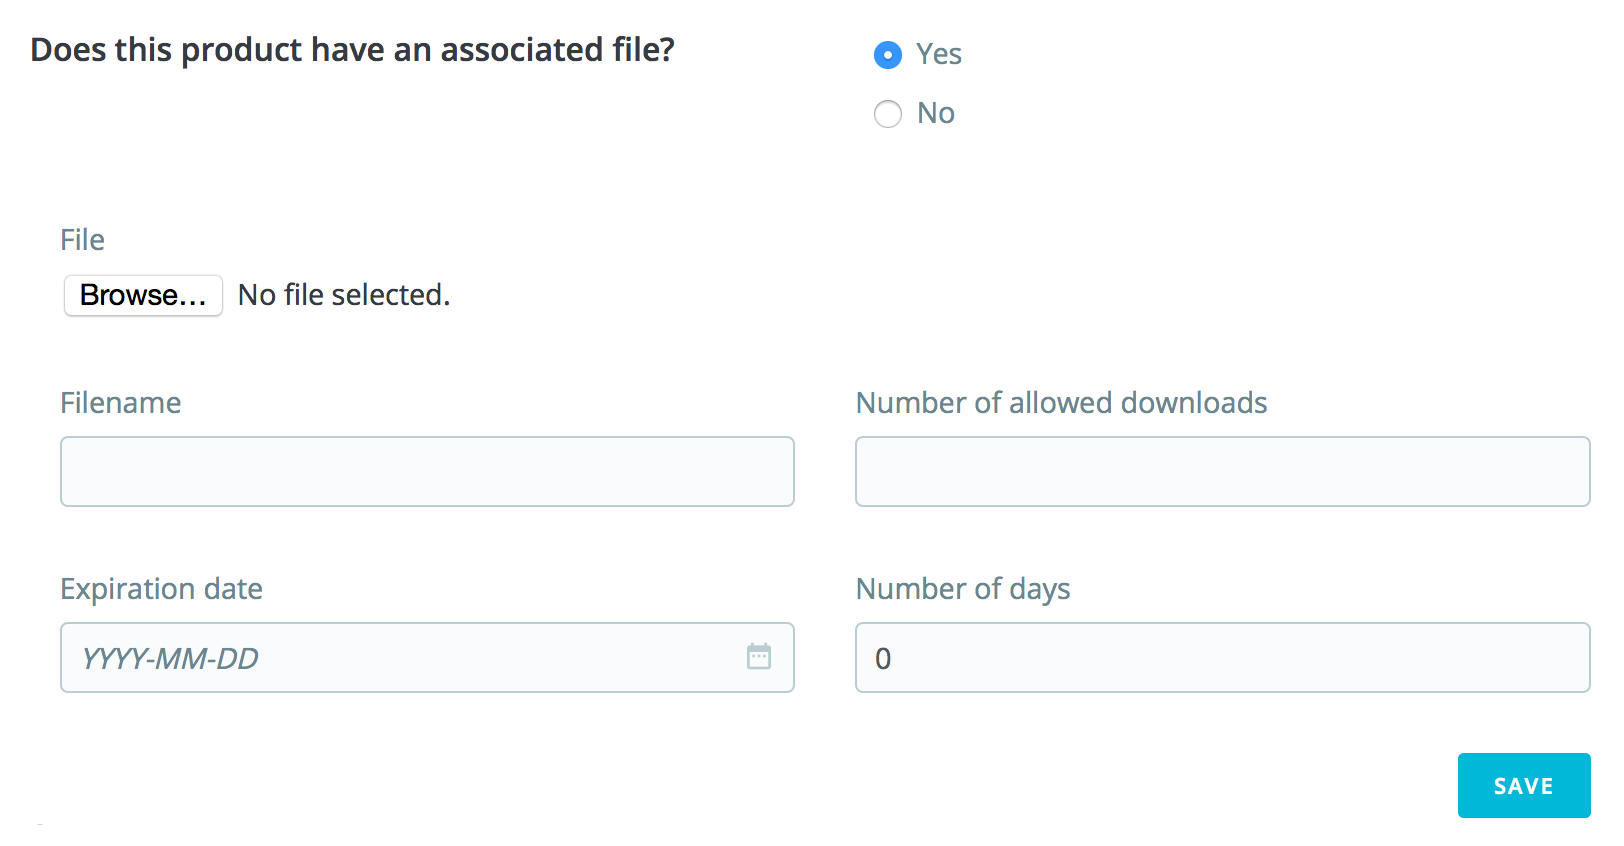
File. Click the "Browse" button to find the file on your hard drive. As soon as you have selected a file, the upload begins.
The maximum file-upload size setting depends on your server's settings, and cannot be increased from PrestaShop. If you have access to your server's
If you do not have access to the |
You should compress your file in zip format, in order to avoid the browser misinterpreting If you are selling a high resolution image, uploading it using this form does not prevent you from uploading its thumbnail in the "Images" tab on the left. |
Once you are done with the "Virtual Product" tab, you can edit all the other available tabs as if you would for a regular product.
You may wish to sell a pack of products made of several items. I.e.: a computer start-up pack composed of the computer itself, a monitor, and a printer. PrestaShop makes it easy for you to create a "pack" product and add other products from your catalog to this pack.
Packs enable you to simplify preparing orders. They also allow customers to take advantage of special prices and offers.
You cannot currently add combinations or virtual products to a pack. |
You cannot add an existing pack within a new pack, or import the content of an existing pack into a new pack. |
The process to create a pack is similar to the one for creating a regular product:
This will change two things:
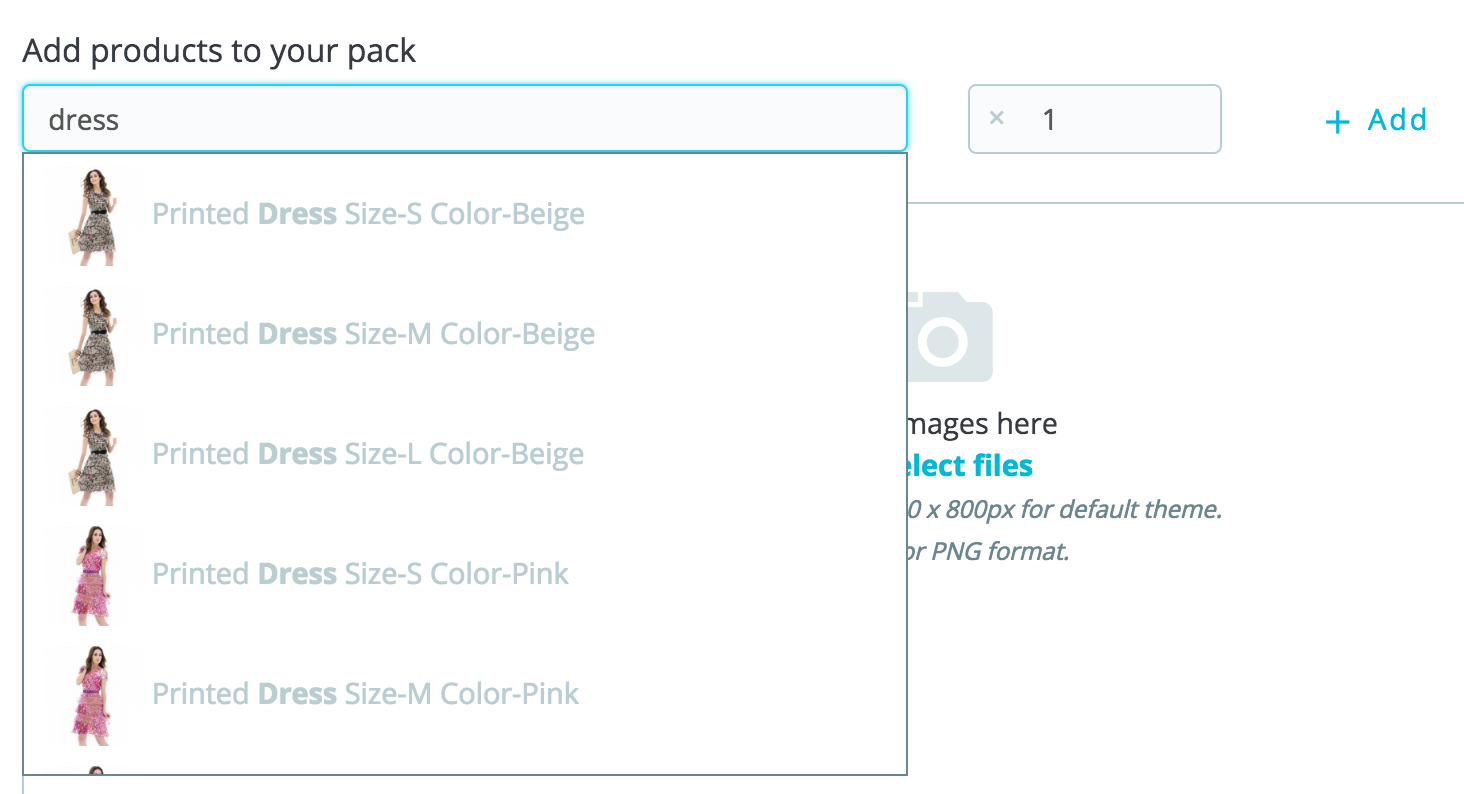
You can add as many products as you would like to the pack.
You can remove a product from the pack simply by clicking the trashcan icon when you hover on it.
When you are creating a pack of products, PrestaShop needs to know how to handle the stock. In the "Quantities" tab, under "Pack quantities", you must choose one of the following options:
Once you are done with the "Pack" tab, you can edit the content of all the other available tabs as if you would for a regular product.
Watch our short video with 12 tips on how to create a great product page:
|