Table of content
PrestaShop introduced automatic upgrade in version 1.4.4 and 1.4.4.1, which was then turned into a free module for earlier versions (starting with PS 1.3) and later versions (including 1.5.x).
It enables shop owners to backup and update their site in a few clicks and no technical knowledge.
You should never update your online shop right away. The automatic upgrade tool can fail in some situations, and you might not be able to revert to the previous version. The safest way is to have an exact copy of your shop available, either on your local computer or in another folder of your web server. It should contain all your products, categories, themes, modules, translations, settings, etc. Make a trial upgrade on that copy of your shop. Once the upgrade is done, browse your front- and back-office thoroughly to make sure that everything is as expected. If not, then the upgrade tool has an issue with your configuration, and you should use the manual upgrade method, which is now deprecated and takes longer, but which may help in your situation. |
Make sure you are using the latest version of the 1-Click upgrade module:
|
Simply follow the normal path to installing a module on PrestaShop:
Click on the "Add a module" button, located at the top right of the list of available modules.
If updating from version 1.4, click on the "Add a module from my computer" link, located at the top left. |
/modules folder.The module is now available in your list of modules, but you still have to install it:
The module is now ready to configure and use.
The module's configuration screen is available from the "Modules" list, by clicking on the module's "Configure" link.
The configuration screen is also available from:
|
The configuration screen presents you with a series of sections, providing information, tools and settings.
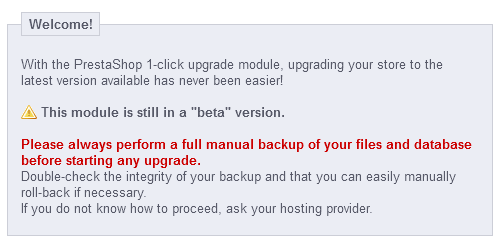
This small section serves as a reminder that an upgrade is never 100% safe, and therefore that you should make sure you have made a complete backup of your files and data. This way, should the upgrade fail, you will be able to return to the initial state of your shop – albeit with a bit of work putting your files and data back into place.
This process is explained in details in the "Making and restoring your own backup" chapter of this guide: http://doc.prestashop.com/display/PS15/Making+and+restoring+your+own+backup.

Note that the 1-Click Upgrade module performs its own set of backup in order to allow for reverting of the whole upgrade. Nevertheless, you should rely on your own backups.
The "The pre-Upgrade checklist" section gives you useful information on your current PrestaShop installation, and how it might interact with the automatic upgrade.

You must make sure that all the checks are validated before you can launch the upgrade.
All these indicators must be green for the upgrade to work. Otherwise, the upgrade button will not appear.
When your store is hosted on your local server ( |
This section compares your version of PrestaShop with the latest stable one. You can quickly see whether you need to update or not. If you know that there is a newer version available than the one presented, you can trigger a version check by clicking the "Check if new version available" button.

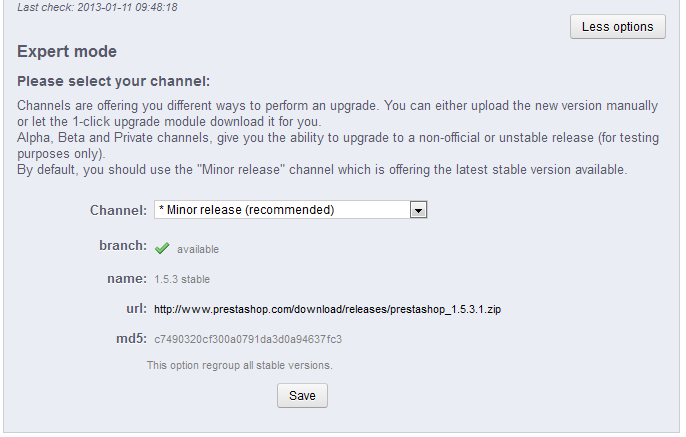
By default, the update tool is set to update your store to the next minor version. This means that if you use a version from the 1.4.x branch, it will not suggest the latest 1.5.x version, but rather the latest 1.4.x version. Therefore, if you want to update from a 1.4.x version to the latest 1.5.x version, you must click on the "More options (Expert mode)" button. This will open a new section, named "More options (expert mode)", where you can choose the distribution channel to which you want to update.
This is also very useful if you want to check for a version other than a stable one (for instance, beta, RC or any other unstable version).
Before launching the upgrade, you must make sure that you understand its settings. The "Backup options" and "Upgrade options" sections are available at the bottom of the page (and are described later in this chapter). Make sure you understand them all.
This section enables you to pinpoint exactly to which version you want to upgrade your current PrestaShop installation.

The options are:
/admin/autoupgrade/download. Once you have selected archive in the drop-down selector, indicate the version number in the text field (be very exact!)./admin/autoupgrade/latest/prestashop folder. That /prestashop folder must come directly from the archive that you downloaded.For the curious, the numbered differences between your current version and the latest version in the chosen channel.

In case you have make changes directly to the core files instead of using the overriding possibilities of PrestaShop, these lists can help you know if your changes are safe or not.
Nevertheless, you can improve the lifespan of your custom code by turning it into overriding files. See the developer documentation for more information.
This section only appears when at least one upgrade has been performed.
See below for more information.
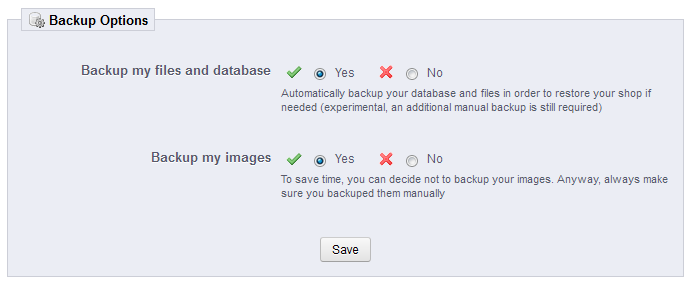
These options enable you to have some control on the backup process:

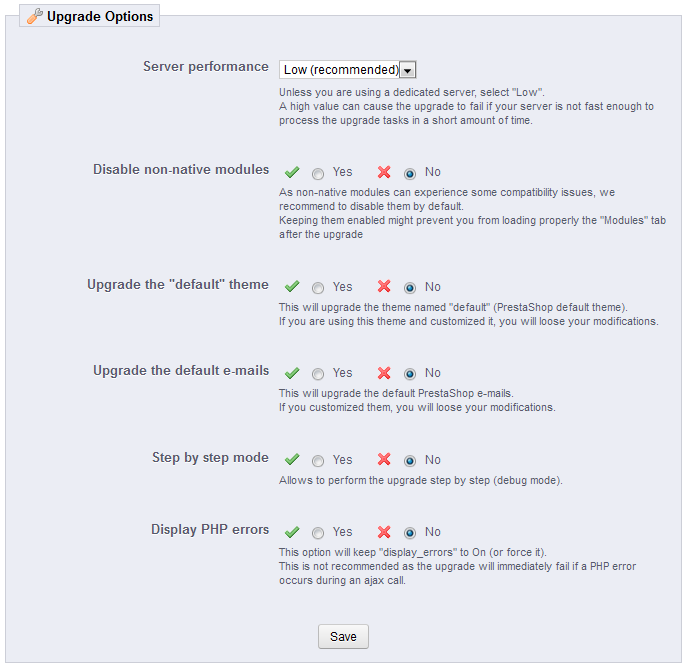
These options enable you to have some control on the upgrade process:

Once all the indicators in the "pre-Upgrade checklist" section are green, the update button appears in the "Start your Upgrade" section, along with the URL from which the new version will be downloaded.
Clicking the "Upgrade PrestaShop now !" button triggers the whole process.
Once the upgrade process is launched, the whole configuration page is replaced by two sections: "Activity Log" and "Rollback".
The activity log gives you a detailed journal of what the updater is doing, in a screen you can scroll through:
auto-backupfiles_V1.5.2_20130127-120310-798d3a69.zip form.A lot of files are mentioned during the whole process. You do not need to read all the notifications, it's only there for you to peruse in case of error.
You'll know the upgrade is over when the following message "upgrade complete. Please check your front-office theme is functional (try to make an order, check theme)" appears in green, along with the following final log entry: "End of process".
The upgrader also indicates that you should re-enable your shop, but before you do that, you should first check that everything is working in your back-office: no errors, all products and categories are in place with their images and attached files, etc. Until you have checked that everything is okay in your shop, it is better to keep it from the public eye.
On first load, pages might look wonky: because your web browser caches files, it is probably using the old CSS files instead of the new ones. Do not hesitate to reload the page several times, or even empty your browser's cache, in order to get the correct interface. |
When you upgrade from version 1.4 to version 1.5, your menus will not be arranged the way they would be if you made a fresh installation of version 1.5. That is because PrestaShop 1.4 tabs got reorganized into 1.5 menus, and a lot of pages were moved around in order to create consistent menus. Additionally, the upgrader assumes that your 1.4 tabs may have been customized or moved around, either by a module or by your own action. Therefore, rather than breaking the existing settings, the upgrader takes the tabs as-is, and does not re-arrange them into the default 1.5 menu order. If you want to change the position of pages within a menu once you have updated to version 1.5, go the to "Menus" page under the "Administration" menu, and start fiddling with positions. |
Once you have made sure your PrestaShop installation is up and running, you can re-enable your shop using the option in the "Maintenance" page of the "Preferences" menu, then make tests on your front-office: browse products, sort them, try to order one, etc. In short, go through the entire buying process in order to make sure that you won't miss a sale.
Is everything working fine? Congratulations, you know have successfully upgraded your PrestaShop installation!
In some server configurations, an error message might be displayed, saying "Javascript error (parseJSON) detected for action "upgradeNow". Starting restoration...". Follow these steps to solve the error, :
After you have done all this, start the autoupgrade process again. |
Sadly, not all upgrades are successful – which is the very reason why you should always back-up all your files and data, and why PrestaShop performs an additional backup of said files and data by itself, which you should not always count on. Make your own backup first. See the "Making and restoring your own backup" chapter of this guide for more information.
PrestaShop's own backup files are saved on your server, and if it turns out your update has gone badly, you can find them in the "Rollback" section of the configuration page for the 1-Click Upgrade module.
Backup files are created as soon as the upgrade process is started, and are available immediately in the "Choose your backup" drop-down list.
Choose the most recent one. The date and hour of the creation of the backup file are right within the name: Vversion-date-hour-random, for instance "V1.4.9.0_20120907-114024-f85f41a" for a backup of a previous PrestaShop 1.4.9 installation, made September 7th 2012, at 11:40:24 AM.
The "Rollback" button triggers two actions:
Select the backup archive to which you want to roll back to, and click the "Rollback" button. As with the upgrade process, the whole interface disappears to only leave the "Activity Log" section and the "Rollback" section. You can follow the rollback process in the scrolling journal, and once it is finished, reload the page in order to check that everything is indeed back in place.
This is explained in details in the "Making and restoring your own backup" of this guide: http://doc.prestashop.com/display/PS15/Making+and+restoring+your+own+backup.