Tabla de contenidos

Administrar el Back-Office
El menú "Administración" contiene un conjunto de páginas de preferencias con parámetros específicos: estas a diferencia de las vistas anteriormente, les presenta opciones que afectan al funcionamiento interno de su tienda , e incluso a su propio negocio. En efecto, estas páginas le permiten establecer cómo debe funcionar el software PrestaShop, y cómo usted y su equipo deben utilizarlo.
Preferencias
La página de administración "Preferencias" contiene opciones generales y ajustes concernientes a la manera en cómo PrestaShop trabaja. Esta tiene cuatro secciones:
General
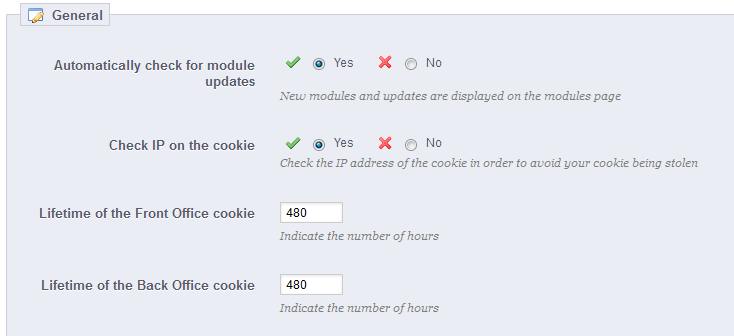
Esta sección presenta los ajustes más generales:
- Comprobar automáticamente las actualizaciones de los módulos. Novedad en Prestashop 1.5. Puede pedirle a PrestaShop que compruebe regularmente si hay nuevas versiones de los módulos disponibles en el sitio web de Prestashop Addons. Si así fuera, la página "Módulos" mostraría un botón "¡Actualizalo!".
- Comprobar IP en la cookie. Esta es una medida de seguridad adicional: puede pedirle a PrestaShop que compruebe si el usuario viene de la IP almacenada en la cookie de su navegador.
- Tiempo de vida de la cookie de Front Office. Por defecto, la longevidad de una cookie PrestaShop es de 480 horas (20 días). Puede reducir esta longevidad si piensa que la seguridad de su tienda depende de ello.
- Tiempo de vida de la cookie de Back Office. Por defecto, la longevidad de una cookie PrestaShop es de 480 horas (20 días). Puede reducir esta longevidad si piensa que la seguridad de su tienda depende de ello.
Cuota de subida
Esta página le permite definir el tamaño máximo de los archivos que puede subir su propio equipo - este límite no es el de sus clientes, por lo tanto no afecta a ellos.
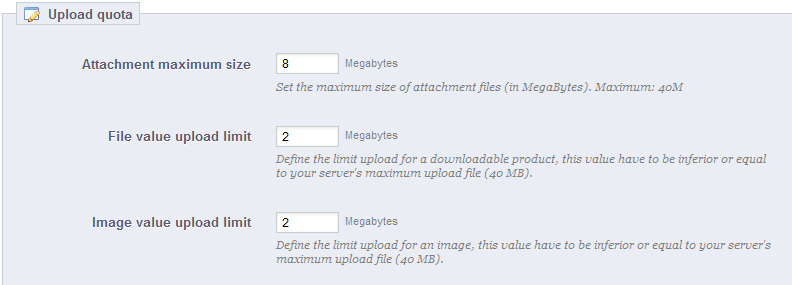
Se le presentan tres opciones, la primera más general y las dos siguientes más específicas:
- Tamaño máximo de los archivos adjuntos. El valor predeterminado se toma directamente de la configuración de su servidor, pero se puede bajar si es necesario.
- Limite de subida de archivo. Si vende productos virtuales (servicios, reservas y productos descargables), esta opción le permite limitar el tamaño de los archivos que su equipo puede subir – y en consecuencia, el tamaño del producto. Planifique bien su uso, con el fin de no entorpecer el trabajo a algún miembro de su equipo que necesite subir un archivo de mayor peso.
- Limite de subida de imagen. Del mismo modo que en la opción anterior, puede limitar el tamaño de las imágenes que usted o su equipo suban a su tienda. Esta opción puede servir como recordatorio a los miembros del equipo para que reduzcan el tamaño de las imágenes, ya que a menudo no es útil cargar imágenes con un tamaño superior a 600x600 (los que suponen aproximadamente 200 kb cuando están debidamente comprimidas). Diríjase a la página de preferencias "Imágenes" para establecer los diversos tamaños imágenes que su tienda debe utilizar. Esto tiene el beneficio añadido de ahorrar espacio y ancho de banda en el servidor, así como de evitar sobrecargas al procesador (ya que PrestaShop redimensiona las imágenes cargadas, creando la miniaturas, u otros formatos especificados).
Ayuda
Para ayudarle con su uso diario de PrestaShop, el equipo de desarrollo ha añadido algunos trucos y consejos dentro de la interfaz.

You can have them displayed using one of these two options:
- Cajas de ayuda del BackOffice. Esta opción mostrará cajas de color amarillo con información de ayuda, en las secciones más complejas.
- Ocultar los consejos de optimización. Esta opción mostrará una sección con sugerencias de configuración en la página principal del back-office .
Notificaciones
Las notificaciones son globos de ayuda emergente de color rojo con un número en su interior, que se presentan en la parte superior de cualquier página de la administración, justo al lado del nombre de la tienda . Estas muestran el número de nuevos elementos desde la última vez que hizo clic.

Puede optar por no recibir ciertos tipos de contenido:
- Mostrar las notificaciones para los nuevos pedidos. Al hacer clic en esta notificación, la interfaz mostrará el número de pedidos recientes, su importe total y los nombres de los clientes. Desde aquí, puede abrir una sóla página de cualquiera de los nuevos pedidos, o abrir la página "Pedidos" para obtener el listado completo.
- Mostrar notificaciones para los nuevos clientes. Al hacer clic en esta notificación, la interfaz mostrará los nombres de los usuarios registrados desde su última verificación . Desde aquí, puede abrir una sola página de cualquiera de los nuevos clientes, o abrir la página "Clientes" para obtener el listado completo.
- Mostrar las notificaciones para nuevos mensajes. Al hacer clic en esta notificación, la interfaz mostrará la dirección de correo electrónico de las últimas personas que le enviaron un mensaje utilizando el formulario de contacto de su tienda. Desde aquí, puede cualquiera de estos nuevos mensajes, o abrir la página "Servicio al cliente" para obtener el listado completo.
Acceso rápido
PrestaShop ofrece accesos rápidos y directos a las páginas más importantes, a los que puede acceder desde el menú "Acceso rápido", situado en la parte superior derecha de cada página del panel de administración (justo al lado del nombre de usuario).
La página de administración "Acceso rápido" le permite crear accesos directos personalizados, para facilitar la navegación a las zonas de administración más relevantes y utilizadas por usted y su equipo.

La página muestra todos los accesos directos que han sido creados. Por defecto, estos son:
- Inicio. Le lleva a la página de inicio de su back-office.
- Mi tienda. Le lleva a la página de inicio de su tienda. Este acceso directo es equivalente a hacer clic en el botón "Ver Mi Tienda" ubicado en la parte superior derecha del back-office.
- Nueva categoría. Este acceso rápido le lleva directamente al formulario de creación de categorías.
- Nuevo producto. Este acceso rápido le lleva directamente a la página de creación de productos.
- Nuevo cupón. Este acceso rápido le lleva directamente a la página de creación cupones/reglas de compra.
Las páginas que se abren en una nueva pestaña/ventana tienen una marca de verificación de color verde en la columna "Nueva ventana".
Puede crear tantos accesos directos como necesite – pero asegúrese de no establecer demasiados, ya que hará que el menú de "Acceso rápido" sea demasiado largo, y su nombre carecería de todo sentido si hace complicada la navegación a través de él.
Añadir un nuevo enlace
Vamos a crear un acceso directo de la página de creación de pedidos, desde la cual puede crear un nuevo pedido, e incluso añadir nuevos clientes y sus direcciones sobre la marcha.

Como es habitual, tendrá que hacer clic en el botón "Añadir Nuevo" para abrir el formulario de creación:
- Nombre. Dé el acceso directo un nombre único. Este debe ser corto y descriptivo.
- URL. Indique la dirección de la página. He aquí cómo usted puede establecer incluso páginas con vínculos complejos como enlaces rápidos:
- Mientras mantiene la página de creación de enlaces abierta, diríjase a la página "Pedidos" bajo el menú "Pedidos" abriendola en una nueva pestaña del navegador .
- Copie la dirección web desde la barra de direcciones del navegador. Por ejemplo, http://www.myprestashop.com/admin/index.php?controller=AdminOrders&token=f326b0419984706791c03f7e96599147.

- Borre completamente la parte
&token=xxx y mantenga las partes importantes (así que no mantenga el nombre del dominio ni la carpeta de administración). En nuestro caso: index.php?controller=AdminOrders. - Pegue el resulstado en el campo "URL" del formulario de creación.
- Abrir en una nueva ventana. Indique si desea que esta pestaña se abra en una nueva ventana o no. En general, los enlaces correspondientes al back-office deben mantenerse dentro de la misma pestaña/ventana, y los enlaces que le dirijan fuera del back-office(front-office, u otros sitios) deben abrirse en una nueva ventana/pestaña.
Tenga en cuenta que a pesar de todo, puede crear vínculos a otros sitios , por ejemplo, a su cuenta de PayPal o a su webmail. Simplemente pegue la dirección del sitio web en el campo "URL", incluyendo el prefijo http://.
Empleados
La página de administración "Empleados" lista todas las cuentas de usuario que tienen acceso al back-office de su tienda. Por defecto encontrará la cuenta que creó durante la instalación de la tienda, la cual se configura automáticamente como usuario SuperAdmin. El usuario con perfil SuperAdmin tiene acceso a todas las funcionalidades de PrestaShop sin restricción alguna.

Debe crear una nueva cuenta de usuario para cada empleado que forme parte de su grupo de trabajo. Esto significa que nunca se debe tener una única cuenta de uso general que todos ellos puedan utilizar, ya que es necesario realizar un seguimiento de quién hizo tal cosa en su tienda. Los empleados pueden modificar los pedidos y aceptar los pagos y devoluciones de los clientes entre otras acciones, y usted como propietario de la tienda, debe conocer quien de ellos realizó una determinada acción. Tener una cuenta personal para cada empleado es una buena forma de asegurarse de que su equipo gestiona su tienda con responsabilidad.
Añadir un nuevo empleado
El botón "Añadir nuevo" le lleva al formulario de creación:
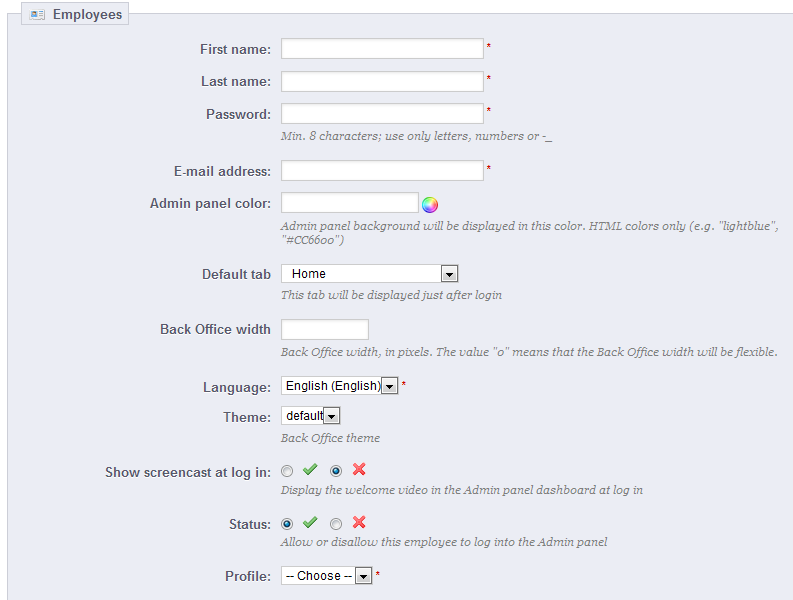
Este formulario cuenta con una docena de opciones:
- Nombre y Apellidos. El nombre no se muestra a los clientes, pero le será de mucha utilidad cuando necesite saber qué empleado realizó cierta acción en su tienda.
- Contraseña. Asegúrese de no utilizar una contraseña demasiado sencilla u obvia. Esto evitará en gran medida que cualquier persona ajena a su personal de trabajo, pueda acceder a la tienda.
- Dirección de correo electrónico. Si lo permite, el empleado recibirá los correos electrónicos de los clientes y las notificaciones de PrestaShop en esta dirección. Esta también se utiliza como identificador para iniciar sesión en el panel de administración.
- Color del panel de administración. Un ajuste algo superficial, que puede servirle como recordatorio de cual es la cuenta con la que actualmente está logueado. Por ejemplo, podría hacer que las cuentas SuperAdmin tengan un fondo de pantalla de color verde, mientras que las logistas tengan un color amarillo. Al iniciar sesión en una de las computadoras de su empresa, esta opción le ayuda a saber de inmediato qué cuenta (o tipo de cuenta) está utilizando, y decidir si debe seguir utilizándola o cambiar a otra.
- Página por defecto. Puede decidir que página verá el usuario tras loguearse. Esta podría ser la página de estadísticas para los SuperAdmins, y la página de pedidos para los comerciales.
- Ancho del panel de administración. Por defecto, la interfaz back-office de PrestaShop es tan ancha como la pantalla en la que la está visualizando. Cuando tiene una pantalla realmente ancha, esto puede ser un problema. Utilice esta opción para limitar el ancho de la interfaz a un tamaño especificado, en pixeles.
- Idioma. El idioma predeterminado a utilizar para este usuario , dado que su tienda puede trabajar en inglés, pero sus logistas ser de otro país. Asegúrese de añadir los idiomas necesarios, utilizando la página "Idiomas" bajo el menú "Localización".
- Tema. El back-office de PrestaShop puede utilizar un tema diferente al predeterminado. Puede elegir cuál usar desde esta opción.
- Mostrar screencast al iniciar la sesión. Cuando se activa, PrestaShop mostrará un video de bienvenida en la página inicial del back-office, que le habla acerca de las mejoras y características de la versión actual de PrestaShop.
- Estado. Puede desactivar temporalmente y definitivamente una cuenta. Esto le permite crear cuentas temporales, por ejemplo, cuando necesite ayuda durante las vacaciones o los periodos de mayores ventas.
- Perfil. Es muy importante que asigne un perfil adecuado a cada cuenta de empleado. Un perfil está ligado a un conjunto de permisos y derechos de acceso, y usted debe conocer todos los existentes. Estos se encuentran listados en la página "Perfiles" bajo el menú "Administración" (en la siguiente sección de este capítulo, obtendrá más información). El perfil determina a que parte del back-office tiene acceso un empleado; por ejemplo, cuando un empleado inicia sesión, sólo se mostrarán las páginas/menús que se han configurado como accesibles para su perfil. Este es un ajuste muy importante.
Opciones de empleados

La sección en la parte inferior de la página de "Empleados", justo debajo de la lista de empleados, tiene dos opciones:
- Regenerador de contraseña. Le permite establecer la frecuencia con la que un empleado puede cambiar su contraseña.
- Cambiar el idioma predeterminado. Si se activa esta opción, permitirá a los empleados establecer su propio idioma predeterminado para los formularios.
Perfiles
PrestaShop enables you to assign specific duties and rights to each employee who helps you manage the online shop. For example, the administrator will have access to the entire store, without restriction, while an employee can only have access to the catalog or orders.

By default, PrestaShop has 5 profiles ready to use:
- SuperAdmin. The highest rank. It has all the rights and can access everything on the PrestaShop installation.
- Administrator. Can do and view pretty much everything, apart from CMS content, shop URLs, price rules, multistore setting, and couple other pages. Only trusted employees should have access to this profile.
- Logistician. Those in charge of packing and sending orders. Can only access the orders, shipping and stock management pages, and part of the catalog and customer pages.
- Translator. Those who are tasked in translating your shop's textual content. Can access products and categories, CMS content and the "Translations" page.
- Salesman. Your salespersons, if any. In addition to the translator's access rights, can also access the customer pages, the modules and webservice, and some stats.
You can see the details of the access rights by reviewing each profile in the "Permissions" page (see below).
The SuperAdmin profile cannot be deleted, only renamed. |
Adding a new profile
You can add as many profiles as needed.
Adding a new profile is pretty straightforward: simply click the "Add new" button, enter a unique name for the new profile, and save.

The more complex part comes when setting the new profiles access rights. This is done in the "Permissions" page (see below).
Permissions
Permissions are the central part of PrestaShop's profiles. They enable you to see very precisely what an employee account can and cannot do on your shop.
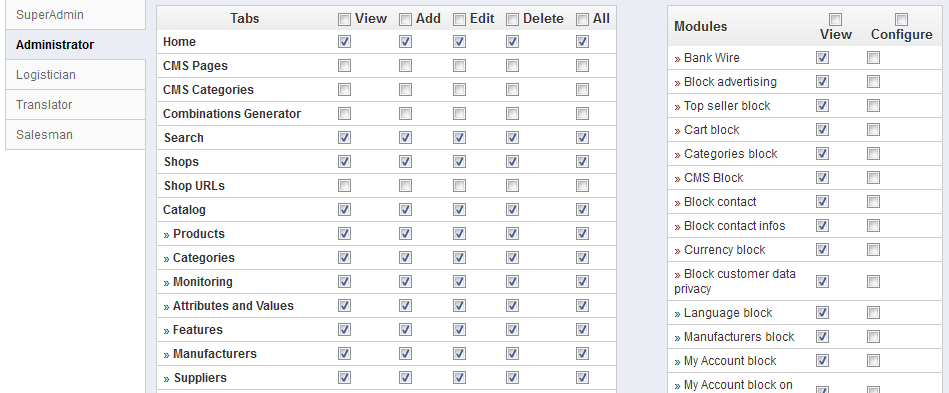
The "Permissions" administration page is built using tabs:
- On the left of the screen, as many tabs as there are available profiles.
- On the remaining right of the screen, PrestaShop display the clicked profile's permissions. This tab contains two tables, side by side.
When you click any profile (except SuperAdmin), the two tables appear to give you access to their criteria:
- On the left, menu-related permissions: you can decide what the profile can do with menus. In effect, you could prevent a profile from editing the content of a page, or even hide the menu entirely.
- On the right, module-related permissions: while you might allow some profiles to see the available modules, you might prefer that only the most trustworthy employees should be able to configure some key modules.
For each of the menu criteria, you have 5 options:
- View. Employee can view information.
- Add. Employee can add new information.
- Edit. Employee can change information.
- Delete. Employee can delete information.
- All. Enable all the above options for the current row.
Meanwhile, the module criteria have only 2 options:
- View. Employee can view the module's configuration.
- Configure. Employee can configure the module.
The SuperAdmin permissions cannot be changed: the profile simply has all the rights for every criterion. |
Setting permissions for a new profile
For this example we will create a new profile, "Order Preparer". First create the profile in the "Profiles" page, by filling the "Name" field. As soon as it is saved, it appears in the list of profiles.
Then you need to assign permissions to this new profile. Go to the "Permissions" page, and click on the tab for the new profile: the list of criteria appears. By default, a new profile has access to none of the back-office pages, and can only view the impact of some modules on the back-office (for the pages he or she has permissions to view).
You have two ways to fill the criteria, depending on the limits or freedom you want the profile to have:
- Click the permission checkboxes one by one until it has enough access rights to get the job done.
- Have all the checkboxes checked, then remove permissions one by one until it has only the ones necessary.
You have two ways to have checkboxes checked in batches:
- Per column: at the top of each column, a checkbox makes it possible to have all of the column's checkboxes checked at once. Unchecking it unchecks all the currently checked boxes.
- Per row: if you click on the "All" checkbox for a given row, all the checkboxes this row will be checked. Unchecking it unchecks all the currently checked boxes.
You can then uncheck selected rows rather than spending time checking each needed rows one by one.
To avoid mistakes during the configuration of your permissions, PrestaShop automatically saves your settings every time you make a change. This means you do not have to click any "Save" button. Once you have assigned the profile its rights, you can return to the "Employees" administration page and start assigning that new profile to the employees who need it.
Menus
PrestaShop's back-office menu organization is not set in stone: while the default arrangement is built in order to have the most useful pages readily available, you might have a different opinion, and may want to change the organization, in part or in full.
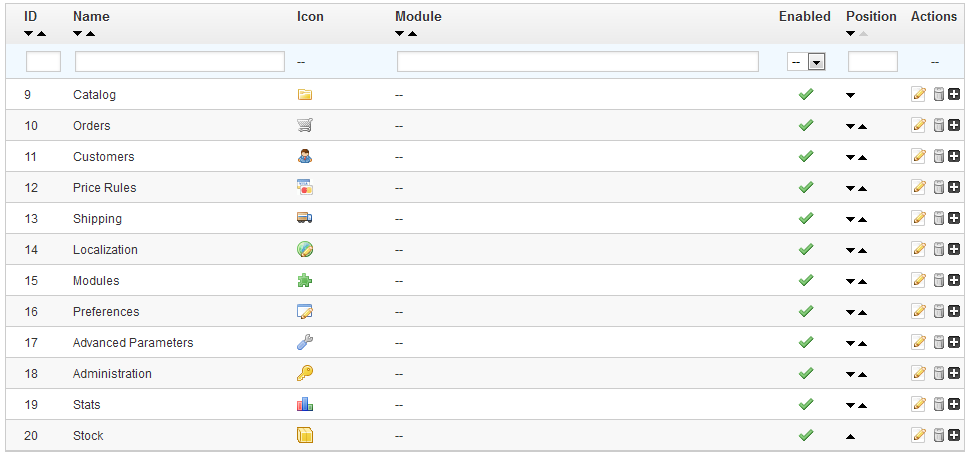
This administration page enables you to move, edit, disable and even create pages.
Moving menus
Menus can be moved directly from the list. You can either click on the arrows in the "Position" column, or drag the row itself and drop it in the position you want it to have. As soon as you drop the row, PrestaShop saves the location automatically. You can drag the row when the mouse cursor is over the "Position" column.
You can disable a menu simply by clicking on the green checkmark in the "Enabled" column. Note that this will disable the menu for all back-office users. If you want to hide a menu from a specific set of users, edit their profile's permissions, in the "Permissions" administration page.
Moving pages
To access a menu's pages, click the "+" icon on the right of the row. A new list appears within the main list, with the same columns.
Pages can be moved within a menu directly from the list. You can either click on the arrows in the "Position" column, or drag the row itself and drop it in the position you want it to have. As soon as you drop the row, PrestaShop saves the location automatically. You can drag the row when the mouse cursor is over the "Position" column.
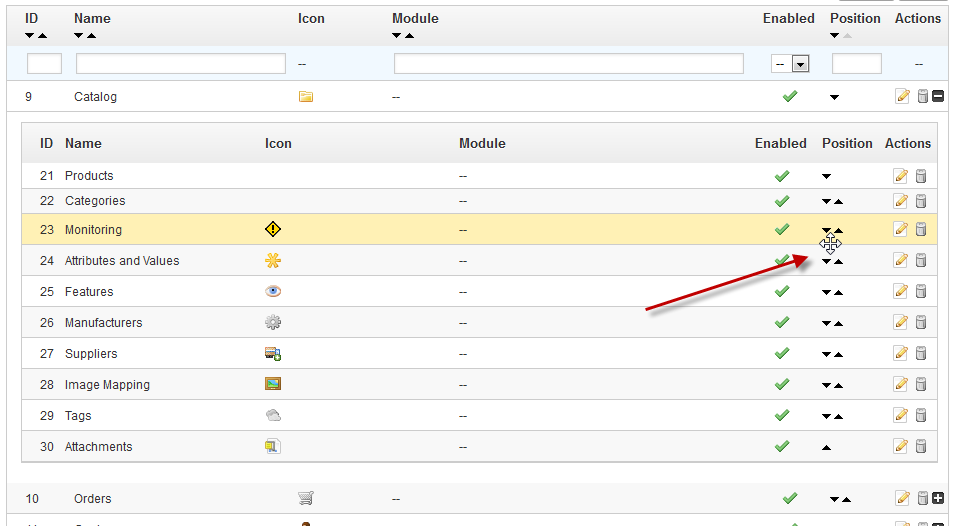
You can also move a page to a different menu altogether. This cannot be done directly from the list; you must open the page's editing form, where you will find the "Parent" option. Change that option to another menu name, save your changes, and when returning to the "Menus" page, the page will have moved menu.
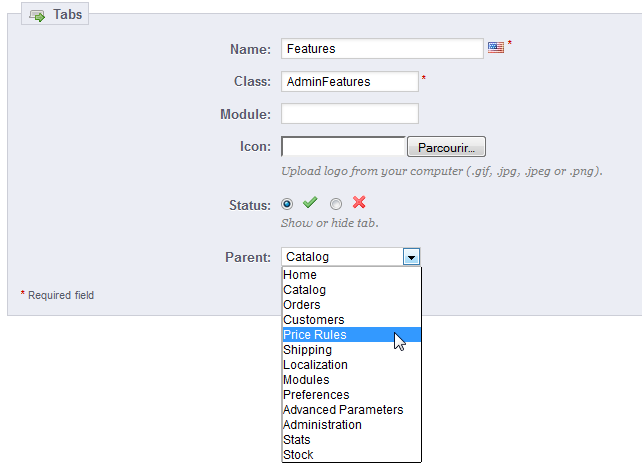
You can disable a page simply by clicking on the green checkmark in the "Enabled" column. Note that this will disable the page for all back-office users. If you want to hide a page from a specific set of users, edit their profile's permissions, in the "Permissions" administration page.
Creating a new page or menu
Click on the "Add New" button to reach the page creation form.
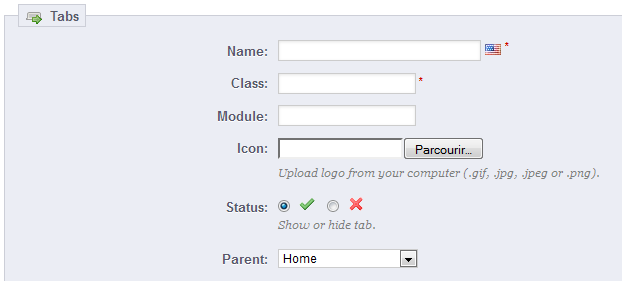
This form has a handful option, some of which might prove complicated:
- Name. Give it a unique name, because it will serve as an internal identifier.
- Class. In short, a PrestaShop back-office page is based on specific internal PHP files, which are called "admin controllers", and are most often stored in the
/controllers/admin folder of your PrestaShop installation. When creating a new page, you must know which controller to target, and most importantly the name of its class – which is the name of its PHP file.
For instance, if you want to create a page displaying PrestaShop's backup administration page, you must first find its controller name (in this case, AdminBackupController), and copy it in the "Class" field. - Module. In some cases, the administration controller for which you want to create a page comes from a module. In that case, you must also indicate the identifier for the module (in most cases, its folder name) and copy it in the "Module" field, in lowercase. This way, PrestaShop will know that it should not look for the controller in the
/controllers/admin folder, but rather in the /modules/NAME-OF-THE-MODULE/ folder. - Icon. You can use any 16*16 icon; for instance, the excellent and free FamFamFam Silk icon set: http://www.famfamfam.com/lab/icons/silk/.
- Status. You can disable a page at any time, but do note that it affects all the back-office users.
- Parent. You can choose any menu, but for consistency's sake, make sure to pick one to which the page you are creating is relevant.
If you want to create a new menu page, choose "Home" as the parent.
Merchant Expertise
New in 1.5.4.
This page is generated by the module of the same name. It was specifically designed to help PrestaShop users keep track of their progress as e-merchants, see how much they’ve grown and progressed over the days, months and years. It is installed by default.
This module adds system of badges and points, broken down into three levels, all of which are integral to success in the e-commerce world:
- Features. Your use of key e-commerce features such as Site Performance, Catalog Size, Employees and SEO.
- Achievements. Your completion of specific key e-commerce goals such as number of Customers, Orders and Revenue.
- International. Tracks your presence in key International Markets such as the Americas, Oceania, Asia, Europe, Africa and Maghreb.
The more progress your store makes, the more badges and points you earn. There is no need to submit any information or fill out any forms. We know how busy you are; everything is done automatically. Use this tool to drive your business, view your progress and reflect on your great achievements.


