Tabla de contenidos
El método de envío de sus paquetes es un elemento clave en la gestión y el éxito de su tienda. Debe tener en cuenta la gran variedad de métodos disponibles, la capacidad que tiene de combinar varios transportistas, los impuestos regionales o internacionales, el peso y el precio del paquete. Afortunadamente, PrestaShop simplifica estos ajustes, gestionando todo esto en unas pocas pantallas.
El precio del envío se calcula utilizando un método de entre los dos disponibles: precio total del pedido, o peso total del pedido. Así es como la mayoría de las empresas de transporte calculan sus gastos de envío, y es por eso que debe rellenar el peso de un producto al crearlo en el catálogo, además de porque es absolutamente necesario indicar los costos por peso y por precio para cada transportista en la página "Transportistas".
PrestaShop calcula el precio de envío de acuerdo a un sistema de rangos de peso o de precio. Este sistema sólo funciona para uno u otro de estos tipos, no para los dos a la vez. |
La configuración del transporte trabaja conjuntamente con su configuración local establecida en PrestaShop. Mientras que en PrestaShop 1.4 algunos de estos ajustes también se encontraban en el menú "Transporte", en la versión 1.5 todos las configuraciones locales han sido trasladadas a un nuevo menú, denominado "Localización". Aquí es donde podrá editar las zonas geográficas, países, monedas, etc. Por lo tanto, asegúrese de revisar con detalle el menú "Localización", el cual será exlicado en el siguiente capítulo de esta guía, "Comprender la Configuración local". Por ejemplo, con el fin de crear completamente un transportista en PrestaShop, debe haber definido sus áreas geográficas anteriormente; esto se realiza en la página "Zonas" bajo el menú "Localización".
La manera en que los transportistas son creados en Prestashop ha sido completamente reelaborada en la version 1.5.5.0, con el nuevo Asistente de transportistas.
Los ajustes más generales de la configuración de transporte de su tienda se encuentran en la página "Transporte", bajo el menú "Transporte".
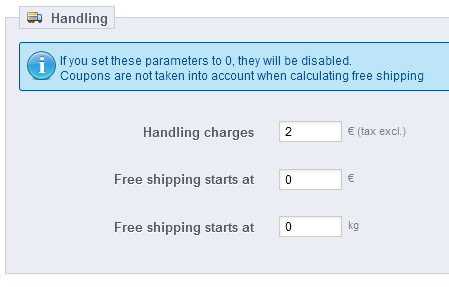
Esta página presenta la configuración global:
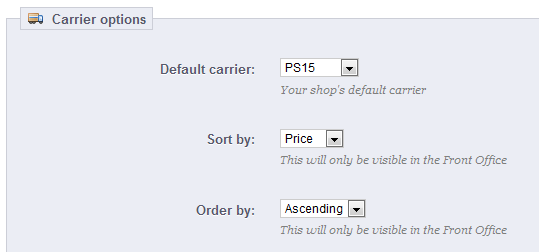
La sección "Opciones del transportista" la da acceso a tres ajustes, que repercuten en el front-office con el fin de ayudar al cliente a tomar una decisión:
Debe tener transportistas añadidos a su instalación de PrestaShop – esto es, un indicador claro de que entregará sus productos. Este podría ser usted o su propia tienda (por ejemplo, si está vendiendo productos descargables, o sólo trabaja a nivel local), pero tan pronto como realice el envío de paquetes utilizando sellos y una tercera parte como por ejemplo el servicio postal local, FedEx, o UPS, sea la que realice sus envíos, entonces deberá tener los detalles de estos añadidos a la base de datos de su tienda. Esto permitirá a sus clientes a que puedan elegir el transportista que más les convengan, en función de sus rangos de entrega, sus precios y sus plazos de entrega.

La página "Transportistas" le presenta una lista de todos sus transportistas actuales. Desde aquí, puede cambiar directamente sus estados, indicar si el transportista realiza el envío gratuitamente, y cambiar su posición para cuando se les presente a los clientes.
Por defecto, tiene dos transportistas en su base de datos:
Le corresponde a usted eliminar estos transportistas y añadir otros nuevos para sus clientes. Por lo menos, debe editar el transportista "My carrier" y sustituir sus datos por los de un transportista real: nombre, detalles, y rangos.
En esta sección, vamos a crear un transportista detallando toda su configuración, desde la A a la Z, utilizando el Asistente de Transportistas. Puedes crear tantos transportistas como desee.
Si un transportista realiza diferentes servicios de entrega, debe crear tantos transportistas en PrestaShop como servicios realicen, y diferenciarlos a través de sus nombres.
El Asistente de Transportistas sólo está disponible para PrestaShop 1.5.5.0 y versiones superiores. Si está utilizando una versión anterior (entre la v1.5.0.0 y la v1.5.4.1), no tiene un asistente de transportistas a su disposición, pero si cuenta con los formularios habituales. Obtendrá más información sobre esto en la próxima sección "Antigua interfaz, de esta documentación. |
Muchos de los detalles solicitados por los formularios de PrestaShop deben ser proporcionados por los transportistas una vez que haya creado una cuenta, o haya realizado un contrato directamente con ellos. Verifique con ellos los datos establecidos, para asegurarse de que todo está configurado correctamente.
Para crear un nuevo transportista, haga cicl en el botón "Añadir nuevo" en la página "Transportistas". Esto abrirá el Asistente de Transportista mostrando el primero de sus cuatro paneles.
Aquí es donde describe el transportista, dando la información que el cliente necesita con el fin de que lo reconozca y pueda elegir el transportista que más le guste.
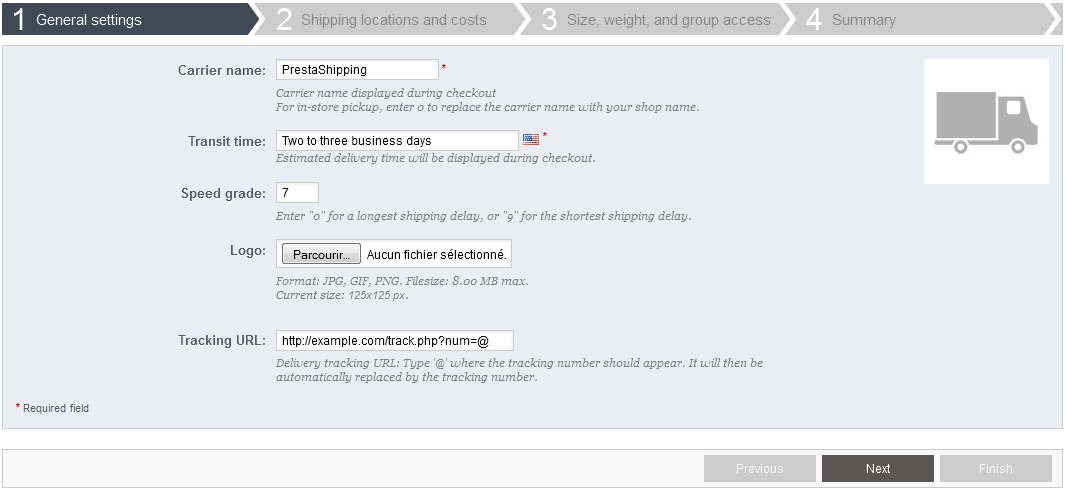
Vamos a examinar toda la información que necesita introducir:
http://www.colissimo.fr/portail_colissimo/suivreResultat.do?parcelnumber=@. Cuando los clientes finalizan su compra, recibirán esa URL con la "@" reemplazada por el número de seguimiento proporcionado por el transportista, por lo que es posible hacer clic en ese enlace y ver en donde se encuentra el pedido del cliente.Haga clic en "Siguiente" para pasar al segundo panel.
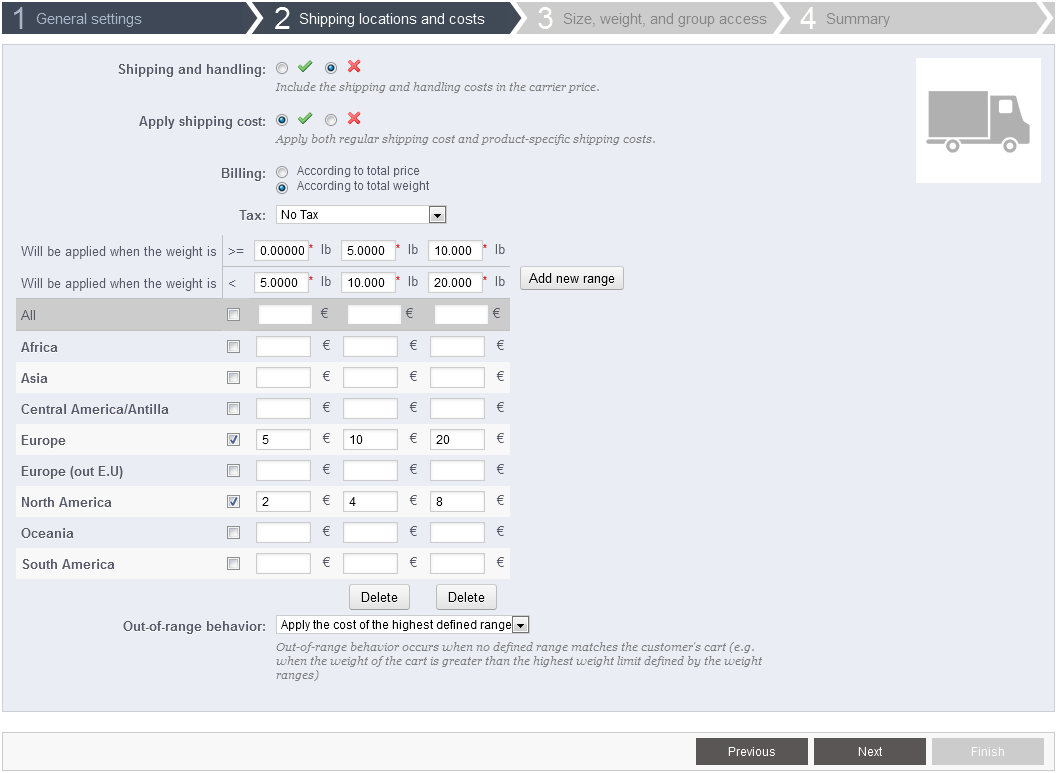
Al principio, este panel presenta unos cuantos ajustes:
A continuación viene la parte importante: la creación de los rangos del transportista. Este es un paso muy importante, ya que Prestashop necesita esta información para presentarle al cliente que o cuales transportistas pueden realizar la entrega de su pedido. En efecto, dependiendo del precio o del peso total del pedido, algunas opciones de transporte no estarán disponibles mientras que otras sólo aparecerán cuando se encuentren dentro de ciertos valores. Debe ser muy preciso al rellenar estos valores, y preferiblemente seguir las instrucciones y sugerencias que aparezcan en la documentación de cada transportista.
Aquí es donde el Asistente de Transportistas toma su nombre. Aquí, construirá los rangos de precio o peso de cada transportista (dependerá de su elección tomada en la opción "Facturación", aparecida anteriormente), uno tras otro, aplicando sus precios para cada zona.
Para rellenar cada rango, sólo necesita unos pasos:
Fijar los límites inferiores y superiores del rango o gama que está creando. Dependiendo de la elección en el campo "Facturación", este mostrará "Será aplicado cuando el precio sea" o "Será aplicado cuando el peso sea" para el límite inferior, y "Será aplicado cuando el precio sea" o "Será aplicado cuando el peso sea" para el límite superior
Tenga en cuenta que el límite inferior es incluido (>=) mientras que el límite superior es excluido (<). Esto significa que el límite superior de un rango puede tener el mismo valor que el valor más bajo de la siguiente gama, ya que estos no se superponen. |
The weight and price units are the default ones for your PrestaShop installation, and the ones your products use. You can change these units "Localization" page of the "Localization" menu. |
Finally comes one final option:
Click "Next" to reach the third panel.
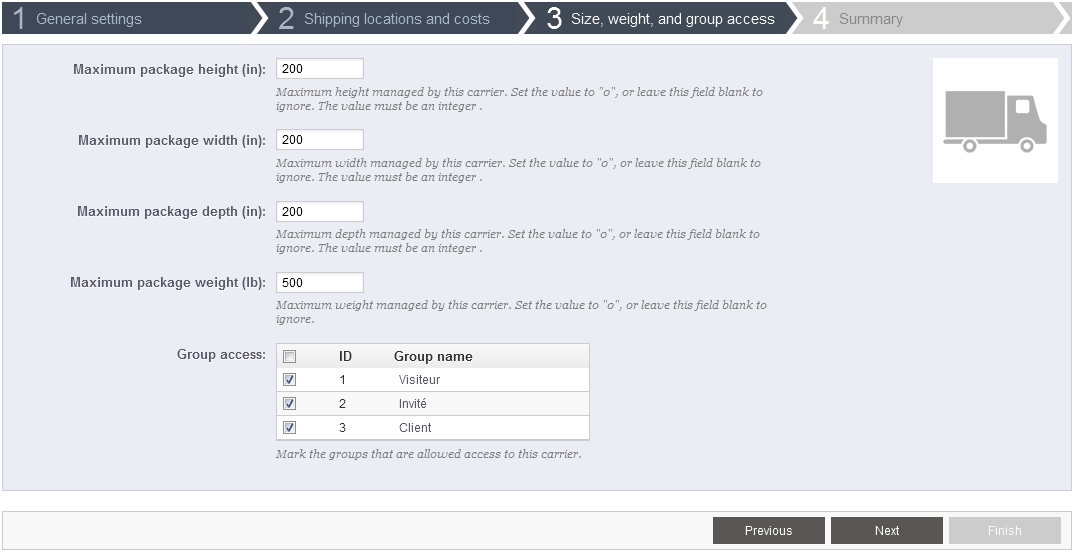
This panel presents two sets of options:
Click "Next" to reach the fourth and final panel.
This last panel gives you an overview of your settings for this carrier.
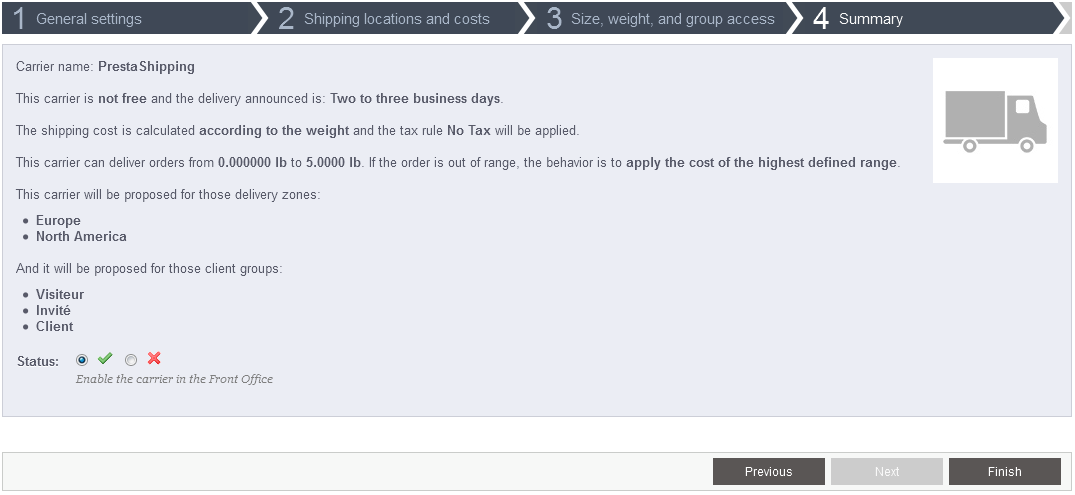
If some settings are wrong, you can go back to any previous panel by either using the "Previous" button, or directly clicking on the panel's tab.
If you want to save this carrier as a draft for now then come back to it later, disable the carrier using the "Status" option at the bottom of this final panel.
Either way, click on the "Finish" button to save your work, and create the carrier.
When using PrestaShop in multistore mode, another panel is available, and the panel order changes slightly:
All the panels are as described above. The new one, "MultiStore", makes it possible for you to limit this carrier to a selection of your stores. |
The "Shipping" menu has changed a lot in version 1.5.5.0 of PrestaShop: the Carrier Wizard appeared, the "Weight ranges" and "Price ranges" pages disappeared (merged into the Carrier Wizard), and section of the "Shipping" page were removed.
Up until version 1.5.4.1, the "Shipping" page featured two additional sections: Billing and Fees. Both have been merged into the new Carrier Wizard, along with the "Weight ranges" and "Price ranges" pages.
For those who are still using a version below 1.5.5.0, here is the documentation for these sections of this page:
That last portion of the page is extremely important, as this is where all your shipping settings come to meet, and where you enter the actual shipping fees. After you have created carriers, price ranges and weight ranges in their respective pages, this seemingly harmless section will be the tool to use to make them all work in conjunction with an actual price.
Having correct shipping fees is very important, so make sure not to skip this setting – unless of course if you only sell downloadable products. |
Once you have created all your carriers and set all the weight and price ranges for these carriers (with the "Carriers", "Price Ranges" and "Weight Ranges" pages under the "Shipping" menu, which are fully explained later in this chapter), it is high time to set their shipping fees per zone/range.
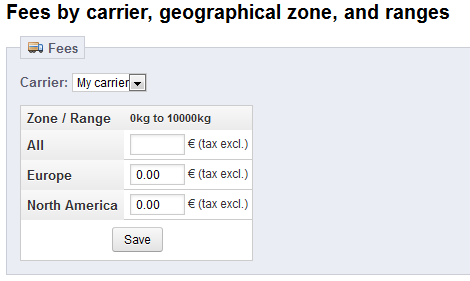
When selecting a carrier in the drop-down menu, PrestaShop displays a table with all the weight ranges and geographical zones that were set for this carrier, along with the shipping fee for each, tax excluded.
Carrier's weight ranges are set in the "Weight ranges" page of the "Shipping" menu. Carrier's geographical zones are set in the carrier's own setting form, in the "Carriers" page of the "Shipping" menu. Both ranges and zones must be configured in their respective pages in order to have this fee assignment tool work properly. |
The default value is "0.00", which is certainly not what you will want to leave as this pretty much means "free shipping, whatever the weight". You must therefore precisely set the shipping fees for each zone and range, as provided by the carrier itself, or as estimated by you. For instance, if you are sending packages from the US, the fee to Europe might be double or triple the domestic fee.
An empty field has a real impact on the availability of the carrier in the matching zone:
If the selected carrier does not have any range set, PrestaShop will let you know with the message "No ranges set for this carrier". You then must create at least one weight range for this carrier, or else you will not be able to set its shipping fees.
You must perform this for all of your carriers: click the tool's "Save" button when you are done entering your fees for the selected carrier, then choose another carrier in the dropdown list in order to set that carrier's fees for its own range and zone settings.
In this section, we are going to create a complete carrier, from A to Z. You can create as many carriers as you wish.
If one carrier has different shipping services, you should create as many carriers in PrestaShop, and differentiate them with their names.
Many of the details asked by PrestaShop's forms should be provided by your carriers once you have set up an account or are under contract with them directly. Check with them in order to make sure everything is configured correctly.
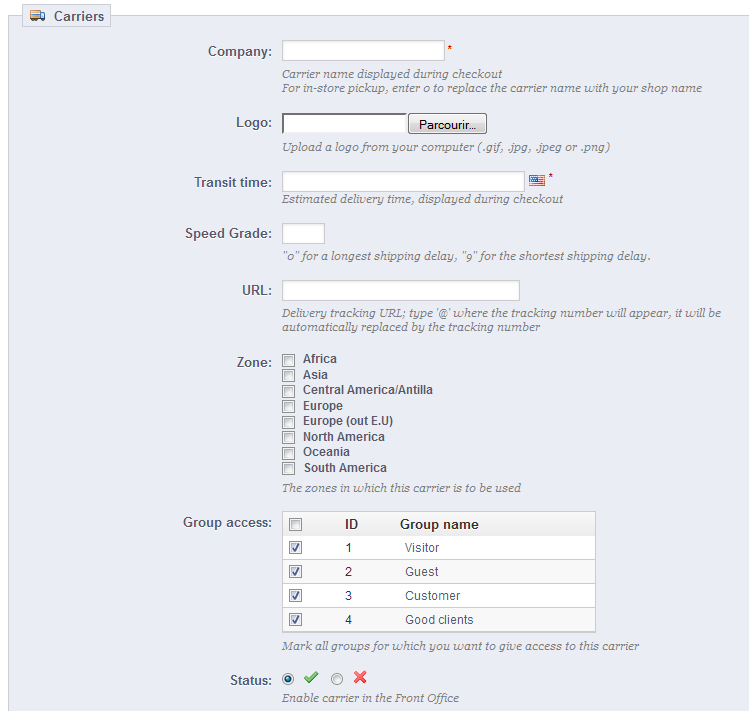
Let's examine all of the information you need to enter:
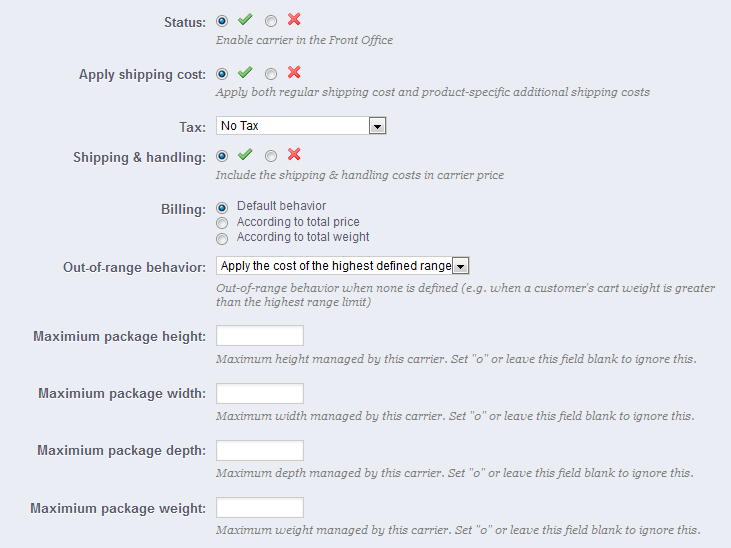
Here is an example of out-of-range behavior: Let's say you have set up a weight range from 0 to 10 lbs. Your customer wants to place an order that is 15 lbs., and no behavior has been configured for this weight. By choosing "Apply the cost of the highest defined range", PrestaShop will apply the price conditions that you have set up for orders from 5-10 lbs. If you choose "Deactivate the carrier", then this carrier will not be offered to the customer in this case.
Carriers can be set to accept orders within a given price range. For example, if you want orders between $1 and $15 to be sent by the US Post Office, create a price range from 1 to 15, and set it to "US Postal Service". Put together, ranges should fill the entire prices spectrum, up to your most expensive possible order.

The form that opens when click on the "Add new" button is very simple:

Remember that you can create as many ranges per carrier as needed, so if a carrier can handle more than one, but each in a different way, you should create the complete set of ranges.
Make sure to have the ranges overlap! Therefore, the "To" value of a range should be equal to the "From" value of the next one. For instance, if one range ends at $20, the next one should start at $20 too. Likewise, if you have to add a range before one that starts at $20, the new one should end at $20. |
Carriers must be set to accept orders within a given weight range. For example, if you want orders between 1 lbs and 15 lbs to be sent by the US Post Office, create a weight range from 1 to 15, and set it to "US Postal Service". Ranges should fill the entire weight spectrum, up to your heaviest possible order.
A carrier should have at least one range. In that case, as you cannot set an infinite maximum weight, set it to an abnormal number, such as 10,000.00 kg.


The form that opens when click on the "Add new" button is very simple:
Remember that you can create as many ranges per carrier as needed, so if a carrier can handle more than one, but each in a different way, you should create the complete set of ranges.
Make sure to have the ranges overlap! Therefore, the "To" value of a range should be equal to the "From" value of the next one. For instance, if one range ends at 20 kg, the next one should start at 20 kg too. Likewise, if you have to add a range before one that starts at 20 kg, the new one should end at 20 kg. |
Once the ranges are determined and allotted to a carrier, you can define the shipping and handling for each range. Go to the first page of the "Shipping" menu, and fill out the table found at the bottom of the page.