Table content
Comprendre les préférences
L'onglet Préférences vous permet de configurer et de peaufiner certains détails de votre boutique. Nous allons détailler toutes les fonctions de cet onglet.
Général
Cliquez sur l'onglet "Préférences", vous arriverez directement sur la page de configuration des paramètres généraux.
- Activer la boutique. Activez ou désactivez votre boutique. Désactivez votre boutique pendant que vous effectuez la maintenance. Veuillez noter que le webservice ne sera pas désactivé pour autant et que vos données seront toujours accessibles par ce biais.
- IP de maintenance. L'IP de maintenance permet d'accéder à la boutique même lorsqu'elle n'est pas activée. Si vous souhaitez ajouter plus d'adresses IP, séparer les caractères avec des virgules ",". Pour trouver votre adresse IP, aller sur http://www.myip.dk/.
- Activer le SSL. Fournir une connexion SSL à votre boutique est un bon moyen de rassurer vos clients à propos de la confidentialité et de la sécurité de leurs informations (authentification, carte de crédit, etc.) sur votre boutique. Si votre fournisseur supporte le SSL, assurez-vous d'activer le support SSL de PrestaShop, en cliquant sur le lien. Cela fera apparaître un sélecteur. Choisissez "Oui".
- Vérifier l'IP dans le Cookie. Il s'agit d'une mesure de sécurité supplémentaire qui vous permet de vérifier l'adresse IP du cookie afin d'éviter que votre cookie soit volé.
- Durée de vie du cookie Front Office. Indiquez en nombre d'heures la durée de vie du cookie Front Office. Une fois ce délai dépassé, vous devrez alors vous reconnecter.
- Durée de vie du cookie Back Office. Indiquez en nombre d'heures la durée de vie du cookie Back Office. Une fois ce délai dépassé, vous devrez alors vous reconnecter.
- Améliore la sécurité du Front Office. Activez ou désactivez les jetons (tokens). Les jetons permettent d'améliorer la sécurité de votre boutique.
- Bulles d'aide Back-office. Activez l'aide contextuelle en dessous des champs de saisie. Cela permet de comprendre l'utilité de certains champs. Si vous trouvez que cette aide est inutile, désactivez la.
- Type de processus de commande. Par défaut, le client doit valider 5 étapes successives pour terminer sa commande. Vous pouvez choisir d'afficher ces étapes en une seule page. La page en question sera extrêmement chargée, ce qui peut effrayer votre client...
- Activer la commande express (Guest checkout). Cette fonctionnalité permet le passage de commande sans création de compte.
- Conditions générales de vente. Si cette option est activée, le client devra accepter les conditions générales de vente pour terminer sa commande.
- Page CMS de conditions générales de vente. Les conditions générales de ventes sont affichées sur une page statique (une page "CMS"). Le menu-déroulant propose plusieurs pages CMS, choisissez-en une.
- Proposer des emballages cadeaux. Propose l'emballage cadeau au client et la possibilité de laisser un message. Cette idée peut plaire aux clients.
- Tarifs emballages cadeaux. Fixe un prix pour l'emballage cadeau.
- Tax des emballages cadeaux. Fixe une taxe pour le prix de l'emballage cadeau.
- Poids maximum des fichiers joints. Configurer la limite de tailles des fichiers téléchargeables (en MegaOctets). Cela vous permet de ne pas encombrer votre serveur avec de trop gros fichiers.
- Proposer des emballages recyclés. Le client peut choisir ou non de recevoir un colis recyclé. Cela montre à vos clients que vous avez la fibre écolo.
- Ré-afficher le panier après identification. Si un client avait un panier pour lequel il n'a pas finalisé la commande, ce panier se ré-affichera lorsqu'il se reconnectera.
- Règle d'arrondi. Choisissez la règle d'arrondi : arrondir toujours au supérieur, à l'inférieur, ou arrondi classique.
- Vérifier automatiquement les mises à jour de modules. De nouveaux modules et mises à jour sont affichés sur la page des modules.
- Masquer les conseils d'optimisation. Si vous désirez masquer les conseils d'optimisation sur la page d'accueil du panneau d'administration, choisissez "Oui". Sinon, choisissez "Non".
- Afficher les fournisseurs et les fabricants. Afficher les fournisseurs et les fabricants même si les blocs correspondants sont désactivés.
- Utiliser Smarty 2 au lieu de Smarty 3. Ne modifiez cette option que si vous savez à quoi correspond Smarty 2 et Smarty 3. Ces cases sont prévues dans le cas où votre boutique a un thème qui n'a pas été pis à jour avec Smarty 3. Si c'est le cas, vous devriez le mettre à jour car PrestaShop va bientôt déprécier les modèles Smarty 2.
- Fuseau horaire. Choisissez le fuseau horaire de votre boutique.
Coordonnées
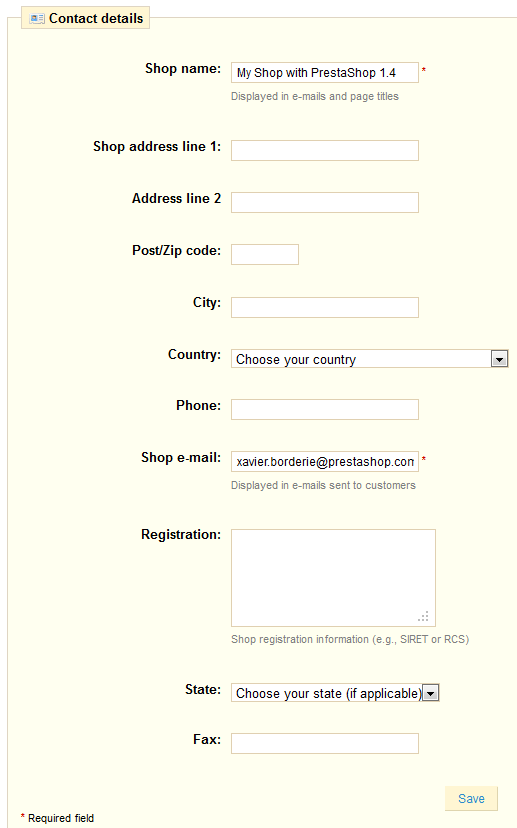
Cette page vous donne accès aux coordonnées et aux détails d'identification de votre boutique. La plupart des champs son explicites.
- Nom de la boutique.
- Adresse du magasin (ligne 1).
- Adresse du magasin (ligne 2).
- Code postal.
- Ville.
- Pays.
- Téléphone. Indiquez le téléphone de votre boutique. Si vous ne souhaitez pas recevoir d'appel, ne remplissez pas ce champ.
- Adresse e-mail de la boutique. Utilisez l'adresse e-mail que les clients verront lorsqu'ils recevront un e-mail de votre boutique.
- Immatriculation. Indiquez le numéro d'immatriculation de votre boutique. Cela prouve que votre boutique est officielle et lui donne une image sérieuse.
- Etat.
- Fax.
Apparence
Vous pouvez personnaliser l'apparence de votre boutique avec le sous-onglet "Apparence". Vous êtes en faite redirigé vers le sous-onglet "Thèmes" de l'onglet "Module".
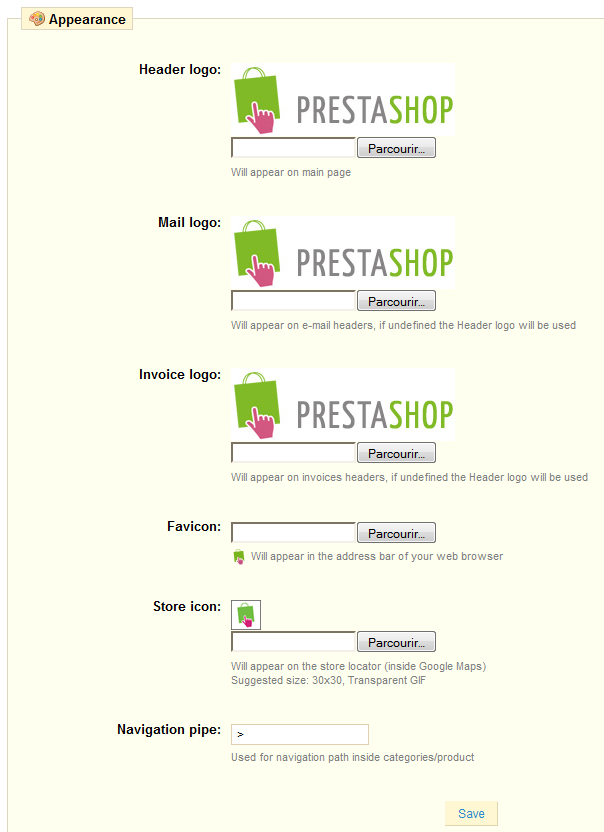
La première section vous permet de personnaliser les différents logos et icônes, et le caractère de séparation (ou "le fil d'Ariane").
Cliquez sur "Parcourir" pour charger une image depuis votre ordinateur.
Une favicon est une petite image qui apparaît dans la barre d'adresse de votre navigateur et permet à vos clients de trouver plus facilement votre site parmi leur liste de sites favoris.
Le caractère de séparation est utilisé par PrestaShop pour séparer les articles, par exemple "Lecteur MP3 > iPods > iPod Nano".
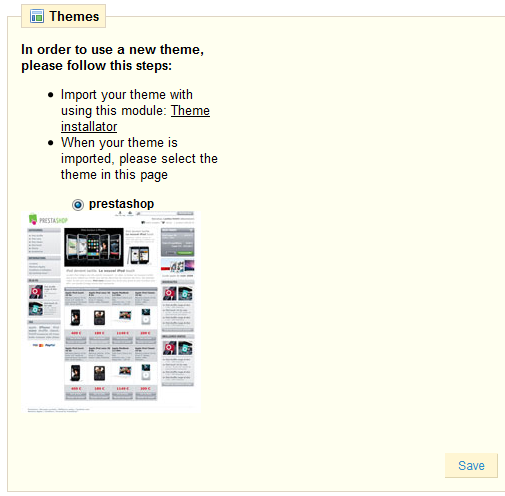
La deuxième section affiche tous les thèmes disponibles sur votre serveur.
Sélectionnez le thème qui sera actif sur votre boutique en cliquant sur le bouton radio, puis confirmez en cliquant sur "Enregistrer".
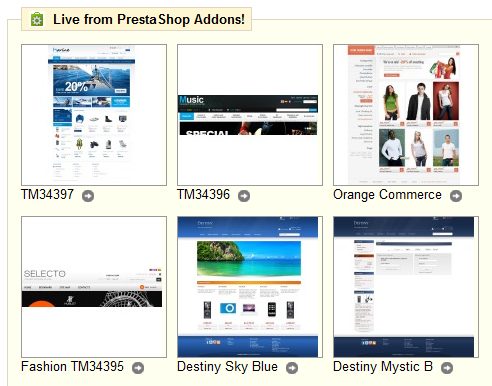
La troisième et dernière section vous donne un aperçu des derniers thèmes ajoutés au PrestaStore.
Vous pouvez facilement personnaliser votre boutique avec les différents thèmes disponibles. Vous pouvez les trouver sur : http://addons.prestashop.com/fr/3-themes-prestashop.
SEO & URLs
SEO signifie Search Engine Optimization. Cela représente un ensemble de techniques visant à améliorer la visibilité d'un site internet sur les moteurs de recherche. Cette section vous aide à améliorer la présence de votre boutique PrestaShop dans les recherches sur le web, et par conséquent vous permet d'atteindre davantage de clients potentiels.
Les URLs (de l'anglais Uniform Resource Locators) sont les adresses d'une page web. Par défaut, ils ne donnent pas vraiment d'informations aux clients ou aux moteurs de recherche : un URL tel que http://www.myprestashop.com/product.php?id_product=2 n'aide pas à savoir au premier coup d'oeil quel est le produit affiché sur cette page. Les URLs simplifiés sont un moyen de corriger ce défaut, on aura par exemple http://www.myprestashop.com/2-music-players/27-ipod-nano-green.
Un lien simplifié d'un produit se configure directement lorsqu'on ajoute le produit au catalogue ou lorsqu'on le modifie. Ce processus est expliqué dans le chapitre " "Ajouter des produits et des catégories de produits", dans la section "Inscrire votre produit". La section "créer une catégorie" explique également comment créer un URL simplifié.
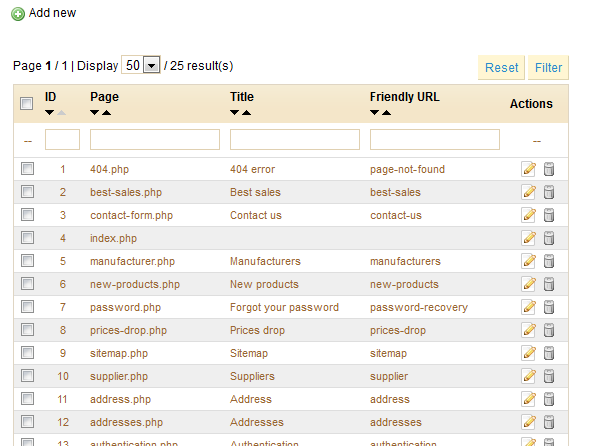
Il y a néanmoins des pages individuelles "statiques" (ou pages CMS) dans votre installation PrestaShop quoi pourront également profiter de certains URLs simplifiés. Ce tableau vous présente une liste de ces pages CMS, et vous permet de configurer leurs URLs simplifiés.
ATTENTION : Les URLs simplifiés ne fonctionnent qu'avec une configuration de serveur qui supporte la réécriture URL. Soyez certain que votre serveur supporte les réécritures URLs (demandez à votre hébergeur!), car si vous activez les URLs simplifiés alors que votre serveur ne les supporte pas, vos clients risquent de ne pas pouvoir accéder à la boutique.
Ajouter un nouvel URL simplifié
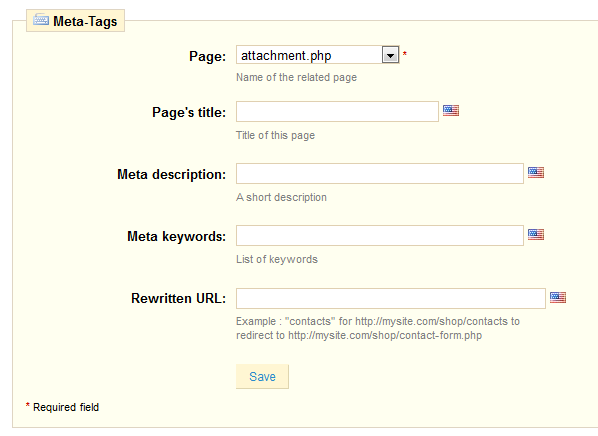
Cliquez sur "Nouveau" pour accéder à ce formulaire :
Ce formulaire contient différents champs :
- Page. Nom de la page concernée, qui n'a pas encore d'URL simplfié.
- Titre de la page. Titre qui apparaîtra sur les moteurs de recherche lorsqu'une requête est effectuée par un client.
- Meta description. Une courte description du produit, en quelques mots, destinée à attirer l'attention du client. Cette description apparaîtra dans les résultats de recherche.
- Meta mots-clefs. Mots-clefs pour lesquels vous devez définir un ordre afin que votre site soit référencé par les moteurs de recherche. Vous pouvez en entrer plusieurs, séparés par des virgules, et aussi des expressions, qui doivent être inscrite entre guillemets.
- *URL réécrite*. C'est ici que vous indiquez l'URL simplifié. Faites-en un court et descriptif, et remplacer les espaces (" ") par des tirets ("-").
Configuration des URLs
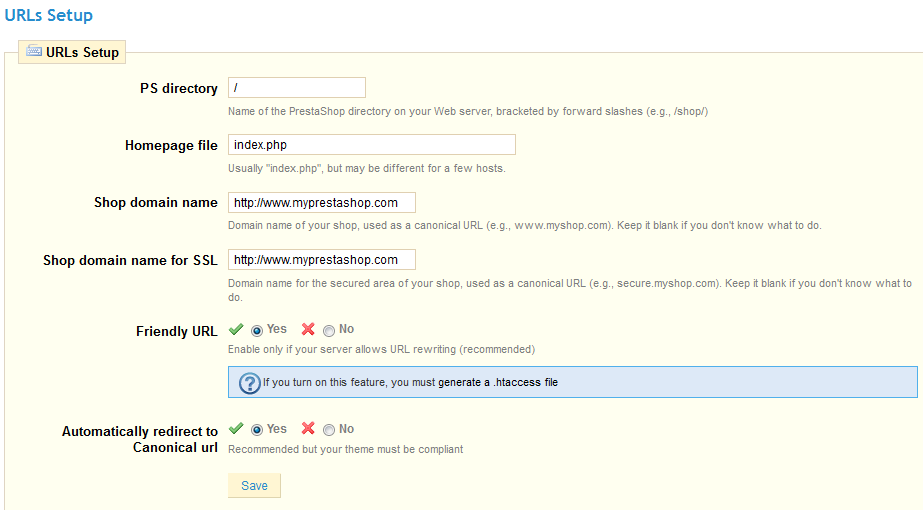
Au bas de l'onglet "SEO & URLs", vous trouverez le formulaire suivant :
Vous pouvez ici voir et configurer certains des paramètres par défaut du serveur. La plupart du temps, il est préférable de ne pas modifier les premiers champs (Répertoire contenant PrestaShop, page d'accueil, nom de domaine SSL) sans savoir exactement l'impact qu'auront les modifications effecutées. Une erreur peut mettre à plat votre boutique.
Changez les boutons radio "URL simplifié" si vous savez que votre serveur peut supporter la réécriture d'URL. Sinon, laissez le bouton sur "Non". De la même façon, ne changez le bouton radio "Rediriger automatiquement vers l'URL canonique" que si vous savez ce que vous faites et les conséquences que cela pourrait entraîner. Les URLs canoniques sont d'excellents moyens d'améliorer la SEO, car ils aident à éviter d'avoir des contenus dupliqués sur votre boutique (plus d'un URL pour le même contenu réel).
Produits
Ce sous-onglet contient une flopée de préférences relatives à la façon dont vos produits doivent être manipulés et affiché par PrestaShop.
- Mode catalogue. Lorsque ce paramètre est activé, toutes les fonctionnalités d'achat sont désactivées, la boutique sera une simple galerie, sans aucun moyen d'en acheter les articles.
- Autoriser la commande de produits hors stock. Si vous n'autorisez pas cette opération, le bouton Ajouter au panier sera caché lorsque le produit sera indisponible. Sinon, il apparaîtra même si le produit n'est pas disponible.
- Activer la gestion des stocks. Par défaut, vous devriez laisser cette fonctionnalité activée. Cela affecte la gestion de l'inventaire sur votre boutique, comme par exemple la gestion en fonction du statut, etc.
- Afficher les quantités disponibles sur la page produit. En activant cette fonctionnalité, vos visiteurs peuvent connaître les quantités disponibles de chaque produit dans le stock. Afficher cette information peut être utile pour stimuler les ventes lorsque par exemple un produit n'est disponible qu'en petite quantité. Les quantités affichées sont celles des attributs et des déclinaisons choisis.
- Enable JqZoom instead of Thickbox on product page. Once you activate this feature, a zoom will appears whenever a mouse is scrolled over a product's image on your store. You can configure the zoom size by modifying the image value in the "Image" sub-tab of the "Preferences" tab.
- Display unavailable product attributes on product page. Your product can be composed of many different combinations or attributes.
Go to the "Configure Attributes" section on page 28 to understand attributes and combinations. When one or several of them are not available, you have several possibilities:- First possibility. Leave this preference active. Example: The product "iPod Shuffle" is no longer available in "Blue" in our store. By activating the feature, the product’s variety will remain visible in the shop. A message indicates that the product is no longer available in the chosen option and invites customers to choose another variation.
- Second possibility. Disabling this preference. If the blue variety of the product “Ipod Shuffle” is no longer available, the product is not displayed the front office and the customer can not select it. This feature clearly displays the availability of your products
- Display "add to cart" button when product has attributes.
- Max items in the comparator.
- Minimum purchase total required in order to validate order. Indicates the minimum amount that must be in the shopping cart to submit an order. If the amount in this field is not reached, your customer can not complete their purchase. If you do not want to activate this feature, enter "0" in the field.
- Display last quantities when qty is lower than. You can display an alert when a stock of your products gets low. This option is particularly useful for promoting purchases. To configure this feature, enter the field value at which an alert message should appear on your store.
- Number of days during which the product is considered 'new'. When you add a product in your store, it is considered new and it is reported back through the "New products" block and the "New products" page. The field allows you to specify how many days the product will remain visible on the block and page. With this feature, you choose how to display and updated your store's news This page is usually accessed by your loyal customers.
- Re-direction after adding product to cart. When a product is added to the shopping cart and the AJAX version of the cart mode is disabled, the client can be directed to the shopping cart summary or stay in the current page.
- Products per page. Indicate how many products are displayed on the pages of your categories.
- Default order by. Indicate the order of default products in your store’s categories Example In our shop's "iPod" category, we can present the iPods in our desired order. 6 choices are available:
- Product name. Displays a list of your products based on the first letter of the product.
- Product Price. Displays your products according to their price.
- Product Added Date. Displays your products according to the date added to your shop.
- Position inside category. Displays your products as they are positioned in the categories in your catalog. The position of the products can be modified directly in the catalog of your store using the position arrows. This way you have your product in the most attractive fashion for your customers.
- Manufacturer. Displays your products in order of the first letter of the Manufacturer.
- Project Modified Date. When you edit your products the modification date is changed. They will appear in order of the modification date.
- Default order way. The above options can be sorted by ascending or descending order.
- Image generated by. This feature allows you to position the product image in its pre-established space. Choose ‘height’ in order to fill the frame height (the width is then recalculated to maintain the same height/width ratio as in the file of origin). You could also choose ‘width’ so the image fills the width of the frame (the height is then recalculated to maintain the same proportion), or finally, choose "auto", where the width and height are calculated to maximize the space it can occupy in the frame.
- Maximum size of product pictures. The maximum size of pictures that customers can upload (in bytes).
- Product pictures width. The maximum width of pictures that customers can upload (in pixels).
- Product pictures height. The maximum height of pictures that customers can upload (in pixels).
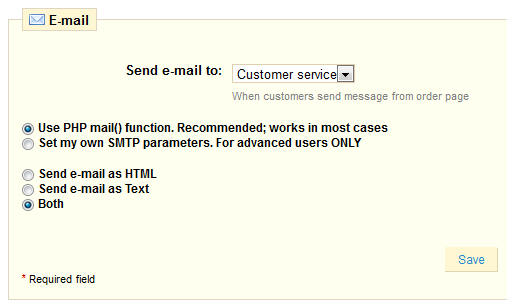
At the end of the checkout process, a client can leave a message. He can choose whom to send it to by selecting from the drop-down menu.
Under the "Email" sub-tab of the "Preferences" tab, you can configure PrestaShop to send emails to your customers. However, we advise that you consult your web host before modifying this feature.
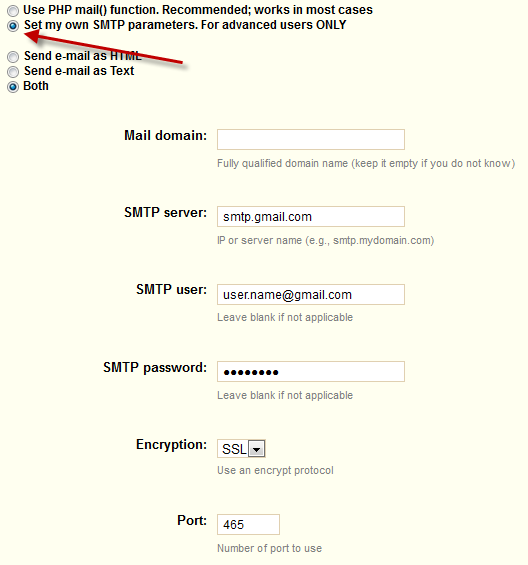
Your shop sends many messages throughout all the steps of registration or placing an order. Here, you can configure how these messages will be sent. By default, it is advisable to use the first option of sending information to "Use the PHP mail() function”.
In the event that this does not work, then use the second option. In this case additional fields appear.
Once you have configured emails using one of the two methods, enter your email address in the field labeled “Test your email configuration” then click “Send a email test at”.
Now check the inbox of the address provided to verify that you received the test mail. If you have not received it, please modify your configuration. The configuration information can be provided to you either by:
- Your system administrator
- Your host
- Your ISP
- Your e-mail provider.
Your web host can tell you whether or not your username is mandatory, as well as the password information, and the encryption to use.
For example, in the case of GMail (the email service offered by Google), enter the following information:
- SMTP server: smtp.gmail.com
- User: [email protected] (example)
- Password: RT22UE87 (example)
- Encryption: SSL
- Port: 465
Aliases
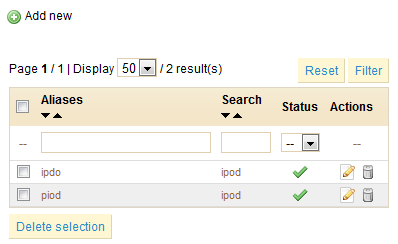
When customers make a request using your shop’s internal search engine, they may make mistakes in spelling. If PrestaShop does not display the right results, the "Alias" feature can address them. You'll be able to take words containing spelling errors, and point them to the real products sought by customers.
Firstly, to find spelling errors often typed by your users, go to the heading "Shop search" sub-tab under the "Stats" tab. You can see the words typed by your customers as well as the most frequent errors. Take the most frequent ones, and add them to your list of aliases, in order to point user to the correct product.
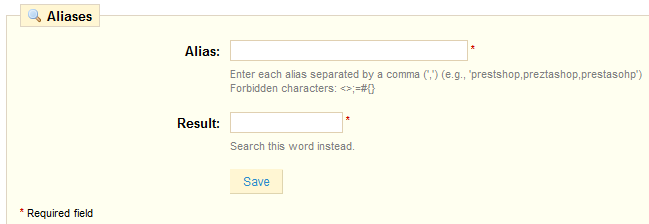
To create a new alias, click on “Add New”. The form below will appear:
For instance, let's say your visitor frequently "player" as "palyer" and "plaier". You can create an alias for each of these typo, which will match the word "Player". Once all of your words are configured click "Save" to confirm.
We also invite you to consult the section on meta tags, to better understand how to display products based on words typed by your customers. See Configuring product description on page 25 and Tags on page 47.
Image
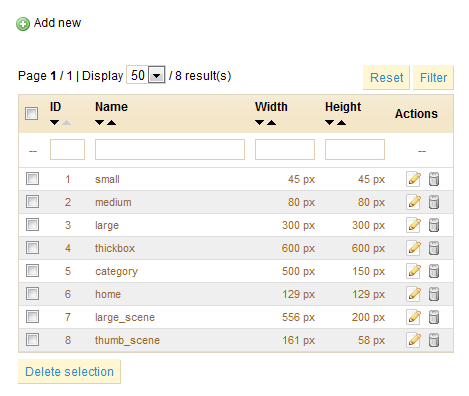
In the "Products" sub-tab of the "Preferences" tab, you can choose to have a zoom appear when the mouse hovers a product's image. The "Image" sub-tab enables you to configure the various sizes.
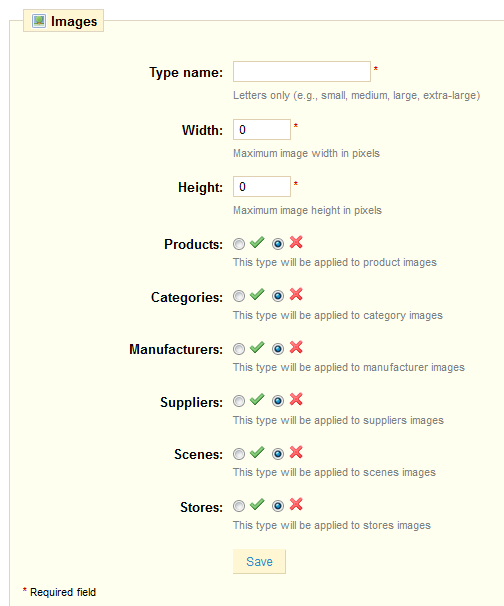
Add a New Images Size
You can easily add a new image size, and even set which categories it applies to.
- Type in its name, width and height.
- Choose which categories it applies to.
- Validate.
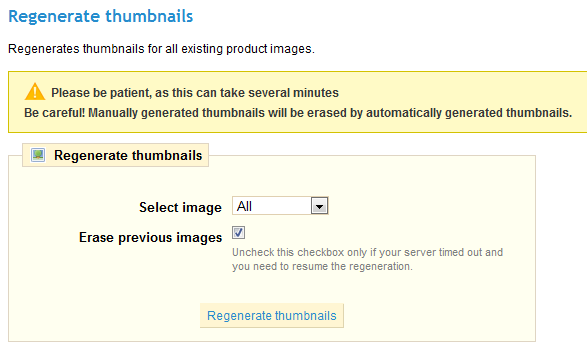
Regenerate Images
You may be dissatisfied with your shop's current thumbnails size. You can regenerate them using the "Regenerate" section at the bottom of the "Image" sub-tab page.
Select which category's images should be regenerated, indicate whether the previous thumbnails should be kept or not, then click "Regenerate Images".
Database
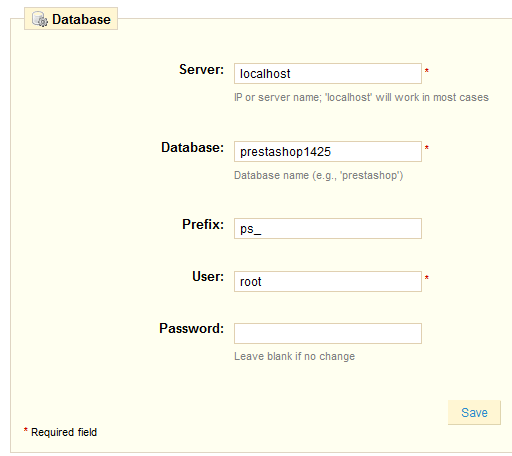
You can change your store’s database settings if you need to change your database server, or if you change the configuration access to your database. However, before making any changes, be careful and do all the necessary checks, or ask your host. These changes are required only if you changed your database settings at your server level.
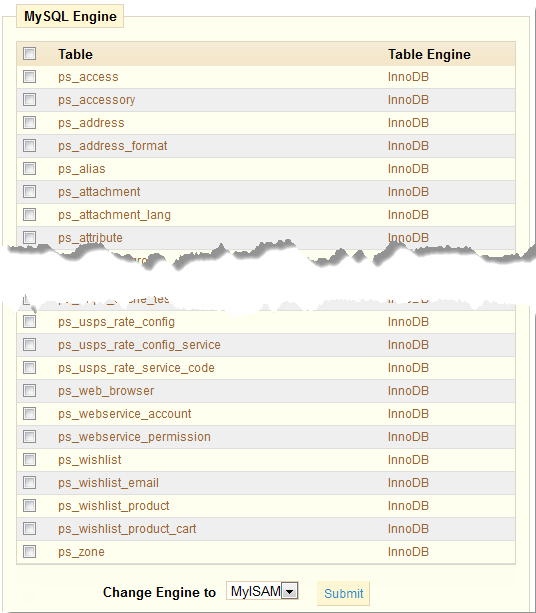
At the bottom of the page is the MySQL Engine section, which is a long list of all of PrestaShop's table, and their MySQL engine.
You can change the engine by ticking the appropriate tables, choose the engine in the drop-down menu, and clicking "Submit".
You can learn more about the various MySQL engines (including some not available to you) on the MySQL website.
Localization
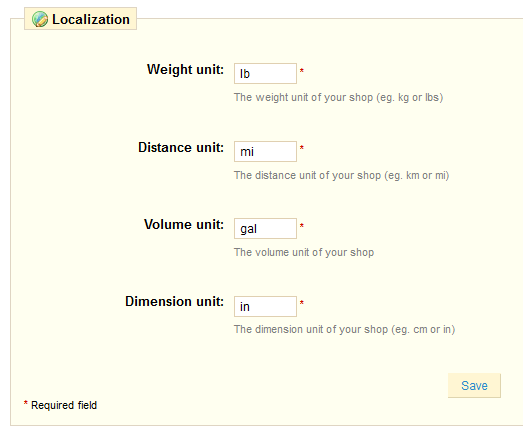
This sub-tab enables you to the units used for your products.
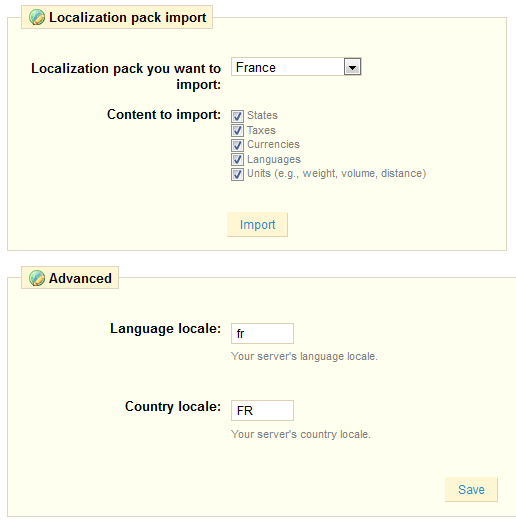
In addition to that, PrestaShop provides you with an extensive list of existing unit localization packs.
Choose your shop's country, check the box that apply, and whole lot of local data will be imported for you.
Finally, you can indicate your shop's language, using the adequate ISO 639 code for the language, and the adequate ISO 3166 code for the country.
Search
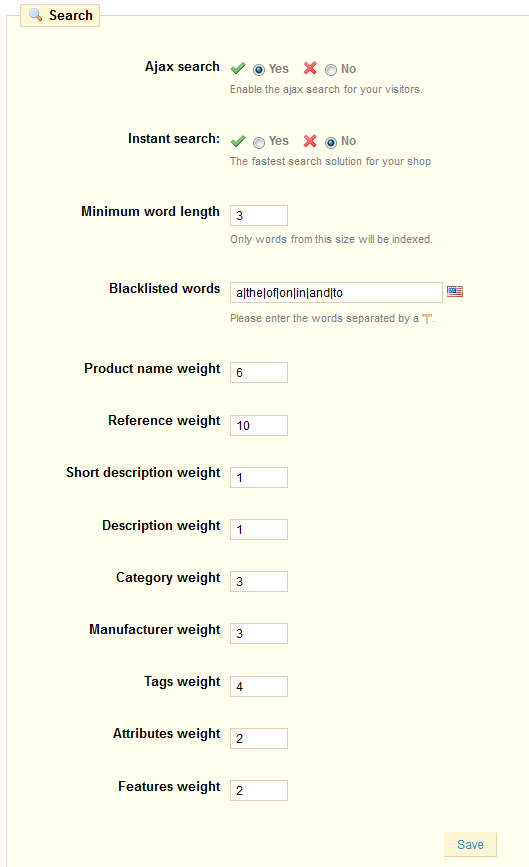
The "Search" sub-tab enables you to configure your shop's search function.
The "Indexation" section provides information on the number of products that can be searched through your shop's search function, and compares it to the number of products present in the database. If the value does not match the number of products you have in your store, you must select the option "Add missing products to the index."
The following information permits
you to configure the behavior of
your shop’s search function
- AJAX search. Enabling it displays a list of results from the moment your customers type a few letters into the search bar, as seen below.
- Instant Search.
- Minimum word length. You can choose the minimum size at which a word may be registered in the search index and found by your customers. This feature allows you to eliminate short words in the search, such as prepositions or articles (the, the, of ..).
- Blacklisted words. You can choose the terms that must not be found by your visitors. Enter them directly into the field separated by "|".
- Product Name Weight. PrestaShop enables you to prioritize certain data when a search is performed on your shop. Here is how: Consider the keyword search term "player". This term is associated with the product "iPod shuffle" in the test store, and is also the name of an example product that we created, called "Walkman example".
- We will show first the search results that has the word "player" in the name of the product. To do this, we will assign to the "Product Name weight" field a value that is worth far more than others. In our case, we are going to write 10 and place the value of field "Tags Weight" at 1. This way, the product with this term in its name that will appear first.
- We take the same term "Player" but inverse the values in the fields: "Product Name Weight" thus gets a 1, and "Tags Weight" gets a 10 .
You have many more factors that you can assign a weight to: short description, category, tags, attributes, etc. You will find that the display order of results is reversed because we changed the weight of the various fields. Fine-tuning these settings will be more visible on a large catalog with many references.
Once your changes have been made, click on "Save" for them to take effect immediately.
Performance
This tab combines many tools and tips that might help you improve your shop's performance (server-wises, not sales-wise).
Smarty
Smarty is the name of the templating language used by PrestaShop's themes.
- Force compile. Only enable this if you are building a theme, and needed to see your changes at each page reload.
- Cache. Only disable this if you debugging a theme or a plugin for PrestaShop: otherwise, you should probably not touch this.
Combine, Compress and Cache (CCC)
CCC is a set of tools aimed at minimizing server load and theme loading time.
- Smart cache for CSS.
- Smart cache for JavaScript.
- Minify HTML.
- Compress inline JavaScript in HTML.
- High risk HTML compression. It is marked as "high risk" because while the HTML code is very much compressed, it will not respect web-standards anymore. Use it at your own risk: some search engine do not deal well with non-standard-respecting website.
Media servers enable you to redirect part of your traffic (media files, for instance) to other servers under your control, through other domains or sub-domains.
Cyphering
Cyphering means to encrypt data so as to render unreadable to unwanted eyes. Your costumers' account details, as well your own, are protect by cyphering. Here you can choose the algorithm you prefer:
- Rijndael with mcrypt lib. Default choice. Fast and secure.
- custom BlowFish class. Better security, but performance take a toll, as it takes more time to validate the authentication, this for each page load. You customers might appreciate the added security, but might not like the time spent waiting for the page to load.
Ergo, choose wisely.
Caching
Your server's cache stores static versions of your dynamic webpage, in order to server these to your customers and thus reduce server load and compiling time.
This tab enables you to choose to enable caching, and choose the caching method:
- Memcached. A distributed caching system. Very effective, but you need to make sure that your server/host supports it – most probably, if your PHP configuration features the Memcached PECL extension, you're good to go. You can add Memcached servers by clicking on the "Add server" link.
- File system. The static files are simply stored as any other file, on your server. You can indicate the directory depth
!_Images^239-preference-performanceCiphering|border=1!
Geolocation
Geolocation is "the identification of the real-world geographic location of an object, such as a radar, mobile phone or an Internet-connected computer". In our case, geolocation is used to discover the location of a visitor, using his computer's IP and other tools. One of the usage of geolocation si to block visitors from certain cities/countries.
As indicated the first time you open the "Geolocation" sub-tab, in order to use geolocation, you need download this file and decompress it into the /tools/geoip/ directory. This file is the GeoLite City database from MaxMind, an accurate database of cities locations.
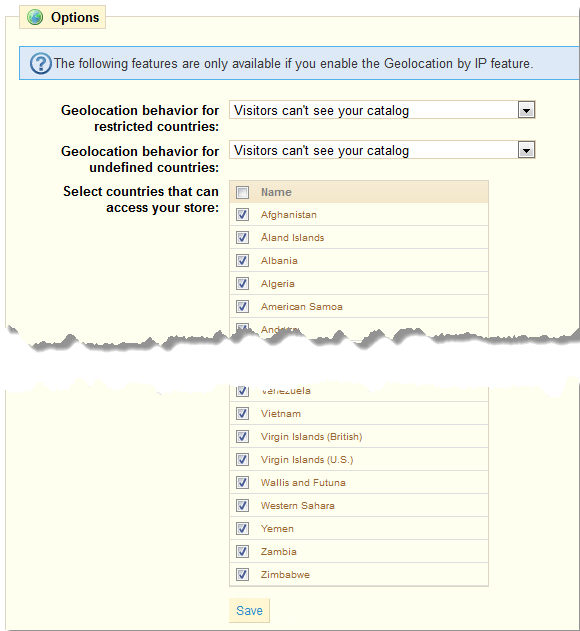
Once the file is in place and geolocation is enabled, you can choose which countries can access your shop (all of them, by default), and set PrestaShop's behavior for restricted and undefined countries:
- Visitors can't see your catalog.
- Visitors can see your catalog but can't make an order.
- All features are available (only for undefined countries).
Click the "Save" button, at the bottom of the form, to confirm your choices.
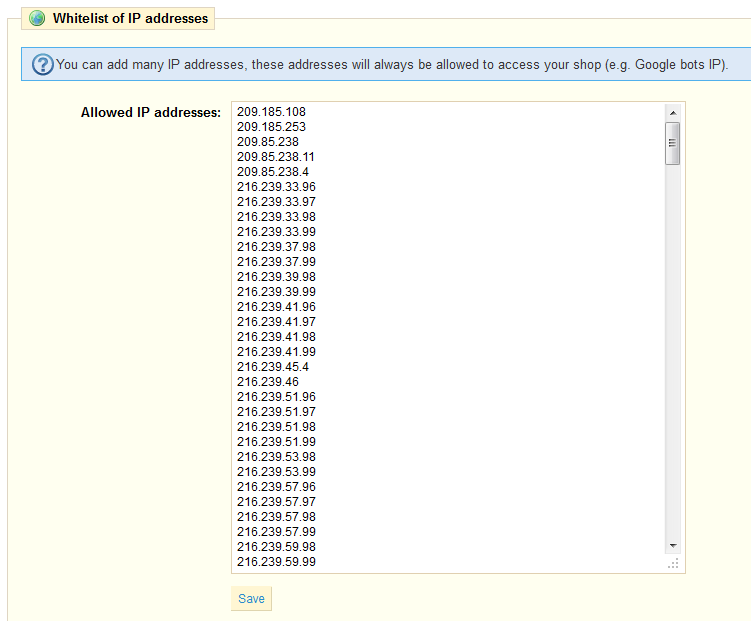
At the bottom of the "Geolocation" sub-tab is the "Whitelist of IP address" section. It enables you to block specific IPs rather than blocking whole countries. It can be useful in case of spammers, bots or attacks. It is already filled with a list of known bad IPs. Add as many as needed, one per line, and click "Save".


