
Spis zawartości
Pierwsze kroki w PrestaShopie 1.6
Musisz poświęcić trochę czasu, by mieć pewność, że każda część Twojego przyszłego sklepu internetowego jest prawidłowo skonfigurowana , zabezpieczona, sprawdzona i gotowa do rozpoczęcia sprzedaży.
Wprawdzie PrestaShop znacznie ułatwia zainstalowanie sklepu i zbudowanie Twojego biznesu w Internecie, ale niemożliwe jest rozpoczęcie sprzedaży w kilka sekund: tu masz do czynienia z produktami, klientami, przewoźnikami i, co najważniejsze, z rzeczywistymi kwotami pieniężnymi, które będą przepływały z kont klientów na Twoje konto bankowe. Wiemy, że chcesz mieć pewność, że nie będzie żadnych kłopotów w procesie potwierdzania zamówień, że produkty będzie można znaleźć w magazynie, zapakować i wysłać do klientów bez żadnej awarii ani żadnych nieprzewidzianych okoliczności, które zaszłyby bez Twojej wiedzy.
PrestaShop jest bardzo kompletnym narzędziem, a ogrom jego możliwości może przytłaczać. Niniejszy rozdział poprowadzi Cię zatem przez kilka podstawowych czynności, które należy wykonać przed wielką premierą Twojego sklepu. Wiele można i trzeba zrobić jeszcze zanim Twój sklep zacznie działać, ale są kluczowe kroki konfiguracyjne dla jakiegokolwiek sklepu.
Wyłącz swój sklep
Zakładamy, że jesteś w trakcie pierwszej godziny po instalacji Twojego sklepu na PrestaShop. Wyłączenie sklepu powoduje, że nikt nie może uzyskać do niego dostępu w czasie, gdy Ty zajmujesz się wprowadzaniem zmian, wprowadzaniem produktów, określaniem cen i podatków, instalowaniem modułów płatności i nowego szablonu oraz ustalaniem przewoźników… Określa się to jako wprowadzenie sklepu w „tryb konserwacji”.

W panelu administracyjnym przejdź do menu: „Preferencje/Przerwa techniczna”. Strona ta zawiera dwa ustawienia:
- Włącz sklep. Wystarczy wybrać „Nie”, a odwiedzający będą na stronie widzieli informację, że sklep będzie wkrótce dostępny.
- Adres IP do zarządzania. To miejsce, w którym musisz wpisać swój adres IP, tak aby wciąż mieć dostęp do strony głównej i przeglądać swój sklep tak, jak gdyby był dostępny dla wszystkich. To konieczność za każdym razem, kiedy wprowadzasz sklep w tryb konserwacji, gdyż zawsze będziesz musiał przeglądać front-end (stronę główną, która wyświetla się użytkownikom), tak aby upewnić się, że wszystko znalazło się na miejscu, zgodnie z przeznaczeniem. Wystarczy kliknąć w przycisk „Dodaj mój IP”. Możesz dodać więcej adresów IP, rozdzielając je przecinkami.
Jeśli już wybierzesz swój szablon i produkty, możesz zamieścić sklep w trybie katalogu. Oznacza to, że klienci mogą przeglądać zawartość sklepu, ale ceny nie będą wyświetlane. Nie będą oni w stanie dodać czegokolwiek do koszyka, dopóki nie wyłączysz trybu katalogowego.
Tryb katalogowy możesz aktywować, przechodząc do strony „Preferencje/Produkty”. Tryb katalogowy jest na pierwszym miejscu.
![]()
Usuń zawartość domyślnego sklepu
Domyślna instalacja oferuje tylko garstkę produktów – głównie damską odzież. Ich jedynym zastosowaniem jest pomóc Ci w poznaniu tego, jak zorganizowany jest prawdziwy sklep. Po tym, gdy opanujesz całą złożoność powiązań pomiędzy produktami, kategoriami, zamówieniami i klientami, należy usunąć te wszystkie elementy po to, byś mógł uruchomić sklep z czystym kontem.
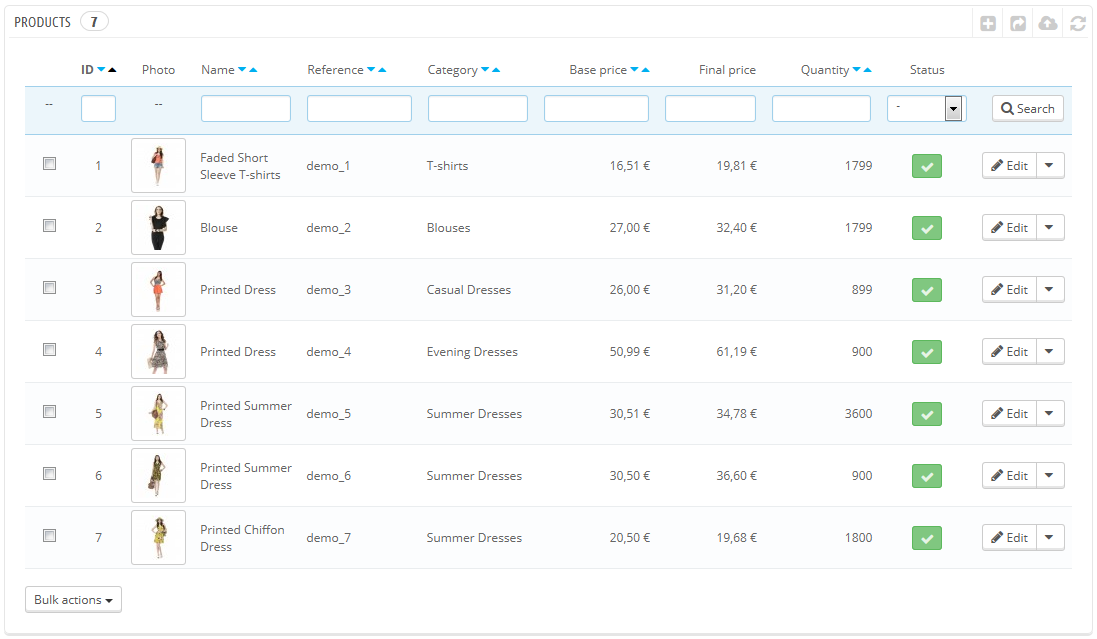
Należy zatem usunąć wszystkie domyślne dane, co oznacza:
- produkty oraz ich…:
kategorie
atrybuty
funkcje
producenci
dostawcy
mapowanie obrazu
tagi
- zamówienia
- wiadomości z zamówieniami
- klienci
- koszyki
- przewoźnicy
- zakresy cenowe
- zakresy wagowe
- kontakt i sklepy (usunąć lub dostosować do potrzeb sklepu)
- strony CMS (usunąć lub dostosować do potrzeb firmy).
Wymagałoby to jednak przeglądania wielu różnych stron w back-office i usuwania zawartości strona po stronie. Jest na to jednak o wiele łatwiejszy sposób:
- Przejdź do sekcji „Moduły > Moduły”.
- Odszukaj moduł „Oczyszczanie PrestaShop” (Database Cleaner) i kliknij przycisk „Instaluj”.
- Przeniesiono Cię bezpośrednio do strony konfiguracji (jeśli nie, należy kliknąć przycisk „Konfiguracja”).
- Przeczytaj i zatwierdź ostrzeżenie, a następnie kliknij przycisk „Usuń katalog”: zlikwidowane zostaną wszystkie produkty, ich atrybuty, producentów itd.
- Przeczytaj i zatwierdź ostrzeżenie, a następnie kliknij przycisk „Usuń zamówienia i klientów”: zlikwidowane zostaną wszyscy klienci, ich zamówienia, koszyki itd.
- Kliknij przycisk „Sprawdź i napraw”, by zlikwidować ograniczenia integralności bazy danych.
- Kliknij przycisk „Wyczyść i optymalizuj”, by zreorganizować fizyczne przechowywanie danych z tabel i powiązanych z nimi odnośników, by zmniejszyć powierzchnię magazynową i poprawić wydajność wejścia-wyjścia podczas dostępu do tabel.
NIE MA ODWROTU. Pamiętaj, by kliknąć te przyciski tylko wtedy, gdy naprawdę zamierzasz oczyścić bazę danych z jej domyślnej zawartości.
Konfiguruj informacje sklepowe
Teraz, gdy już wyczyściłeś sklep domyślny, możesz rozpocząć tworzenie własnego, a to zakłada ustawienie wszystkich Twoich upodobań, rozpoczynając od informacji osobistych i preferencji.
Podstawowe ustawienia sklepu
Należy zwrócić uwagę na następujące ustawienia, których większość jest ważna ze względu na fakt, że wyświetla się na front-office, a więc przed oczyma Twoich klientów.
Niektóre z tych ustawień wymagają konfiguracji modułu zamiast zmiany ustawień PrestaShop.
Konfigurowanie modułu jest bardzo proste:
- Przejdź do strony „Moduły” w menu „Moduły”.
- Wpisz nazwę modułu (lub jej część) w polu wyszukiwania. Wyniki powinny wyświetlać się już w trakcie pisania.
- Gdy moduł zostanie znaleziony, kliknij przycisk „Konfiguruj” i postępuj zgodnie z instrukcjami.
W przypadku każdego przedstawionego modułu należy przeczytać jego dokumentację, aby uzyskać więcej informacji.
Ustawienia | Opis | Gdzie to znaleźć |
|---|---|---|
Nazwa sklepu | Defines your brand, most notably on search engines (Google, Yahoo!, Bing...). | "Preferences" menu, "Store Contacts" page, then in the "Contact details" section, edit the "Shop name" option. |
Shop logo | Defines your brand visually. The default logo says "YourLogo" as an incentive to use yours. | "Preferences" menu, "Themes" page, "Appearance" section, then change the various default images to your logo. |
Default shop currency | The currency in which you want to set the default price for your products. | "Localization" menu, "Localization" page, "Configuration" section. |
Customer service info | A block presenting the phone number for your customer service, and a button to send you an e-mail. | "Contact block" module. |
Company info / | A block presenting your contact address, the phone number for your customer service, and a link to send you an e-mail. | "Block contact info" module. |
Advertising | A block presenting an image with a link to another site. | "Advertising block" module. |
Image slider | The slider presents several images, scrolling one after the other. It is a strong visual signature for your store and products. | "Image slider for your homepage" module. |
CMS pages | The content of static pages, such as "About Us", "Delivery", "Legal Notice", "Terms and Conditions", and "Secure Payment". Some of them have default content, which you should adapt to your business; some others are empty, and you should paste your own text. | "Preferences" menu, "CMS" page, then edit and create pages at will. |
| Social networks | A block presenting three links: your company's Facebook page, your company's Twitter account, and the RSS feed for your company's blog (or "current events" site). | "Social networking block" module. |
| Top menu | The top of the default theme uses a top menu to indicate categories that the visitor can go to, as well as links to other locations – for instance, the default installation has a "Blog" link which sends the use to the official PrestaShop blog. | "Top horizontal menu" module. |
| Homepage content | The default theme contains a lot of demo content: texts, images, links, etc. If you intend on using that theme for your own store instead of buying your theme, you should make sure to remove all the default content first. | "Theme configurator" module: this module handles a lot of things on your theme. Mainly, it enables you to switch some feature off and on (social sharing buttons, top banner, payment logos, etc.), and perhaps more importantly, it lets you easily add/change images on your home-page. "Custom CMS information block" module: this module helps you manager the two last blocks at the bottom of the home-page, right before the footer: the "Free shipping etc." one and the "Custom block" one. |
These are the most visible default settings on your front-end – at least with the default theme.
The "Where to find it" column enables you to see where you can find the interface to change these aspects of your store. This user guide will provide you with more details for each interface.
Shop languages
PrestaShop is able to work with many languages, both on the front-office and the back-office. As soon as more than one language is enabled in your back-office, each back-office text-field is accompanied with a language code selector, which indicates the current language, and which you can click in order to choose another language in which to write that field's content.
By default, PrestaShop is installed with two languages: the one used when installing the software, and French. To manage the currently installed languages, go to the "Localization / Languages" page. It presents you with a table of the available languages.
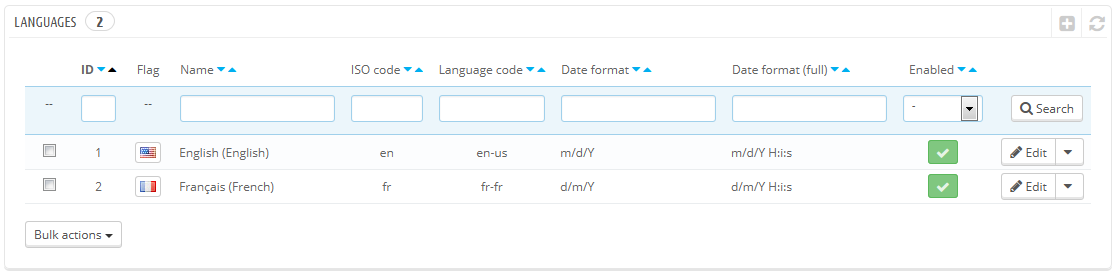
The currently enabled language(s) have a green "Yes", while the others have a red "No". Click on a "Yes" to disable the selected language; click on a "No" to enable it back.
You can install and enable many languages if you think your shop needs them, but be aware that you will have to translate your content for all of the enabled languages: product names, descriptions, tags, category names and descriptions, static content (CMS pages), module settings, etc.
You can easily import many more languages in the "Localization / Localization" page, and then enable them in the "Localization / Languages" page.
Employees information
Should you have people helping you with your shop (whether they are your family, your friends, or paid employees), you should make sure to create an employee account for each of them – if only to know who has performed which recent action. The other advantage is that you can give them specific profiles and specific access rights to the administration pages: for instance, you might not want everyone to have access to your statistics, your invoices or your payment settings.
You can create as many profiles as needed.
To create a new employee account, go to the "Administration" menu, select "Employees", and click the "Add new employee" button. Give it a name, such as "Martin Doe" or "Shipping handler", and save.
An account can be used for as many people as needed – but we do advise you to create one for each helping person.
Now that you have a proper account for this employee, you should give that account specific permissions, tailored to the employee's tasks. By default, a new profile cannot do much. It is up to you to set exactly the parts of your shop to which that profile should have access. It can be a tedious task, but it is an important one.
To assign permissions to an employee account, you must use the "Profile" option in the account creation page: this menu lets you pick the account's profile (SuperAdmin, translator, etc.)

You can edit these permissions this way: go to the "Administration" menu, select "Permissions", and select the profile you want to change. A long list of permissions appears: edit them at will. Your changes are saved automatically.
Configure your payment methods
Your shop is meant to earn money, and this can only become a reality if you use at least one payment module. Several modules are already available in the default install, which you can install and configure (from the "Modules" page under the "Modules" menu, in the "Payments & Gateways" category), and create restrictions for them (in the "Payment" page under the "Modules" menu). Many payment modules require you to first set up an account on the service they were built for.
See the "Payment" section of the "Making the Native Modules Work" chapter of this guide in order to learn about them all.
You can also install other payment modules, downloaded from the Addons marketplace: http://addons.prestashop.com/en/4-payments-gateways-prestashop-modules
Check and bank wire are the only two payment methods which are enabled by default. If you choose to keep them, you need to configure them with your information: check order and address, account owner, bank details (IBAN, BIC, etc.).
These payment methods are configured through the "Bank Wire" and "Payment by check" modules, which you can find in the "Payments & Gateways" category of the modules list.
Configure carriers and shipment
Products sold on your shop must be shipped to your customers – unless you only sell downloadable products, in which case the "Shipping" menu will be of little use to you.
Whether you are sending your products yourself by regular post office mail, or you have set up a contract with a carrier, you should set this information within PrestaShop.
See the "Managing Shipping" chapter of this guide in order to learn about shipping and carriers.
Merchandise return is not enabled by default. If you want to allow your customers to return products and get a refund or a voucher, you can do it in the "Merchandise return (RMA) options" of the "Merchandise return" page, under the "Orders" menu.
Merchandise return is explained in the "Managing Orders" chapter of this guide.
Choose your theme
Your shop should have its own theme in order to have a distinctive style, and therefore be more recognizable, separating it from the numerous other online shops.
There are many themes to choose from on the PrestaShop Addons marketplace: http://addons.prestashop.com/en/3-templates-prestashop.
You can also choose to create your own theme, or have it created for you by a developer. Refer to the PrestaShop Designer Guide for help.
Once your theme is installed, you should explore it fully in order to know it by heart and be able to help customers out of a situation. Read its documentation carefully.
You can and should customize some of the theme's aspects, most notably its logo in various situations (header, mail, invoice, etc.). This is done using the "Themes" preferences page, which you can find under the "Preferences" menu.
Choose your modules
PrestaShop comes bundled with more than a hundred modules. These are very varied: analytics, front-office features, payment, shipping... You should explore the available modules in full, in order to know which ones you might want to enable, and which you'd rather keep disabled.
See the "Managing Modules" and "Making The Native Modules Work" chapters of this guide in order to learn about them all.
You can also find many other modules on the Addons marketplace: http://addons.prestashop.com/en/2-modules-prestashop
Every time you activate and configure a module, make sure that it does work well within the confines of your theme, in case its features impact your shop's front-end.
Create your products and product categories
This is described in details in the "Adding Products and Product Categories" chapter.
Create your static content
If you haven't done this already, you should take the time to write the content for the various static pages which are either already available in your PrestaShop installation, or ones that you feel are needed.
Some pages already exist, but their content should really be triple-checked, as they can have a lot of impact on your shop's legal status, among other things.
The default pages are "About Us", "Delivery", "Legal Notice", "Terms and Conditions", and "Secure Payment". Some of them have default content, which you should update; some others are empty, and you should paste your own text.
To edit these pages, go to the "Preferences" menu, click the "CMS" page, then choose the page you want to edit, or create new ones.
You can create as many pages as you feel are necessary.
Build your top menu
Now that you have product categories and CMS pages, you should arrange them in a logical and compelling way in the top menu.
This is done using the "Top horizontal menu" module: go to the "Modules" page, type "menu" in the module search form, and you should find the module. Enable it if it is disabled, then configure it: remove the pages or categories you deem unnecessary, add other pages, and move the content around, until you are satisfied with your menu's hierarchy.
Activate your shop
Now that all is set and done, you can finally open your shop to the public.
Go the "Preferences / Maintenance" page, and change the two options:
- Enable Shop: set it back to "Yes".
- Maintenance IP: remove your IP from the list. This is optional: your shop will still work if you leave the field as it is.
Your shop should now be fully ready to receive its first visitors... and take its first orders!