
Spis zawartości
Odkrywanie obszaru administracyjnego
Teraz, gdy Twój PrestaShop 1.6 został już zainstalowany i jesteś zalogowany do panelu administracyjnego, potrzebujesz trochę czasu, by przejść przez jego interfejs administracyjny, zrozumieć jego powiadomienia i wiedzieć, gdzie znaleźć określone informacje.
Konstrukcja obszaru administracyjnego została w wersji 1.6 PrestaShop całkowicie odnowiona, by był bardziej intuicyjny i ergonomiczny i lepiej funkcjonował na urządzeniach mobilnych.
Mimo że większość stron i opcji wersji 1.5 znajduje się tam, gdzie mógłbyś ich oczekiwać, trochę czasu może zająć oswojenie się z nimi.
Stworzyliśmy tę sekcję, by pomóc w odkryciu interfejsu administracyjnego PrestaShop. Został on zaprojektowany, by być bardziej ekonomiczny i łatwiejszy w użyciu, ale należy pamiętać, że powinieneś przeczytać wszystkie rozdziały podręcznika, aby w pełni zrozumieć zalety tego nowego narzędzia e-commerce!
Prezentacja głównego interfejsu
Poświęć trochę czasu na zapoznanie się z pulpitem, czyli pierwszą stroną, którą widzisz po połączeniu się z back-office. Nie tylko daje Ci ona zbiór wszystkiego, co powinieneś w danej chwili wiedzieć o swoim sklepie, z linkami do najbardziej przydatnych stron, lecz także udziela Ci, jako nowemu użytkownikowi PrestaShop, kilku porad odnoszących się do ustawień, na które należy zwracać uwagę.
Górny pasek

Na górze strony znajduje się ciemny pasek zawierający kilka linków:
- (nazwa Twojego sklepu). Ten link przeniesie Cię z powrotem do pulpitu z dowolnej strony.
- Ikona koszyka. Podpowiedź wskazuje na liczbę nowych zamówień. Z tego miejsca możesz albo wyświetlić jedno z zamówień, albo przejść do listy zamówień. Po kliknięciu na ikonę otworzy się okno prezentujące nowe zamówienia, które pojawiły się od czasu ostatniego kliknięcia.
- Ikona osoby. Podpowiedź wskazuje na liczbę nowych klientów. Stamtąd można albo wyświetlić stronę z informacjami o klientach, albo przejść do listy klientów. Po kliknięciu na ikonę otworzy się okno prezentujące nowo zarejestrowanych klientów, którzy pojawili się od czasu ostatniego kliknięcia.
- Ikona wiadomości. Podpowiedź wskazuje na liczbę nowych wiadomości. Po kliknięciu na ikonę otworzy się okno prezentujące nowe wiadomości otrzymane przez obsługi klienta od czasu ostatniego kliknięcia. Stamtąd można albo wyświetlić jedną z wiadomości, albo przejść do strony serwisu.
- Ikona pucharu. Podpowiedź wskazuje na liczbę nowych elementów. Po kliknięciu na ikonę otworzy się okno prezentujące Twoje postępy jako kupca. Stamtąd można wyświetlić całą stronę z odznakami i punktami pochodzącymi z modułu „Osiągnięcia sprzedawcy”.
- Szybki dostęp. Menu zawiera skróty do niektórych z najbardziej przydatnych stron, które możesz modyfikować na stronie „Szybki dostęp”, z menu „Administracja”.
- Nie jesteś zalogowany do PrestaShop Addons. Otwiera okno modalne umożliwiające podłączenie Twojego sklepu do sklepu Addons i, tym samym, uzyskanie aktualizacji modułów i szablonów, które zakupiłeś.
- Link „Zobacz Mój Sklep”. Otwiera nową kartę w przeglądarce ze stroną główną Twojego sklepu.
- Link (imię i nazwisko). Proste przypomnienie konta, na którym jesteś zalogowany.
- Link „Moje ustawienia”. Otwiera stronę z bieżącymi ustawieniami konta użytkownika, na której możesz dostosowywać określone opcje, jak język back-office czy Twoje hasło.
- Link „Wyloguj się”. Wylogowałeś się z konta użytkownika.
Menu
Podczas codziennych czynności związanych z administrowaniem sklepem trzeba będzie regularnie przeglądać liczne strony i opcje back-office.
Domyślnie menu systemowe w PrestaShop 1.6 jest wyświetlane po lewej stronie. Możesz je wyświetlić na górze strony, korzystając z opcji „Orientacja menu administracyjnego” na stronie ustawień użytkownika (dostęp do niej masz poprzez link z Twoim imieniem i nazwiskiem znajdujący się w górnym pasku.
![]()
Czy to będzie w formacie poziomym, czy pionowym, zawartość każdego menu jest wyświetlana, gdy wskaźnik myszy znajduje się na tytule menu, redukując w ten sposób konieczność ładowania nowych ekranów tylko po to, by uzyskać dostęp do opcji menu.
Ponadto format pionowy może być zredukowany tylko do postaci ikon poprzez kliknięcie ikony „linie równoległe” znajdującej się u dołu menu.
Każde menu odnosi się do danego zbioru zadań: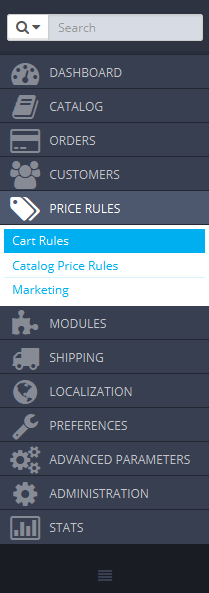
- Pole wyszukiwania wraz z listą rozwijaną. Pozwala Ci na przeszukiwanie zawartości Twojego sklepu.
- Katalog. To serce Twojego sklepu, miejsce, gdzie można dodać swoje produkty, tworzyć kategorie, ustawiać przewoźników i dostawców…
- Zamówienia. Gdy klient rozpoczyna dodawanie produktów do swojego koszyka, zobaczysz pierwsze zamówienia, które się pojawią w tym menu, wraz z powiązanymi z nimi fakturami. Również z tego menu zarządzać będziesz zwrotami towarów, należnościami i obsługą zamówień klienta.
- Klienci. Tutaj dostępne są wszystkie informacje o Twoich klientach. Możesz edytować ich adresy, tworzyć grupy klientów, do których można zastosować specjalne zniżki, zarządzać obsługą klienta, a w razie potrzeby operować zwrotami grzecznościowymi.
- Reguły cenowe. To konkretne menu pozwala szybko generować kupony rabatowe i obniżki cenowe poprzez zbiory zasad.
- Moduły. Zwiększ możliwości i użyteczność Twojego sklepu, dodając i aktywując moduły: ponad sto z nich jest dostępnych domyślnie, zaś znacznie więcej można zakupić w sklepie Addons (http://addons.prestashop.com/). To także miejsce, gdzie możesz zarządzać szablonami oraz umieszczać bloki z zawartością modułów na Twoim szablonie (włącznie z funkcją edycji na żywo). Ostatnia strona menu pozwala na zastosowanie globalnych ustawień modułów płatności.
- Wysyłka. Wszystko, co dotyczy przewoźników i kosztów wysyłki, a także marketingu.
- Localization. Helps you customize your shop with local values, such as language and translation, currency, units, taxes and tax rules, and geographical entities (regions, countries, etc.).
- Preferences. PrestaShop is a very configurable e-commerce solution, and you can edit just about any of its behaviors using the full-featured preferences.
- Advanced Parameters. This menu contains links to tools and informational pages that are too specific to fit in other menus, such as the Web service settings, the database backup tool, or the performance page, among others.
- Administration. Here are the settings pertaining to the back-office itself; for instance, the content of the Quick Access menu, the employees list and permissions, or the menu order, among others.
- Stats. This menu gives you access to all the numerous statistics and graphics that are gathered and generated by PrestaShop.
These are the default menus. Note that modules can add new options to the existing pages, new pages to the existing menus, and even new menus.
Also, one menu is only available when the proper option is set:
- Stock. This menu gives you access to stock management feature, where you can handle warehouses, stock movement and supply orders.
It can be made available through the "Products" preference page: simply activate the "Enable advanced stock management" option (in the "Products stock" section) and save your change to see the menu appear.
All the default standard menus, including the "Stock" menu, are explained in depth in this user guide.
The buttons
Many of the back-end pages use recurring buttons, either at the top or at the bottom of the screen. For instance, the product edition page can have up to 8 buttons available at the same time.
More than simple shortcuts, they open actual features that you will use very often.
The available buttons vary a lot depending on the context, and therefore two different pages might not feature the same set of buttons. Still, there are a few that you will often see:
- Add new. Opens the creation page of the current context.
- Recommended modules. Open a pop-in window containing the modules available in the current context.
- Help. Opens the online documentation for the current page.
The "Recommended modules" button presents you the modules which apply to the current context. For instance, in the "Shipping > Carriers" page, it will display the modules from the "Shipping & Logistics" category of modules. This is very helpful when you need to quickly find which module to install and configure in order to get a given result.
Many of the back-office forms are validated with buttons at the bottom of the screen:
- Save. Saves the content of the current page and returns to the list of existing items.
- Save and stay. Saves the content of the current page and keep the page open.
- Cancel. Returns to the list of existing items.
Contextual help
Since version 1.6.0.7 of PrestaShop, the software's documentation is directly embedded into administration interface: clicking on the "Help" button from any back-office page reduces the main interface's width in order to add a new column on the right, which contains the documentation for that section of the back-office.
Another click on the "Help" button closes the contextual help. If you do not close the help column, PrestaShop understands that you want it displayed on every page of the back-office, and thus will maintain the column open until you have clicked to close it.
If the browser's display zone is lower than 1220 pixels width, then PrestaShop will open the contextual documentation in a new browser window rather than reducing the screen space dedicated to the main interface.
At the bottom of the help column, a small form enables you to tell the PrestaShop team whether the help section has been helpful to you or not. Rate the help page by clicking on one of the 5 levels of satisfaction. If you click on one of the two lowest levels, PrestaShop will open a short form allowing to detail your thoughts? You can either fill it and click on the "Submit" button, or close the form by clicking on the cross, in which case only your rating will be sent to our server.
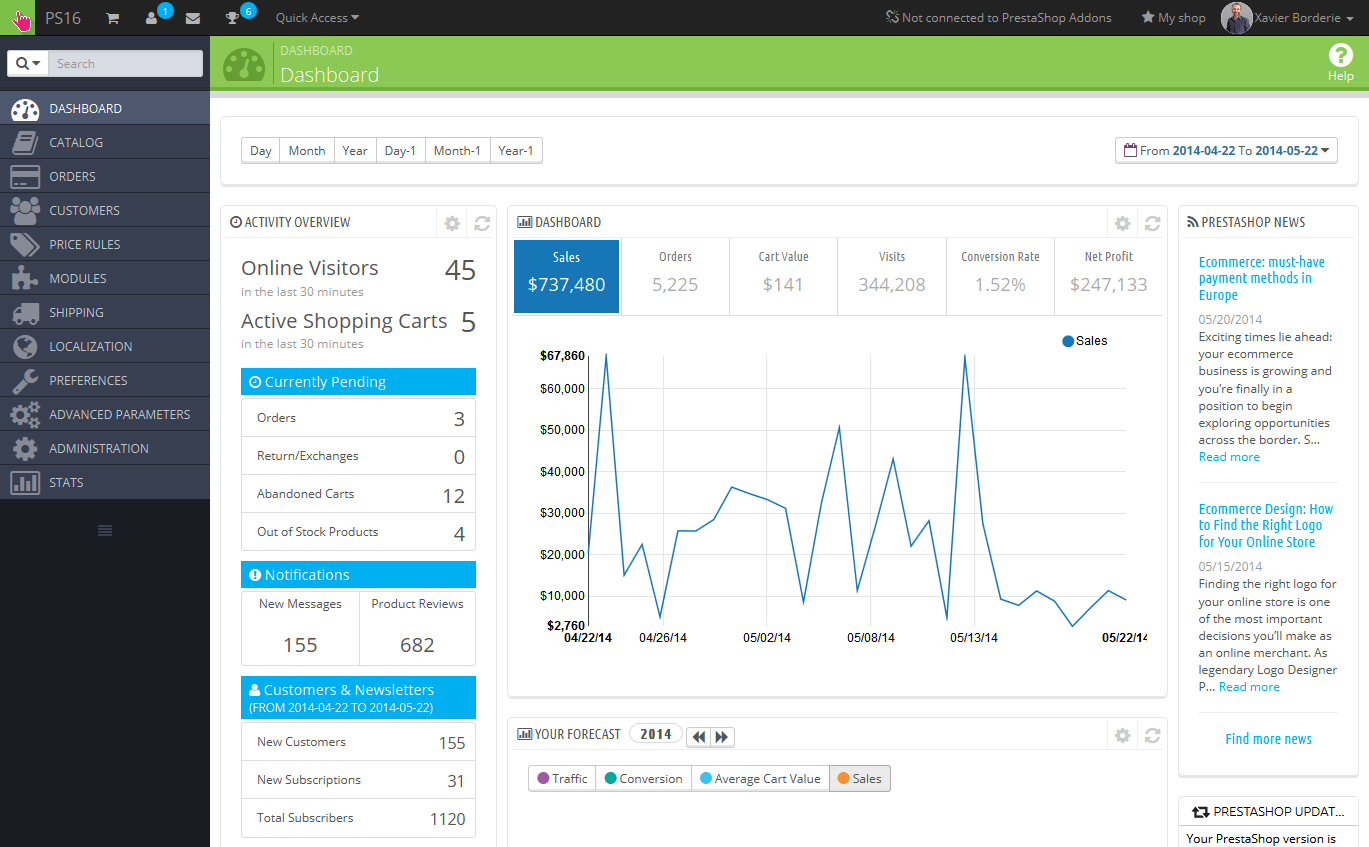
The Dashboard
Let's now explore the content of the Dashboard itself. It can feel crowded to a first-time user, but you will find that it gives an excellent summary of your shop's daily activities at a glance.
The Dashboard is divided in 4 main areas: a horizontal bar, and three columns.
Demo mode
By default, the Dashboard uses fake data so that you can better visualize what the various stats are for.
When using PrestaShop for a real online store, you must disable this fake data so that your real data is used: click on "No" in the "Demo mode" block at the bottom right of the screen.
The horizontal bar
At the top of the Dashboard is a single bar which helps you choose the period of time for the currently displayed dashboard statistics. Three sets of options are available:
- Current day, month or year.
- Previous day, month or year.
- Precise date selection (the button on the right, which opens a date selector).
Choosing an option updates all the blocks of content that are on the Dashboard so that they display data for the chosen period of time only. Blocks that are not stats-based do not change.
In order to choose a period of time, you can either click the first and last date of that period in the calendar (the clicking order does not matter), or you can type the dates in the YYYY-MM-DD format in the text boxes. Click "Apply" to see the Dashboard change according to your settings.
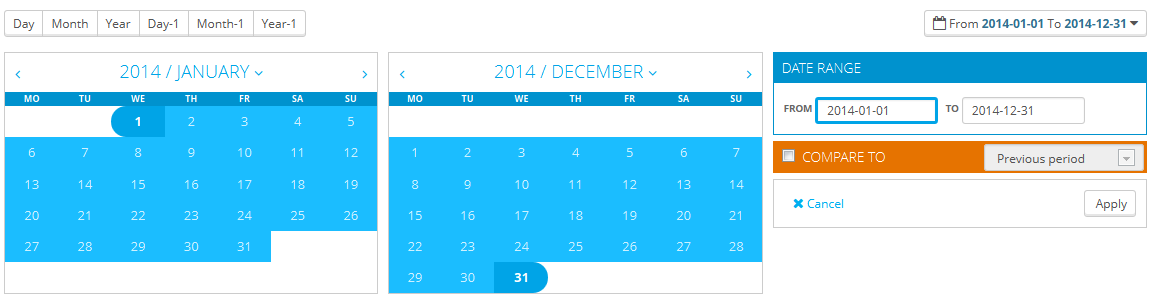
You can also compare two periods of time together by checking the "Compare To" box. Select the second period as would do for the first one (the two can even overlap), then click on the "Apply" button.
When comparing two periods, some of the content blocks will update to indicate the evolution of the data (see for instance the main "Dashboard" block, which presents data from the Dashboard Trends module).
The left column
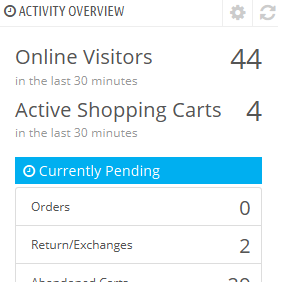 By default, this column presents you with data from the Dashboard Activity module, which gives the main figures from your database in a quick glance:
- Online visitors in the last 30 minutes.
- Active shopping carts in the last 30 minutes.
- Currently pending orders, return/exchange inquiries, abandoned carts and out of stock products.
- Notifications for new messages, order inquiries and product reviews.
- New customers and new newsletter subscriptions.
- Traffic statistics: visits, unique visitors, traffic sources and direct links.
The central column
The central column is where the term "dashboard" takes its importance: this area of the Dashboard presents the user (you) with the most important numbers pertaining to his shop's daily activities, along with a graph of sales and a list of the latest orders. Every time you log into your shop's administration area, you will be first and foremost looking at the evolution that these numbers take. This is where you see your shop live and breathe.
By default, there are three blocks of content in this column, which are handled by modules:
- Dashboard (Dashboard Trends module). This is the main block of information on the dashboard. With its various graphics, it really helps you see if your shop is headed in the right direction or not. Click on one of the graphic type to display it. Additionally, when comparing two time periods, it displays the evolution of each figure in percentages. Hover the graphic with your mouse to see the details.
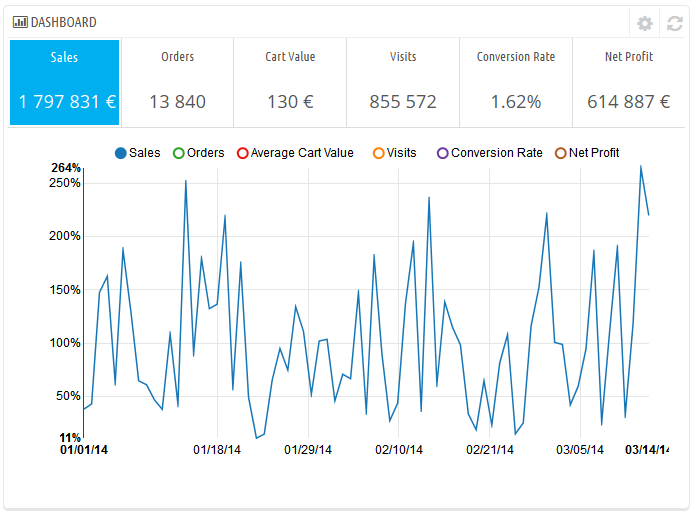
Clicking on its configuration icon (top right) open a new page where you can set various expenses that your shop has (bank wire fee, average shipping fee, hosting expenses, etc.), in order to better indicate your trends. - Your Forecast (Dashboard Goals module). This block presents you with the goals you have for the coming months, and how your shop is doing as compared to them. Hover the graphic with your mouse to see the details.
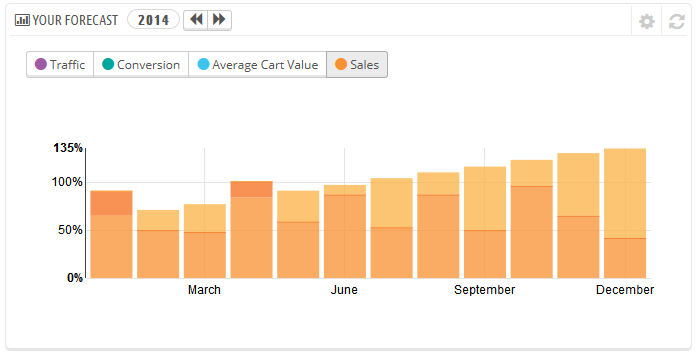
Depending on your monthly results, you should update your forthcoming goals. You can set your goals in the block's configuration form (top right of the block), and fill in your expectations month per month in terms of traffic, conversion rate, and average cart value. The "Sales" column will be updated according to the goals set in the other columns (for instance, for a 1000 visitors with a 2% conversion rate and a $10 average cart, you would get 1000*(2/100)*10 = $200). You can change the currency in the "Currencies" page under the "Localization" menu. - Products and sales (Dashboard Products module). This block presents you with a table of your latest orders and a ranking of your products: best sellers, most viewed and top searches (as searched in your shop's search form, not from search engines).

You can set the number of items to display in each by opening the block's configuration form
The right column
This last column is an informational one: it gives you the latest news from PrestaShop.com, notifications about new PrestaShop versions, and useful links.
It also features the "Demo mode" block, from which you can disable the fake data used by default on the Dashboard and use your own data (as gathered by PrestaShop's statistics system).