
Parámetros de Importación de archivos CSV
La página de importación CSV le permite introducir fácilmente una gran cantidad de productos a su catálogo, o importar datos que exportó y convertió desde otra herramienta de comercio electrónico.
CSV es un acrónimo de "valores separados por comas". Es es un un archivo de texto plano que se utiliza cuanto hay una necesidad de importar, exportar o simplemente almacenar datos en un formato no propietario. Puede obtener mayor información sobre el formato CSV en el siguiente enlace de la Wikipedia: http://es.wikipedia.org/wiki/CSV.
El proceso de importación requiere de la preparación del archivo CSV, y cumplimentar el formulario que presenta la configuración principal:
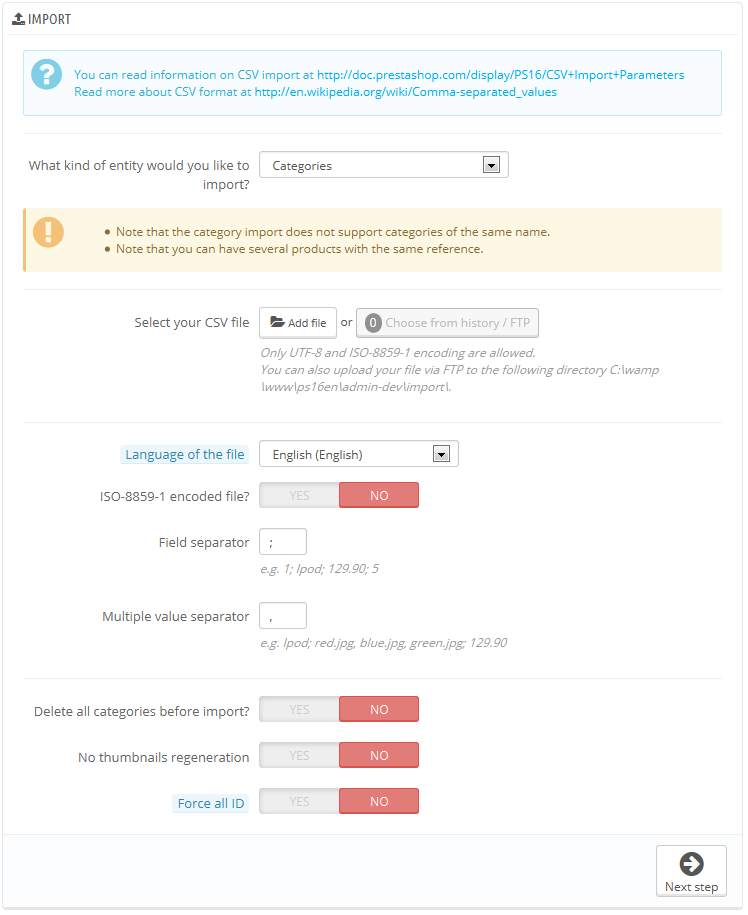
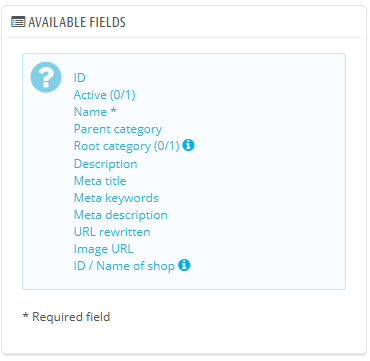
- ¿Qué tipo de entidad desea importar?. Las entidades son los tipos de datos que se pueden importar. Los "Campos disponibles" a la derecha son actualizados cuando se elige una entidad, así que debe conocer previamente la clase de datos que el archivo CSV debe contener.
PrestaShop le permite importar estos tipos de datos:- Categorías,
- Productos,
- Combinaciones,
- Clientes,
- Direcciones,
- Fabricantes,
- Proveedores,
- Alias,
- Pedidos a proveedores (si la Gestión avanzada de stock está activada),
- Detalles de pedidos a proveedores (si la Gestión avanzada de stock está activada).
Elegir un archivo CSV para importar. Puede importar más de un archivo a la vez, pero asegúrese de que todos ellos contienen el mismo tipo de datos.
Puede descargar archivos de ejemplo para cada tipo de datos desde la sección de la derecha "Descargue ejemplos de archivos CSV". Esto le ayuda a comparar estos archivos de ejemplo con sus propios archivos creados, de esta manera puede asegurarse de que los archivos que va a importar están realmente preparados para ser importados a PrestaShop. Estos archivos se almacenan realmente en la carpeta
/docs/csv_importde su instalación de PrestaShop.Idioma del archivo. Los datos solamente pueden ser importados para un simple idioma al mismo tiempo. Si sus datos utilizan más de un idioma, debe dividirlos en tantos archivos como idiomas tenga.
- ¿Archivo codificado en ISO-8859-1?. De forma predeterminada, los archivos de importación deben utilizar la codificación UTF-8. Pero si sus archivos utilizan la norma ISO-8859-1 y prefiere no convertirlos, puede marcar esta casilla.
- Separador de campos. No todos los archivos CSV utilizan comas para separar sus valores: algunos utilizan tabulaciones, otros punto y coma, etc. Puede indicar qué separador utiliza en este campo.
- Separador de valor múltiple. Cuando un atributo puede soportar más de un valor, estos valores deben ser separados con un separador específico. Después de revisar sus archivos, indique su separador aquí.
- ¿Eliminar todos/as ___ antes de la importación?. Esta opción eliminará todas las entradas previamente existentes del tipo de datos que está importando. Esto le ayuda a partir de cero.
- ¿Usar la referencia del producto como clave?.Sólo para la importación de productos. Puede optar por dejar que PrestaShop determine la clave del producto, o que la clave del producto sea el ID del producto. En este caso, asegúrese de que el archivo contiene la ID en todos los productos que quiera importar.
- No regenerar las miniaturas. Solamente para la importación de Categorías y Productos. Puede optar porque PrestaShop regenere las miniaturas que están vinculadas desde su archivo CSV (en los campos "URL de imagen" o "URLs de imágenes").
- Forzar todas las ID's durante la importación. Puede mantener los IDs importados, o dejar que el importador autoincremente éstos.
Cuando cambie el ajuste Entidad, la sección de la derecha, titulada "Campos disponible", cambia para presentar los campos de datos que se esperan. Aunque la herramienta de importación está diseñada para ayudar a PrestaShop a encontrar los campos en el archivo, debe esforzarse para que la importación de datos sea lo más amigable posible, siguiendo el esquema de nombres y el orden de los campos presentados. En caso de que esto no sea así, la importación de datos será más tediosa, pero no imposible.
Some fields have a little information popup available (represented by a "i" logo), which you can display by hovering the mouse cursor over it. They mostly pertain to PrestaShop's multistore or advanced stock management features. Make sure to read them all in order to better build/edit your data files.
Data format
Imported data file must be in text-file, using a CSV-based format and the accompanying .csv file extension. We recommend using a semicolon ";" as a field separator. If you textual data (product description and such) contains semicolons, you should either remove them, or choose another separator in the "Field separator" option.
You can create a CSV file using any text editor (we recommend Notepad++: http://notepad-plus-plus.org/), but we do advise you to use a spreadsheet program, then save your work in the CSV format. Using a spreadsheet program enables you to have an easier and more visual grasp of your data, in comparison to the plain text file. You can use the commercial Microsoft Excel (http://office.microsoft.com/en-us/excel/ or the free OpenOffice.org http://www.openoffice.org/ Calc.
Here is a sample import file, with a list of products:
"Enabled";"Name";"Categories";"Price";"Tax rule ID";"Buying price";"On sale";"Reference";"Weight";"Quantity";"Short desc.";"Long desc";"Images URL"
1;"Test";"1,2,3";130;1;75;0;"PROD-TEST";"0.500";10;"'Tis a short desc.";"This is a long description.";"http://www.myprestashop/images/product1.gif"
0;"Test 02";"1,5";110;1;65;0;"PROD-TEST2";"0.500";10;"'Tis also a short desc.";"This is a long description too.";"http://www.myprestashop/images/product2.gif"
1;"Test 03";"4,5";150;1;85;0;"PROD-TEST3";"0.500";10;"'Tis a short desc. again";"This is also a long description.";"http://www.myprestashop/images/product3.gif"
Note that this is only a regular sample files built for this demonstration; it is purposefully not optimized for PrestaShop importation. If you need a sample file you can learn from, use the ones you can download from the "Upload" button's form.
The first row should be a descriptive name for the data column (you will be able to skip it during the import process). There must be the same number of columns on each row.
You should remember that:
- The price column will use your store's default currency.
- Categories are to be specified using their existing IDs (so you should have imported them first), and separated with a comma (by default).
- The URL of the image must be an absolute link. In other words, it should be the link that may be used in a web browser in order to display the image. For instance: http://www.myprestashop/images/productXXX.gif.
- The file's character encoding should be UTF-8. If not, use ISO-8859-1 and check the "ISO-8859-1 encoded file?" option.
- Dates use the ISO 8601 format, without a time zone designator (the time zone is the one for your store):
2013-06-21 15:07:27.
Uploading the file
Once you have all your data in CSV format, you can upload them to your store's database using the form in this page.
You have two ways to register files to import:
- Using your browser: click the "Add file" button, find your file then validate. Do this as many times as necessary to list all your import files.
- Using your FTP client: upload the files in the
/admin-dev/importfolder of your PrestaShop installation. Reload the import page: the "Choose from history/FTP" button should now indicate a number. Click the button to display the list of available files (including the ones you previously uploaded using the browser), then click the "Use" button for the file you wish to import.
Once your files are all listed in the "Select your CSV file" section, you can proceed with the rest of the form:
- Select the type of data contained in your file, using the drop-down list named "What kind of Entity would you like to import?". Once you have selected the type of data, the list of the available fields appears on the right, which helps you refine your CSV file – at least for the order of the columns, which will soon prove handy.
- Select the language of the imported content. If the target language is not available, you must install it first, in the "Languages" page under the "Localization" menu.
- Select the file encoding. Simply indicate if the file uses ISO-8859-1 or not. If not, then it is assumed the files use UTF-8.
- Select the field separators. We suggest that you leave the default values ("field separator" with a semicolon "
;", "multiple value separators" with a comma ","). But obviously, if your CSV file is built differently, you should change these values accordingly. - If you want to remove all the products in your catalog before importing, select the appropriate option.
- Once all your choices have been made, click "Next step".
All import files are uploaded directly in the admin folder's /import sub-folder. If the CSV File drop-down menu gets too crowded, you can delete old imports directly using your FTP client.
When clicking the "Next step" button, the page reloads with the data mapping tool. This interface helps you map you file's data columns with the ones required by PrestaShop.
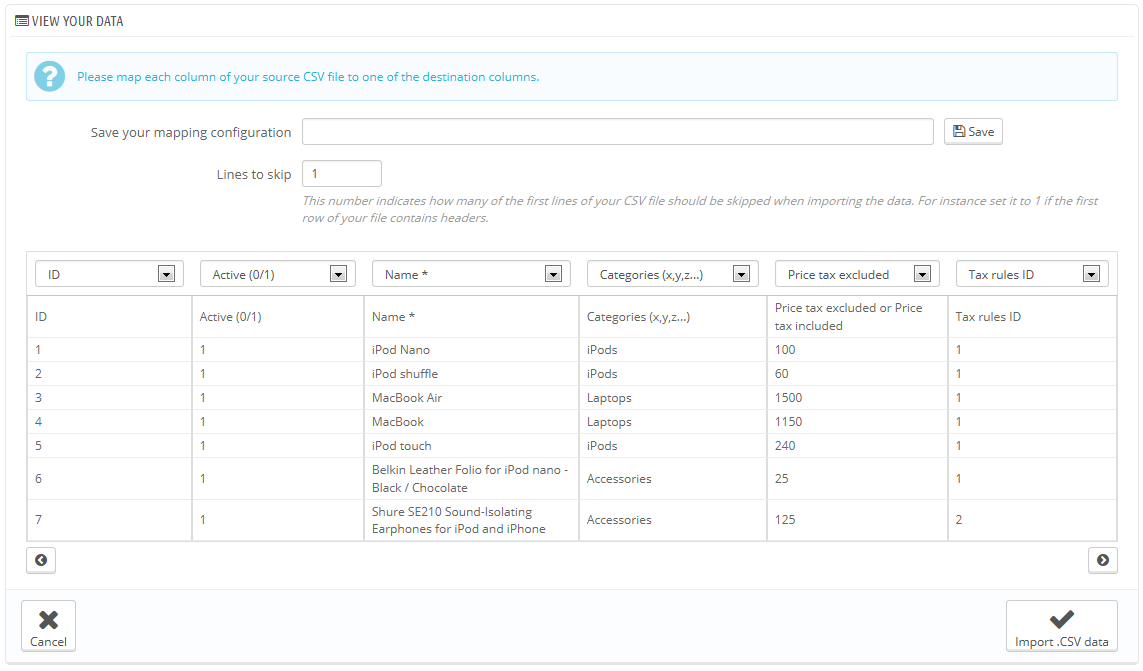
Presented in this table are the rows from your CSV file, placed under arbitrary columns matched to PrestaShop's database needs. It is up to you to make sure that all the columns from your CSV file are matched with the correct column header, using each header's drop-down selector, so as to import your content correctly.
For instance, with our sample file:
- First column. We marked it as "Enabled", PrestaShop presents "ID" as a header. Click on the header's drop-down menu, and select "Active (0/1)".
- Second column. Marked "Name", header indicates "Active (0/1)". Let's change the header for "Name *".
- Third column. You get the idea...
The screen cannot contain more than 6 columns, so click the ">" and "<" buttons to see the other columns, and make sure to match them all correctly.
In our example, we used the first row as for column names. Since we do not want these imported, enter "1" in the "Lines to skip" text-field.
Once you are done matching your columns, click the "Import .CSV data" button (bottom right-hand corner of the screen), and PrestaShop will start the importing process. When the process is done, you are sent to the main screen, which should either confirm that everything has indeed been imported, or give you a notice of all the encountered problems. In this second case, you should review your CVS file and make sure to correct everything.
Mapping configurations
The mapping process can be a tedious task if you cannot customize your CSV files columns order according to that used by the PrestaShop importer, and even more so if you have to do that repeatedly or frequently. That is why PrestaShop includes a small tool to save the current mapping order that you have set up using all the headers drop-down selectors.

The tool is a simple field at the top of the matching tool. You can do the three basic actions (only one if there is no mapping configuration saved yet):
- Saving. Enter a descriptive name in the field, and click "Save". The interface updates to feature the saved configuration in its drop-down list.
- Loading. Select a mapping configuration in the drop-down list, and click "Load".
- Deleting. Select a mapping configuration in the drop-down list, and click "Delete".