Table of contents
Managing Payment Methods
With PrestaShop, you can accept your customer's transactions through several different payment methods, such as checks, bank wire, cash on delivery, Google Checkout, and some partner modules such as Hipay, Moneybookers, and PayPal. They are already included in your store and are ready to be used. However, it is necessary to configure them.
Installing a payment module
Let's install the "Cash on delivery" module. You first need to access the list of payment modules. It is of course accessible via the "Modules" tab, under the "Payments and Gateways" section, but you also have a shortcut from within the "Payment" tab: just click on the appropriate button at the top of the page!

This button will send you directly to the correct module section. Here is the full list of payments modules included in the default PrestaShop install.

Find the "Cash on delivery (COD)" module in the list (third row). To install it, you just need to click on the "Install" button.

Setting up a payment module
We are now going to look over how to set up and handle these modules, which are absolutely essential to your online store.
Allied Wallet
How customers pay for products in their shopping cart is just as important as the shopping cart itself. So when choosing a payment processing solution, make sure you chose one that works for you, and Allied Wallet is one of the best payment solutions available to PrestaShop users.
You must have an Allied Wallet account in order to use this module, and you can easily create one by going to this URL: https://www.alliedwallet.com/sign-up.
Configure the module with your Allied Wallet Merchant ID, your Allied Wallet Site ID and your Redirect URL. The redirect URL is the page to which Allied Wallet should return paying customers once they have validated their purchase on their server. Generally, you can keep the suggested URL, which is http://URL-OF-YOUR-SHOP/history.php.
Once you've filled out the necessary information and have received a confirmation email from Allied Wallet, you’ll be able to start accepting payments securely from customers all over the world.
Bank Wire module
Click "Install" for the module, if it's not already the case. A "Configure" link appears below the module's name. Click it: a form appears, asking for some information.

In order for the module to accept bank wires, you need to fill out the address of the bank that your store uses. Once all of the fields are filled out, click "Update settings" to save your data.
Your customers will now see it appear in the store's Front Office as part of the available payment methods.

Your customers can choose the "Pay by bank wire" method. They need to click it to see the next page.
They will be asked for their choice of currency.

When clicking on the "I confirm my order" button, your bank information appears.

Your customer's order will appear directly in the orders summary, under the "Orders" tab.
When you receive the customer's bank wire, you must manually change the payment status of the order in your Back Office. This is different from a credit card order, where the payment is carried out automatically.
Check module (paying by check)
To configure payment by check, you need install the Check module (if it's not already done). Click "Install" for that module in the payments modules list. You now need to configure it.
Click the "Configure" link under the name of the module. The configuration form appears.
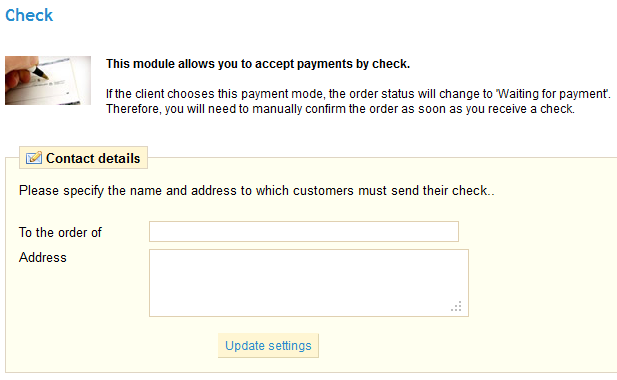
Indicate to whom your customer must make the check payable and your address then save by clicking on "Update settings".
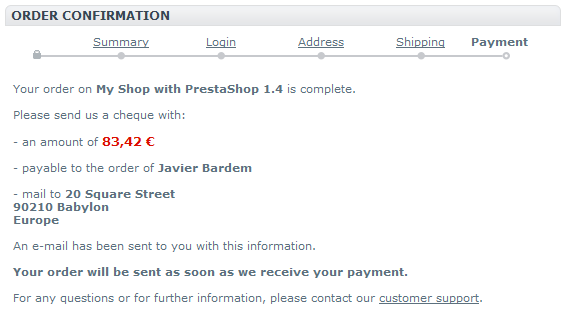
This information will appear to the user at the end of the ordering process, after clicking the "Pay by check" option, and validating with a click on the "I confirm my order" button.
Your customer's order will appear directly in the orders summary, under the "Orders" tab.
When you receive the customer's check, you must manually change the payment status of the order in your Back Office. This is different from a credit card order, where the payment is carried out automatically.
Partner Payment Modules
PrestaShop offers several partner payment modules:
- Authorize.net
- Cash-Ticket
- DIBS
- Google checkout
- Hipay
- Moneybooker
- Ogone
- Paypal
- PaysafeCard
In order to use these modules, click on the "Install" button in the payments module list.
You will then see a "Configure" link under the installed module. Click it, and follow the instructions.
Authorize.net
Authorize.net is a "Payment gateway enables Internet merchants to accept online payments via credit card and e-check."
You must have an Authorize.net account in order to use this module. You can access the website by clicking the Authorize.net logo in the module's configuration page (right of the page).
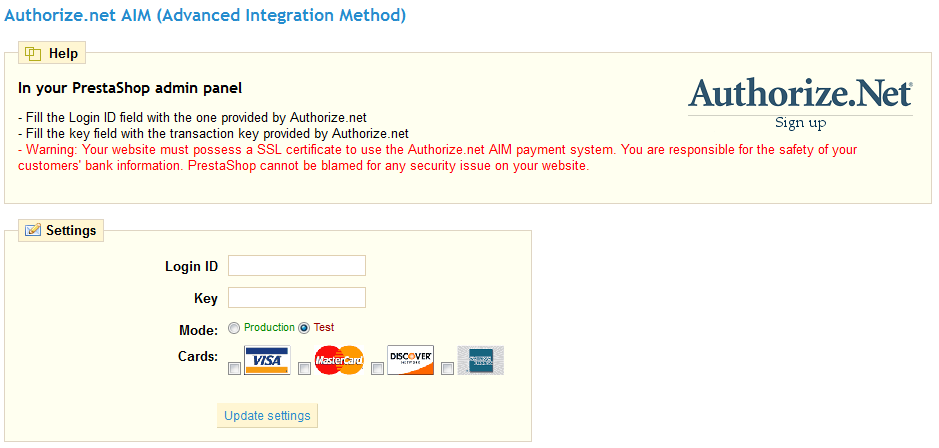
Once you have an account, follow the instructions provided by the module: fill in the fields with your information, and click "Update configuration".
Cash-Ticket
Cash-Ticket is a "safe payment method to book your ticket for holidays and pay for shopping online. No card or bank account needed!"
You must have a Cash-Ticket account in order to use this module. Contact them for more information.

Once you have an account, fill in the various fields with your information, and click "Update configuration".
DIBS
DIBS is "the leading supplier of payment solutions in the Nordic countries."
You must have a DIBS account in order to use this module. Use their subscription form.

Once you have an account, fill in the various fields with your information, and click "Update configuration". Do follow the instruction given by the module. DIBS also provides a step-by-step guide to integrating their system.
Google Checkout
Google Checkout is "a fast, secure checkout process that helps increase sales by bringing you more customers and allowing them to buy from you quickly and easily with a single login."
You must have a Google Checkout account in order to use this module. Use you Google account to log in.
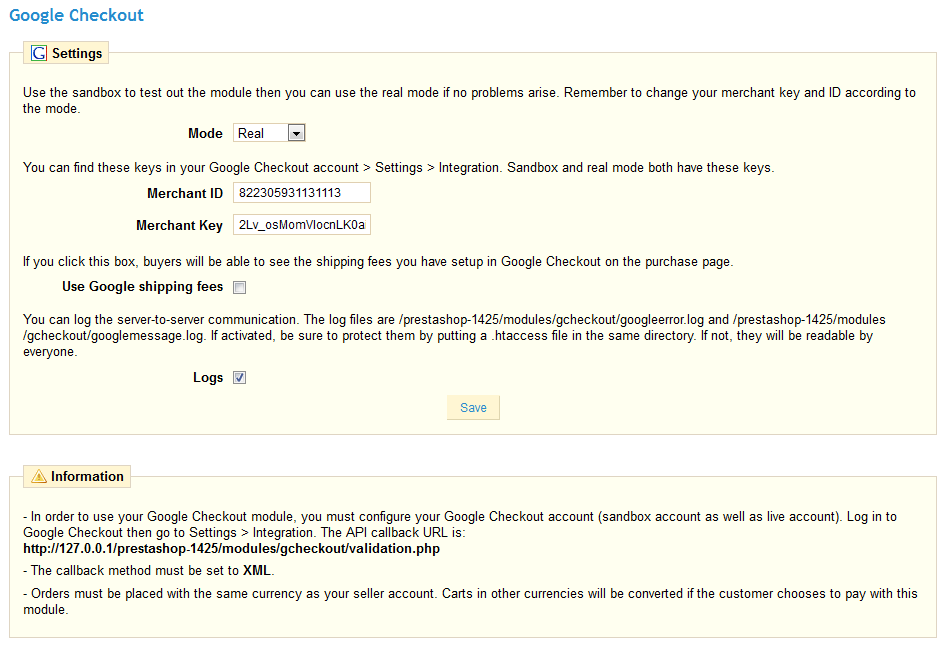
Once you have an account, follow the instructions provided by the module. Once done, click the "Update configuration" button.
Hipay
Hipay is a safe and effective solution to pay, be paid online and bill all types of products, contents and - or services: digital, physical goods, download...
You must have a Hipay account in order to use this module. Use their online form.
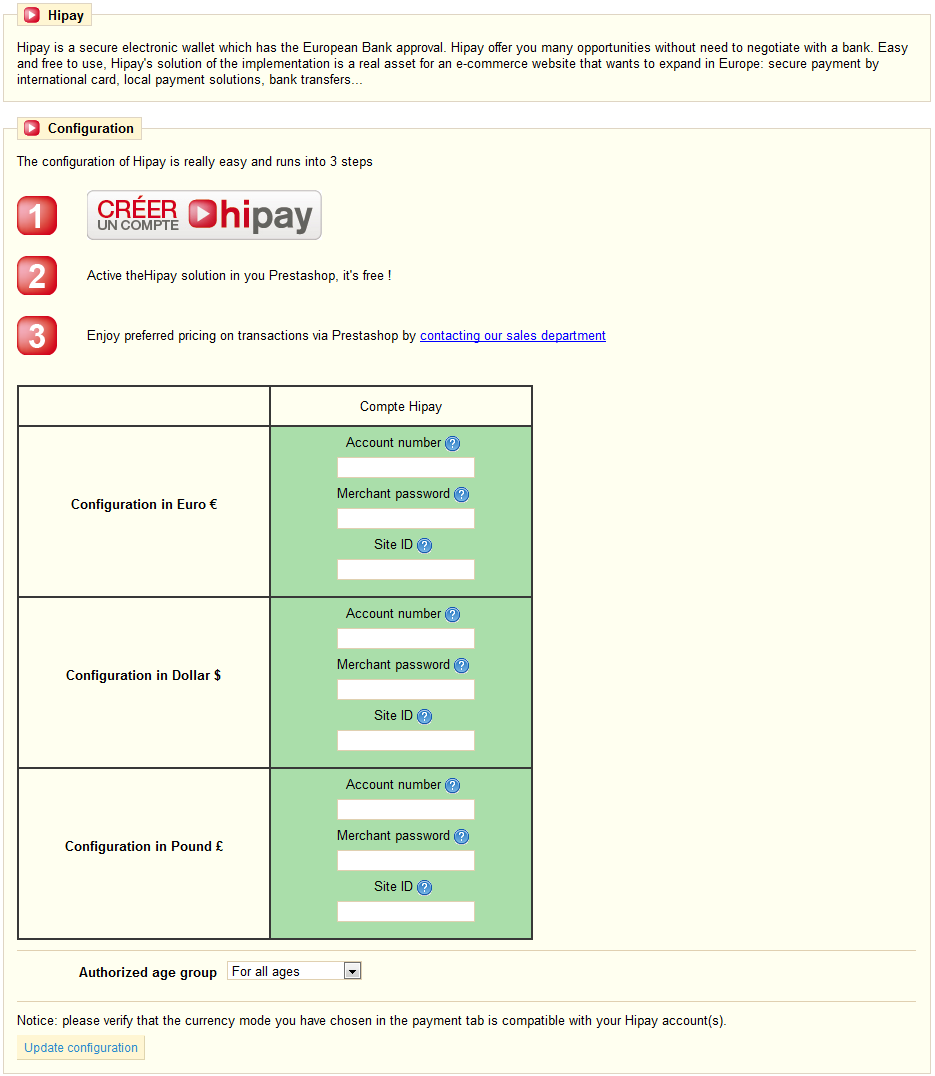
Once you have an account, follow the instructions provided by the module: fill in the various fields with the information Hipay provided you with, and finally, click the "Update configuration".
Moneybookers
Moneybookers is "the cheaper way to send and receive money worldwide. Secure and convenient online payments."
You must have a Moneybookers/Skrill account in order to use this module. Use this PrestaShop partner link for special rates.
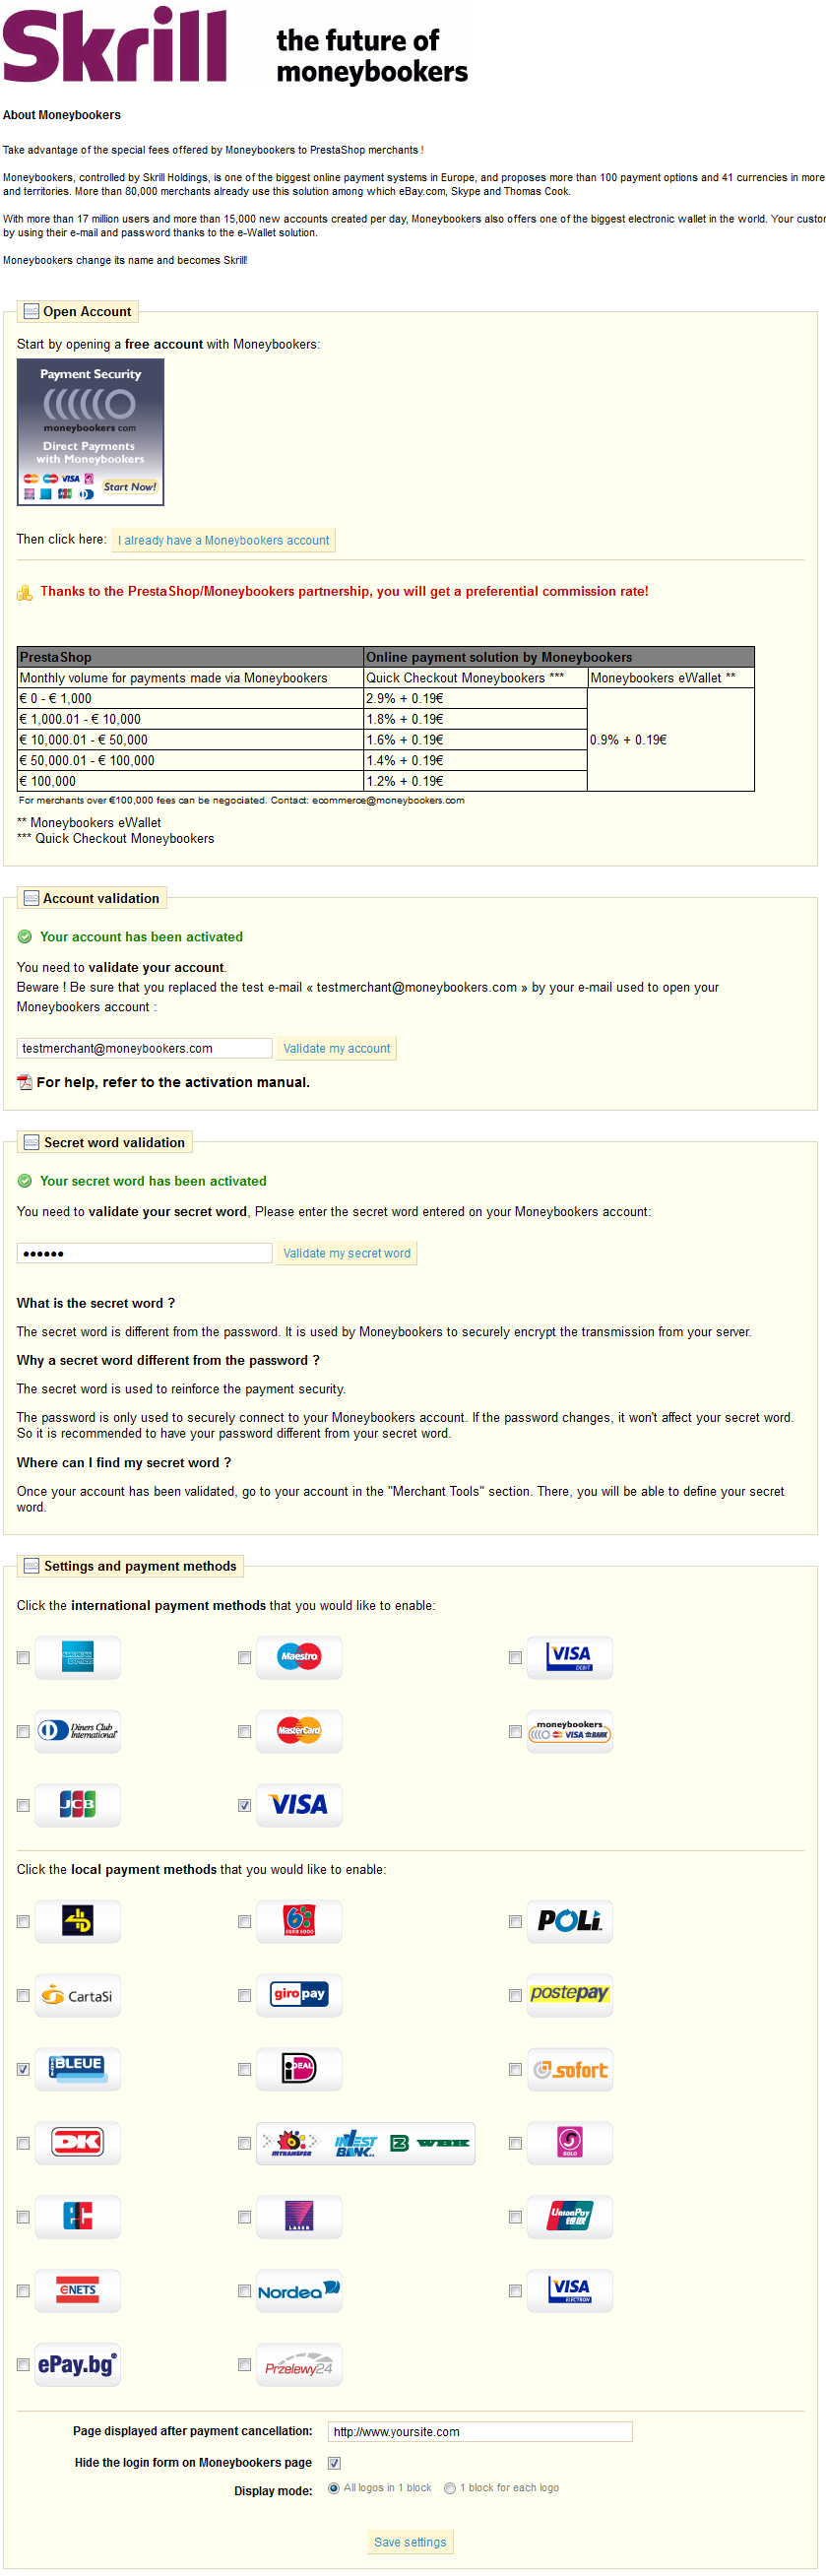
Once you have an account, follow the instructions provided by the module: fill in the various fields with the information Moneybookers provided you with, check the boxes that are relevant to you, and finally, click the "Update configuration".
Ogone
Ogone is "a leading independent payment service provider (PSP). Catering for businesses of all sizes, Ogone makes accepting payments online, simple, fast, secure and profitable."
You must have an Ogone account in order to use this module. Use their online form.

Once you have an account, follow the instructions provided by the module: fill in the various fields with the information Ogone provided you with then click the "Update configuration".
PayPal
PayPal is "the faster, safer way to send money, make an online payment, receive money or set up a merchant account."
You must have a PayPal account in order to use this module. Use their online form.
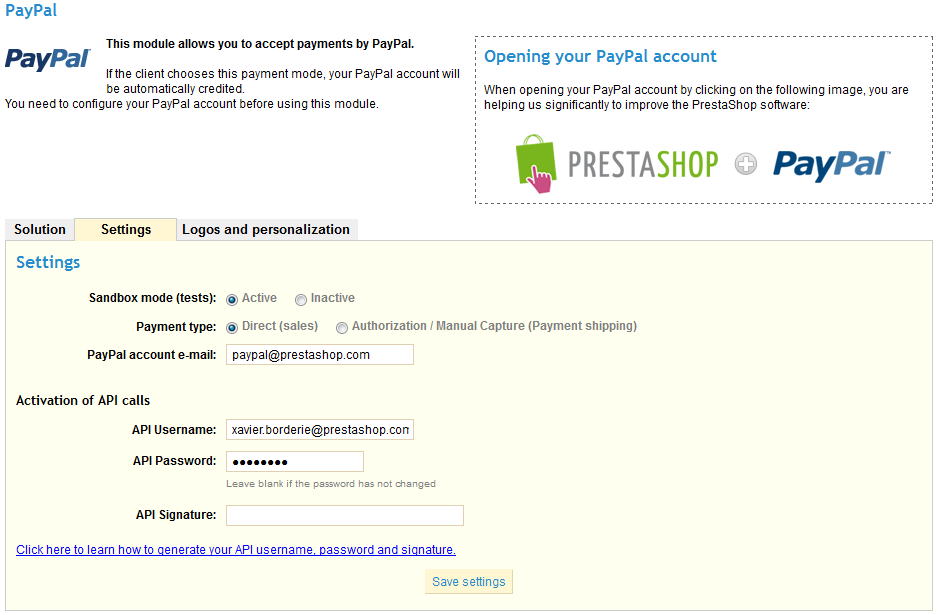
Once you have an account, follow the instructions provided by the module: fill in the various fields, then click the "Update configuration".
PaysafeCard
PaysafeCard is "an electronic payment method for predominantly online shopping and is based on a pre-pay system."
You must have a Paysafecard account in order to use this module. Use this PrestaShop partner link.
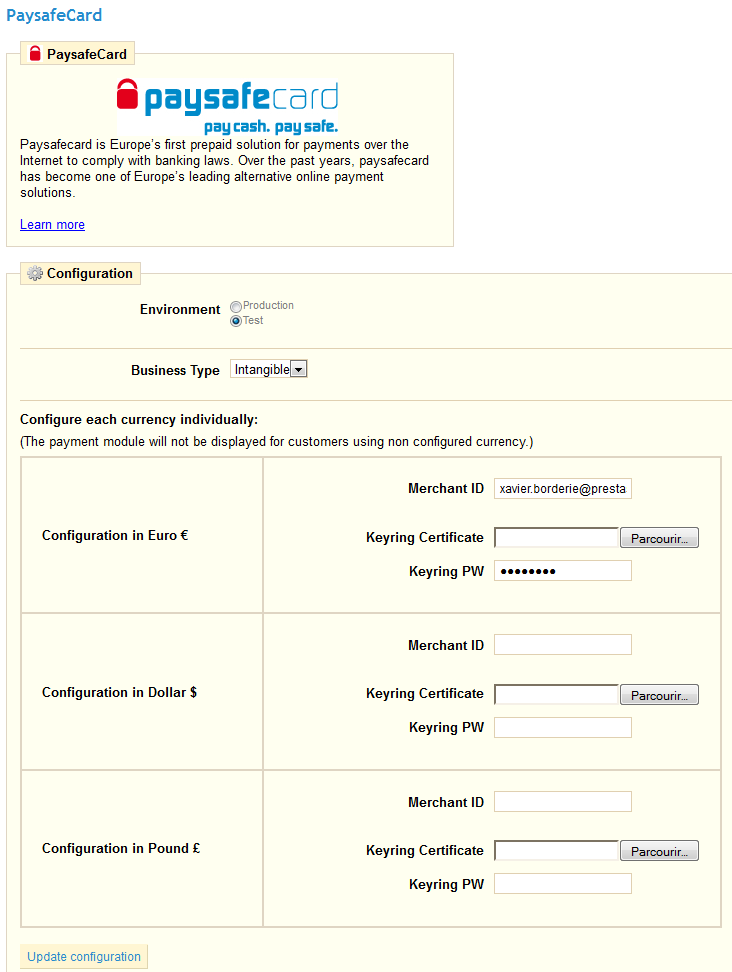
Once you have an account, follow the instructions provided by the module: fill in the various fields, then click the "Update configuration".
Stripe
![]()
Stripe (https://stripe.com/prestashop) is a premier online payment solution that offers something many competitors do not… simplistic transparency.
Getting started with Stripe is as easy it gets. For those using PrestaShop v1.4, simply download the free Stripe module from our Addons store and then install it into your Back Office under the "Modules" tab. You can find the module here: http://addons.prestashop.com/en/payments-gateways-prestashop-modules/6611-stripe.html
Once the module has been installed, you will need to configure it. This process has been streamlined and made simple so every online merchant can start using Stripe in minutes.
After clicking configure, you will need to create a free Stripe account. Simply enter your email address and choose an account password. From there, you will need to confirm your email before entering Stripe's dashboard (Check your chosen email's inbox for the required URL.)
After your email address has been confirmed, you will automatically be logged into the Stripe dashboard. From here, you will need to enter your business' information under "Your Account" settings (top right hand corner of the dashboard). Fill out the required fields while paying particular attention to the bank information at the bottom of the form. Once complete, click "Save."
You will now need to copy and paste the API Keys into the module itself. Both the "Test" and "Live" API Keys can be found under "Account Settings" in the Stripe dashboard. After copying them into the module, click "Save." Once complete, you will be ready to start accepting secure online payments from customers in USD or CAD. It's that easy.
Payment Module Restrictions on Currencies
When in the "Payment" tab, you can see the following section:

As you can see, depending upon the payment, the customer's choice of currency will differ:
- Authorize.net, Bank wire, Cash-Ticket, Check, DIBS, Moneybookers, Ogone, and Paysafecard: click on the boxes corresponding with the currencies that you authorize. If you accept several of them, the customer will be able to choose among them at checkout.
- Cash on delivery: The customer will be able to pay only in the currency that he has selected in the store.
- Google Checkout, Hipay, and Paypal: You can choose one accepted currency (among those installed in your store), and allow each customer to pay with the currency that they will have chosen in the store.
Another option is that you can only accept payment with the store's default currency (which you can set in the "Payment" tab, "Currencies" sub-tab, "Currency options" setting).
Payment Module Restrictions on Groups
You can limit the choice of payment method depending on the group of customers.

For instance, let's say you would prefer that individuals pay with PayPal, Moneybookers and Hipay, while professionals only pay by bank wire. Depending on the type of customer and on your choices, customers will only pay using the methods that match with your decisions.
Payment Module Restrictions on Countries
You can limit the choice of payment methods according to your customer's country of origin. For instance, in France, Spain, and Germany, you can accept all payment methods, while customers in Italy, the United Kingdom or Switzerland can only pay by bank wire.
The choice of payment modules according to country is found under the "Payment" tab, in the "Countries restrictions" section.
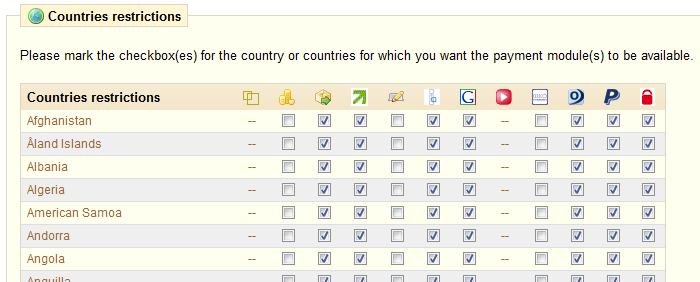
Find the country in the alphabetical list, and check the boxes to select or deselect the payment methods you want to make available to customers from that country. Once all of your settings have been configured, click on the "Save restrictions" button, found at the bottom of the table.
Currencies
PrestaShop can accept a large number of currencies. By default, there are three standard currencies: The Euro, the Dollar, and the Pound. However, you can add and configure new currencies by clicking on the "Currencies" sub-tab, under the "Payment" tab.

Click on "Add New" to create a new currency and fill out the form (see the next page).
Currencies options
The two last sections of the "Currencies" sub-tab are very simple:

- Currencies options: set the default currency for your shop.
- Update currency rates: update your currencies exchange rates.
Adding a New Currency
When you want to add another currency, simply click on the "Add New" button seen in the previous screenshot, and this form will appear:

- Write the name of the currency, its ISO code (see this Wikipedia page for information) and its symbol (see this Wikipedia page for information).
- The conversion rate is defined according to your shop's default currency.
- Formatting: Set up how you want your price to be displayed. The X corresponds to the currency symbol. The "Blank" selector also enables you to include a blank between the sign and the price.
Once the new currency is added, click "Save" to save your settings
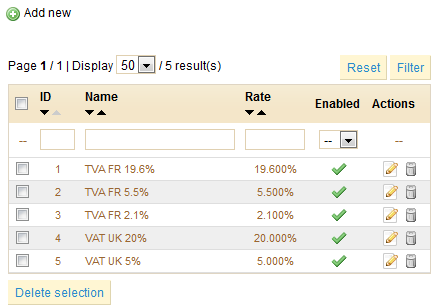
Taxes
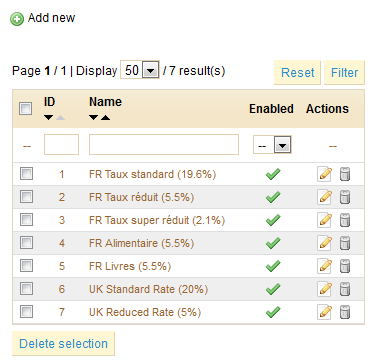
The "Taxes" sub-tab, located under the "Payment" tab, enables you to manage the applicable taxes. Click on this tab to see the list of taxes. Three taxes are set up by default.
Taxes options
This sub-tab also gives you access to a set of options, which apply to the whole store and all of the orders.

- Whether or not taxes are included in each purchase.
- Whether or not taxes are displayed in the cart.
- Which customer address should the tax be based on.
- Whether or not an ecotax applies (read this Wikipedia page to learn more about the ecotax).
If an ecotax does apply, a new field will appear in the product creation page:
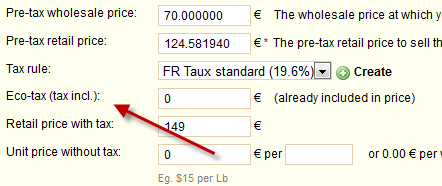
If you decide to take the ecotax in consideration after having added products, you will have to edit them in order to set the tax properly for each product.
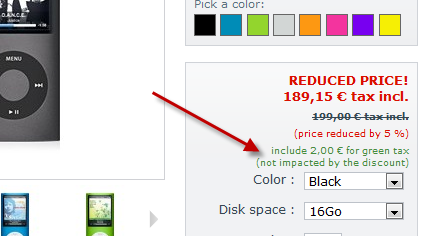
The ecotax will also appear to the customer, on the product's page:
Adding a New Tax
When you want to add another tax; simply click on the "Add New" button seen in the previous screenshot, and this form will appear:
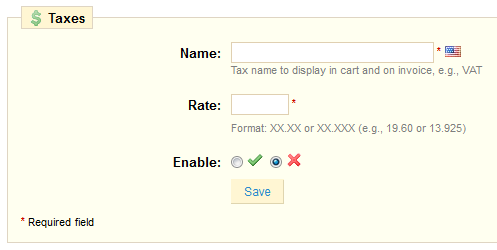
Fill in the name of the tax ("TVA", for example), and its rate (in the XX.XX format), and save.
Note: It is a good idea to add reminders within the name, such as the country/group/zone the tax applies to, and its rate; this can help remembering which tax is to be applied to a given product.
Tax Rules
Be default, a tax applies to all groups and countries/states/zones. If you wish to apply a particular tax to a country or set of countries (and not some others), you must create a tax rule for it. To that end, go to the "Tax Rules" sub-tab.
A few sample tax rules are already in place, which you can edit to get a better grasp of how things work. Let's create a new tax rule altogether. Click on "Add New".
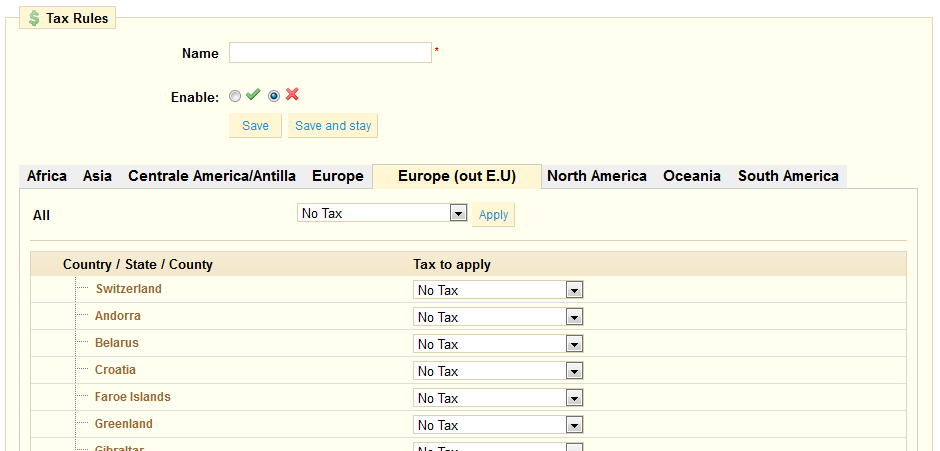
- Fill in the name of the tax rules. Use a telling name: name the tax's country code, the tax's name, maybe even its rate, so as to find it again easily.
- Enable the rule once you are ready to have it used on the store... that is, once all countries have been properly set.
- Select the countries the tax should be applied to:
- Browse the regions tabs until you find the targeted country,
- If you need the tax applied to a single country, use that country's drop-down menu to apply the tax to country only. If needed, do the same for more countries.
- If you need the tax applied to all countries for a given region EXCEPT a single country, then first apply the tax to all countries by using the drop-down menu at the top and clicking apply, then change the individual drop-down menu to "No tax" for the targeted country. If needed, do the same for more countries.
- Click on the "Save" button at the bottom of the countries list.
Note that the default rate applied to your product will be based on your store's default country.
Vouchers
In the "Vouchers" tab, you can give your customers discounts (by value or by percent) or offer free
shipping on their orders. Under this tab are all of the previously created vouchers, along with their
status of validity.
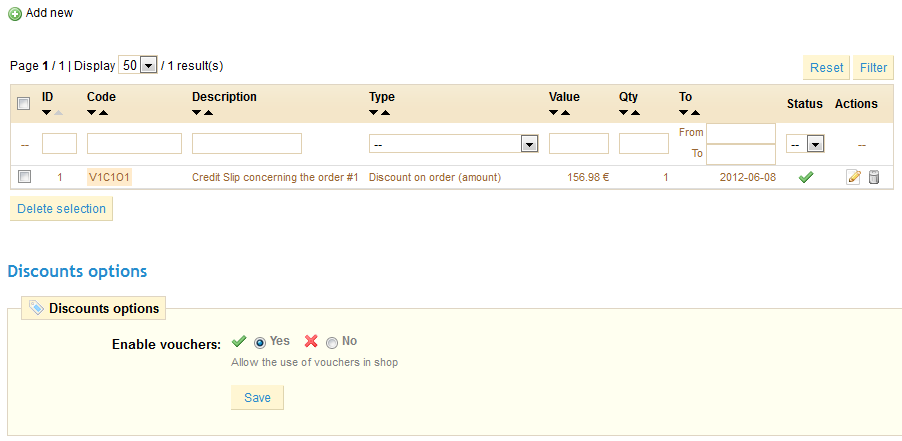
You can also enable/disable vouchers at the bottom of the screen.
Creating a New Voucher
Vouchers can be created automatically after a product return, but you can create a new voucher at any time manually, and be very specific about its properties.
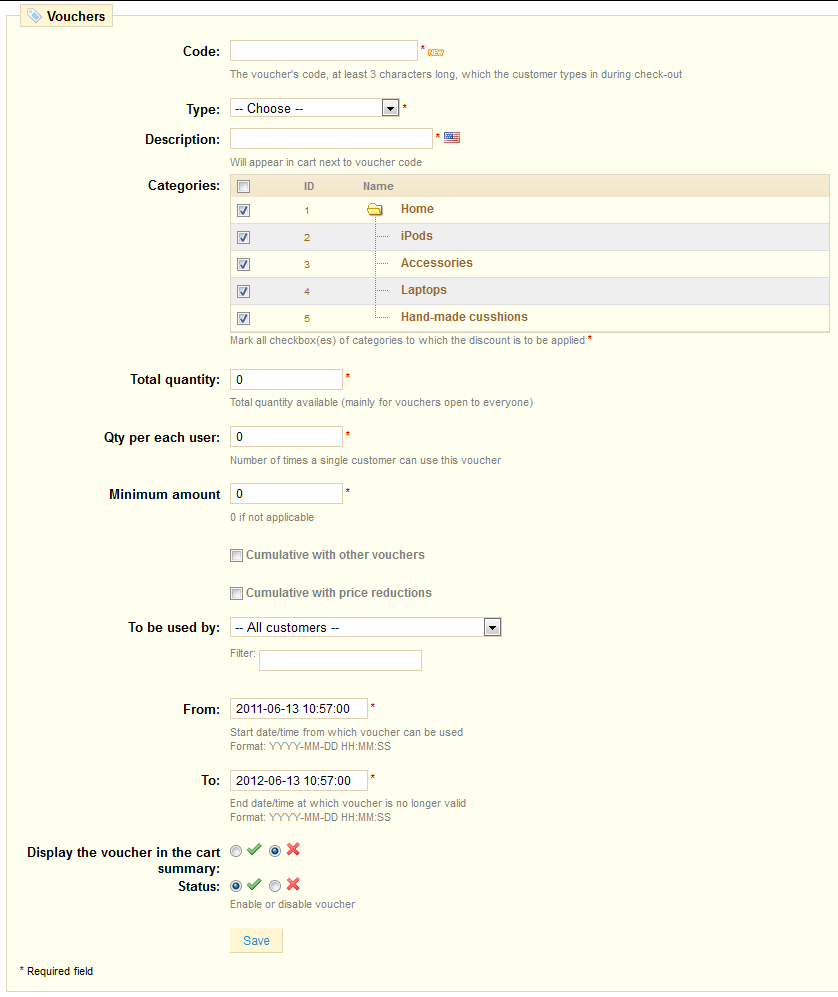
- Give it a unique code. You can either create one manually (and therefore use readable words, like 1VOUCH4JOE), or have PrestaShop generate one unique string by clicking the "New" button. Of course, you can also use another string generator (such as random.org's). You can use up to 32 characters.
- The "Type" field enables you to choose the method of the applied discount:
- Discount on order (%). The voucher applies to a percentage of the order total. For instance, let's say the order is valued at $200 before taxes. The voucher has a value of -15%. When applying this coupon the customer will only have to pay $170 before taxes.
- Discount on order (amount). This choice is applied to a monetary discount on the entire order. For instance, let's say the order is valued at $100 before taxes. The discount offers $20 off the purchase. By using the discount the customer pays only $80 before tax.
- Free shipping. With this discount, you can treat your customers to free shipping. They can use the code when paying and it will apply to their offer.
- Choose the voucher's behavior – meaning how it should behave when the order's amount is less that the voucher's:
- reduce the voucher to the total order amount: do this if you want vouchers to be used only once.
- create a new voucher with the remaining amount: do this if your customers can use their voucher's value for as long as it has some.
- create a negative invoice: do this if you want vouchers to be used only once, but you still need to know the final value for your accounting book. The user won't receive any kind of further voucher or discount.
- Give it a proper description, in every languages that your shop supports (click on the flag to change language). Customers will be able to read this, so write a proper sentence.
- Indicate which categories the voucher applies to – because sometimes you'd rather have customers not use vouchers for certain products.
- Set a quantity of available vouchers: either "1" if it is intended for a single customer, or any number if the voucher is for whoever uses one first.
- You can set the number of times a voucher can be used. That number must be at least equal to the quantity of available vouchers.
- If that number is inferior to the total quantity of available vouchers, then one single customer won't be able to use all of them.
- Keeping it to "1" makes sure that each of your customers can only the voucher once. In that case, make sure the voucher applies to a group rather than a customer...
- Set a minimum amount under which the voucher is not applicable. Your voucher will only be applicable if the customer's order is above the given amount.
- You can choose whether or not the vouchers are allowed to be used with other promotions on your products or other vouchers. Make your preferences known by ticking the checkboxes.
- The "To be used by" field enables you to restrict your voucher to only one of your customers. For instance, if you had a delivery delay and you want to apologize, you can create a voucher for this customer that only he or she can access. To quickly find the customer, type in the first few letters of their First or Last name in the "Filter" field.
- The voucher can have a time limit (for instance, a discount for launch week). Click the "From" and "To" fields in order to choose your dates using the calendar. By default, a new voucher lasts a year.
- You can decide whether the voucher should be shown in the cart summary or not. Do this if you want to inform a customer that they can use a voucher. If you'd rather not push for the voucher's usage, then do not show it.
- Finally, the "Enable" field allows you to enable or disable the vouchers.
Once everything has been saved, you can send your voucher to your customers.
Your voucher will appear in the "Vouchers" tab, and you can delete or edit it at any time. If the voucher was set to a specific group or customer, then it will appear in the Front-Office, in the customer's "Vouchers" section of his account:

...as well as in the cart (if you chose to), where they can choose which one to apply to their order:

Vouchers that are set to apply to all customers do not appear in these locations: the customer has to know about them in order to use them.
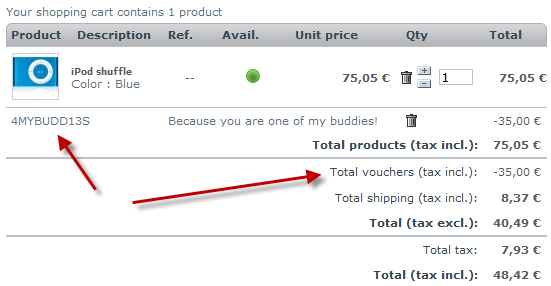
In order to apply the voucher, the customer needs to visit his cart and enter the voucher in the suitable field and click "Add". The customer won't be able to apply the voucher if he checks out immediately.
Once applied, the cart summary displays the voucher's impact on the order's amount: