...
You cannot perform any other action on the available modules using this view: installing, configuring, and others must be done in normal view.
Performing Actions
...
on Modules
All actions are performed in the normal view.
...
| Info |
|---|
Top ranking modules from Addons can be promoted to your module list, depending on your country settings. They appear among regular modules, but their action buttons are not labeled "Install" but instead "Buy - 30 €", for instance. Clicking on the button takes you to the module's Addons page, from which you can log in, buy and download the module. From there on, you can install it on your shop. |
Configuring
...
the Native Modules
All the native modules are explained in depth in their own chapter, "Making The Native Modules Work".
Modules
...
and Themes Catalog
PrestaShop comes bundled with a host of modules, but even that number might seem limiting, or you could want to explore other directions.
...
- Go to the "Modules" menu, and its "Positions" page.
- Click the "Transplant a module" button at the top right. The transplanting interface appears.
- In the "Module" drop-down list, select the module you want to transplant.
- In the "Hook into" drop-down list, select where you want to transplant the module to. There are many available hooks. You can change your setting later if needed.
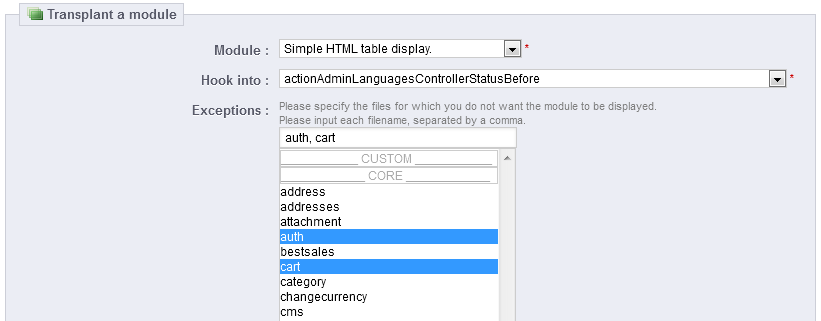
- In the "Exceptions" field, type the name of the file(s) of the pages in which you do not want the module to appear.
Since From PrestaShop 1.5.0 to 1.5.4.1, instead of typing the file-names, you can simply select a file-name and click the "Add" button: it will add the file-name to the list.
Likewise, you can remove a file-name from the existing list by selecting that name in the drop-down list and clicking the "Remove" button.
Since PrestaShop 1.5.5.0, this interface has changed: you can simply perform a multiple selection by clicking on the file names while keeping the Ctrl key pressed. You can deselect files in the same manner: Ctrl+click. - Do not forget to save your changes.
The interface up to v1.5.4.1:
The interface since v1.5.5.0:
The "Hook into" drop-down menu gives you a good idea where module can be placed.
Even though the "Hook into" drop-down list gives a comprehensive overview of the available hooks, it might not always be clear which is the one to which you want to attach your module. Do not hesitate to try another hook if the result of your selection if not what you expect.
Since PrestaShop 1.5, the list gives more detail: both the hook name and a quick description of what it does, for instance "Before carrier list" known as "displayBeforeCarrier". Peruse them all in order to choose your hook correctly.
...
- Authorize.net, Cash on delivery, CashTicket, PaysafeCard: You cannot change their default setting.
- Bank wire, Buyster, check, DIBS, Moneybookers, Ogone: You can change any of their currency settings, except for the "Customer currency" and "Shop default currency", which stay at their default state.
- Google Checkout, Hipay, PayPal: You can change any of their currency settings, but you can choose only one option between "Customer currency" and "Shop default currency", not both.
...

