| Section | ||||
|---|---|---|---|---|
|
Table of content
| Table of Contents | ||
|---|---|---|
|
...
Managing Modules
PrestaShop 1.5 comes bundled with over 120 modules that can be installed/uninstalled and configured as desired, in order to customize and complete your shop.
...
Above the table of modules are two buttons, titled "Normal view" and "Favorite Favorites view". They radically change the way modules are listed.
...
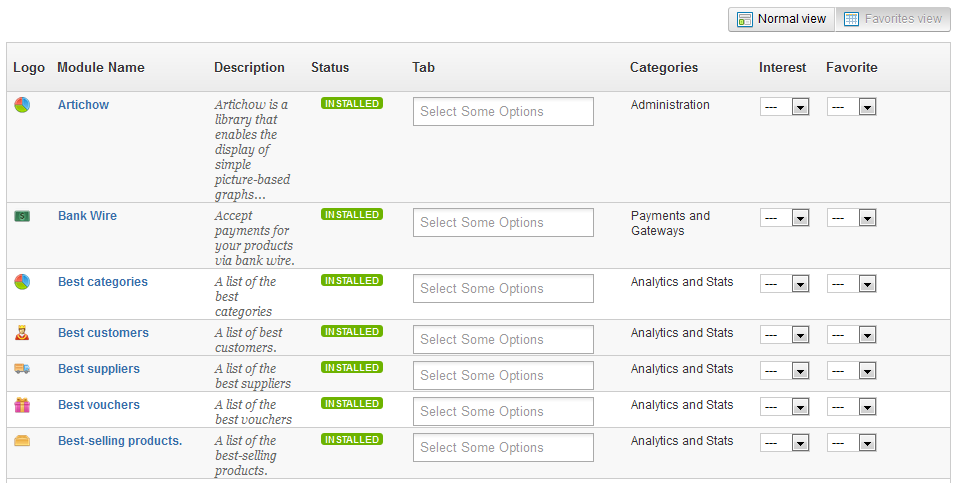
This is the default view. It enables you to quickly find the module you want to install or edit the settings of.

The first section is where you can search for a specific module, or filter down modules until you find the one you are looking for.
...
- Non-installed: orange.
- Installed but disabled: gray.
- Installed and enabled: green.
- Installed and enabled, but with warnings: red.
There is one additional "status": "Must have", in orange. Modules with this status are actually promoted from the Addons website. They are not free: the "Install" button is replaced by a shopping cart button, with the price of the module. Clicking that button open the module's page on the Addons website, where you can buy the module.
Most of the time, warnings are a reminder that you have not properly configured the module. Click its "Configure" link and go through the various needed steps.
...
| Tip |
|---|
Some modules have "(Addons)" at the end of their name. This means the modules will not be installed from files on your server, but downloaded from the Addons website. It helps ensure that you always have the latest version of a module. Still, installing a module from files that are downloaded from the Addons servers is no different for PrestaShop from installing it from files that are already on your server. |
...
Favorites view
This view gives a whole different presentation of your modules: gone is the list of category selectors, the install/uninstall buttons and the action links.
This view gives an alphabetical list of all your modules, both installed or not, their categories in plain text and two drop-down menus:
...
Interest | Favorite | Appears in module list? | Appears in "Favorites" category? |
|---|---|---|---|
Yes | Yes | Yes | Yes |
No | Yes | No | No |
Yes | No | Yes | No |
No | No | No | No |
Since v1.5.4, you can use the selector from the "Tab" column to indicate in which contextual page the module should appear. This has a direct impact on each page's "Modules list" button. If no selection is made, the module will appear in its default contextual page.
You cannot perform any other action on the available modules using this view: installing, configuring, etcand others must be done in normal view.
Performing Actions
...
on Modules
All actions are performed in the normal view.
...
| Info |
|---|
Top ranking modules from Addons can be promoted to your module list, depending on your country settings. They appear among regular modules, but their action buttons are not labeled "Install" but instead "Buy - 30 €", for instance. Clicking on the button takes you to the module's Addons page, from which you can log in, buy and download the module. From there on, you can install it on your shop. |
Configuring
...
the Native Modules
All the native modules are explained in depth in their own chapter, "Making The Native Modules Work".
Modules
...
and Themes Catalog
PrestaShop comes bundled with a host of modules, but even that number might seem limiting, or you could want to explore other directions.
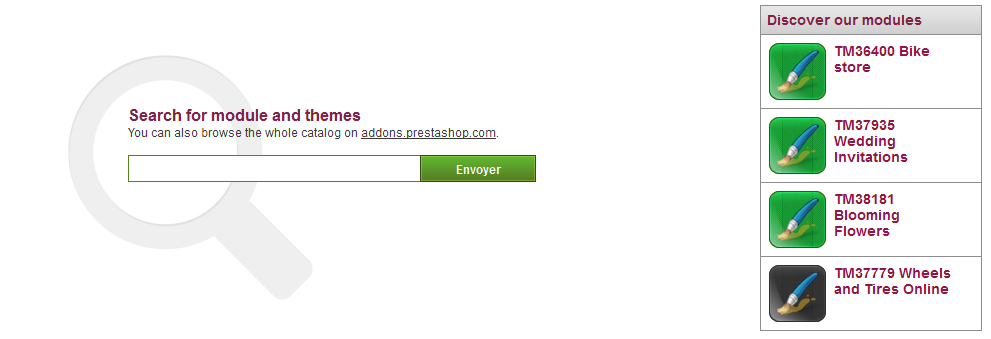
There are many more modules available on the PrestaShop Addons website (http://addons.prestashop.com/). Some are free, others are for-pay, and you are sure to find something that suits your needs! Once you are a seasoned module developer/theme designer, you can even submit your own creations, and sell them on Addons!
...
- A search field, with which you can search the whole content of the Addons website.
- On the right, a "Discover our modules" box , which features 4 modules chosen among the most downloaded.
...
A quick summary is displayed in the next page, indicating what that importer is about to do..
Click "Next" again to validate your choice. The theme is now installed, and PrestaShop asks you if you wish to install modules that were imported along with the theme, what you would rather do with the current modules configuration, and how you would like the images configuration to be taken into account.
...
This section is only available when there is at least one theme installed on your PrestaShop site.
Exporting a theme is very useful when you want either to back the theme up for safety, and create an archive of the theme for a friend or in order to make it available on the Addons marketplace (http://addons.prestashop.com/fr/). Not only does it generate a complete Zip archive of your theme, but it also adds many information in an XML files, which is very useful both when uploading to Addons, and when importing to another PrestaShop site.
...
- Connect to you PrestaShop's 1.5 administration.
- Go to the "Themes" page under the "Preferences" menu.
- In the "Appearance" section, go to the "Enable mobile theme" part and choose one of the three options other than "I want to disable it".
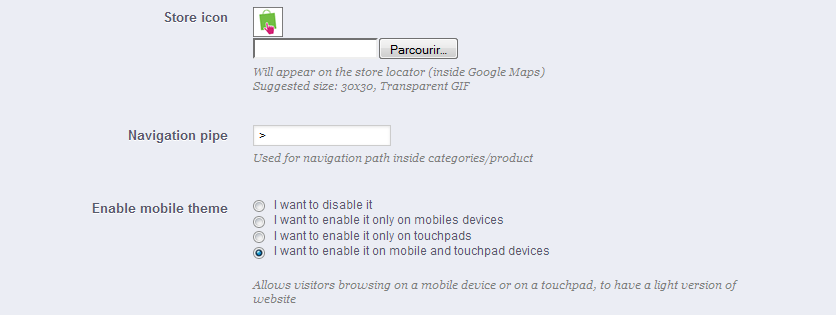
By default, the mobile template is only used for mobiles phones, tablet receiving the same theme as regular devices. With this option, you can choose to have the mobile template be used for tablets ("Both" option"), or even choose to only have it used for tablets (mobile phones receiving the regular theme).
...
The template is made of HTML, CSS and JavaScript files: its structure is therefore the same as for the default theme, but it's its design is radically different, as it was built for the smaller screens of mobile devices.
...
While the theme you are using is being updated with its own mobile template, you can use the default mobile template, thanks to a quick file manipulation: you just have to copy the /mobile subfolder from the /themes/default folder, and paste this subfolder (and all of its files) in your current theme's folder.
...
- Go to the "Modules" menu, and its "Positions" page.
- Click the "Transplant a module" button at the top right. The transplanting interface appears.
- In the "Module" drop-down list, select the module you want to transplant.
- In the "Hook into" drop-down list, select where you want to transplant the module to. There are many available hooks. You can change your setting later if needed.
- In the "Exceptions" field, type the name of the file(s) of the pages in which you do not want the module to appear.
Since From PrestaShop 1.5.0 to 1.5.4.1, instead of typing the file-names, you can simply select a file-name and click the "Add" button: it will add the file-name to the list.
Likewise, you can remove a file-name from the existing list by selecting that name in the drop-down list and clicking the "Remove" button.
Since PrestaShop 1.5.5.0, this interface has changed: you can simply perform a multiple selection by clicking on the file names while keeping the Ctrl key pressed. You can deselect files in the same manner: Ctrl+click. - Do not forget to save your changes.
The interface up to v1.5.4.1:
![]()
The interface since v1.5.5.0:
![]()
The "Hook into" drop-down menu gives you a good idea where module can be placed.
Even though the "Hook into" drop-down list gives a comprehensive overview of the available hooks, it might not always be clear which is the one to which you want to attach your module. Do not hesitate to try another hook if the result of your selection if not what you expect.
Since PrestaShop 1.5, the list gives more detail: both the hook name and a quick description of what it does, for instance "Before carrier list" known as "displayBeforeCarrier". Peruse them all in order to choose your hook correctly.
...
- All module blocks have a dotted red border, enabling you to see which blocks you can move.
- At their top left side, a block-specific icon appears, along with the block's name, enabling you to always find your way among blocks.
- At their top right side, they have two icons:
- A "move" icon: click on it to start moving the module around.
- A "trash" icon: click it to remove the block from the home.
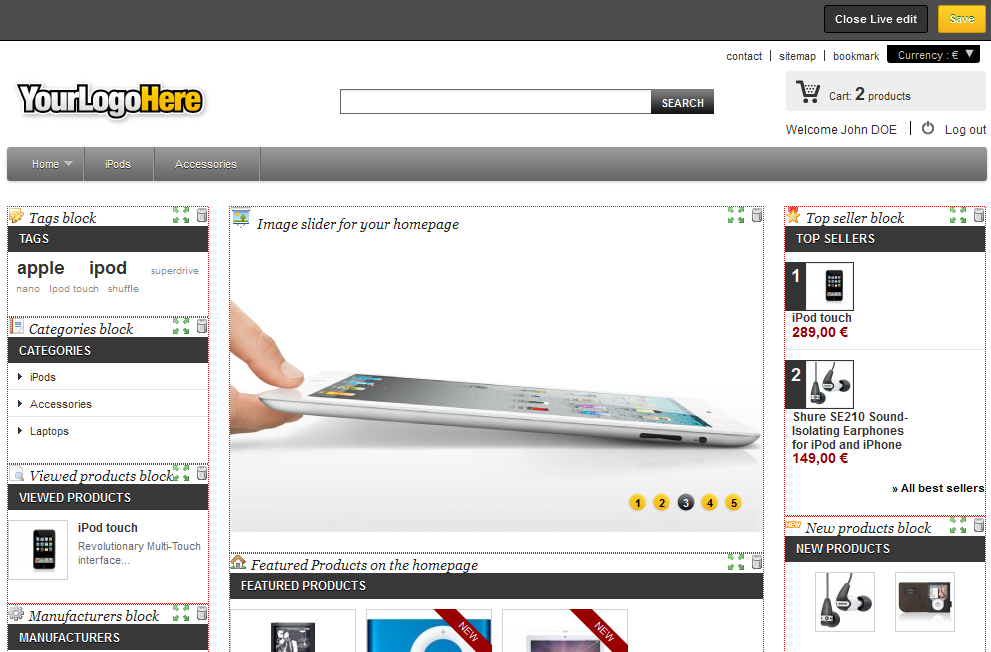
At the top of the Live Edit mode, a toolbar presents you with two buttons: "Close Live Edit" and "Save".
...
To customize the transplantation ability of a module, you must give it the correct PHP function for the new target hook. For example, the "Currency" block has this function:
| Code Block |
|---|
function hookTop($params)
  {
  ...
  }
|
In order to transplant the "Currency" block into the right column, for instance, you need to add the hookRightColumn() function:
| Code Block |
|---|
function hookRightColumn($params)
  {
  ...
  }
|
...
- Authorize.net, Cash on delivery, CashTicket, PaysafeCard: You cannot change their default setting.
- Bank wire, Buyster, check, DIBS, Moneybookers, Ogone: You can change any of their currency settings, except for the "Customer currency" and "Shop default currency", which stay at their default state.
- Google Checkout, Hipay, PaypalPayPal: You can change any of their currency settings, but you can choose only one option between "Customer currency" and "Shop default currency", not both.
...
Find the country you are looking for in the alphabetical list, and check the boxes to select or unselect the payment methods you want to make available to customers from that country. Once all of your settings have been configured, click on the "Save restrictions" button, found at the bottom of the table.
By default, all installed payment methods are enabled for the shop's country.
| Section | ||||
|---|---|---|---|---|
|