| Section | ||||
|---|---|---|---|---|
|
Table of content
| Table of Contents | ||
|---|---|---|
|
...
Creating Price Rules and Vouchers
Vouchers play an important role in your daily relationships with your customers. Typically, customers like two things when shopping:
- feeling Feeling special, unique.
- getting Getting good prices.
Both can be achieved with personalized discounts, and this is precisely where vouchers come into play – or more precisely, price rules, which is a new feature in PrestaShop 1.5.
...
- Cart rules. These are actually the successors to vouchers, as they were known in previous version versions of PrestaShop.
Basically, it enables you to create per-customer vouchers voucher codes, but also much more. See the dedicated section below. - Catalog price rules. Enables you to assign price reductions by category, manufacturer, supplier, attribute or feature.
For instance, you can set a rule that would say that for Spanish customers belonging to the "Good clients" group would get 10% off on your Electronics category and all Sony products for the first week of July.
Cart Rules
The "Cart rules" page presents gives you access to an advanced tool that succeeds and builds upon the voucher system from PrestaShop 1.4. Seasoned users of PrestaShop will not be surprised with the features that were added, but will only have to adapt to the new name: when this guide mentions vouchers, we 're are actually talking about cart rules – which, in themselves, are quite different to credit slips.
| Tip | ||
|---|---|---|
| ||
A credit slip is first and foremost a written proof that a product has been returned. Most of the time, the user can use it as a voucher. A voucher is a discount code which does not have to be tied to a merchandise return or a refund, and which can take many more forms than a simple credit slip:
You can apply a voucher to all customers, or a group of customers, or a single customer; you can set its expiration date; . A cart rule is basically an advanced version of a voucher: in addition to what a voucher could do in PrestaShop 1.4, the cart rules system introduced in PrestaShop 1.5 enables you to:
In this user guide, "cart rule" and "voucher" are synonymous and interchangeable. |
The "Cart rules" page lists the currently existing cart rules, which you can enable or disable by clicking on the icons in the "Status" column.
Creating
...
a New Cart Rule
Vouchers A voucher can be created automatically after a product return, but you can create a new voucher at any time manually, and be very specific about its properties.
The creation form has three tabs, enabling you to precisely build new rules and vouchers.
...
Information Tab
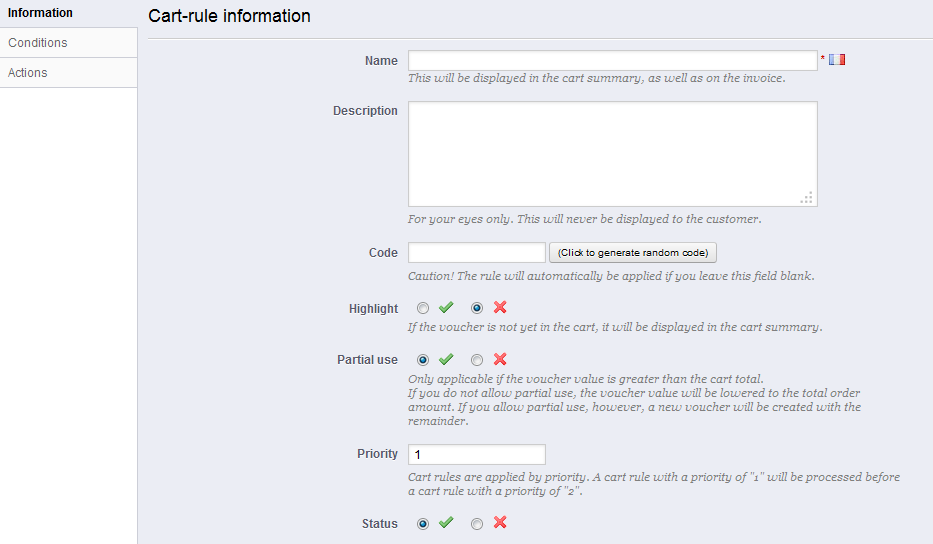
The first tab, "InformationsInformation", contains the rule's identifiers and main settings.
- Name. The name is public, so you should keep it casual.
- Description. The description is not public. It helps your shop employees understand why the rule was created.
- Code. Give your rule a unique code. You can either create one manually (and therefore use readable words, like 1VOUCH4JOE), or have PrestaShop generate one unique string by clicking the "Click to generate random code" button. Of course, you can also use any other string generator (such as http://www.random.org/strings/).
Note that if no code is set, the rule will apply to any customer fitting the other conditions:- If there 's is a code, then customer have to enter it during the ordering process.
- If there 's is no code, then the rule is automatically applied to benefiting customers.
- Highlight. If enabled, PrestaShop will let the user know that a voucher corresponding to the items in the cart is available and can be added.
- Partial use. If disabled, the rule/voucher can only be used once, even if it is not completely used. If enabled, a new voucher is created when the current one is not completely used.
- Priority. If a customer (or group of customers) are is eligible for more than one voucher, or if more than one voucher can be applied to an order, then PrestaShop applies said voucher one by one in the alphanumerical order. You can change that order by placing a lower priority to you voucher. By default, they all have a priority of 1. If you set it to a higher number, the voucher will be applied after vouchers with a lower number.
- Status. You can disable and enable a rule whenever you feel is necessary.
Conditions Tab
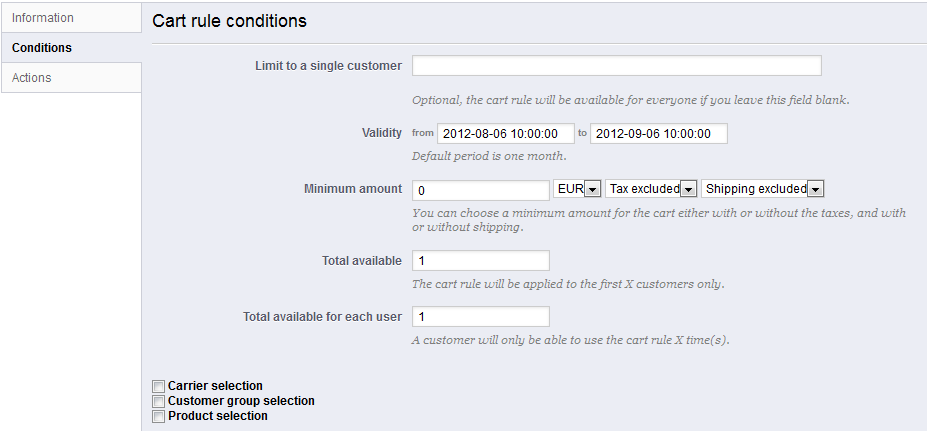
The second tab, "Conditions", contains a large set of possibilities, enabling you to precisely target who should be able to benefit from this rule.
- Limit to a single customer. This is where you indicate that the voucher you are creating is for one customer only. For instance, if you had a delivery delay and you want to apologizemake a gesture of goodwill, you can create a voucher for this customer that only he or she can access. To quickly find the customer, type in the first few letters of their first or name, last name or e-mail in the text field.
If empty, PrestaShop will understand than any customer can use it... unless you have added a customer group as a further condition (see "Customer group selection" check-box below). - Validity. The default validity is one month, but you can reduce that to one week or even one day.
- Minimum amount. The minimum order amount under from which the voucher is not applicable. Your voucher will only be applicable if the customer's order is above the given amount. You can choose if that amount should include taxes and/or shipping costs.
- Total available. Set a quantity of available vouchers: either "1" if it is intended for a single customer, or any number if the voucher is for whoever uses one first.
- Total available for each user. You can set the number of times a voucher can be used for each user. That number must be at least equal to the quantity of available vouchers above ("Total available" field).
- If that number is inferior to the total quantity of available vouchers, then one single customer won't will not be able to use all of them.
- Keeping it to "1" makes sure that each of your customers can only use the voucher once. In that case, make sure the voucher applies to a group rather than a customer...
...
- Carrier selection. You can make it so that the customer will have a discount if he or she chooses a specific carrier for the package delivery.
- Customer group selection. This is very useful. Thanks to PrestaShop's group creation tool, you can create discount that apply to a range of users, and build other conditions on top of that discount thanks to the cart rule creation tool. You can go even further: with the help of modules such as the "Customer Segmentation" module, you have a set of very powerful tools to create cart rule, and make more clients happy. Download the "Customer Segmentation" module here: http://addons.prestashop.com/en/analytics-stats/2943-customer-segmentation.html
- Compatibility with other cart rules. Only Compatibility with other cart rules. By default, an order can benefit from any number of cart rules. With this option, you can tell PrestaShop that this rule cannot be combined with a selection of other rules. This option only appears if you have more than one cart rule.
- Product selection. Another very useful tool, which enables to create automatic vouchers for cart which contain specific products. The tool is explained in more detail below.
- Shop selection. By default, a cart rule applies to all your stores. With this option, you can make it so that rule only applies to a selection of your stores.
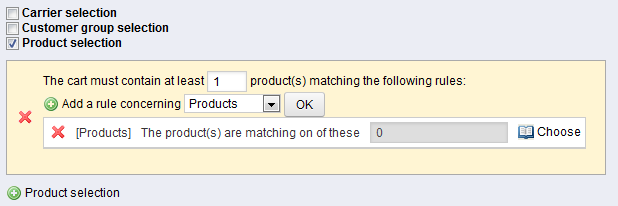
The "Product selection" option brings a whole new form, and enables you to create not only per-product vouchers, by also per-categories, per-manufacturers, per-suppliers and even per-attribute. As a bonus, you can combine all these in order to expand specify your customer target as much as possible.
...
For instance, you can create automatic vouchers for your customer in the form "Buy at least 3 Apple product, get free shipping!"
This is really a tool within the cart rule too, and its configuration is quite specific. You can add as many product selections as needed, following this path:
- Click the "Product selection" link to add a new section.
- Indicate the number of products needed for the discount to activate.
- Add at least one rule, of the type you want: products, attributes, categories, manufacturers, suppliers. You can add as many rules per product selection as you want, even one for each type if necessary.
- Clicking the "OK" adds a new line in the selection. For each type, you must give details on the content the rule applies to. Click the "Choose" link and a window opens, listing the content available for this type (products, categories...). Move the content from the left panel to the right one by clicking on the "Add" button, and close the window by clicking on the "X" at the top right. If only one content is selected, the content field will give its name; otherwise, it will indicate the number of selected content.
You can add as many rules within a selection as necessary. These rules are cumulative: either they all apply, or the discount is not granted.
Product selections are independent: you can add as many as needed, and they will not influence each other. This enables you to create a whole range of products to which the cart rule will apply.
Actions Tab
The third and last tab, "Actions", is where you choose what the discount actually consists of.
- Free shipping. The rule treats benefiting customers to free shipping.
- Apply a discount.
- Percent (%). The rule applies to a percentage of the order total. For instance, let's say the order is valued at $200 before taxes. The rule has a value of 15%. Customer who benefit from this rule will only have to pay $170 (before taxes and shipping costs).
- Amount. The rule applies a monetary discount on the order total. For instance, let's say the order is valued at $200 before taxes. The discount offers $20 off the purchase. Customer who benefit from this rule will only pay $80 before (before shipping costs). You can choose whether taxes are applied to the discount or not.
- None. The rule doesn't does not offer any discount on the order. Choosing this option makes the next section, "Apply discount to", disappear.
- Apply discount to.
- Give it a proper description, in every languages that your shop supports (click on the flag to change language). Customers will be able to read this, so write a proper sentence.
- Indicate which categories the voucher applies to – because sometimes you'd rather have customers not use vouchers for certain products.
- You can choose whether or not the vouchers are allowed to be used with other promotions on your products or other vouchers. Make your preferences known by ticking the checkboxes.
- The "To be used by" field enables you to restrict your voucher to only one of your customers.
- The voucher can have a time limit (for instance, a discount for launch week). Click the "From" and "To" fields in order to choose your dates using the calendar. By default, a new voucher lasts a year.
- You can decide whether the voucher should be shown in the cart summary or not. Do this if you want to inform a customer that they can use a voucher. If you'd rather not push for the voucher's usage, then do not show it.
- Finally, the "Enable" field allows you to enable or disable the vouchers
- Order (without shipping). The discount applies to the whole order.
- Specific product.
- Cheapest product.
- Selected product(s).
- Send a free gift.
- Choose the voucher's behavior – meaning how it should behave when the order's amount is less that the voucher's:
- reduce the voucher to the total order amount: do this if you want vouchers to be used only once.
- create a new voucher with the remaining amount: do this if your customers can use their voucher's value for as long as it has some.
- create a negative invoice: do this if you want vouchers to be used only once, but you still need to know the final value for your accounting book. The user won't receive any kind of further voucher or discount.
- You can choose to which product the discount should apply: type the first letters of the product, and choose in the list of matching names.
- Cheapest product. Only available for the "Percent (%)" option.
- Selected product(s). The customer can choose on which products the discount should be applied. Only available for the "Percent (%)" option.
- Send a free gift. You can choose to offer a gift for some conditions (and skip the discount altogether). A field appears: type the first letters of the product, and choose in the list of matching names.
Once everything has been saved, you can send your voucher code to your customers, or let the system handle the cart rules automatically, depending on your settings.
Your voucher will appear in the "VouchersCart Rules" tab, and you page, under the "Price rules" menu. You can delete or edit it at any time. If the voucher was set to a specific group or customer, then it will appear in the Front-Office, in the customer's "Vouchers" section of his account :
... as well as in the cart (if you chose to), where they can choose which one to apply to their order:.
Vouchers Cart rules that are set to apply to all customers do not appear in these locations: the customer's "My vouchers" page: he or she has to know about them in order to use them. It is up to you to let them know about these public discounts.
In order to apply the vouchercart rule, the customer needs to visit his cart and enter the voucher in the suitable "Vouchers" field and click "Add". The customer won't will not be able to apply the voucher if he checks out immediatelythe check-out is already validated.
Once applied, the cart summary displays the voucher's impact on the order's amount:
.
Catalog price rules
Catalog price rules are a new feature from PrestaShop 1.5, which enables you to assign price reductions by category, manufacturer, supplier, attribute or feature. As its name implies, this type of rules applies to a range of products; it cannot be used for a single product. If you need a discount applied to a single product, you must create a cart rule instead or create a specific price (in the "Price" page of the product's edition page).
For instance, you can set a rule that would say that for Spanish customers belonging to the "Good clients" group would get 10% off on your Electronics category and all Sony products for the first week of July.
The "Catalog price rules" page lists the currently existing rules, which you can edit or delete by clicking on the icons in the "Status" column. If you need to disable a rule, simply change its end date to the day before.
Creating a New Catalog Price Rule
The creation form page has two sections, enabling you to precisely build new rules.
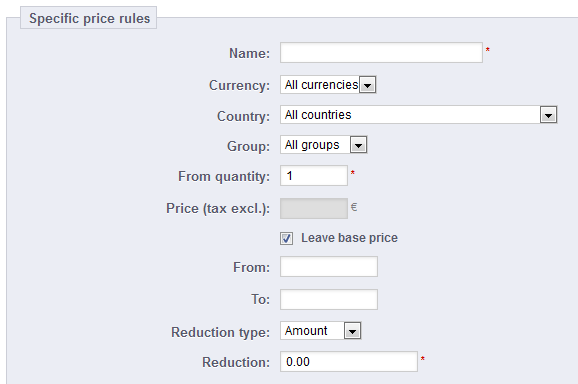
Specific price rules
The first form is easy to understand.
This is where you set who should benefit from the rule, what the discount should be, and other details.
- Name. The name is public, so you should keep it casual.
- Shop. The rule applies to customers who buy through a specific shop. Only available if you have at least two shops.
- Currency. The rule applies to customers who set to pay with a specific currency.
- Country. The rule applies to customers from a specific country.
- Group. The rule applies to customers who belong to a specific customer group.
- From quantity. The rule applies the order has at least a specific number of matching products.
- Price (tax excl.). The new price for the product. Here you can set the public price of the product that matches the rules that you are putting in place. By default, the rule applies to the base price.
- From and To. The rule applies in this time frame.
- Reduction type. The discount can either be an amount of money, or a percentage of the order total.
- Reduction. The value of the reduction. Depending on the "Reduction type" above, putting "10.0" in the field can either mean "$10 off" (depending on the default currency) or "10% off".
You can of course combine all of these rules.
Conditions
The "Conditions" section is where you set the products to which the category price rule applies.
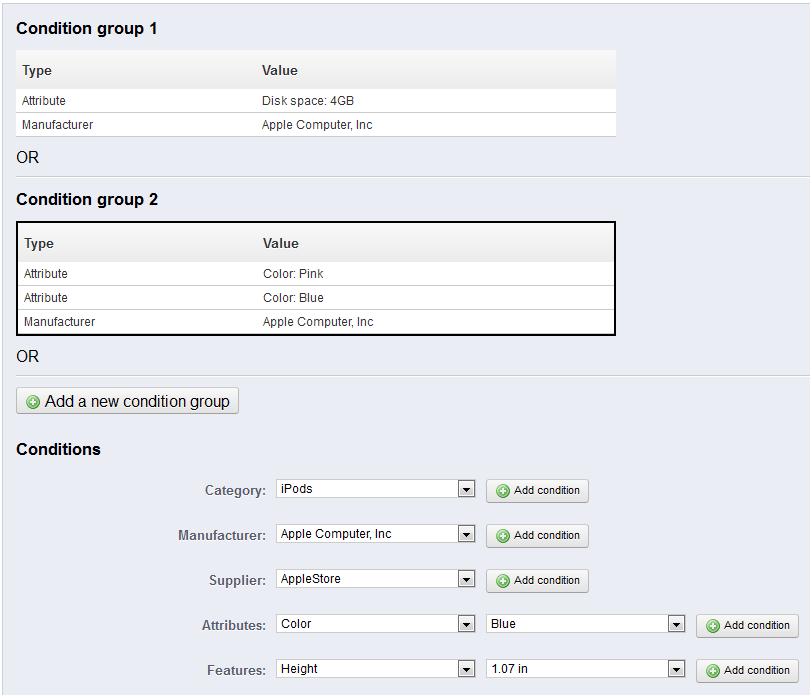
Conditions are built around condition groups, meaning that your data from the "Specific price rule" section above can be applied to many different ranges of products.
The default condition group is empty. You can add conditions to it using the drop-down menus in the lower part of the section:
- Choose a category or any other type of selection, and then click on the "Add condition" button.
- The condition will appear in the condition group. You can put many conditions in a condition group.
- Once a group is completed and you want to create a new condition group, click on the "Add new condition group". A new group will then appear, which you can fill in the same way.
By default, new conditions are added to the condition group that was created last. If you need to add conditions to a previous group, click on that group to highlight it, and then add your conditions.
| Warning |
|---|
You cannot currently remove a condition from a condition group. You cannot currently delete a condition group. |
Marketing
New in v1.5.4.
This page gathers in one place some of the most marketing-wise important modules available in your installation of PrestaShop. It serves as a shortcut to certain categories of modules from the "Modules" page.
The modules in this page come from the "Advertising and Marketing" and "Smart Shopping" sections in the "Modules" page.
You can install modules directly from this page. When you click the "install" button (or select "Install" in the drop-down list and click "Validate"), the module is installed and you are taken to the "Modules" page, where you can open the module's configuration page by clicking on its "Configure" link. You can also return to the "Marketing" page in order to open the configuration page, or delete, disable, reset or uninstall the module, depending on its status.
| Section | ||||
|---|---|---|---|---|
|

