| Section | ||||
|---|---|---|---|---|
|
Table of content
| Table of Contents | |
|---|---|
|
...
|
Managing Orders
As a shop manager, you will have to deal with heaps of orders and their accompanying invoices and customer support requests – at least, that's what we wish for you. The daily task of handling numerous orders can be daunting. Fortunately PrestaShop does its best to help you wade through them all and successfully handle your customers' purchases, along with credit slips and the unavoidable merchandise returns.
...
The "Orders" page under the "Orders" tab menu enables you to see all of the information about all the purchases from your shop. All of your shop's transactions are available there, organized by date (by default, it is set to sort from newest to oldest).

You can filter the results and easily find the orders you're looking for by using the fields above. For instance, to identify Mr. Doe's orders, type "Doe" into the "Customer" field and then click "Filter".
| Info |
|---|
YOU CANNOT DELETE AN ORDER. It is illegal to be able to remove payment or ordering information and/or invoice information from a business in Europe. Therefore, implementing a "Delete" button for orders would render PrestaShop illegal in Europe. To safely delete the default order (and thus be able to delete the iPod from your catalog), install the "Database Cleaner" module (which is available in the default installation since v1.5.4), open its configuration screen and check the "Orders and customers" box before you click on the "Delete orders & customers" button. |
You can export a list of your orders by clicking on the "Export" button at the top.
You cannot import orders.
Creating an Order
One of the great new features of PrestaShop 1.5 is the ability to create an order directly from the back-office. For instance, this is tremendously useful when a customer wants to buy a product but does not succeed, and you need to take the hand and make the order while on the phone or during an e-mail conversation with the customer.
Clicking "Add new" opens a new page with a single text field, labeled "Search customers". When creating a new order through the back-office, your first task is to associate that order with a customer. Type the first letters of the customer first name, last name or e-mail address, and PrestaShop will display the matching accounts.
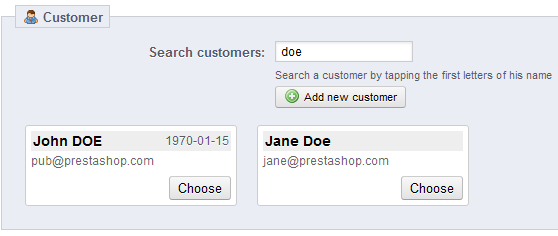
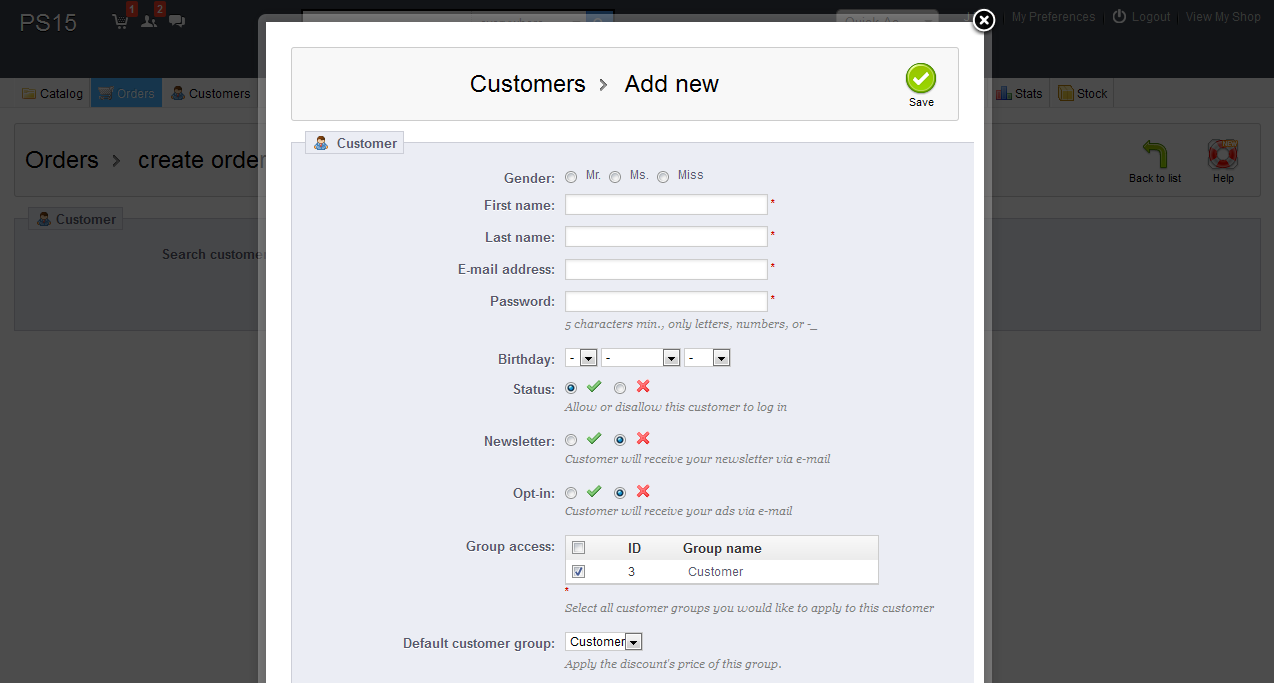
| Info |
|---|
If the customer you are creating this order for does not even have a user account already, you can create one on the fly: click the "Add a new customer" button to open a window with the main account details ready to fill. Once the account is saved, it becomes the chosen account for the order.
Note that you will also have to register the customer's address – a "Add new address" button is available at the bottom of the page, in the "Addresses" section. |
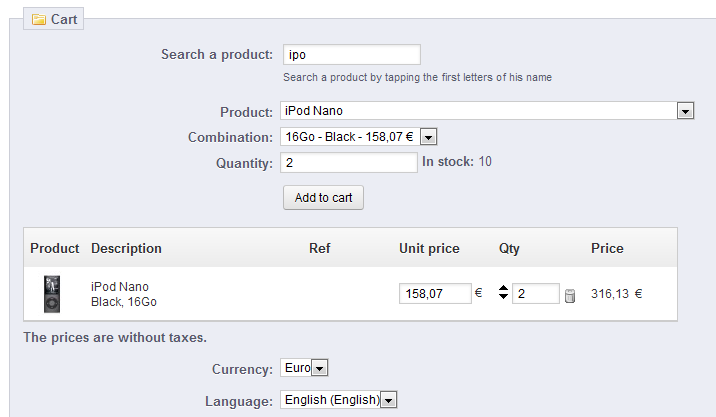
Click the "Choose" button for the correct customer, and the whole order form appears. Its main section, "Cart", is where you will make all the necessary product decisions for this order.

The "Search a product" field enables you to dynamically find products to add: type the first letters of its name and PrestaShop will fill a drop-down list with matching products. Choose a product, select a quantity, and click "Add to cart" button. You can of course choose among the many combinations of a product, if any, in the "Combination" drop-down list that appears in that case.
Note that PrestaShop gives you an indication of the remaining stock for a given product, which enables you to tell the customer that you are out of stock for said product right from the order form.
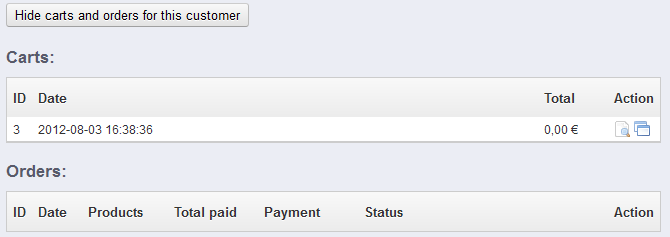
The page also enables you to see the previous carts and orders from that customer, if any. If it turns out you are dealing with a cart that a customer somehow cannot validate, you can use that cart for this order by clicking on the "Use this cart" action button (the "two windows" icon).
If needed, you can also grant that order a voucher/cart rule, and even create one on the fly by clicking on the "Add new voucher" button.

Finally, you need to specify to which address the order should be delivery (and possibly billed). Here, again, you can create new addresses on the fly using the "Add new addresses" button.

Viewing an Order's Details
In order to process the orders you receive, you have to view the information they contain.
Click on the line containing the order, or click on the button to the right of the order.
The order detail sheet fills a full page.
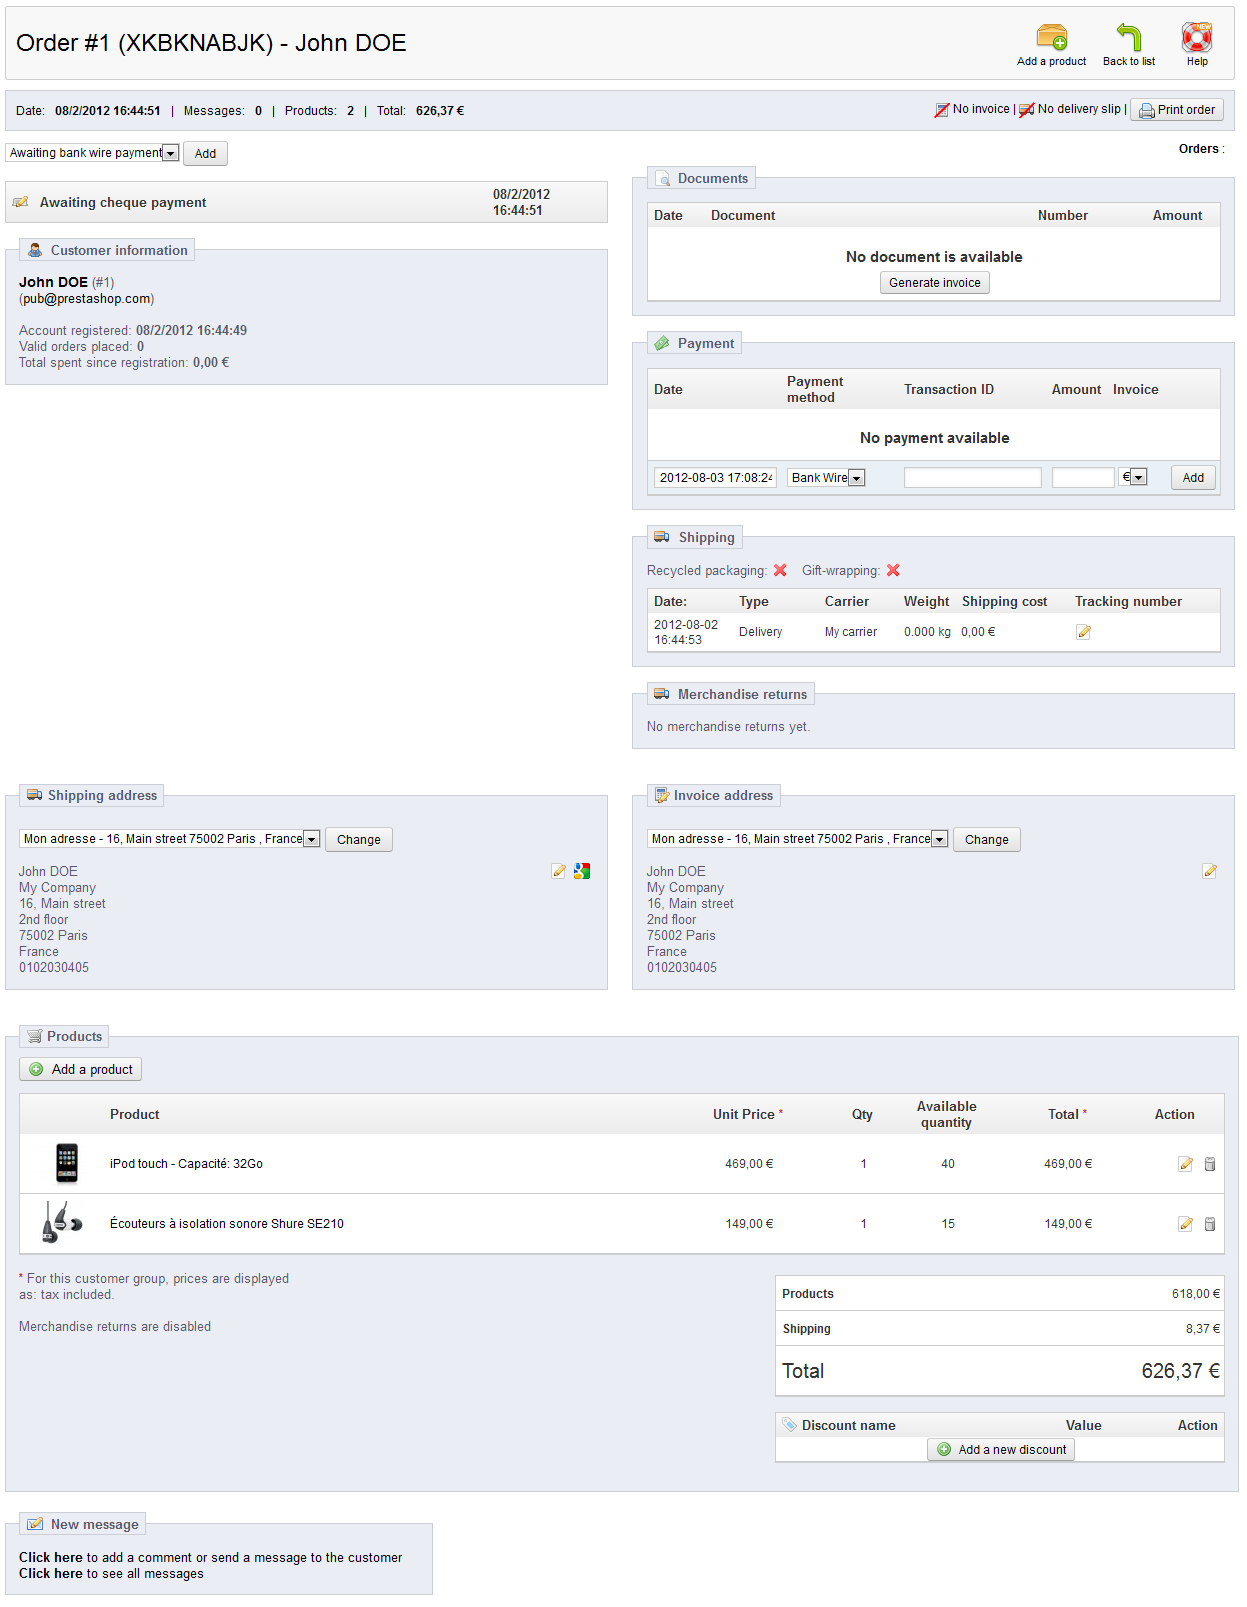
This summary of the order gives you access to:
...
Orders are not unalterable. There are many reasons why you would need to change an order before its products are gathered, packed and sent to their new owner: one of the product is out of stock, the customer changed his or her mind, etc.
Adding a product
At the top of the page are , you can find the "Add a product" and "Cancel products"button, which trigger triggers two actions upon clicking:
- scroll Scrolls down the page to the "Products" section.
- add fields Adds a field to the product sheetorder.
...

When adding a product, the products table gets a new row added with a handful of fields. The first text field is actually a small search engine: type the first letters of a product to see a list of corresponding products. Select the one you want to add, and the grayed-out field of the row become becomes available.
If the product has combinations, you can select it in a drop-down list that appears below the name: the unit price update accordingly.
Set the quantity of products, and then click the "Add product" button: the product is added
...
You cannot add more product quantity than there is of available product.
Removing products
Clicking the "Cancel product" button in the top bar adds a column in the product list, titled "Cancel". This column feature a check-box and a text field: check the box to indicate that you want to remove quantities from this product, and type a number in the text-field indicating how much of the product should be removed. Finally, click on the "Cancel product" button at the bottom of the "Products" section in order to validate your choice.
To cancel a product, go to the product list, and either delete the product by clicking on the "Delete" action (the "trashcan" icon), or by clicking on the "Edit" action if all you need is to remove some quantity of a product.

You can edit the quantity of many product products at the same time.
If a product's quantity reaches 0, it is removed from the order altogether.
You cannot remove more than the quantity of product.
Click the "red cross" icon to cancel your edit.
Editing the order details
...
The first drop-down list in the order page enables you to change its status. It is a very important part of the whole order monitoring process, as with each status change, new functionalities and documentation will be made available for the order.
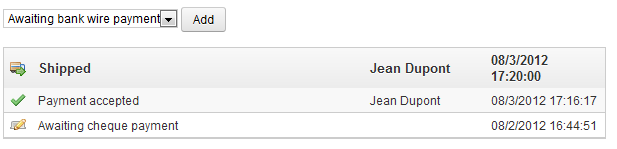
You can choose between the following statusstatuses:
- Awaiting bank wire payment.
- Awaiting cheque payment.
- Awaiting PayPal payment.
- Canceled.
- Delivered.
- On backorder.
- Payment accepted.
- Payment error.
- Payment remotely accepted.
- Preparation in progress.
- Refund.
- Shipped.
In order to get a better view of the order's activity, every status change is recorded, and the log appears right below the status change drop-down list. Therefore, you should only change a status if it has been clearly confirmed: do not mark an order as "Delivered" when you have sent the package, use "Shipped", ; do not use "Preparation in progress" when in fact you have only taken a quick glance at the order, etc.
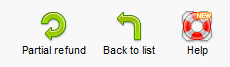
Actions Buttons
The action buttons in the top bar change depending on the order's status. For instance, once the order is in the "Delivered" state, the "Add a product" and "Remove products" turn into two new buttons: "Return products" and "Partial refund".Return products is to be used when the customer returns
| Info |
|---|
Product return is not activated by default. To activate it, go to the "Product returns" page under the "Orders" menu, and activate the option in the option at the bottom of the page. This will apply to all products and all orders. |
- Return products. To be used only when the customer has effectively returned products: once the returned product has been received, you can mark it as returned directly in the order form. Click the "Return products" button and a new column will appear in the product list,
...
- titled "Return". Check the box of the
...
- affected products,
...
- indicate the
...
- quantity of items that were
...
- returned, and click the "Return products" at the bottom of the table.
...
- Partial refund. To be used when you need to refund only part of the order and not the whole order, either because the customer returned the ordered product, or simply as a sign of goodwill for a damaged product that the customer chose to keep anyway. Click the "Partial refund" button and a new column will appear in the product list, titled "Partial refund". Set the amount and quantity for each of the affected products, choose one of the option at the bottom of the list (see below), and click the "Partial refund" button at the bottom of the table.
When you set a product as returned or to be refunded, four options are available below the list of products:
- Re-stock products. When checked, PrestaShop will consider that the returned product as available for sale again, and will therefore increase the stock for this product. You should not click this when a product is returned due to it being broken...
- Generate a credit slip. When checked, you will create a credit slip will be created for the selected items. A credit slip is an acknowledgment from your shop that merchandise has been returned and that a refund has been issued. The customer can then use it as a credit slip for his or her next purchase.
Generate a voucher.
Partial refund is to be used when you need to refund only part of the order and not the whole order, either because the customer return of the ordered product, or simply as a sign of goodwill for a damaged product that the customer chose to keep anyway.
When checked, a voucher will be created for the amount of the selected items. A voucher takes the form of a discount code that the customer can enter during the checkout process.
You can edit the customer's existing vouchers by viewing the customer's page: from the current order's page, click on the link under the customer's name in the "Customer information" section; once in the customer's page, reach the "Vouchers" section. You can edit each voucher by clicking on the "Edit" icon.Warning In PrestaShop 1.5, vouchers are part of a new kind of discount feature: "cart rules". They can be created and edited from the "Cart Rules" page, under the "Price rules" menu. The cart rules creation process in the next chapter, "Creating Price rules And Vouchers".
- Repay shipping cost. You can also choose to refund the shipping cost of the returned product, which is always an appreciated gesture.
If the customer paid the order using a credit card, the payment system should refund the cart automatically. If the order was paid using a check or a bank transfer, you have to issue the refund yourself, then mark the order as having been refunded manually in the back-office (in the order's page).
| Tip | ||
|---|---|---|
| ||
A credit slip is first and foremost a written proof that a product has been returned. Most of the time, the customer can use it as a voucher. A voucher is a discount code which does not have to be tied to a merchandise return or a refund, and which can take more forms than a simple credit slip:
You can apply a voucher to all customers, or a group of customers, or a single customer; you can set its expiration date; A cart rule is basically an advanced version of a voucher: in addition to what a voucher could do in PrestaShop 1.4, the cart rules system introduced in PrestaShop 1.5 enables you to:
|
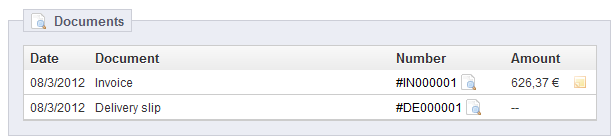
Documents
You can get many PDF documents from an out of the order page. When available, they are listed in the "Documents" section of the page.
By default, you can download the order itself as a PDF, by clicking on the "Print order" button on right.
You can get an invoice for the order by clicking on the "Generate invoice" button from the "Documents" section. The invoice is also generated once you put the order in the "Payment accepted" status.
Once it is generated, the "View invoice" button below gets activated the top-bar.
| Tip |
|---|
You can customize the invoice layout easily: the PDF template files are located in the |
When you put the order in the "DeliveredPreparation in progress" state, a delivery slip PDF is generated, which you can then download from the "Documents" section.
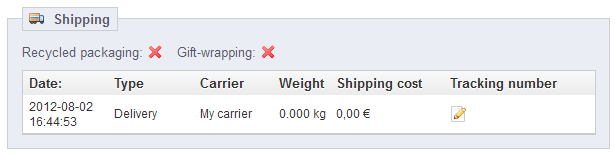
Shipping
The shipping details of the current order can be partly edited. More specifically, you can change the tracking number: in the "Shipping" section, click on the "Edit" icon in the "Tracking number" column, and enter the new number.
Shipping Address
The "Shipping address" section enables you to edit the destination address of the package your team is about to send. You can either use the drop-down list to choose another of the addresses that the customers has already registered on your shop, or you can use the "Edit" icon to edit the currently chosen address.

If you need to send the package to an address that is not already registered in PrestaShop, you must first create it. To do this, go to the "Customers" menu, open the "Addresses" page, and click in the "Add new" button. Do not forget to put the correct e-mail of the customer, as this is the way PrestaShop will know to associate that new address with your existing customer! Once done, go back to the order's page, and change the address using the drop-down list.
Note that a small "G" icon enables you to visualize the destination of the package on Google Maps.
Invoice Address
Discount
Sending a message to your customer
The "Invoice address" section enables you to edit the payment address of the order. Just as for the shipping address, you can either choose the drop-down menu to choose another of the addresses that the customers has already registered on your shop, or you can use the "Edit" icon to edit the currently chosen address.
If you need the payment to be tied to an address that is not already registered in PrestaShop, you must first create it. To do this, go to the "Customers" menu, open the "Addresses" page, and click in the "Add new" button. Do not forget to put the correct e-mail of the customer, as this is the way PrestaShop will know to associate that new address with your existing customer! Once done, go back to the order's page, and change the address using the drop-down menu.
Discount
In the "Products" section, at the bottom of the products listing, you can find an empty table with an "Add new discount" button. This creates a simple discount, not as advanced as the vouchers/cart rules system but still useful.
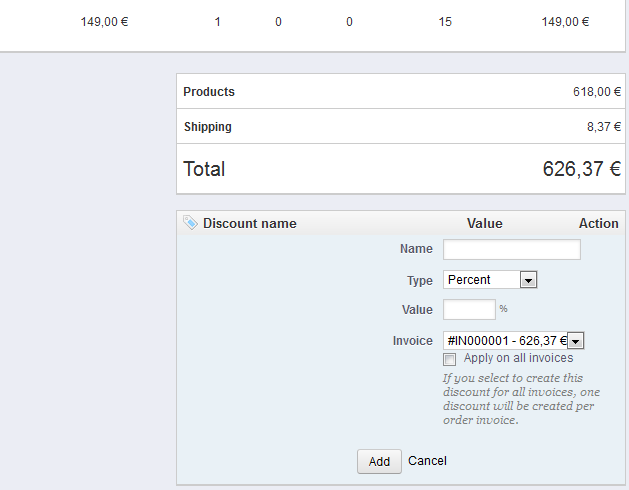
Clicking it will open a new form, with the following items:
- Name. Give the discount a short name. This will be public to the customer.
- Type. Choose the discount type: "percent", "amount" or "free shipping".
- Value. For the "percent" or "amount" types, set the value of the discount.
- Invoice. Select to which invoice from this order this discount should be applied. When there is more than one invoice, you can check the box to apply the discount to all the invoices.
The discount will be applied to the total before the shipping costs.
Attaching a message to the order
In the "New Message" section, at the bottom of the page, you can send a message attach a comment on the order for your team.
You can also have this comment be sent to the customer, in order to give him or her information concerning the order, a delay, a surprise, or keep him or her informed on offers and specials. This is key to good businessa key point of customer relationship.
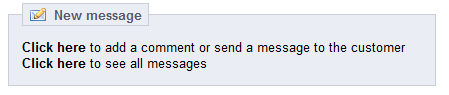
There are two links available:
- Click here to add a comment or send a message to the customer.
- You can send add a message simply by writing it in the message box and clicking "Send". The message will be stored in the client's profile in your Customer Service database, which you can access either by going to the client's page, or to the Customer Service page. The message can also be sent to the client's e-mail address should you choose to.
- Pre-written message messages can be saved and used multiple times, saving you the hassle of writing them over and over again. If you would like to send one of these messages, select it from the drop-down menulist. You can then add further details to the pre-written message if needed.
You can create more pre-written messages using the tool in the "Order messages" page, under the "Orders" page.
- Click here to see all messages. Rather than opening a message form, this This link will take you to the "Customer service" page of the "Customers" tab.
...
- menu. This is fully explained in the "Managing Customers" chapter of this guide.
Invoices
Each time an order from your store shop is validated, an invoice is sent out to the customer. If there are no problems, the order status will read "OK" or "Payment accepted." You can download it directly the invoices for a single order from the order summary by clicking 's page. The "Invoices" page under the "Invoice" section in the top right-hand corner of the page.
The customer will be able to access the invoice by going to his account.
Printing Invoices
If you want to print several invoices at the same time, head to the sub-tab "Invoices" under the "Orders" tab. The invoice interface will appear.
In order to print several invoices, fill in the date range in the "From" and "To" fields in the "Print PDF invoices" section and create PDFs by clicking on "Generate PDF file."
In the second section "Invoice Options", you Orders" menu enables you to download a selection of invoices from past orders in PDF format, all at the same time (in the same PDF file).
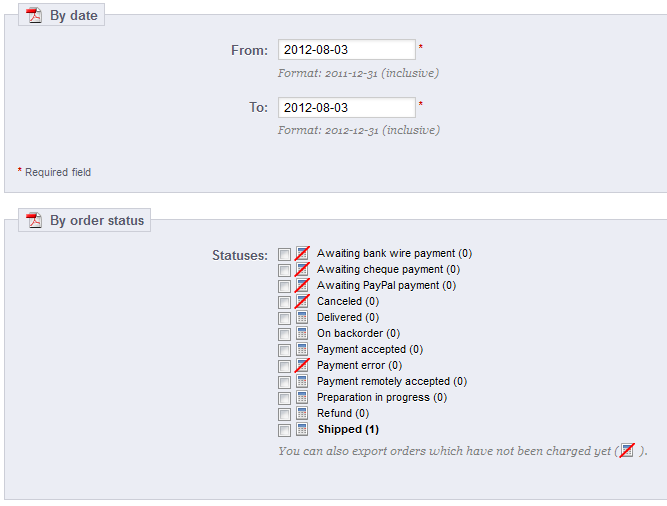
You can get a PDF of several invoices depending on two main criteria:
- By date. Very useful when you need to print all invoices for a given month or a given quarter. Select the start and end date, and click on the "Generate PDF file by date" button in the top bar.
- By order status. A must-have when you need to print precisely which orders are canceled, refunded or on backorder. PrestaShop helpfully indicates the number of invoices tied to each status in parentheses.
In both cases, the invoices are generated into a single PDF file, each with their own pages. You cannot get a single PDF file for each invoice of the given period or statuses using this page.
| Info |
|---|
If you want to customize the look of your store's invoices, you must change its template files. PDF template files are located in the |
Invoice Options
You can choose whether or not invoices should be printed available to your customers as soon as the order is made, as well as the Invoice Prefix and the invoice number you want listed on the printed version of the invoice. This feature can help you simplify the management of your account.
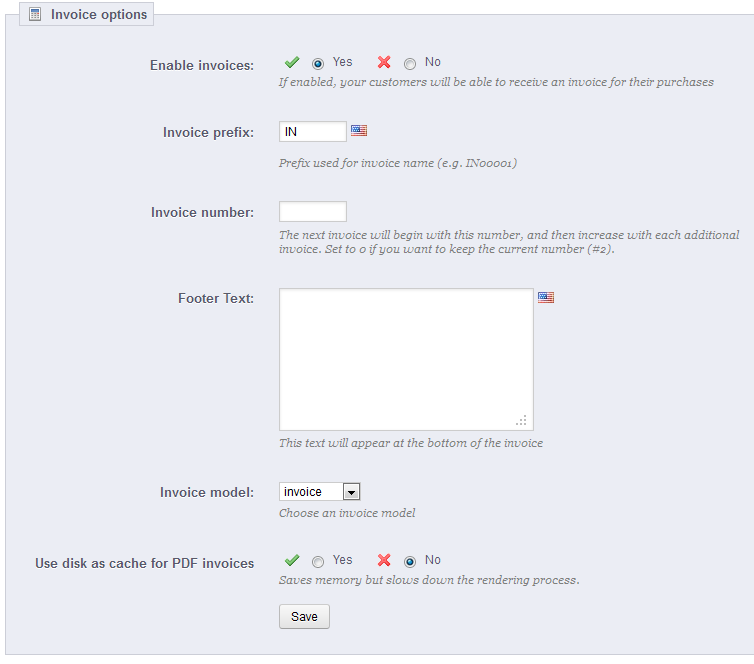
- Enable invoices. When disabled, your customer will not receive an invoice after their purchase. You will be responsible for handling the invoices, if your customers ask for one.
- Invoice prefix. Be default, PrestaShop has language-adapted invoice prefixes: "IN" in English, "FA" in French (for "facture"), "CU" in Spanish (for "cuenta"), etc. You could choose to have language codes instead: "EN", "FR", "SP", etc. Of course, you can also choose to have a single prefix for every language, or to not have a prefix at all.
PrestaShop will then generate the invoices number according to you settings: "#IN000001", "#FR000002", etc. - Invoice number. If your business has already had orders and invoices before you started using PrestaShop, you can use this option to start your invoice number from a higher number.
- Footer text. You can use to have a custom text at the bottom of all your invoices. The text will appear below the name of your shop in the invoice.
- Invoice model. Depending on your themes, you might be able to use more than one style of invoice. Test them with a fake order, in order to choose the one you prefer. If you know how to code in HTML, you can add your own invoice models or edit the existing ones: they are located in the
/pdf/folder of your PrestaShop installation. - Use disk as cache for PDF invoices. You can choose to store generated invoices on PrestaShop's server disk rather than in its server cache. While it saves on memory usage, it slows down the PDF generation itself, so use it knowingly.
Do not forget to save your changes.
When your customers ask for their invoices, you can redirect them to the "Order History" section of their user accounts, which keeps all of their invoices available for them.
Delivery Slips
Printing a delivery slip is exactly like printing an invoice. Select the dates, as well as the options you would like, and then confirm them to create your documents.
Merchandise Returns
Under the The "Merchandise Returns" tabpage gives you a list of all the RMA process.
At the bottom of the page, you have the possibility of allowing enabling customers to send products back to you. Click on the tab and a form will appear. Select your Simply make a choice, indicate the time of validitynumber of days during which a return request can be made, and save your settings.

Return process: how the customer sees it
Once you have activated this the RMA option in your Back Officeback-office, the customer can choose to return an item (provided the order is still in the time of validity). In order to do this, s/he must do the following:
- Access the "Orders History" section of his or her account.
- Select the order from which he wants to return an item.
- Select the product(s) that s/he wishes to return by checking the box next to its name(s).
- (optional) Add an explanation, in order for the store shop team to better understand why the item is being returnedcustomer wants to return this product.

Once the form is complete, the customer clicks on "Make an RMA slip", and the request is sent to you.
A list of returns will appear in your Back Office.
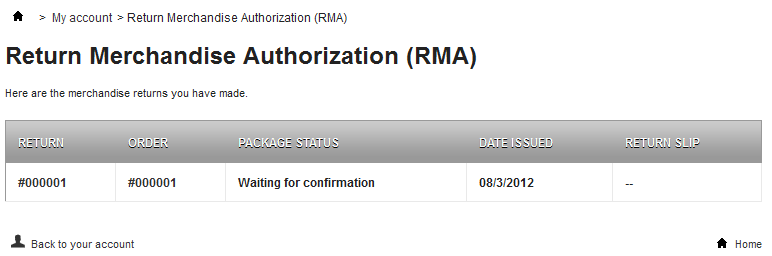
The request appears in the customer's "Return Merchandise Authorization" page, accessible from the account page.
Return process: how you see it
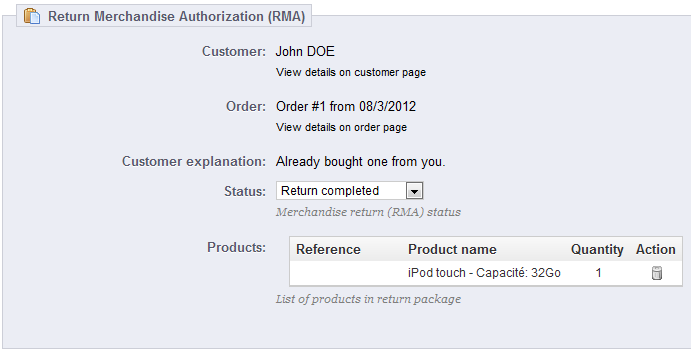
The return request appears in your back-office.

It is now up to you to accept it or deny it:
- Click on the name of the return request to see more details.
- At first, the RMA has the "Waiting for confirmation" status. Change the status to continue with the return process or stop it.
Create a Credit Slip
Once a package has been returned, you must create a credit slip.
...
- Validate.
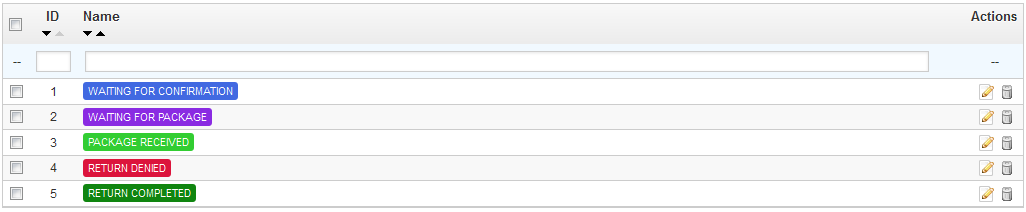
The refund process can take several steps, which are indicated by the RMA status. There is just a handful of statuses, which can follow the whole RMA process:
- Waiting for confirmation.
- Waiting for package.
- Package received.
- Return denied.
- Return completed.
If you want to stop the return process (and deny the customer a refund), simply choose the "Return denied" status.
If you agree with the product being returned and the customer being refunded, follow each step precisely:
- Choose the next step in the process: "Waiting for package". This will send an e-mail to the customer indicating that the product can be sent back to you.
- Once you have received the package, change the RMA's status to "Package received".
- Finally, once the whole process is over (either the customer has been refunded or you have issued a credit slip), change the RMA's status to "Return completed".
Refunding a customer
An order can be refunded, either partially or totally. This is done using two actions buttons located in the top bar of the order's page itself rather than in the RMA page.
The action buttons change depending on the order's status. For instance, once the order is in the "Delivered" state, the "Add a product" and "Remove products" turn into two new buttons: "Return products" and "Partial refund".
| Info |
|---|
Product return is not activated by default. To activate it, go to the "Product returns" page under the "Orders" menu, and activate the option in the option section at the bottom of the page. This will apply to all products and all orders. |
- Return products. To be used only when the customer has effectively returned products: once the returned product has been received, you can mark it as returned directly in the order form. Click the "Return products" button and a new column will appear in the product list, titled "Return". Check the box of the affected products, indicate the quantity of items that were returned, and click the "Return products" button at the bottom of the table.
- Partial refund. To be used when you need to refund only part of the order and not the whole order, either because the customer returned the ordered product, or simply as a sign of goodwill for a damaged product that the customer chose to keep anyway. Click the "Partial refund" button and a new column will appear in the product list, titled "Partial refund". Set the amount an quantity for each of the affected products, choose one of the option at the bottom of the list (see below), and click the "Partial refund" button at the bottom of the table.
When you set a product as returned or to be refunded, four options are available below the list of products:
- Re-stock products. When checked, PrestaShop will consider that the returned product as available for sale again, and will therefore increase the stock for this product. You should not click this when a product is return due to it being broken...
- Generate a credit slip. When checked, a credit slip will be created for the selected items. A credit slip is an acknowledgment from your shop that merchandise has been returned and that a refund has been issued. The customer can then use it as a credit slip for his or her next purchase.
Generate a voucher. When checked, a voucher will be created for the amount of the selected items. A voucher takes the form of a discount code that the customer can enter during the checkout process.
You can edit the customer's existing vouchers by viewing the customer's page: from the current order's page, click on the link under the customer's name in the "Customer information" section; once in the customer's page, reach the "Vouchers" section. You can edit each voucher by clicking on the "Edit" icon.- Repay shipping cost. You can also choose to refund the shipping cost of the returned product, which is always an appreciated gesture.
If the customer paid the order using a credit card, the payment system should refund the cart automatically. If the order was paid using a check or a bank transfer, you have to issue the refund yourself, then mark the order as having been refunded manually in the back-office (in the order's page).
Delivery Slips
A delivery slip is a notification of delivery. It can also be called "delivery note" or "advice note".
It is supposed to be put in the shipped package, along with the ordered products. It will have your shop's logo, and indicate the content. On receiving the package, the customer will be able to use the delivery slip in order to double-check the content of the package, see that nothing is missing from the order.

Get a delivery slip is exactly like getting an invoice. Select the dates, as well as the options you would like, and then confirm them to create your documents.
You can get a PDF file of several delivery slips depending only by date, which is very useful when you need to print all delivery slips for a given day or a given quarter. Select the start and end date, and click on the "Generate PDF file" button.
Delivery Slips Options
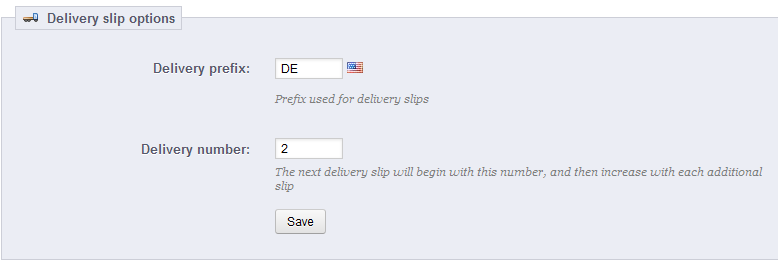
The two options are the same as for the invoice options:
- Delivery prefix. You might like to have language-tagged delivery slips: "DE" in English, "LI" in French (for "livraison"), "EN" in Spanish (for "entrenga"), etc. Or you could directly choose to have language codes: "EN", "FR", "SP", etc. Of course, you can also choose to not have a prefix at all.
- Delivery number. If your business has already had orders and delivery slips before you started using PrestaShop, you can use this option to start your delivery slip number from a higher number.
PrestaShop will then generate the delivery slips number according to you settings: "#DE000001", "#LI000002", etc.
Do not forget to save your changes.
Credit Slips
Following your agreement on a product return, you should receive a package from the customer. Once you have received that package, you must create a credit slip. It can also be called "credit note" or "credit memo".
Credit slips are not created in the "Credit Slips" page, but only listed there
In your list of orders ("Orders" page), click on the order for which the customer is returning the item some items for more details.
Below the "Products" table, do the following:
...
The credit slip is now created and will be available in the Order Details well as in the "Credit Slips" tabpage.
You From there, you can click the link to download the PDF file.
Your The customer will see the slip in his or her "My Account" section.
If you have created a voucher, they customers will see it in the "My vouchers" section of their account. If they click on it, it should look something like this:
The amount of the returned item(s) is added to the voucher. The customer can use the discount code (listed in the far left of the column) next time he or she places an order.
Messaging Customers
Your PrestaShop online store gives you the ability to interact with your customers thanks to an integrated messaging system.
Basically, your customers can send you messages about their orders through the "My Orders" section of their user accounts. They select the order they want to write about, and then fill out the following.
Once the message has been sent by the customer, it will appear directly under the "Customer Messages" sub-tab, in the "Orders" tab.
Clicking on the message's row takes you to the order that it concerns. You can see the message from this point in the bottom left of the page: it is highlighted in yellow.
Click on the green checkmark to signal that you have read and understood the message.
Take a moment to send a message back to your customer! You can do this by clicking on the "New message" section, which can be found right above, and which has already been discussed.
Statuses
Having different order statuses lets you easily manage your customers. These different statuses are visible and editable in the "Order Statuses" tab.
...
Statuses
Having different order or return statuses enables you to easily manage your orders and returns, and keep you customers informed of the evolution of their purchase.
The various available statuses are visible and editable in the "Statuses" page, under the "Orders" menu.
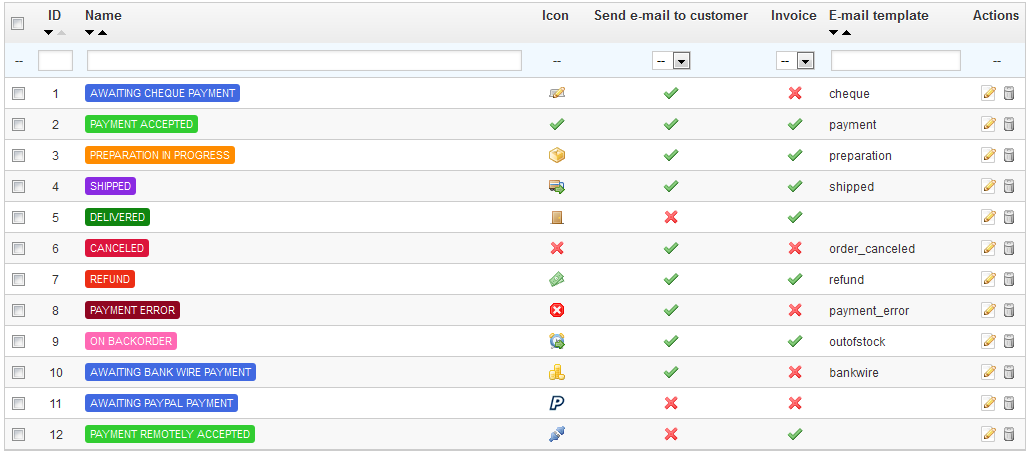
The page displays a list of the currently registered order statuses, along with:
- Their distinctive colors: existing status have colors that help quickly decide if there's an issue with the order or if it all goes well.
- Their icons.
- Their ties to two PrestaShop behaviors (more are available):
- Should the customer receive e-mail when the order gets this status?
- Does this status allow the customer to download and view a PDF version of the order's invoice?
- The name of their e-mail template: you can edit these templates, language by language, in the "Translations" page under the "Localization" menu. In the "Modify translations" section of that page, choose "E-mail template translations" in the drop-down menu, and then click on the flag of the language in which you wish to edit these templates.
- Their action icons: "edit" and "delete".
The return status list features less information, because those statuses are merely labels with no impact on the order.
Creating a new order status
You can create a new status with the "Add New" button at the top. The creation form opens.
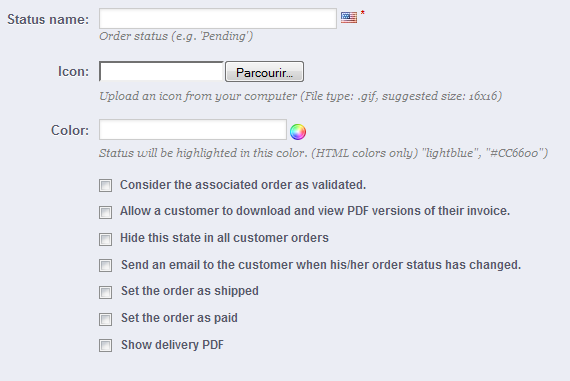
Fill out the form:
- Status name. Keep it very short and distinctive.
- Icon. You can use any 16*16 icon; for instance, the excellent and free FamFamFam Silk icon set: http://www.famfamfam.com/lab/icons/silk/.
- Color. You should strive to have the status' color match the existing colors (if relevant). The default color usages are:
- Red/Orange: canceled or refunded orders,
- Crimson red: payment error,
- Blue: orders which are still awaiting payment,
- Light green: paid orders,
- Dark green: delivered orders,
- Purple: shipped orders,
- Pink: backordered orders.
- Options:
- Consider the associated order as validated. If enabled, this status marks all associated orders as "paid", and puts them in this same status.
- Allow a customer to download and view PDF versions of their invoice. If disabled, you will have to send customers their invoice yourself.
- Hide this state in all customer orders. This enables you to create internal statuses, for you and your team. Customers will never see this in their order status page.
- Send an e-mail to customer when his/her order status has changed. When enabled, a drop-down menu appears to let you choose which mail template to use.
- Set the order as shipped. Be careful: once an order is set as "shipped", it cannot be set back to the previous status.
- Set the order as paid. Same here: once an order is set as "paid", it cannot be set back to the previous status.
- Show delivery PDF. Displays the delivery PDF.
Creating a new return status
You can create a return status with the "Add New" button . Fill out the form, and save it.
The color will be used to underline order statuses and will be written, like the previously seen color attributes, in HTML code.
Pre-written messages
at the bottom. The creation form opens.

It only features two fields: set your desired status name and its color, and save your creation.
Order Messages
When you have to send a message to your customers using the PrestaShop administrative interface, you can choose to save this message in order to send it out again to other customers with similar questions, comments, or concerns.
To do this, go to the "Order Messages" sub-tab page under the "Orders" tabmenu. One default message is already saved: "Delay".

To add others, click on the "Add New" button. You can also edit the default message.
...
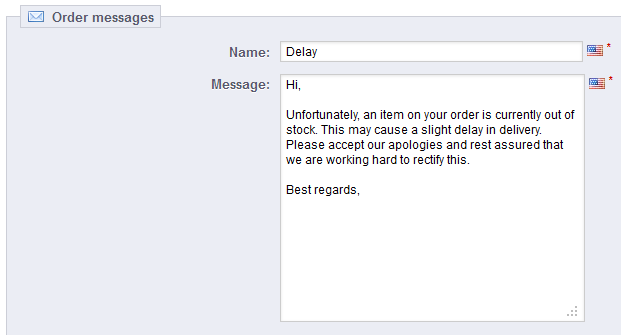
The form goes to the essentials:
- Name. Give your message a descriptive name so that you can easily find it again later.
- In the "Message" field, write Message. Write out the content that you wish to send to your customers.
...
You can create as many messages as you wantneeded.
You Once you pre-written messages are all set, you can send these messages them by going directly into a customer's order:
- Select the pre-written message.
- Edit it if needed.
- Click "Send"."
Your customer will receive the message on the email address associated with this account.
| Section | ||||
|---|---|---|---|---|
|