Gestionar las Categorías
Las categorías son esenciales, ya que le permite permiten agrupar productos equivalentes. Esto ayuda a los clientes a navegar fácilmente a través de su del catálogo de productos de tu tienda, y restringir su la búsqueda a un tipo específico de producto.
Debe Debes crear una nueva categoría en el momento en que tenga tengas al menos dos productos con atributos o características equivalentes. Los productos dentro de una misma categoría deben ser comparables, e incluso intercambiables. Mantenga Mantén esta idea en mente al añadir nuevos productos y al crear nuevas categorías.
| Tip |
|---|
Categories are determinant of how people will navigate on your site and search for your products. You should focus on your category tree and how categories are organized even before you start creating product sheets. |
Categories are managed in the "Categories" page of the "Catalog" menu. This page displays a table with the currently existing categories, with the main information displayed.
In order to display sub-categories, click on the parent category or select "View" in the action menu.
Using the icon in the "Displayed" column of the table, you can indicate the ones you want to hide from the customer by clicking on the green check-mark icon, thus turning it into a red "x" mark.
All the categories are actually sub-categories of the "Home" category.
To edit the "Home" category (or any currently selected category), click on the arrow next to the "View" button, then on "Edit".
To create a new category (or a sub-category of an existing category), click on the "Add new category" button from any level of categories.
| Tip | ||
|---|---|---|
| ||
Make sure to translate each field in every language that your shop supports. In order to do that, click on the language button next to the field, and choose the language in which you wish to edit the text. |
First of all, you must enter a set of general information:
- Name. Give your category a name. Make it very short and descriptive, and choose your words wisely: your customers will rely on it when browsing your shop.
- Displayed. Indicate if it is "displayed" (i.e., whether or not it will be available to your customers). For example, you may want to postpone displaying a new category to your customers because you have not quite completed it.
- Parent Category. Does not appear when creating a root category. If you wish to create a subcategory belonging to a category other than the home page, choose the category under which it will appear.
The form is the same when creating a root category or a sub-category. The only difference is that when clicking "Add new category" from a sub-level of categories, PrestaShop understands that you want to create a sub-category, and therefore sets the "Parent category" option accordingly. - Description. You should fill this field, because not only will it be useful to you or your employees, but some themes might also make use of it, displaying it to your customers.
- Category cover image. Click on "Add file" to upload an image from your computer which will represent this category. It will appear on the category's page.
- Category thumbnail. Displays a small image in the parent category's page, if the theme allows it.
- Menu thumbnail. The category thumbnail appears in the menu as a small image representing the category, if the theme allows it.
- Meta title. The title that will appear on the search engines when a request is made by a customer
- Meta description. A presentation of your category in just a few lines, intended to capture a customer's interest. This will appear in the result pages of search engines.
- Meta keywords. Keywords that you must define in order to have your site referenced by search engines. You can enter several of them, separated by commas, as well as expressions, which must be indicated in quotation marks.
- Friendly URL. Enables you to rewrite the addresses of your categories as you wish.
For example, instead of having an address such as http://www.example.com/category.php?id_category=3, you can have http://www.example.com/123-name-of-the-category.
In this case, all you would need to do is indicate in the field marked "Friendly URL" the words that you wish to see appear instead of "name-of-the-category" separated by dashes. - Group access. Restricts access to the category and its products to certain shoppers. To see these categories, your shoppers must belong to a user group. For more information, check out the "Groups" tab in the "Customers settings" page, from the "Shop Parameters" menu.
Root Category. Only appears when creating a root category. You might want to use this new category as the new root category, instead of "Home". If so, check this option that applies.
Info The root category is very useful in multi-shop mode. Imagine you have 3 stores with different or partly different products and categories: you might want to use a different root category for each store.
The root category thus reflects the "home" category of each store so if you do not want to have the same products in the homepage category of each store, you need different root categories.
This way it is easier to assign categories to each store and you can have different products in the home category.
Once you have finished configuring your category, save it, and you are ready to fill it with products.
| Note |
|---|
A new category will not automatically appear in your shop's menu. To display it, you should edit the menu with the "Main menu" module (when using the default theme), or any custom module you may have to manage the menu. |
Navigating and editing categories
The "Edit" button in the button bar enables you to edit the parent category of the currently-displayed sub-categories. This means that when you are viewing the main sub-categories, clicking the "Edit" button will enable you to edit the "Home" category.
You can click on any category in the table: this will open that category, and display all of its sub-categories. In effect, this will change the context of the interface: clicking the "Edit" button will edit the current parent category, and clicking the "Add new" button will open the category creation form with the "Parents category" option set to the current parent category.
Importing and exporting categories
Besides the "Add new" and the "Edit" buttons, the list's button bar also features three buttons:
...
Las categorías determinan cómo las personas navegarán a través de tu tienda y cómo accederán a tus productos. Deberías concentrarte en el árbol de categorías de tu tienda y en cómo las categorías estarán organizadas, incluso antes de comenzar a crear páginas de productos. |
Las categorías son gestionadas desde la página "Categorías" del menú "Catálogo". Esta página muestra una tabla con las categorías existentes en la actualidad, mostrando la información principal de cada una de ellas.
Para visualizar las subcategorías, haz clic en la categoría padre o selecciona "Ver" en el menú de acciones.

Utilizando el icono verde de verificación de la columna "Visible" de la tabla, puedes indicar que desea ocultar la categoría correspondiente, convirtiéndose en este caso el icono en una "x" de color rojo.
Todas las categorías son en realidad subcategorías de la categoría "Inicio".
Para editar la categoría "Inicio" (o cualquier categoría actualmente seleccionada), haz clic en la flecha situada junto al botón "Ver" y luego en "Modificar".
Para crear una nueva categoría (o una subcategoría de una categoría existente), haz clic en el botón "Añadir nueva categoría" desde cualquier nivel de categorías.
| Tip | ||
|---|---|---|
| ||
Asegúrate de traducir cada campo en todos los idiomas soportados por tu tienda. Para ello, haz clic en el botón que muestra la lista desplegable de códigos de idioma, y selecciona el idioma en el que deseas editar el texto. |
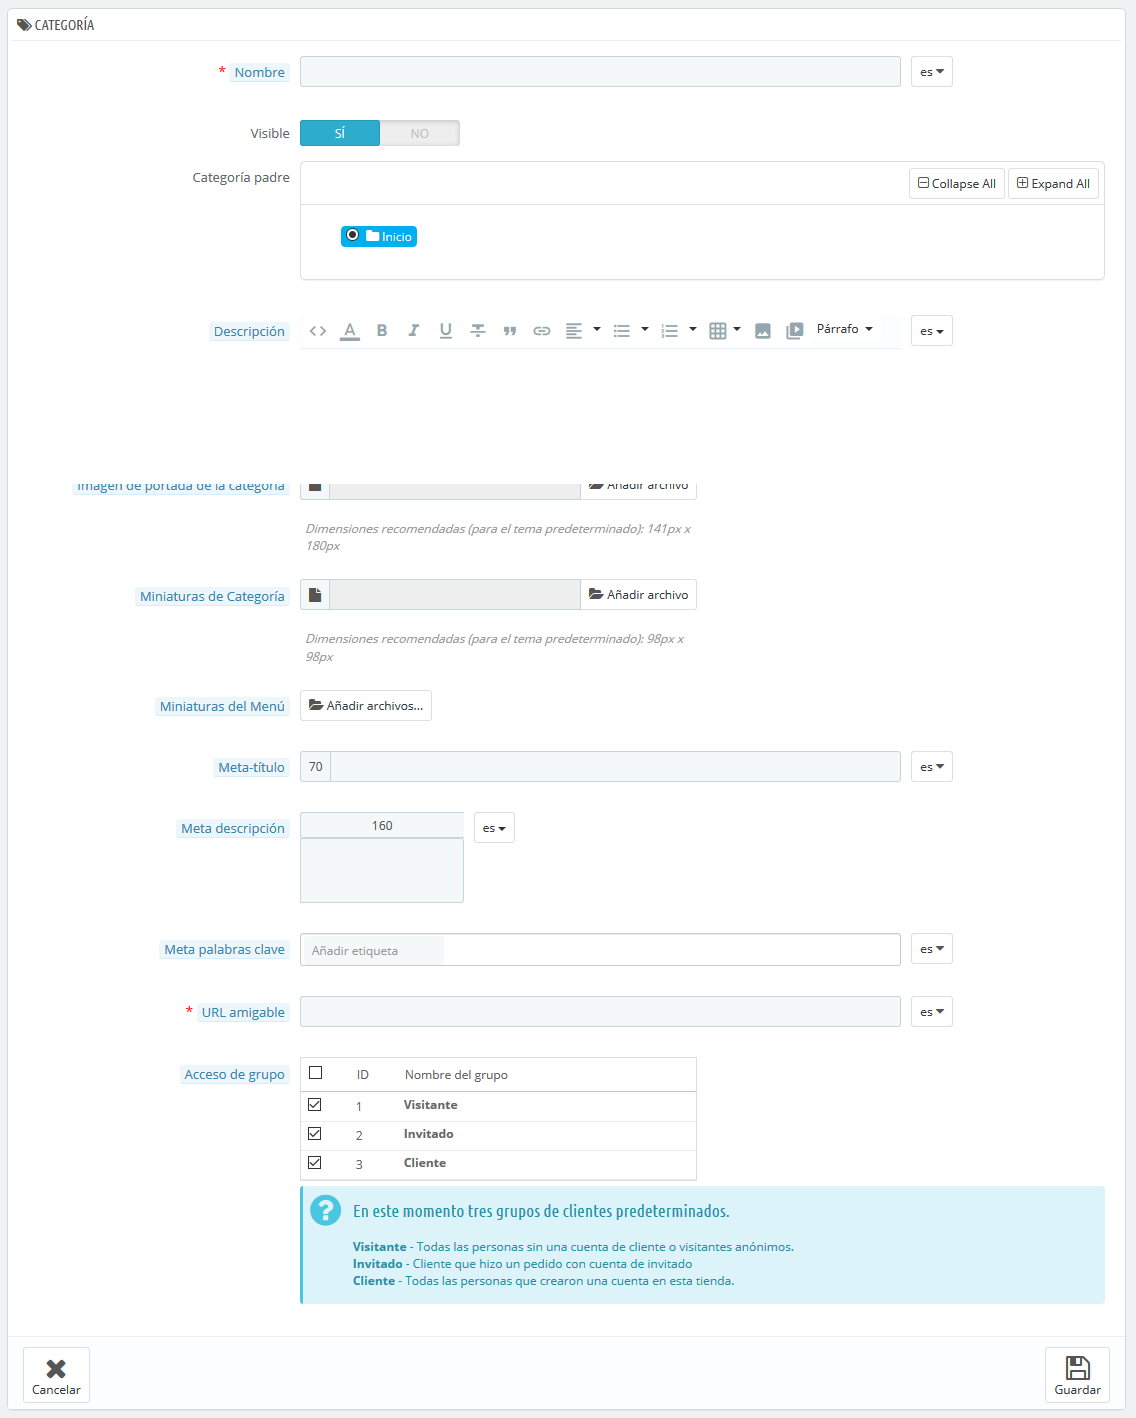
En primer lugar, debes introducir la información general:
- Nombre. Establece un nombre a la categoría. Asegúrate que éste sea corto y descriptivo: tus clientes confiarán en dicho nombre para guiarse a través de tu tienda.
- Visible. Indica si esta categoría será "mostrada" (es decir, si estará o no estará disponible para tus clientes). Por ejemplo, podrías posponer el mostrar una categoría a tus clientes si consideras que ésta no cuenta todavía con suficientes productos introducidos.
- Categoría padre. No aparece cuando se crea una categoría raíz. Si deseas crear una subcategoría perteneciente a una categoría que no sea la página de inicio, selecciona la categoría bajo la cual aparecerá.
La forma en la que se crea una categoría raíz o una subcategoría es la misma. La única diferencia es que cuando se hace clic en "Añadir nueva categoría" desde un subnivel de categorías, PrestaShop entiende que deseas crear una subcategoría de esa categoría, y por lo tanto, determina la opción "Categoría padre" en consecuencia. - Descripción. Debes rellenar este campo, no solamente porque te será de utilidad a ti y a tus empleados, sino porque también algunos temas hacen uso de ella, mostrándose ésta a tus clientes.
- Imagen de portada de la categoría. Haz clic en "Añadir archivo" para subir una imagen desde tu ordenador, que represente a esta categoría. Ésta aparecerá en la página de categorías.
- Miniatura de categoría. Muestra una pequeña imagen en la página de la categoría padre, si el tema lo permite.
- Miniatura de menú. La miniatura aparece en el menú como una pequeña imagen que representa la categoría, si el tema lo permite.
- Meta título. El título que aparecerá en los motores de búsqueda cuando se realiza una solicitud por parte de un cliente.
- Meta descripción. Una presentación de tu categoría en unas pocas líneas, destinada a captar el interés de un cliente. Esta descripción aparecerá en la página de resultados de los motores de búsqueda.
- Meta palabras clave. Palabras clave que definan a esta categoría, con el fin de ser referenciadas por los motores de búsqueda. Puedes introducir varias palabras separadas por comas, así como expresiones que deben ser indicadas entre comillas.
- URL Amigable. Te permite reescribir las direcciones de tus categorías como deseas.
Por ejemplo, en lugar de tener una dirección como http://www.ejemplo.com/categoria.php?id_categoria=3, puedes tener http://www.ejemplo.com/123-nombre-de-la-categoria.
En este caso, todo lo que tendrías que hacer es indicar en el campo "URL amigable" las palabras que deseas que aparezcan en lugar de "nombre-de-la-categoría", separadas por guiones. - Acceso de grupo. Restringe el acceso a la categoría y tus productos a ciertos compradores. Para visualizar estas categorías, los compradores deben pertenecer a un grupo de usuarios. Echa un vistazo a la pestaña "Grupos" de la página "Ajustes sobre clientes", del menú "Parámetros de la tienda", para obtener más información.
Categoría raíz. Sólo aparece cuando se crea una categoría raíz. Es posible que desees utilizar esta nueva categoría como la nueva categoría raíz, en lugar de "Inicio". Si es así, marca esta opción para aplicar el cambio.
Info La categoría raíz es muy útil en el modo multitienda. Imagínate que tienes 3 tiendas con diferentes (o parcialmente diferentes) productos y categorías: es posible que desees utilizar una categoría raíz diferente para cada tienda.
La categoría raíz refleja la categoría "inicio" de cada tienda, así que, si no quieres tener los mismos productos en la categoría de la página principal de cada tienda, necesitas crear diferentes categorías raíz.
De esta forma, es más fácil asignar categorías para cada tienda, y así poder tener diferentes productos en la categoría inicio de cada una de ellas.
Una vez que hayas terminado de configurar la categoría, guárdala, y ya estará preparada para llenarla de productos.
| Note |
|---|
Una nueva categoría no aparecerá automáticamente en el menú de tu tienda. Para visualizarla, debes editar el menú principal de la tienda con el módulo "Menú principal" (cuando se utiliza el tema predeterminado), o con el módulo personalizado que puedas estar utilizando para administrar el menú de la tienda. |
Examinar y editar de categorías
El botón "Modificar" en la barra de botones, permite editar la categoría padre de las subcategorías actualmente mostradas. Esto significa que cuando estés viendo las subcategorías principales, al hacer clic en el botón "Modificar" podrás editar la categoría "Inicio".
Al hacer clic en cualquier categoría de la tabla, se abrirán, y mostrarán todas las subcategorías de tu tienda. Como consecuencia a esta acción, cambiará el contexto de la interfaz: haciendo clic en el botón "Modificar" puedes editar la categoría padre actual, y haciendo clic en "Añadir nueva categoría" se abrirá el formulario de creación de la categoría con la opción "Categoría padre" establecida a la categoría padre actual.
Importar y exportar categorías
Además de los habituales botones "Añadir nueva" y "Modificar", la barra de botones también cuenta con otros tres botones:
- Exportar. Permite descargar el listado de todas las categorías, en formato CSV.
Importar. Abre la página "Parámetros avanzados > Importación", con el tipo de datos que se espera establecido en "Categorías". Consulta la sección "Comprender los Parámetros avanzados" para obtener más información sobre la importación de archivos.
Necesitarás que el archivo siga este formato:Code Block ID;Name;Description;Position;Displayed; 3;iPods;Now that you can buy movies from the iTunes Store and sync them to your iPod, the whole world is your theater.;1;1; 4;Accessories;Wonderful accessories for your iPod;2;1; 5;Laptops;The latest Intel processor, a bigger hard drive, plenty of memory, and even more new features all fit inside just one liberating inch. The new Mac laptops have the performance, power, and connectivity of a desktop computer. Without the desk part.;3;1;
The category identifier is the ID, not the category's name.
- Refresh list. Reloads the list of categories with all the changes that you made.
More import options are available in the "Import" page of the "Advanced parameters" menu.
Adding products to a category
In order to add a product in a category, you must open the product configuration page and go to its "Categories" sections, on the "Basic Settings" tab. This is where you can set the categories to which the product belongs.
...
The "Home" category is a special category, where you can highlight/promote products from any other category by making them appear in the "Featured products" block. By default, you can only display 8 products in the homepage.
The "Featured products" block depends on the "Featured products" module. If you want more (or less) products on the homepage, configure this module (from the "Modules & Services" page in the "Installed Modules" menu).
...
El identificador de la categoría es la ID, no el nombre de la categoría.
- Actualizar lista. Recarga el listado de categorías mostrando todos los cambios realizados.
Más opciones de importación están disponibles en la página "Importación" del menú "Parámetros avanzados".
Añadir productos a una categoría
Para añadir un producto a una categoría, debes abrir la página de edición de productos e ir a la sección "Categorías", en la pestaña "Ajustes básicos". Aquí es donde puedes establecer las categorías a las que pertenece el producto.
| Info |
|---|
La categoría "Inicio" es una categoría especial, donde puedes destacar/promocionar productos de cualquier otra categoría, haciendo que aparezcan en el bloque "Productos destacados". De manera predeterminada, sólo se pueden visualizar 8 productos destacados en la página principal. El bloque "Productos destacados" está supeditado al módulo "Productos destacados". Si deseas tener más (o menos) productos en la página principal, configura este módulo (desde la página "Módulos" en el menú "Módulos y Servicios"). Nota: No tienes que eliminar un producto de su categoría original para que se visualice en la página principal. Un producto puede tener tantas categorías, como sea necesario. |