| Section | ||||
|---|---|---|---|---|
|
Table of content
| Table of Contents | ||
|---|---|---|
|
...
Take the time to survey the Dashboard – that is, the first page you see when logging into your back-office. Not only does it present you with a summary of everything you need to know about your shop at any given time, along with quick links to the main action page, but as a first-timer in PrestaShop, it also gives you tips about what you should have a look at.
The top bar

At the top of the back-office is a black bar containing a handful of links:
- (name of your shop). From any page, takes you back to your Dashboard.
- Cart icon. Opens a tooltip presenting the new orders since you clicked that icon. A red tooltip indicates the number of new orders. From there on, you can either display one of the new orders, or go to the list of orders.
- People icon. Opens a tooltip presenting the last registered customers. A red tooltip indicates the number of new customers. From there on, you can either display one of the new customers, or go to the list of customers.
- Speech bubbles icon. Opens a tooltip presenting the last customer service message. A red tooltip indicates the number of new messages. From there on, you can either display one of the new messages, or go to the list of messages.
- Trophy cup icon. New in 1.5.4. Opens a tooltip presenting your progress as a merchant. A red tooltip indicates the number of new items. From there on, you can reach the full page of badges and points, from the "Merchant Expertise" module.
- Search field with "Everywhere" dropdown list. Allows you to search within the content of your shop – even within your administration page, if you can't remember where an option is set.
- Quick Access. This is the quick links menu, presenting the most useful links, as set in the "Quick Access" page under the "Administration" menu.
- Welcome, (your name). A simple reminder of which account you are currently logged-in with.
- "My Preferences" link. Takes you to your account's preferences page, where you can set some personal options (for instance, the back-office language or your password).
- "Logout" link. Logs you out of the current user account.
- "View My Shop" link. Opens a new browser tab with your shop's front-end.
The menus
![]()
All along your daily activities administrating your shop, you will have to browse through the many pages and options of the back-office.
...
Many of the back-end pages have an a button bar between the menu bar and the actual content of the page. For instance, the product edition page can have 8 buttons available.
...
The modules list is a new feature brought by PrestaShop 1.5.4, which makes it possible to see modules which apply to the current context. For instance, in the "Shipping > Carriers" page, it will display display the modules from the "Shipping & Logistics" category of modules. This is very helpful when you need to quickly find which module to install and configure in order to get a given result.
...
| Tip | ||
|---|---|---|
| ||
The iPod Touch from the default installation is tied to the sample order (made by sample customer John Doe), and thus cannot be deleted until the order is deleted. Therefore, in order to delete this product, you first need to delete this sample order. | ||
| Tip | ||
| Reinstalling rather than deleting | Reinstalling rather than deleting | While deleting all this data takes only a handful of minutes, you might prefer to not have to do it at all. In this case, you can install your shop again and choose not to install the sample data during the installation process: simply relaunch the installer, and in the "Shop Configuration" screen, choose "No" for the "Install demo products" option. ONLY DO THIS IF YOU HAVEN'T CUSTOMIZED ANYTHING YET. Note that you will also lose some useful content, such as the default contacts, administration profiles and CMS content, which you will have to recreate by yourself. In short: you'd be better off deleting the sample content by handTo safely delete the default order (and thus be able to delete the iPod from your catalog), install the "Database Cleaner" module (which is available in the default installation since v1.5.4), open its configuration screen and check the "Orders and customers" box before you click on the "Delete orders & customers" button. |
Configure your shop's information
...
Setting | Description | Where to find it |
|---|---|---|
Shop name | Defines your brand, most notably on search engines (Google, Yahoo!, Bing...). | "Preferences" menu, "Store Contacts" page, then in the "Contact details" section, click the shop name. |
Shop logo | Defines your brand , visually and on your invoicesvisually. The default logo says "YourLogoHere" as an incentive to use yours. | "Preferences" menu, "Themes" page, "Appearance" section, then change the various default images to your logo. |
Default shop currency | The currency in which you want to set the default price for your products. | "Localization" menu, "Localization" page, "Configuration" section. |
Customer service info | A block presenting the phone number for your customer service, and a button to send you an e-mail. | "Block contact" module. |
Company info / | A block presenting your contact address, the phone number for your customer service, and a link to send you an e-mail. | "Block contact infos" module. |
Advertising | Image displayed A block presenting an image with a link to another site. | "Block advertising" module. |
Image slider | The slider is usually placed front and center of the homepage, and therefore presents several images, scrolling one after the other. It is a strong visual signature for your shop store and products. | "Image slider for your homepage" module. |
CMS pages | The content of static pages, such as "About Us", "Delivery", "Legal Notice", "Terms and Conditions", and "Secure Payment". Some of them have default content, which you should adapt to your business; some others are empty, and you should paste your own text. | "Preferences" menu, "CMS" page, then edit each page at will. |
| Social networks | A block presenting three links: your company's Facebook page, your company's Twitter account, and the RSS feed for your company's blog (or "current events" site). | "Social networking block" module. |
These are the most visible default settings on your front-end – at least with the default theme.
The "Where to find it" column enables you to see where you can find the interface to change these aspects of your store. This user guide will provide you with more details for each interface.
Shop languages
PrestaShop is able to work with many languages, both on the front-office and the back-office. Each back-office text-field is accompanied with a flag icon, which indicates the current language, and which you can click in order to choose another language in which to write that field's content.
...
Should you have people helping you with your shop, be they your spouse, friends or paid employees, you should make sure to create an employee account for each of them, if only to know who is responsible for which action. The other advantage is that you can give them specific profiles and specific access rights to the administration pages: for instance, you might not want everyone to have access to your statistics, your invoices or your payment settings.
To create a new employee profileaccount, go to the "Administration" menu, select "Employees", and click the "Add new" button. Fill in a name, such as "Martin Doe" or "Shipping handler", and save.
Now that you have a proper account for this employee, you should give it specific permissions, tailored to the profileaccount's activity. A profile An account can be used for as many people as needed – but we do advise you to create one for each helping person.
To assign permissions to an employee profile, account, you must use the "Profile" option in the account creation page.
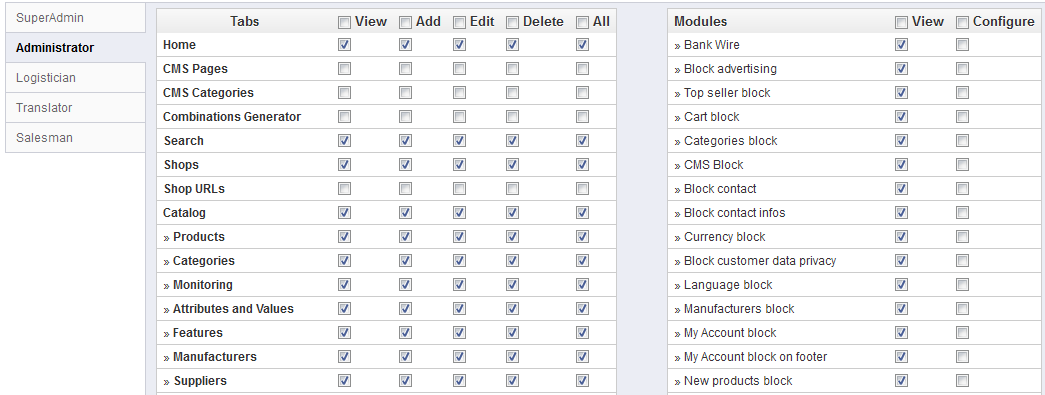
You can edit these permissions this way: go to the "Administration" menu, select "Permissions", and select the profile you just createdwant to change. A long list of permissions appears.
You can create as many profiles as needed, by using the "Profiles" page in the "Administration" menu, and then clicking on "Add new". Type the profile's name, validate it, then go edit its permission in the "Permissions" page.
By default, a new profile cannot do much. It is up to you to set exactly the parts of your shop to which that employee profile should have access to. It can be a tedious task, but it is an important one.
Configure payment methods
...
See the "Payment" section of the "Making The the Native Modules Work" chapter of this guide in order to learn about them all.
...
You can also choose to create your own theme, or have it created for you by a developer. Refer to the online Designer Guide for help, at Designer guideGuide.
Once your theme is installed, you should explore it fully in order to know it by heart and be able to help customers out of a situation.
...
Your shop should now be fully ready to receive its first visitors... and its first orders!
| Section | ||||
|---|---|---|---|---|
|