...
Categories are managed in the "Categories" page of the "Catalog" menu.
On the right side of the table, you can sort the categories (either using the arrows, or by dragging the row around), and disable the ones you want hidden from the customer.
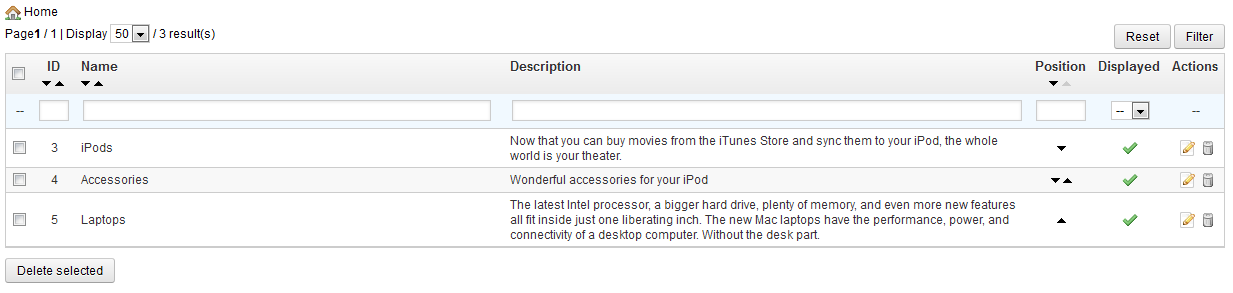
All the categories are actually sub-categories of the "Home" category.
To edit the "Home" category (or any currently selected category), click on the "Edit" button in the button bar.
To create a new category (or a sub-category of an existing category), click on the "Add New" button from the any level of categories.
The form is the same when creating a root category or a sub-category. The only difference is that when clicking "Add New" from a sub-level of categories, PrestaShop understands that you want to create a sub-category, and therefore sets the "Parent category" option accordingly.
| Tip | ||
|---|---|---|
| ||
Make sure to fill translate each field in every language that your shop supports. In order to do that, click on the little flag next to the field, and choose the flag of the language in which you wish to edit the text. |
...
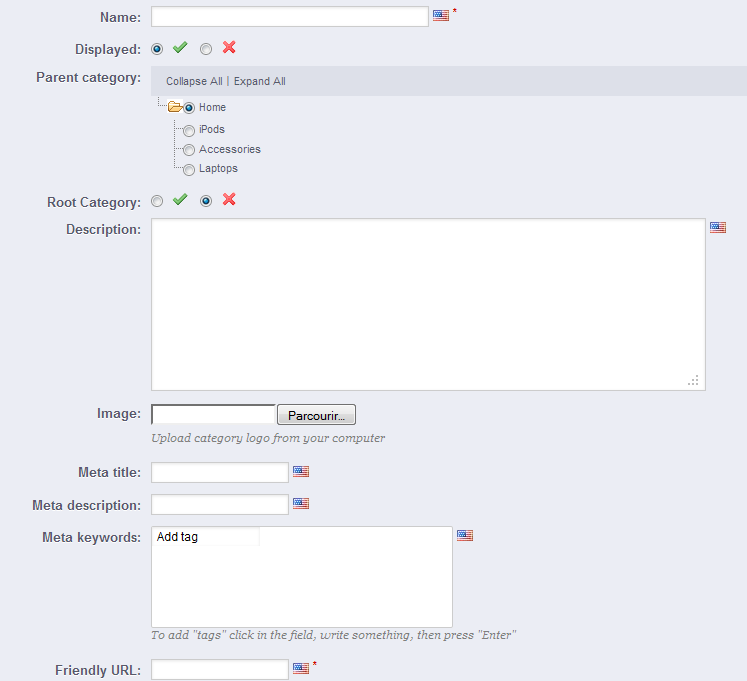
- Name. Give your category a name, then indicate if it is "displayed" (i.e., whether or not it will be available to your customers). For example, you may want to postpone displaying a new category to your customers because you have not quite completed it.
- Parent Category. If you wish to create a subcategory belonging to a category other than the home page, choose the category under which it will appear.
Root Category. You might want to use this new category as the new root category, instead of "Home". If so, check the radio button that applies.
Info The root category is very useful in multi-shop mode. Imagine you have 3 stores with different or partly different products and categories: you might want to use a different root category for each store.
The root category thus reflects the "home" category of each store so if you do not want to have the same products in the homepage category of each store, you need different root categories.
This way it is easier to assign categories to each store and you can have different products in the home category.- Description. You should fill this field, because not only will it be useful to you or your employees, but some themes might also make use of it, displaying it to your customers.
- Image. Click on "Browse" to upload an image from your computer which will represent this category.
...
Besides the "Add new", the "Edit" and the usual "Help" buttons, the button bar also features two buttons:
- Export. Enables you to download the list of all categories, in CSV format.
Import. Opens the "Advanced Parameters > CSV Import" page, with the expect data type set to "Categories". Go to the "Understanding
Thethe Advanced Parameters" chapter to learn more about importing CSV files.
- Export. Enables you to download the list of all categories, in CSV format.
You will need your CSV file to follow this format:
Code Block ID;Name;Description;Position;Displayed; 3;iPods;Now that you can buy movies from the iTunes Store and sync them to your iPod, the whole world is your theater.;1;1; 4;Accessories;Wonderful accessories for your iPod;2;1; 5;Laptops;The latest Intel processor, a bigger hard drive, plenty of memory, and even more new features all fit inside just one liberating inch. The new Mac laptops have the performance, power, and connectivity of a desktop computer. Without the desk part.;3;1;The category identifier is the ID, not the category's name.
More import options are available in the "CSV Import" page of the "Advanced parameters" menu.
Adding products to a category
In order to add a product in a category, you must open the product configuration page and go to its "Association" tab on the left. This is where you can set the categories to which the product belongs.
| Info |
|---|
The "Home" category is a special category, where you can highlight/promote products from any other category by making them appear in the "Featured products" bloc. By default, you can only display 8 products in the homepage. The "Featured products" block depends on the "Featured products on the homepage" module. If you want more (or less) products on the homepage, configure this module (from the "Modules" page in the "Modules" menu). Note: you do not have to remove a product from its original category in order to put it on the homepage. A product can have as many categories as needed. |
Managing and Adding Products in the Catalog
...
You can add new products by clicking on "Add new". A form appears, with several tabs in the left column.
| Info | ||
|---|---|---|
| ||
You cannot reorganize the whole list of products. The products are displayed as is in your store (by increasing ID number), and the customer can choose the product's order using the available sorting algorithms: lowest price first, highest price first, product name A to Z, product name Z to A, in-stock first, lowest reference first, highest reference first. You can organize products on a per-category basis by clicking on the "Filter by category" checkbox. This opens a small interface listing all your categories and sub-categories. Selecting one category automatically filters the list of products to only display products from the selected category. It also adds a "Position" column to the table, with which you can order the product on the category page. This is done either by moving the rows up and down, or by clicking the arrows. Your product order can then be overridden by the user's sorting choice. Note that when you change the display order in the product list in the back-office (by clicking on column name's arrow in order to sort products according to that column), the "Position" column does not display arrows nor can you use it to move rows around anymore. Instead, it displays the position number of the product. In order to be able to position products again, click on the "Reset" button. |
In the following sections, we will explore these tabs one by one. We begin with the first tab in the form, which enables you to fill out the general information about your products.
...
The first line is an essential one: indicate whether the product is a pack (a combination of at least two existing products), a virtual product (downloadable file, service...), or simply a classic, mail-sent product. For now, we will only explore the first option of these three, and deal with packs and virtual products in their own sections of this chapter.
| Info |
|---|
There are many more product-related options in the "Products" page from the "Preferences" menu:
|
You begin with four text fields:
Name. The first thing to complete is the product name, which will appear in the search engine results. Next to the field you will find a flag, which enables you to choose the language into which you wish to edit or create the name.
Info You must give the product a name in at least the default language before you can save it. You won't be able to save until it has a name – and many other tabs require the product to be saved in order to be accessible.
Make sure to translate each field in every language that your shop supports. In order to do that, click on the little flag next to the field, and choose the flag of the language in which you wish to edit the text.
- Reference. This is your own internal reference. It might be a number, or its reference from the storage location or its supplier, or anything that makes it unique. Optional.
- EAN13 or JAN. These are barcode numbers, which are used worldwide in order to identify products. You can use either an EAN13 or a JAN number.
- An EAN13 is the product's 13-digit international article number. Read more on Wikipedia: http://en.wikipedia.org/wiki/International_Article_Number_%28EAN%29.
- A JAN is specific to Japan, but is compatible with the international EAN. Read more on Wikipedia: http://en.wikipedia.org/wiki/Japanese_Article_Number.
- UPC. A 12-digit barcode, more widely used in North America, UK, Australia and New-Zealand. Read more on Wikipedia: http://en.wikipedia.org/wiki/Universal_Product_Code.
...
The two description fields serve different purposes:
- The first "Short description" field enables you to write a short description that will appear in search engines and in the category description for your product.
This field is limited to 400 characters by default: if you exceed that limit, PrestaShop will warn you with a message in red below the field. The second You can change that limit in the "Products" preference page, where you will find the "Max size of short description" option. - The "Description" field enables you to write a full description of your product, which will appear directly on the product page. The text editor offers a wide range of options for creating visually attractive descriptions (font, size, text color, etc.).
While the second field has no limits, there is such thing as too much content: strive to provide the essential information in a compelling way, and your product should be good to go.
In the "tags" field, add some terms and keywords that will help your customers easily find what they are looking for. They are displayed on the store in the "Tags" block. If you do not want the tag block displayed, simply disable the "Tags block" module (in the "Modules" page).
| Tip | ||
|---|---|---|
| ||
PrestaShop 1.4 enabled you to indicate the product manufacturer right on this page. In version 1.5, this setting is to be found in the "Associations" tab on the left. Same for the "Default category" field, the associated categories, and the "Accessories" field. Version 1.4 also enabled you to indicate the size and weight of the final package. In version 1.5, these settings are to be found in the "Shipping" tab on the left. The "Location" field of version 1.4 can be found in the optional "Warehouses" tab on the left, which is only available if you have enabled Advanced Stock Management ("Preferences" menu, "Products" page, "Products stock" section). |
...
At this point, you are done with the essential information for a basic product page. You can save it and have it immediately available for sale on your shop!
But keep reading, as there are many more details you can add to your product to make it more attractive to customers.
Specific prices: Managing Quantity Discounts
You can changes the total price of the product depending on the quantity of products your customer buys, the user group, the country, etc. This is done using the "Specific prices" option of the "Prices" tab.
This is a very easy way to create a discount price for this product (and all its combinations).
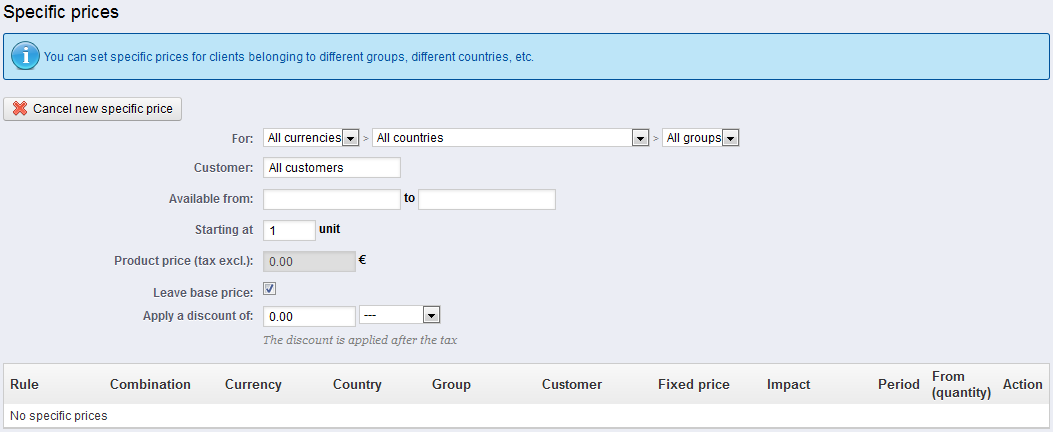
Click "Add a New specific price", and a form appears.
...
Once you have chosen your values click on "Save and stay": the summary of your discount settings appears below. The discount will be immediately visible on the store.
If you wish to delete a value, click on the trashcan icon in the table.
If you want to build more complex discounts, go read about the "Price rules" menu in the "Creating Price Rules And Vouchers" chapter of this guide.
Managing Price Priority
A customer might fit into multiple prices or discount rules, even when you have set detailed prices and quantity discounts, with custom groups and shops (if in a multistore context). PrestaShop therefore uses a set of priorities in order to apply a single price rule to such customers.
...
- Width, Height, Depth & Weight. You should strive to fill each field, because knowing the exact size and weight of a package is not only useful to you, but PrestaShop can also direct specific sizes/weights to specific carriers automatically, based on these settings. Once PrestaShop (or the customer) has selected a carrier, the order's final price will appear to the customer.
- Additional shipping costs. This can prove very useful to you, for instance for product that are particularly tricky to package, or really heavy.
- Carriers. You can choose to have the current product only be shipped by one specific carrier. You can even choose two or three: press the Shift key while clicking on a carrier name to add it to the selection.
| Note |
|---|
These values use the default weight, volume, distance and dimension units, as set in the "Localization" page of the "Localization" menu. These values do not have to be integers. If your products weight less than 1 kg/lbs, you can simply use a period (.) to indicate the fractions:
|
Adding Product Combinations
...
- File Fields. Puts one file upload button on the order page. Each button accepts only one file, so put as many field as you allow your customers to upload.
- Text Fields. Puts one text field on the order page. You can add as many text fields as necessary.
Example: If you allow a 5-line text, each line limited to 14 characters, you can add 5 fields, and indicate the number of allowed characters in the field's label. You cannot limit the number of characters in the string.
Once you have added the needed number for each field, click "Save and stay". The page will reload and display as many text fields as necessary. Fill every one of them with the appropriate public label: this will be an indicator for the customer, so be very specific about what you expect.
...
Once all the label fields have been filled, do not forget to save your changes.
On the customer's side
Once a product has customizable properties set, its front-end product page has a new tab, next to the "More info" tab: "Product customization".
The customer must choose the file(s) and/or add some text and save them before they add the product in the cart.
The custom image(s) and text(s) will appear in the final cart.
The rest of the purchase process is the same as usual.
On the merchant's side
Once the order has been validated by the customer, the merchant gets a notification of the order in the back-office.
He can then check on the order, which will indicate the image(s) and the text(s) in the list of products, for each product. The merchant then simply has to download the image(s) (simply by clicking on the image in the order) or copy/paste the text and use that in its customization tool.
The rest of the order and delivery process is the same as usual.
Managing Attachments
PrestaShop enables you to make some files available to your customers before their purchase. This is done in the "Attachments" tab on the left.
...
| Info |
|---|
You cannot currently add combinations or virtual products to a pack. |
| Warning |
|---|
You cannot add an existing pack within a new pack, or import the content of an existing pack into a new pack. |
The process to create a pack is similar to the one for creating a regular product:
...
- The "Virtual Product" tab appears, to which you will be redirected as soon as you change the product type;.
- The "Shipping product" tab disappears.
...
When you click "Yes", PrestaShop opens a new form within the tab, from which you can upload the file you intend to sell:
Upload a file. Click the "Browse" button to find the file on your hard drive. As soon as you have selected a file, the upload begins.
Info The maximum file-upload size setting depends on your server's settings, and cannot be increased from PrestaShop.
If you have access to your server's
php.inifile, these are the values you should change:upload_max_filesize = 20Mpost_max_size = 20M
If you do not have access to the
php.inifile, contact your web host about this.Note You should compress your file in zip format, in order to avoid the browser misinterpreting
.exeor.jpgfile formats. Browsers automatically download zip files for the customer, no question asked.If you are selling a high resolution image, uploading it using this form does not prevent you from uploading its thumbnail in the "Images" tab on the left.
- Filename. The name of the file. This field is automatically filled after the file has been uploaded. It is not recommended to change it to another value.
- Number of allowed downloads. You can set the number of time the file can be downloaded once the customer has bought it. You might prefer to limit this to 1, or 5. If you want to keep it unlimited, set the text field to 0.
- Expiration date. Virtual files can be of promotional nature, or lose their selling value after a certain date. If so, you can set the expiry date after which the product will not be available on your shop anymore. Leave it blank if there is no expiry date.
- Number of days. You can set the number of days after which the download link becomes non-functioning. If there is no limit, set the text field to 0.
...