Administration Menus Configuration
PrestaShop's back office menu organization is not set in stone: while the default arrangement is built in order to have the most useful pages readily available, you might have a different opinion, and may want to change the organization, in part or in full.
This administration page enables you to move, edit, disable and even create pages.
Moving menus
Menus can be moved directly from the list. You can either click on the arrows in the "Position" column, or drag the row itself and drop it in the position you want it to have. As soon as you drop the row, PrestaShop saves the location automatically. You can drag the row when the mouse cursor is over the "Position" column.
You can disable a menu simply by clicking on the green "Yes" in the "Enabled" column. Note that this will disable the menu for all back office users. If you want to hide a menu from a specific set of users, edit their profile's permissions, in the "Permissions" administration page.
Moving pages
To access a menu's pages, click the "Details" action in the action menu. A new list appears with the pages in that menu, with the same columns.
Pages can be moved within a menu directly from the list. You can either click on the arrows in the "Position" column, or drag the row itself and drop it in the position you want it to have. As soon as you drop the row, PrestaShop saves the location automatically. You can drag the row when the mouse cursor is over the "Position" column.
You can also move a page to a different menu altogether. This cannot be done directly from the list; you must open the page's editing form, where you will find the "Parent" option. Change that option to another menu name, save your changes, and when returning to the "Menus" page, the page will have moved menu.
You can disable a page simply by clicking on the green "Yes" in the "Enabled" column. Note that this will disable the page for all back office users. If you want to hide a page from a specific set of users, edit their profile's permissions, in the "Permissions" administration page.
Creating a new page or menu
Click on the "Add New" button to reach the page creation form.
This form has a handful option, some of which might prove complicated:
- Name. Give it a unique name, because it will serve as an internal identifier.
- Class. In short, a PrestaShop back office page is based on specific internal PHP files, which are called "admin controllers", and are most often stored in the
/controllers/adminfolder of your PrestaShop installation. When creating a new page, you must know which controller to target, and most importantly the name of its class – which is the name of its PHP file.
For instance, if you want to create a page displaying PrestaShop's backup administration page, you must first find its controller name (in this case,AdminBackupController), and copy it in the "Class" field. - Module. In some cases, the administration controller for which you want to create a page comes from a module. In that case, you must also indicate the identifier for the module (in most cases, its folder name) and copy it in the "Module" field, in lowercase. This way, PrestaShop will know that it should not look for the controller in the
/controllers/adminfolder, but rather in the/modules/NAME-OF-THE-MODULE/folder. - Status. You can disable a page at any time, but do note that it affects all the back office users.
- Parent. You can choose any menu, but for consistency's sake, make sure to pick one to which the page you are creating is relevant.
...
Menu's instellen
De backoffice van PrestaShop kent geen vaste organisatie: de standaard rangschikking is opgesteld om de meest nuttige pagina's beschikbaar te houden, maar u hebt wellicht een andere mening en hebt liever dat de rangschikking anders zou zijn.
De administratiepagina "Menu's" maakt het mogelijk om het menu aan te passen en zelfs nieuwe pagina's aan te maken.
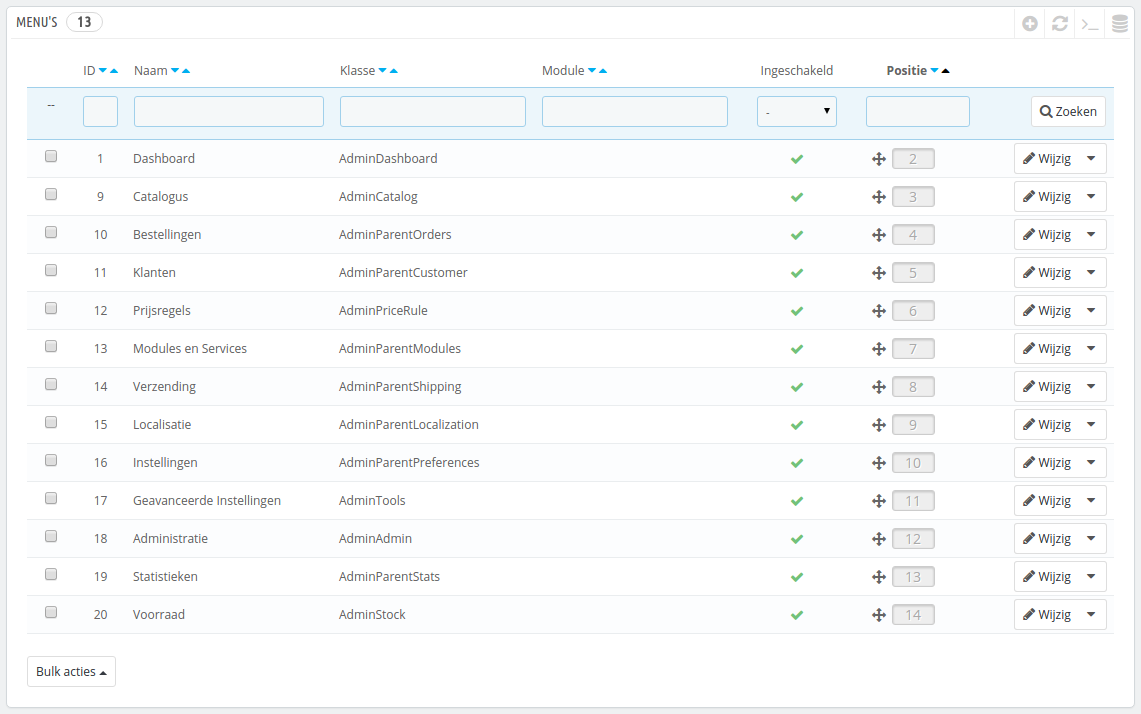
Menu's verplaatsen
Menu's kunnen direct in de lijst worden verplaats. U kunt de rijen verslepen naar de positie die u graag wilt. Zodra u de rij loslaat bewaart PrestaShop automatisch de positie. U kunt de rij verplaatsen als u de muiscursors zich boven de kolom "Posities" bevindt.
U kunt een menu uitschakelen door op het groene vinkje in de kolom "Ingeschakeld" te klikken. Dit zal het menu uitschakelen voor alle backofficegebruikers. Als u een menu wilt verbergen voor een selectie van gebruikers, dan moet u hun profiel aanpassen op de pagina "Permissies".
Pagina's verplaatsen
Om de pagina's van een menu te bekijken, klit u op de actie "Details" in het actiemenu. Een nieuwe lijst verschijnt met de pagina's in dat menu, met dezelfde kolommen.
Pagina's kunnen verplaatst worden binnen een menu, direct in de lijst. U kunt de rijen verslepen naar de positie die u graag wilt. Zodra u de rij loslaat bewaart PrestaShop automatisch de positie. U kunt de rij verplaatsen als u de muiscursors zich boven de kolom "Posities" bevindt.
U kunt een pagina ook verplaatsen naar een ander menu. Dit kan direct worden gedaan vanuit de lijst; u moet het bewerkingsformulier openen, waar u de optie "Bovenliggende" vindt. Wijzig deze optie naar een ander menu en bewaar uw instellingen. Zodra u terugkeert naar de pagina "Menu's" zal u zien dat de pagina is verplaatst.
U kunt een menu uitschakelen door op het groene vinkje in de kolom "Ingeschakeld" te klikken. Dit zal het menu uitschakelen voor alle backofficegebruikers. Als u een menu wilt verbergen voor een selectie van gebruikers, dan moet u hun profiel aanpassen op de pagina "Permissies".
Een nieuwe pagina of menu toevoegen
Klik op de knop "Nieuw menu toevoegen" om het aanmaakformulier te bereiken.
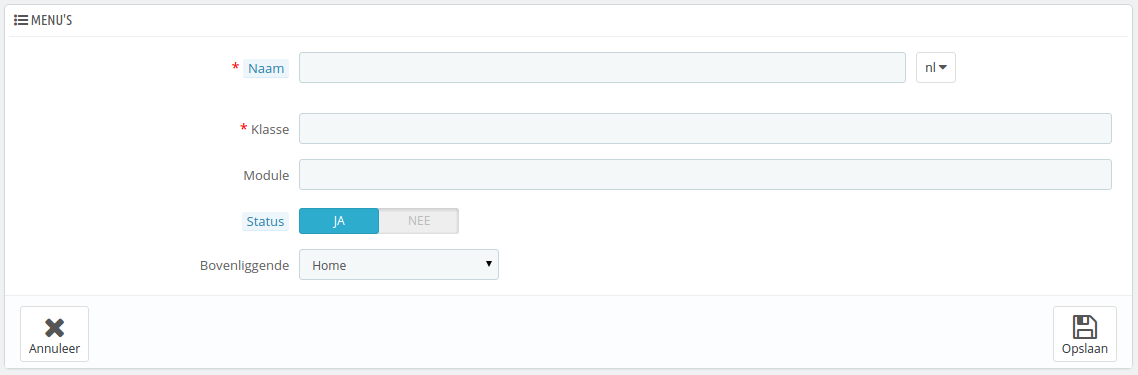
Dit formulier heeft enkele opties; sommige daarvan kunnen vrij ingewikkeld zijn:
- Naam. Geef het een unieke naam, omdat dit wordt gebruikt als interne identifier.
- Klasse. De backoffice van Prestashop is gebaseerd op specifieke interne PHP-bestanden, geheten "admin controller", en worden meestal bewaard in de map
/controllers/adminvan uw PrestaShop-installatie. Zodra u een nieuwe pagina aanmaakt, moet u weten welke controller u moet gebruiken en nog belangrijker de naam van de klasse – dit is de naam van het PHP-bestand.
Als u er bijvoorbeeld voor wilt zorgen dat een item de backup-pagina toont van de backoffice, dan moet u eerste de controllernaam vinden (in dit geval,AdminBackupController) en de naam invullen in het veld "Klasse". - Module. In sommige gevallen komt de administratiecontroller vanuit een module. In dat geval moet u de identifier van de module opgeven (in de meeste gevallen de mapnaam) en vul dit in, in het veld "Module", in kleine letters. Op deze manier weet PrestaShop dat het niet moet kijken naar een controller in de map
/controllers/adminmaar in de map/modules/NAAM-VAN-DE-MODULE/. - Status. U kunt een pagina op elke gewenst moment uitschakelen, maar wees ervan bewust dat alle backofficegebruikers de wijzigingen zien.
- Bovenliggende. U kunt elk menu kiezen, maar voor consistentie moet u er één kiezen die relevant is.
Als u een nieuw menu wilt toevoegen in plaats van een verwijzing naar een pagina dan kiest u "Home" als bovenliggende.