Table of contentsSpis zawartości
| Table of Contents | ||
|---|---|---|
|
Modules and Themes Catalog
PrestaShop comes bundled with more than 100 modules, but even that number might seem limiting, or you could want to explore other directions.
...
Katalog modułów i szablonów
PrestaShop posiada ponad 120 modułów, ale jeśli ta liczba wydaje Ci się mała i niewystarczająca, możesz odkrywać inne możliwości.
Istnieje wiele modułów dostępnych na stronie Addons (http://addons.prestashop.com/). Some are free, others are for-pay, and you are sure to find something that suits your needs! Once you are a seasoned module developer/theme designer, you can even submit your own creations, and sell them on Addons!
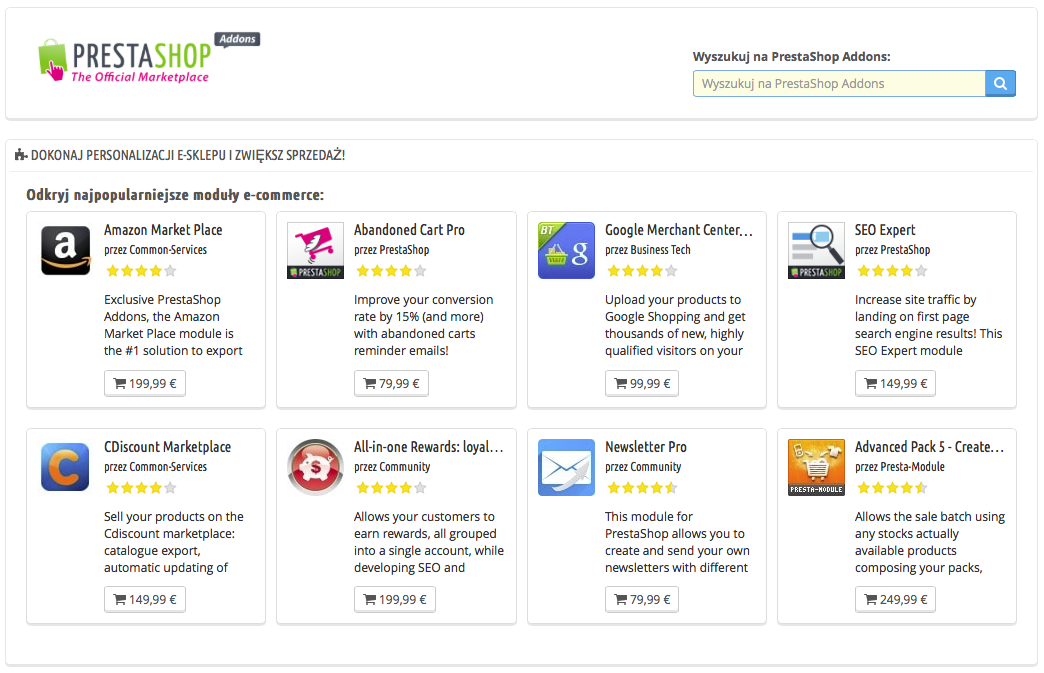
The "Modules & Themes Catalog" page gives you a quick and easy access to the online Addons database of modules and themes. Its interface is pretty straightforward:
- A search field, with which you can search the whole content of the Addons website.
- A list of 8 modules that you can buy directly.
- A list of 12 themes that you can buy directly.
A search query will send you to the Addons website, where more options are available.
Clicking on an item will open its Addons page in a new browser tab.
| Info |
|---|
Addons is the official marketplace for PrestaShop Modules and Themes. This is where shop owners can get all the necessary items to customize their shop, and where authors can share their creations with the community. Modules and themes can either be free or for-sale: the price is set by the author. Take the time to browse the available modules and themes, because expensive does not always mean better. You must be logged-in before you can download or rate anything. Creating an account is free. |
Installing a module
Once you have downloaded a module from the Addons online shop to your computer, it is up to you have it installed on your PrestaShop site.
There are two ways to install a module: either using the dedicated form, or using your FTP client.
Installing using the dedicated form
To install a new PrestaShop module automatically, click on the "Add new module" link at the top of the list of modules, in the "Modules" page. A new section will slide open.
The form in this section enables you to upload the archive file of the module, as downloaded from Addons. You can either upload a zip file, or a tar.gz one (tarball). The form is straightforward: simply browse to the module's file that you downloaded, and click the "Upload this module" button. Do not point to the module's uncompressed folder or any of its unpacked files: only the archive file!
Once you have clicked the button, PrestaShop will upload the module from your computer to its server, unpack it, place the files in the correct location, and update the page, all this in a handful of seconds. PrestaShop will then display "Module downloaded successfully".
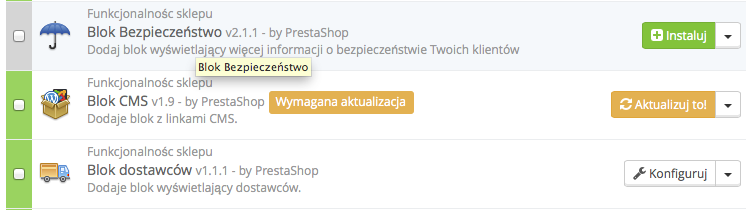
Modules are not installed by default: you still have to click the module's "Install" button, and then possibly configure its settings.
Once configuration is complete, be sure to test the module immediately to confirm that it works as planned.
Installing using a FTP client
To install a new PrestaShop module manually:
- Unzip (decompress) the module archive file (
.ziportar.gz). This should result in a new folder. - Using your FTP client, connect to PrestaShop web server, and place the unpacked module folder in PrestaShop's
/modulesfolder.
Pay attention NOT to upload that folder in another module's folder (which can happen when drag-and-dropping items). Upload both the folder and the files it contains, not just the files. - Go to your back-office, in the "Modules" menu.
- Locate the new module in the modules list. You might have to scroll down; you can also use the list's search engine, which should give you a dynamically updated list of matching module names.
- In the row for the new module, click the "Install" button.
- Your module is now installed and should be activated too. If necessary, click on the module's "Configure" link. Also, pay attention to any warning message that might be displayed by PrestaShop.
Once configuration is complete, be sure to test the module immediately to confirm that it works as planned.
| Warning |
|---|
Modules can come from many sources, and not all of them are reliable. This is why PrestaShop 1.6.0.7 introduced a warning window for "Untrusted" modules – that is, modules that have not been verified by PrestaShop through its Addons marketplace. This screen window lets you choose whether to proceed with the installation with no further notification, or to stop the installation process. Installing a native module or a module obtained through Addons will not trigger the display of this window. |
Updating a module
Your PrestaShop installation regularly checks with the Addons server if there is any update for your modules. If so, PrestaShop displays a "Update it!" link for the affected modules. Simply click it, and PrestaShop will take care of downloading and updating the module.
Uninstalling a module
| Warning |
|---|
Do not ever delete a module by directly trashing its folder using your FTP client! You must let PrestaShop take charge of it. |
When you need to temporarily stop using a module, but still wish to keep its configuration, you can simply disable it: just click on the "Disable" link. The actions will turn into "Enable" and "Delete", but the "Uninstall" button can still be seen.
If you do not care about the module's configuration, click on the "Uninstall" button: your module's folder will still be in the /modules folder, but the module will not have any impact on your shop anymore.
If you wish to entirely remove the module from your server, click the "Delete" link: PrestaShop will get rid of its folder and all its files.
| Tip |
|---|
Make sure that the disabling or removal of the module does not break the theme. |
Installing a theme
Once you have downloaded a theme from the Addons online store, it's up to you have it installed on your PrestaShop site.
Installing using PrestaShop's theme installer
This is the recommended method, as it preserves all the blocks' positions on their respective hooks.
PrestaShop has a native theme importer, which you can reach from the "Themes" page, under the "Preferences" menu. Click the "Add new theme" button at the top of the screen (not the "Add new" button above the list of themes, which is used to create a new theme). This screen presents you with 3 methods to install (or "import") a new module: from your computer, from a public website, or from your own FTP server. It also gives you a method to create a new theme from scratch.
Importing a theme
Whatever the method, the process remains the same: indicate the location of the theme's Zip archive, then click "Next".
| Tip |
|---|
Import from your computer: using the file explorer to find the archive. |
A quick summary is displayed in the next page, indicating what that importer is about to do.
Click "Next" again to validate your choice. The theme is now installed, and PrestaShop asks you if you wish to install modules that were imported along with the theme, what you would rather do with the current modules configuration, and how you would like the images configuration to be taken into account.
Click "Next" one last time. A final confirmation page presents you with all the changes applied to your PrestaShop site. Click "Finish" to end the process.
Installing using a FTP client
This method is not recommended, but is still available. Use with caution: your blocks might not have the expected position on their respective hooks.
To install a new PrestaShop theme via FTP:
- Unzip (decompress) the theme archive file (
.zip). This should result in at least one new local folder,/themes, containing your theme's folder(s). - Using your FTP client, place the theme's folder (as found in the local
/themesfolder) online in your PrestaShop/themesfolder. Pay attention NOT to upload that folder in another theme's folder (which can happen when drag-and-dropping items). Upload the whole folder, not just the files it contains. - (optional) If the theme's archive contains a second
/modulesfolder, it means your new theme comes bundled with modules that are specific to it, or necessary for it to run properly. Using your FTP client, place the folder(s) found in the local/modulesfolder online in your PrestaShop/modulesfolder. If your online PrestaShop install already has a module of the same name, try to only keep the most recent version of the two (the one with the most recent files). If unsure, keep the version bundled with the theme, as it is the most likely to work best with it. - Go to your back-office, in the "Themes" page under the "Preferences" menu.
- Select the new theme in place of the current theme, by clicking on the radio button then clicking "Save".
- Your theme is now in place.
- (optional) If the theme came with modules, activate them on the back-office's "Modules" page, then configure them if need be.
Many themes come with an accompanying Install.txt file, which gives you instructions. Make sure to follow them in order to not forget anything.
Once configuration is complete, be sure to test the theme immediately, every page of it, to confirm that it works as planned. Do try to make a full order, from A to Z – you wouldn't want to miss orders just because you didn't notice the theme was incomplete!
Exporting a theme
Exporting a theme is very useful when you want either to back the theme up for safety, and create an archive of the theme for a friend or in order to make it available on the Addons marketplace Część jest darmowa, inne są płatne. Z pewnością znajdziesz wśród nich takie, które spełnią Twoje oczekiwania. Jeśli jesteś już doświadczonym programistą/twórcą modułów czy szablonów, możesz zgłaszać stworzone przez siebie moduły i później sprzedawać na stronie Addons.
Katalog modułów i szablonów umożliwia prosty i szybki dostęp do bazy modułów i szablonów Addons. Obsługa jest dość jasna:
- Pole wyszukiwania, w którym za pomocą określeń przeszukiwać można całą zawartość bazy Addons.
- Lista 8 modułów, które możesz kupić natychmiast.
- Lista 12 szablonów, które możesz kupić natychmiast.
Wyszukiwanie w polu wyszukiwania przenosi na stronę Addons, na której pojawiają się dodatkowe opcje.
Naciśnięcie na przedmiot z listy otworzy stronę Addons w nowej karcie.
| Info |
|---|
Addons jest oficjalnym sklepem dla modułów i szablonów tworzonych pod PrestaShop. To tam właściciele sklepów mogą znaleźć wszystkie niezbędne produkty, potrzebne by spersonalizować sklep. Twórcy i programiści z kolei mogą dzielić się swoimi dziełami ze społecznością. Moduły mogą być albo darmowe, albo płatne, cena jest ustalona przez autora. Poświęć nieco czasu i przejrzyj dostępne moduły i szablony, ponieważ droższy nie zawsze znaczy lepszy. Musisz być zalogowany, aby cokolwiek pobrać lub ocenić. Założenie konta jest bezpłatne. |
Instalacja modułu
Gdy tylko pobrałeś moduł ze sklepu Addons na swój komputer, to do Ciebie należy zainstalowanie go w Twoim sklepie.
Istnieją dwa sposoby, aby zainstalować moduł: użycie metody polecanej lub protokołu FTP.
Instalacja polecana
Aby zainstalować nowy moduł automatycznie, naciśnij "Dodaj nowy moduł" na stronie "Moduły" u góry po prawej stronie. Pojawi się nowe okno.

Formularz w tej części pozwoli Ci na przesłanie spakowanego pliku z modułem, który został pobrany ze strony Addons. Możesz przesłać plik .zip albo .tar.gz (tarball). Formularz jest dość jasny: wybierz plik modułu, który pobrałeś, a następnie naciśnij "Prześlij moduł". Nie wskazuj do przesłania rozpakowanego folderu ani któregoś z jego plików - tylko i wyłącznie spakowany plik!
Gdy naciśniesz przycisk, PrestaShop pobierze moduł z Twojego komputera na serwer, rozpakuje go, umieści pliki w prawidłowych miejscach i zaktualizuje stronę w przeciągu kilku sekund. W efekcie pojawi się komunikat "Moduł został pobrany".
Moduły nie są instalowane domyślnie: nadal musisz nacisnąć przycisk "Instaluj", a następnie skonfigurować jego ustawienia.
Gdy tylko konfiguracja będzie zakończona, sprawdź natychmiast, czy moduł działa tak, jak powinien.
Instalacja za pomocą protokołu FTP
Aby zainstalować nowy moduł PrestaShop ręcznie, należy:
- Rozpakować plik archiwum (
ziplubtar). To powinno utworzyć katalog z jego zawartością. - Za pomocą klienta FTP połączyć się z serwerem, na którym znajduje się PrestaShop i umieścić rozpakowany moduł w katalogu
/modules.
Uważaj, żeby nie przesłać przypadkiem zawartości modułu do katalogu innego modułu. Prześlij cały katalog wraz z plikami, a nie tylko same pliki. - Przejdź do menu "Moduły" w panelu administracyjnym.
- Zlokalizuj nowy moduł na liście modułów. Być może będziesz musiał przewinąć listę, aby go odnaleźć, albo wyszukaj go po nazwie.
- Gdy go znajdziesz, naciśnij "Instaluj".
- Twój moduł jest teraz zainstalowany i powinien być również aktywny. Jeśli potrzeba, skonfiguruj go. Zwróć także uwagę, czy PrestaShop nie umieścił jakichś ostrzeżeń na stronie.
Gdy tylko konfiguracja będzie skończona, sprawdź natychmiast, czy moduł działa tak, jak powinien.
| Warning | ||||
|---|---|---|---|---|
| ||||
Moduły mogą pochodzić z różnych źródeł i nie wszystkie z nich są pewne. Dlatego też PrestaShop wprowadził od wersji 1.6.0.7 ostrzeżenie w przypadku "niezaufanych" modułów - czyli takich, których PrestaShop nie zatwierdził poprzez umieszczenie ich w sklepie Addons. Dzięki temu zadecydujesz czy kontynuować instalację bez kolejnych ostrzeżeń, czy może jej zaprzestać. Instalacja domyślnych modułów albo tych pobranych ze sklepu Addons nie wywoła podobnego ostrzeżenia. |
Aktualizacja modułu
Twój PrestaShop sprawdza regularnie serwer Addons w poszukiwaniu aktualizacji do zainstalowanych modułów. Jeśli taką znajdzie, wyświetli przycisk "Aktualizuj" przy danym module. Wystarczy wtedy, że naciśniesz przycisk, a PrestaShop pobierze i zaktualizuje moduł.
Odinstalowanie modułu
| Warning |
|---|
Nigdy nie usuwaj modułu poprzez usunięcie jego katalogu, używając klienta FTP! Musisz pozwolić, by PrestaShop zrobił to samodzielnie. |
Jeśli chcesz przestać korzystać na jakiś czas z modułu, ale przy tym zachować jego ustawienia, wystarczy, że wybierzesz przycisk "Wyłącz". Pojawią się nowe dostępne czynności: "Włącz", "Usuń" oraz "Odinstaluj".
Jeśli nie zależy Ci na zachowaniu konfiguracji modułu, naciśnij "Odinstaluj": Twój moduł nadal będzie dostępny w katalogu /modules, ale nie będzie już dalej działał.
Jeśli chcesz całkowicie usunąć moduł z Twojego sklepu i serwera, wybierz "Usuń". PrestaShop pozbędzie się wszystkich plików.
| Tip |
|---|
Upewnij się, że wyłączenie albo usunięcie modułu nie zepsuje wyglądu szablonu! |
Instalowanie szablonu
Jak tylko pobrałeś szablon ze sklepu Addons, powinieneś go zainstalować.
Instalacja szablonu za pomocą Instalatora PrestaShop
To najbardziej polecana metoda, ponieważ zachowuje ona wszystkie bloki na swoich miejscach.
PrestaShop jest wyposażony w natywny importer szablonów, który jest dostępny na stronie "Szablony" w menu "Preferencje". Naciśnij "Dodaj Szablon" u góry strony (a nie "Dodaj nowy" ponad listą szablonów, gdyż tego przycisku używa się do utworzenia nowego szablonu). Okno, które się następnie pojawi, przedstawia 3 metody instalacji (importu) nowego szablonu: z Twojego komputera, ze strony internetowej, z Twojego własnego serwera FTP. Pozwala również na stworzenie szablonu od zera.
Importowanie szablonu
Bez względu na wybrana metodę proces przebiega tak samo: wskaż położenie pliku szablonu w formacie .zip i naciśnij "Zapisz".
| Tip |
|---|
Importuj ze swojego komputera: używając okna do przeglądania plików, zlokalizuj swój plik. |
Na następnej stronie pojawi się krótkie podsumowanie wskazujące kolejne czynności importera.
Naciśnij "Następne", aby zatwierdzić swój wybór. Szablon jest teraz zainstalowany, a PrestaShop zapyta, czy chcesz zainstalować moduły, które zostały zaimportowane wraz z szablonem, co chcesz zrobić z obecną konfiguracją modułów i jak chciałbyś, aby została potraktowana konfiguracja zdjęć.
Naciśnij "Następne" po raz ostatni. Pojawi się strona z ostatecznym potwierdzeniem i wszystkie zmiany zostaną wprowadzone w Twoim sklepie. Naciśnij "Zakończ", aby ukończyć cały proces.
Instalacja za pomocą klienta FTP
Ta metoda nie jest polecana, ale nadal dostępna. Używaj jej z rozwagą: Twoje bloki mogą znaleźć się nie tam, gdzie powinny.
Aby zainstalować nowy szablon PrestaShop poprzez FTP, należy:
- Rozpakować plik archiwum (
zip). To powinno utworzyć katalog/themeszawierający katalog(i) Twojego szablonu. Za pomocą klienta FTP połącz się z serwerem, na którym znajduje się PrestaShop i umieść rozpakowany plik(i) szablonu z katalogu
/themesw katalogu/themesna serwerze. Uważaj, żeby nie przesłać przypadkiem zawartości modułu do katalogu innego modułu. Prześlij cały katalog wraz z plikami, a nie tylko same pliki.- (opcjonalnie) Jeśli archiwum szablonu zawiera katalog /modules, oznacza to, że szablon posiada moduły specyficzne dla niego, które umożliwią mu poprawne funkcjonowanie. Za pomocą klienta FTP umieść katalog z /modules w odpowiednim katalogu
/modulesna serwerze. Jeśli na Twoim serwerze znajduje się już moduł o takiej samej nazwie, postaraj się zachować ten bardziej aktualny. Jeśli nie będziesz pewny, to zachowaj ten powiązany z szablonem, prawdopodobnie będzie on najlepiej z nim działać. - Idź do panelu administracyjnego, na stronę "Szablony" w menu "Preferencje".
- Zaznacz nowy szablon w miejscu starego szablonu i naciśnij "Zachowaj".
- Twój szablon został zainstalowany.
- (opcjonalnie) Jeśli Twój szablon posiadał moduły, przejdź do menu moduły i skonfiguruj je odpowiednio.
Wiele szablonów posiada plik Install.txt, w którym znajdziesz instrukcje dotyczące instalacji. Upewnij się, że postępujesz w odpowiedniej kolejności, aby niczego nie pominąć.
Gdy tylko konfiguracja będzie skończona, sprawdź natychmiast, czy moduł działa tak, jak powinien. Sprawdź wszystko od A do Z, nie chcesz stracić zamówień tylko dlatego, że szablon nie był kompletny!
Eksportowanie szablonu
Eksportowanie szablonu jest bardzo przydatne, jeśli chcesz zarchiwizować szablon dla bezpieczeństwa, jak również wtedy, gdy chcesz udostępnić ten szablon komuś innemu, na przykład korzystając ze sklepu Addons (http://addons.prestashop.com/). Not only does it generate a complete Zip archive of your theme, but it also adds many information in an XML files, which is very useful both when uploading to Addons, and when importing to another PrestaShop site.
Just as for theme importation, there are two ways to export a theme: using PrestaShop's own exporter, or using the one from the Theme Installator module:
- PrestaShop's exporter: click on the "Export theme" button at the top of the "Themes" page (in the "Preferences" menu).
- Theme Installator's exporter: open the module's configuration page, then go to the "Export a theme" section.
Select a theme and click on "Export this theme". A configuration form appears where you can set the exported themes parameters: author, theme name, compatibility version, attached modules (if any), etc.
Once all the parameters are correctly set, click on "Generate the archive now". You will quickly get a file to download from your browser. Save it on your hard-drive, then give the save file a proper name. From there on, you can easily share this theme, and if it is your own creation, you can start selling it on PrestaShop's Addons website at http://addons.prestashop.com/.
PrestaShop's mobile template
The mobile template enables any PrestaShop merchant to have his or her shop be accessible to mobile devices: from the home page to the payment process, along with product pages and conversion funnel.
Installing the mobile template for your shop
Installing PrestaShop's mobile template is easy:
- Connect to you PrestaShop's administration.
- Go to the "Themes" page under the "Preferences" menu.
- In the "Appearance" section, go to the "Enable mobile theme" part and choose one of the three options other than "I want to disable it".
By default, the mobile template is only used for mobiles phones, tablet receiving the same theme as regular devices. With this option, you can choose to have the mobile template be used for tablets ("Both" option"), or even choose to only have it used for tablets (mobile phones receiving the regular theme).
Customizing the mobile template
The mobile template's files are located in the /mobile subfolder of the current theme's folder. This way, if you current theme is the default PrestaShop theme, the mobile template's files are in the /themes/default/mobile of your PrestaShop installation.
The template is made of HTML, CSS and JavaScript files: its structure is therefore the same as for the default theme, but its design is radically different, as it was built for the smaller screens of mobile devices.
Therefore, if you wish to change the colors or layout of the mobile template's pages, you must edit the CSS and/or HTML files in order to adapt them to your likings. You must have a good knowledge of web programming languages, or ask for help from a web developer.
Using the mobile template with another theme
The mobile template is only available if the current theme has a /mobile subfolder in its own folder. Hence, numerous PrestaShop themes do not have a proper mobile theme, and these themes' users cannot automatically offer a mobile version of their shop to their visitors
While the theme you are using is being updated with its own mobile template, you can use the default mobile template, thanks to a quick file manipulation: you just have to copy the /mobile subfolder from the /themes/default folder, and paste this subfolder (and all of its files) in your current theme's folder.
You will therefore use the default mobile template rather than a template with a design that is consistent with your main theme, but nothing is stopping you from editing the HTML, CSS or JavaScript files of the mobile template in order to get it closer to your own themeTa procedura nie tylko spakuje szablon do pliku .zip, ale także doda wiele informacji w postaci plików XML, które są bardzo przydatne w sklepie Addons i podczas importu szablonu do innego sklepu PrestaShop.
Wybierz szablon, który chcesz eksportować i naciśnij przycisk "Eksportuj motyw". Pojawi się formularz konfiguracji, w którym można określić parametry szablonu: autora, nazwę, kompatybilność, moduły powiązane (jeśli istnieją) itp.
Po uzupełnieniu wszystkiego wybierz przycisk "Zapisz", PrestaShop wygeneruje szybko plik, który można będzie zachować na dysku komputera. Po zachowaniu go można z łatwością się nim dzielić, a jeśli to Ty stworzyłeś szablon, możesz umieścić go w sklepie "Addons".
Szablon mobilny PrestaShop
Szablon mobilny daje wszystkim sprzedawcom możliwość zaadaptowania strony do urządzeń mobilnych: od strony głównej po płatność, poprzez stronę produktu i tunel zakupowy.
Instalacja szablonu mobilnego w Twoim sklepie:
Aby zainstalować szablon PrestaShop, należy:
- Zalogować się do panelu administracyjnego.
- Przejść na stronę "Szablony" w menu "Preferencje".
- W części personalizacji wyglądu nacisnąć zakładkę "Mobilne" i przejść do opcji "Włącz szablon dla urządzeń mobilnych". Wybrać jedną z trzech dostępnych opcji (oprócz "Chcę to wyłączyć").
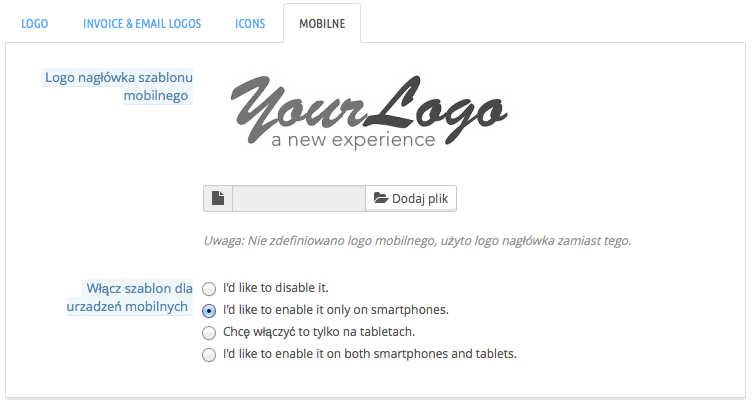
Domyślnie szablon mobilny wyświetla się wyłącznie dla smartfonów, tablety mają ten sam widok, co komputery. Przedstawione opcje pozwalają wybrać, czy szablon mobilny ma być dostępny dla obydwu typów urządzeń, czy tylko dla smartfonów, czy może tylko dla tabletów.
Personalizacja szablonu mobilnego
Pliki szablonu mobilnego znajdują się zawsze w podkatalogu /mobile aktualnego szablonu. Jeśli więc Twój aktualny szablon jest szablonem domyślnym, pliki do szablonu mobilnego znajdują się w katalogu: /themes/default/mobile PrestaShop.
Szablon składa się z plików HTML, CSS i JavaScript: jego struktura jest taka sama, jak w przypadku szablonu domyślnego, ale przy ustawieniach całkowicie odmiennych, przystosowanych do małych ekranów urządzeń mobilnych.
Jeśli więc chcesz zmienić kolory wyświetlania albo inne elementy w wersji mobilnej, musisz edytować pliki CSS/HTML i dokonać zmian zgodnie z Twoim gustem. Musisz jednakże posiadać pewną wiedzę w programowaniu sieciowym albo zwrócić się o pomoc do osoby o odpowiednich umiejętnościach.
Używanie szablonu mobilnego z innych szablonem
Szablon mobilny jest dostępny wyłącznie w sytuacji, gdy aktualny szablon posiada podkatalog /mobile w swoim katalogu. Wiele szablonów PrestaShop nie posiada szablonu mobilnego i użytkownicy tych szablonów nie mogą zaproponować klientom wersji mobilnej sklepu.
Czekając na aktualizację Twojego aktualnego szablonu do wersji mobilnej, możesz skorzystać z domyślnej wersji mobilnej dzięki szybkiemu manewrowi: wystarczy skopiować podkatalog /mobile z katalogu /themes/default a następnie wkleić podkatalog w katalogu Twojego aktualnego szablonu.
W ten sposób możesz używać domyślnego szablonu mobilnego, który może nie jest spójny graficznie z aktualnie używanym szablonem, ale nic nie stoi na przeszkodzie, żeby zmodyfikować nieco szablon mobilny i zbliżyć jego wygląd do bieżącego motywu graficznego.