Managing Carriers
You must have carriers added to your PrestaShop installation – that is, a clear indicator of who will deliver your products. It might be just yourself or your shop (for instance if you are selling downloadable products, or only work locally), but as soon as you are actually sending packages using stamps and a 3rd-party delivery such as your local postal service, or FedEx, UPS and such, then you must have their details added to your shop's database. This will enable your customers to better choose which carrier to use, based on their delivery ranges, fees and dates.
The "Carrier" page presents you with a list of all your current carriers. From there, you can directly change their status, indicate that why of shipping is free or not, and change their position when presented to customers.
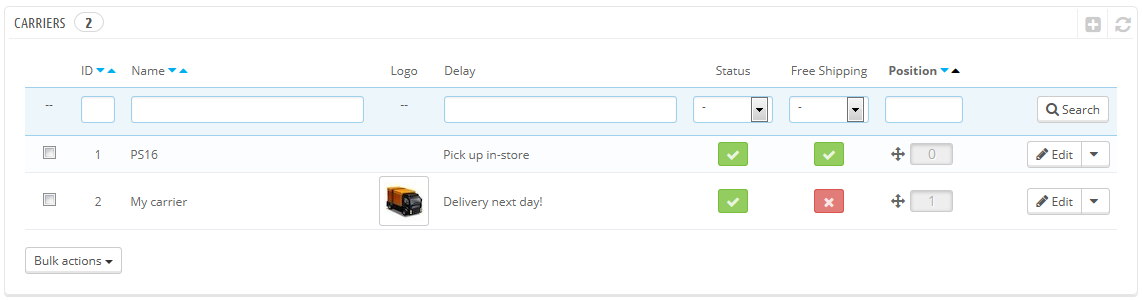
By default, you have two carriers in your database:
...
It is up to you to remove these default carriers and add new ones for your customers. At the very least, you should edit the "My carrier" carrier and replace its data with that of a real carrier: name, details, and ranges. We do recommend that you delete the "My carrier" carrier, and that you use an existing carrier module in order to register you shipping partner in PrestaShop.
New carriers are added by first clicking on the "Add new carrier" button. This opens a new page with two options:
- Use one of our recommended carrier modules. It is highly recommended to register carriers by installing a carrier module: this will make the process much faster, and the settings will be much more accurate.
- Add a new carrier. If you cannot find a module for your shipping partner, either in the native modules or on the PrestaShop Addons marketplace, then you should register your carrier yourself using the Carrier Wizard: click on "Add new carrier" to open this tool.
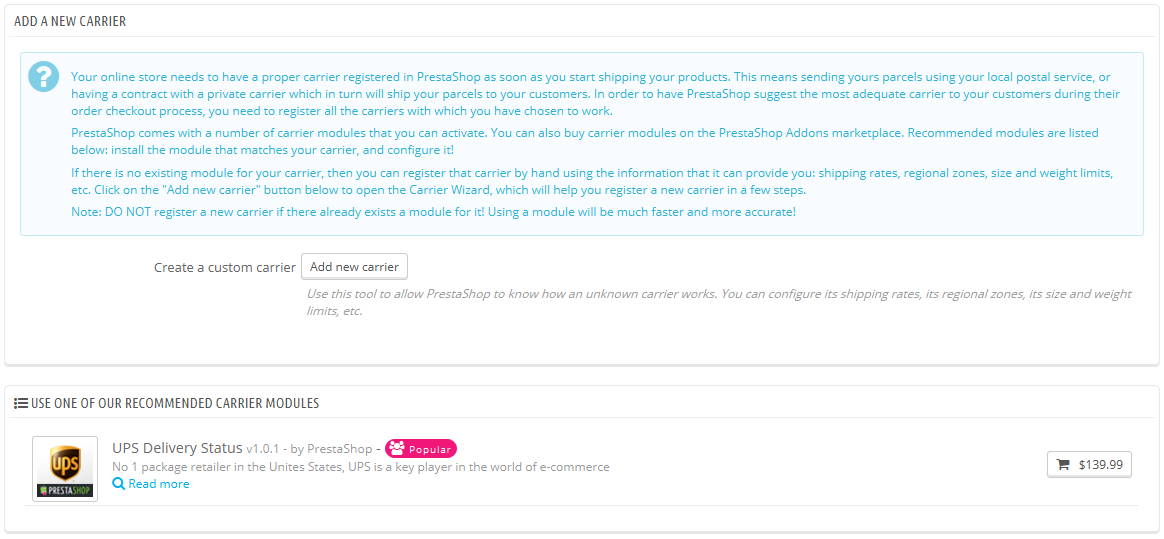
This is a new screen that was added in version 1.6.0.7 of PrestaShop. It helps you decide whether you can install a carrier module, or have to configure your own carrier using the Carrier Wizard.
Creating a New Carrier using the Carrier Wizard
In this section, we are going to create a complete carrier, from A to Z, using the Carrier Wizard. You can create as many carriers as you wish.
If one carrier has different shipping services, you should create as many carriers in PrestaShop, and differentiate them with their names.:
Many of the details asked by PrestaShop's forms should be provided by your carriers once you have set up an account or are under contract with them directly. Check with them in order to make sure everything is configured correctly.
To create a new carrier, click on the "Add new" button in the "Carriers" page. This will open the Carrier Wizard on the first of its four panels.
Panel 1: General settings
This is where you describe the carrier, giving information that the customer will need in order to recognize and choose the carrier he prefers.
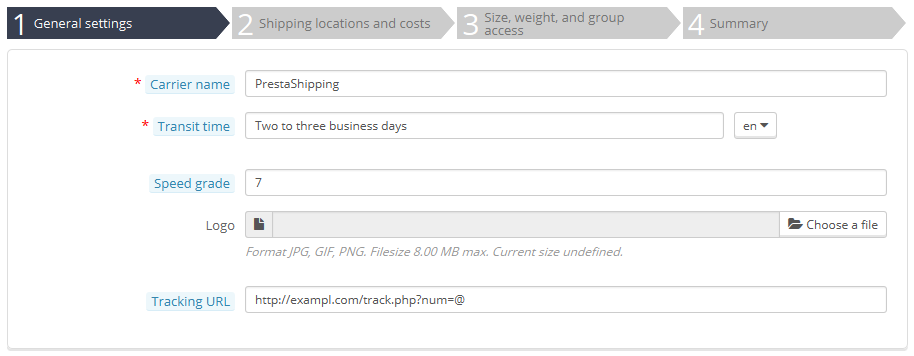
Let's examine all of the information you need to enter:
...
Click "Next" to reach the second panel.
Panel 2: Shipping locations and costs
First, this panel presents a handful of settings:
- Shipping and Add handling costs. Include or exclude shipping & handling costs in this carrier's price, as set in the "Shipping" page.
- Apply Free shipping cost. If enabled, the final order price will include both the carrier's regular shipping fee, along with specific per-product fees, if there are anyyou will not be able to indicate shipping prices.
If disabled, the final order price will only include the product's shipping fee – making this carrier basically free.
Per-product fees are configured on each product's "Shipping" tab, with the "Additional shipping cost (per quantity)" field.Billing. Choose whether you want to calculate the shipping costs by total price or total weight. This depends on the way your carrier handles billing, you will be able to edit the ranges and per-country costs in the form below. - Billing. When billing the customer, PrestaShop can apply one of two behaviors, which you have to set depending on how you carrier handles billing (so make sure to check their documentation about this):
- According to total price. Billing depends on the total price of the order.
- According to total weight. Billing depends on the total weight of the order.
- Tax. Indicates if this carrier requires a local tax in order to deliver, and if so, which one. The tax must already exist in PrestaShop (which can be done in the "Taxes" page of the "Localization" menu).
- Out-of-range behavior. In case the chosen carrier has not set shipping cost for the required zone or weight, you can indicate how PrestaShop should react. You have two options:
- Apply the cost of the highest defined range. PrestaShop will take the most costly range and apply its conditions.
- Disable carrier. PrestaShop will not suggest this carrier, since it probably cannot deliver this order.
Then comes the important part: the creation of the carrier's range. This is a very important step, as PrestaShop needs this information to present the customer with carriers which can actually deliver the ordered package. Indeed, depending on the order's total price or total weight, some carrier options will not be available while others will only appear at a certain value. You must be very precise when filling these values, and preferably those suggested by each carrier's documentation.
...
| Note |
|---|
The weight and price units are the default ones for your PrestaShop installation, and the ones your products use. You can change these units "Localization" page of the "Localization" menu. |
Finally comes one final option:
- Out-of-range behavior. In case the chosen carrier has not set shipping cost for the required zone or weight, you can indicate how PrestaShop should react. You have two options:
- Apply the cost of the highest defined range. PrestaShop will take the most costly range and apply its conditions.
- Disable carrier. PrestaShop will not suggest this carrier, since it probably cannot deliver this order.
Click "Next" to reach the third panel.
Panel 3: Size, weight and group access
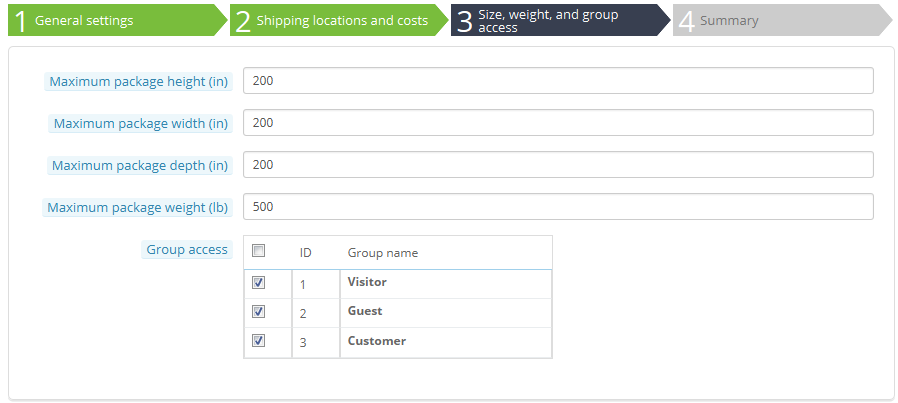
This panel presents two sets of options:
- Maximum package height/width/depth/weight. You can now indicate the minimum and maximum package height and weight, which are an essential part of choosing a package carrier. The value is to use the default weight and dimension units, as set in the "Localization" page of the "Localization" menu.
- Group Accessaccess. You might want only some user groups to be able to use a carrier. This option serves this purpose.
Click "Next" to reach the fourth and final panel.
Panel 4: Summary
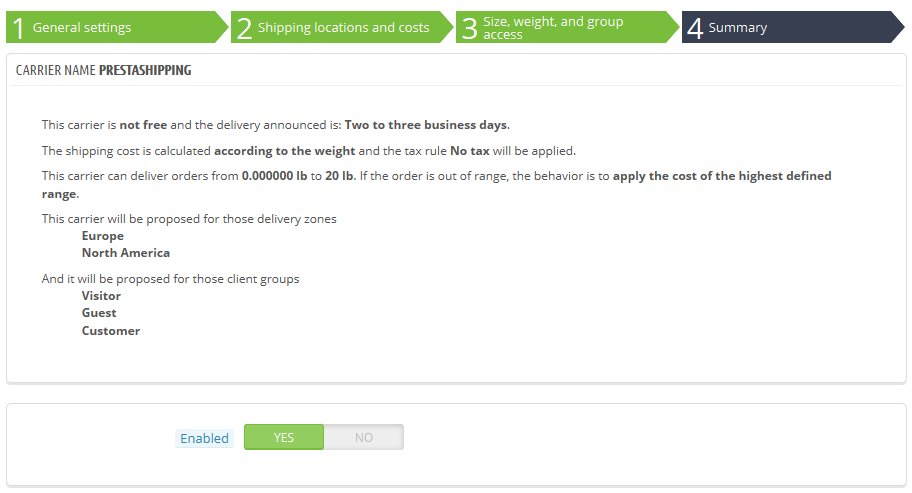
This last panel gives you an overview of your settings for this carrier.
If some settings are wrong, you can go back to any previous panel by either using the "Previous" button, or directly clicking on the panel's tab.
If you want to save this carrier as a draft for now then come back to it later, disable the carrier using the "StatusEnabled" option at the bottom of this final panel.
Either way, click on the "Finish" button to save your work, and create the carrier.
| Info |
|---|
When using PrestaShop in multistore mode, another panel is available, and the panel order changes slightly:
All the panels are as described above. The new one, "MultiStore", makes it possible for you to limit this carrier to a selection of your stores. |
Adding a Carrier using a Carrier Module
PrestaShop comes with a host of free modules, amongst which you can find a handful of carrier modules which you can install right away, for the major worldwide and domestic carriers.
| Info |
|---|
The available carriers depend on the initial settings of your shop: if you have set your shop as being located in France, you will not get the same modules as if you set your shop in the USA! |
In the "Add new carrier" screen, you can choose between creating a carrier using the Carrier Wizard, or using one of our recommended carrier modules. It is highly recommended to register carriers by installing a carrier module: this will make the process much faster, and the settings will be much more accurate.
Depending on the module, you can either click on the "Install" button and let PrestaShop do the work, or click on the shopping cart button. In that second case, you will be taken to the Addons marketplace, where you can buy the module. Once you have bought the module, you can install it and configure it.