...
In practice, the contact form of your shop, available under the "Contact us" link at the bottom of your front - office, presents the customer with two contacts by default: "Webmaster" and "Customer Service". The customer only has to choose who to contact, and then fill the rest of the fields. The message is then recorded in PrestaShop's customer service tool.

| Tip |
|---|
Discussion threads are only included in the customer service tool if the contact has the "Save Message?" option enabled. You can change this setting, or add more contacts, by going to the "Contact" page, under the "Customers" menu. This page is explained in detail in the next section of this chapter of the PrestaShop User Guide. If the option is disabled for the contact that the customer chooses, the message is simply sent to the contact's e-mail address, and is not stored in PrestaShop. You also need to properly configure your IMAP settings, so that PrestaShop can retrieve the customer's answers to e-mail that were sent from the customer service tool. This is done in the "Customer service options" section, at the bottom of the screen. |
On this page, each contact has its own box, where you can quickly see if a there are new messages (meaning, those that have not yet been read). By default there are two, and adding more contacts will move the "Meaning of status" and "Statistics" boxes further to the left and down.
...
Each conversation with a customer can be entirely handled through PrestaShop's complete interface, without having to use an e-mail client such as Outlook or Thunderbird.

In the conversation list, click on a row to view to view the conversation's details:
- Forward this discussion to an employee. From the moment an employee has started replying to a customer message, he becomes in charge of the customer's request. If during the discussion it turns out another employee should handle it instead, you can use that drop-down menu to attribute it. That other employee will receive a notification about it.
- Change status of message. You can apply a handful of color-coded status actions to a discussion, in order to quickly sort them and thus handle them quicker. There are 4 available statusesactions:
- Open. The issue is still going, or has not yet been answered.
- Closed. The issue is been resolved.
- Pending 1 and Pending 2Mark as "handled" or "Re-open". Changes the discussion's status to "Closed" or "Open".
- Mark as "pending 1" and Mark as "pending 2". These two statuses are internal: their meaning is up to your team. You may even choose to not use them, and only rely to on "OpenClosed" and "ClosedOpen".
- Customer name (used as section title) and ID.
- Sent on. Date of the latest message in the discussion.
- Browser used. This can be very useful when having to debug an error on your front-office.
- Subject. The default subject for a new discussion thread is the one chosen by the customer when choosing a contact. If it turns out it was not the right choice, you can change it using this drop-down menu. For instance, the customer chose to write about "Customer service", whereas the discussion is mostly about "Webmaster" issues.
- Thread ID and Message ID. These help you count the number of exchanges needed to reach a conclusion for the customer's issue.
- Message. Forward this discussion to another employee. From the moment an employee has started replying to a customer message, he becomes in charge of the customer's request. If during the discussion it turns out another employee should handle it instead of you, you can use that button to attribute it through a drop-down list. That other employee will receive a notification about it. If the person you want to forward this discussion to is not available in the list, choose "Someone else" in the dropdown list and two options will appear, enabling you to indicate the email address of the recipient and a comment about your message.
- Reply to the next unanswered message in this thread.
Essential details are available:
- Customer name and email, which you can click on to access the customer's information
- Number of orders, total amount spent and date of registration for the customer.
- Time and date of the message.
- Finally, the message itself.
Clicking "Reply to this message" will display a To reply to this thread, simply use the form with your default message . The default message is (as set in "Contact options" section of the "Contacts" page as set in the "Contacts" page.Customer service" page), and click "Send".
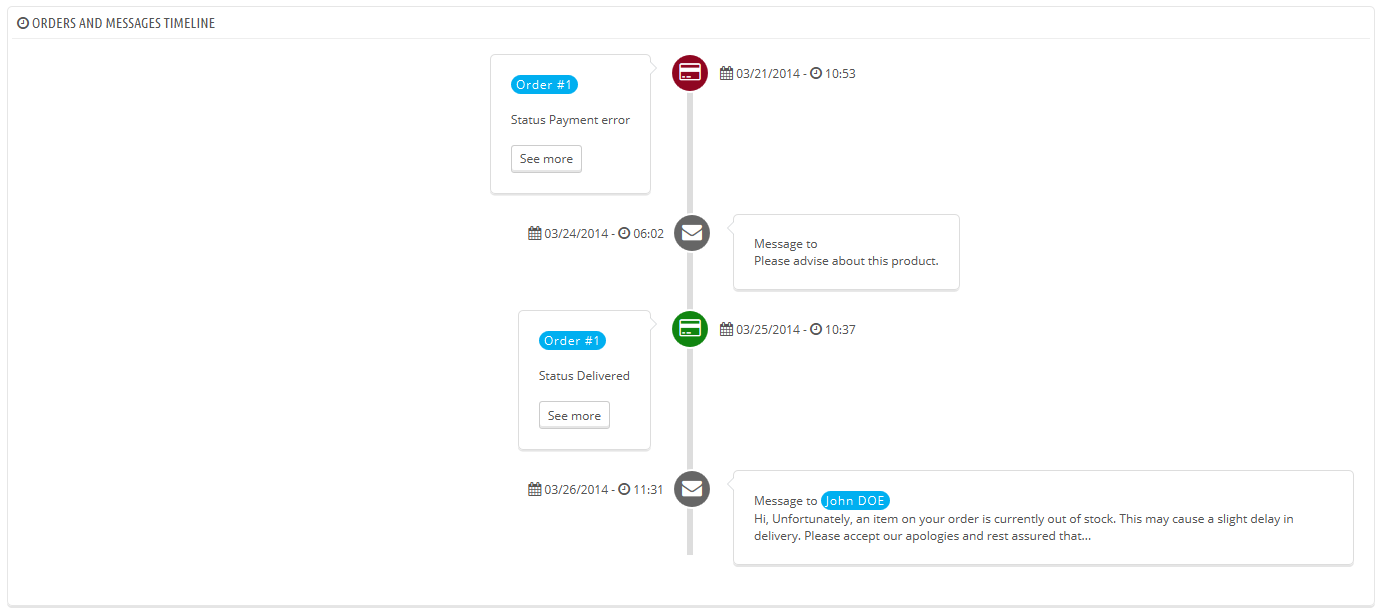
At the bottom of the page, the "Orders and messages timeline" gives you a clear chronological view of the events pertaining to this discussion thread.
Customer Service Options
This section basically enables you to precisely configure PrestaShop's access to your e-mail server through its IMAP interface. You should make sure all fields are filled in order for the customer service tool to work properly. Most of this information should be provided by your webhost.
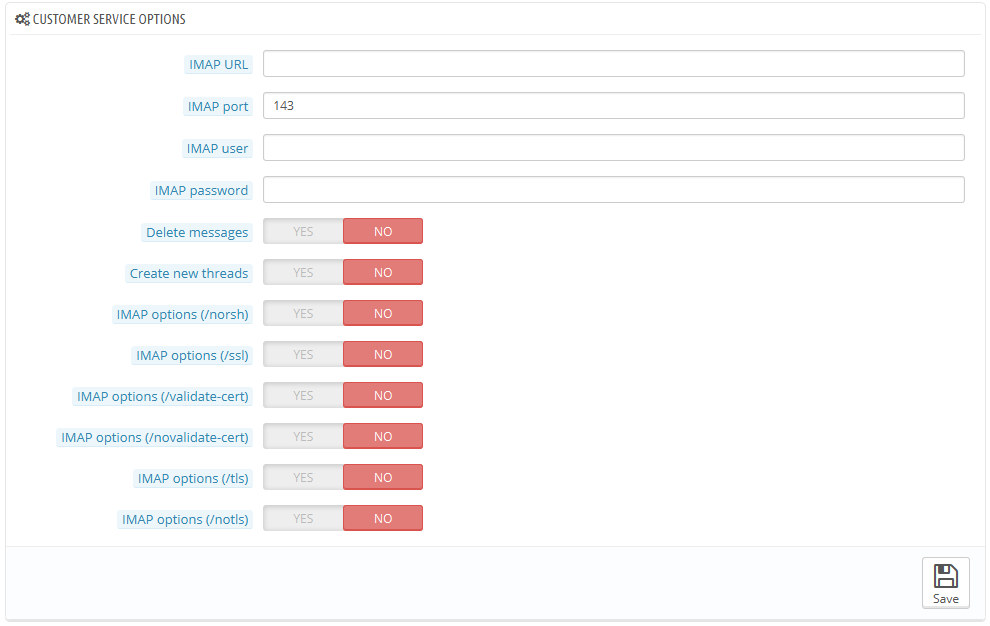
- IMAP URL, IMAP port, IMAP user and IMAP password. Essential details to access the e-mail server using the IMAP protocol.
- Delete message. If enabled, messages on the server will be deleted as soon as PrestaShop has retrieved them. Use with caution: this would make your messages unavailable to other e-mail clients.
- /norsh. If enabled, the connection to your e-mail server will not pre-authenticated. Not recommended.
- /ssl. If enabled, the connection to your e-mail server will not be encrypted. Not recommended.
- /validate-cert. If enabled, PrestaShop will force the validation of the server's TLS/SSL certificate.
- /novalidate-cert. If enabled, PrestaShop will never try to validate the server's TLS/SSL certificate. Essential for servers with self-signed certificates.
- /tls. If enabled, PrestaShop will force use of StartTLS to encrypt the connection. Servers that do not support StartTLS will be rejected.
- /notls. If enabled, PrestaShop will not use StartTLS to encrypt the session, even with servers that support it.