...
- The PrestaShop logo, along with your current version number.
- The name of your shop. From any page, this takes you back to the Dashboard.
- Cart icon. A tooltip indicates the number of new orders, if any. Clicking it opens a panel presenting the new orders since you last clicked that icon. From there on, you can either display one of the new orders, or go to the list of orders.
- Person icon. A tooltip indicates the number of new customers, if any. Clicking it opens a panel presenting the last registered customers. From there on, you can either display one of the new customers, or go to the list of customers.
- Letter icon. A tooltip indicates the number of new messages, if any. Clicking it opens a panel presenting the last customer service message. From there on, you can either display one of the new messages, or go to the list of messages.
- Trophy icon. A tooltip indicates the number of new items, if any. Clicking it opens a panel presenting your progress as a merchant. From there on, you can reach the full page of badges and points, from the "Merchant Expertise" module.
- Quick Access. This is the quick links menu, presenting the most useful links, as set in the "Quick Access" page under the "Administration" menu.
- "Connect to PrestaShop Marketplace account" link. Opens a modal window enabling you to connect your shop to the Addons marketplace, and thus get updates from the modules and themes you bought.
- "My shop" link. Opens a new browser tab with your shop's front-end.
- (Personal menu named after your first name ) menuand surname. A simple dropdown panel with a reminder of the administrative account with which you are currently logged-in. It contains the following links:
- "My preferences" link. Takes you to your account's preferences page, where you can set some personal options (for instance, the language of your back office or your password).
- "Sign out" link. Logs you out of the current user account.
...
It also features the "Demo mode" block, from which you can disable the fake data used by default on the Dashboard and use your own data (as gathered by PrestaShop's statistics system).
 |
|
Reorder the elements
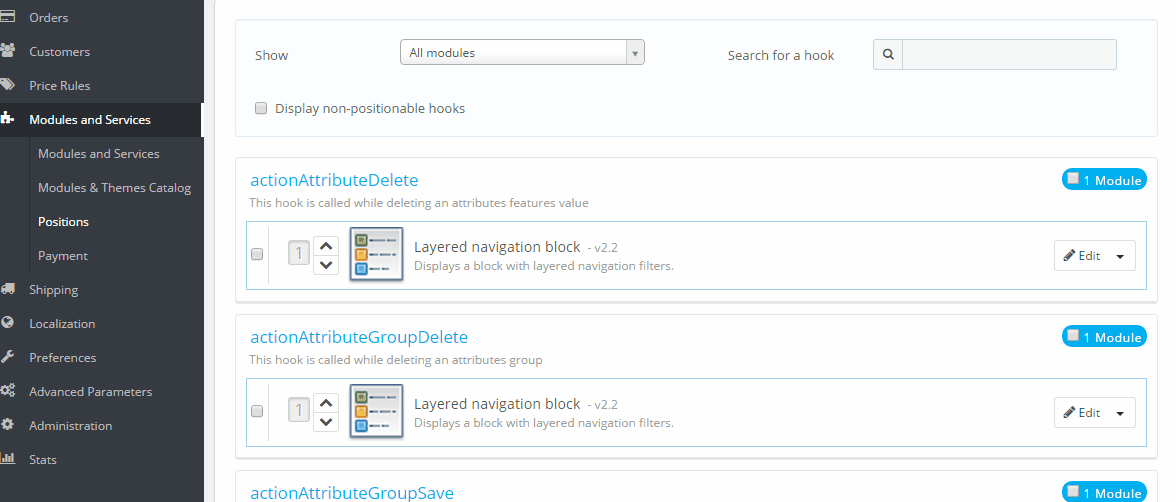
On your dashboard, you have the possibility to change the order of the elements displayed on each column (left and center, see above). It is mostly useful if you have additional modules or if you want to focus on some statistics that are not on the first position.
To change the order, please follow these steps:
- Go to Modules & Services / Position page (via your menu)
- Select "Show: All modules"
- Check the "Display non-positionable hooks" checkbox
- In the "Search of a hook" field, enter "dashboardZoneOne" for the left column, or "dashboardZoneTwo" for the right column.

Now you see all the elements hooked on the left/center columns.
To change the positions, you can drag and drop them or you can click on the small arrow close to the module logos, as shown below :