Managing Your Catalog
Table of contents
| Table of Contents | ||
|---|---|---|
|
Adding Products and Product Categories
The basis of a PrestaShop site is its catalog, which contains products and product categories. Building and improving your catalog is the main way you will make your website live in the eyes of the customer. This is where your shop becomes a reality, creating content and giving value to your online shop.
Adding products does not only mean adding an image and some text, and then validating your content. It means knowing your product by heart: price, weight, size, features, specifications, details, manufacturer, supplier and so much more. You should not start adding products to your Catalog without knowing exactly what you want to present to the customer, and thus need to have a set plan about your products and the way they will be displayed. This also means knowing your shop's Front Office like the back of your hand in order to properly fill in the required fields.
As the heart of your shop, your catalog deserves a great deal of your attention.
The "Catalog" section is accessible can be accessed by clicking on the tab with the same name. This is where you manage all of your products throughout your PrestaShop e-commerce solutionsite.

The first page under the “Catalog” tab looks like this"Catalog" tab lists both the homepage's sub-categories, and the products that are featured on the homepage.
In the “Categories” section via the “Add a new subcategory” function "Categories" section, you can create different product classifications using the "Add a new subcategory" function. This arranges your articles, and helps your customers easily find what they are looking for. All of the categories are considered subcategories of the welcome home page.
Create a Category
To create a category, click on the "Add a new sub-category" button and fill out this the form:.
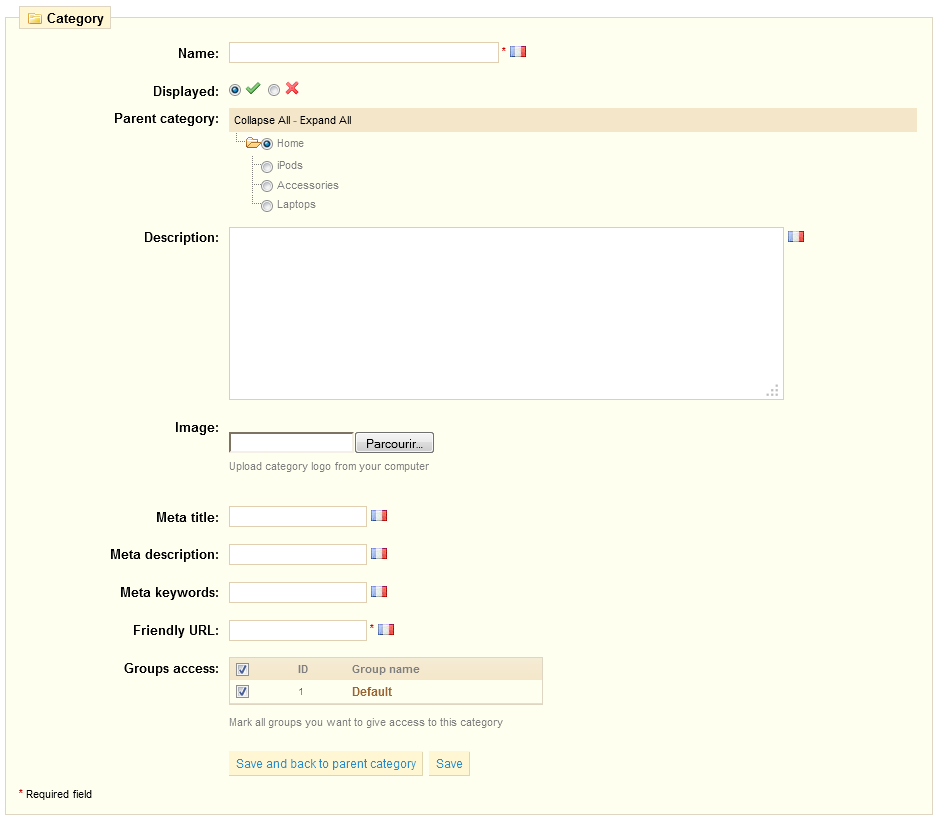
First of all, give your category a name, and then determine if it is “displayed ” or in other words if "displayed" (i.e. whether or not it will be accessible to your customers or not). For example, you may want to postpone showing displaying a new category to your customers because you have not quite completed it.
If you are creating wish to create a subcategory belonging to a category other than the welcome home page, choose the category under which it will appear in the drop-down menu “Parent "Parent Category.” " Click on “Browse” "Browse" to upload an image from your computer , in order to illustrate your which will represent this category.
Search Engine Optimization (SEO) Fields
This information will help you optimize the visibility of your catalog on search engines.
- “Meta title” is the title Meta title. The title that will appear on the search engines when a request is made by a customer
- “Meta description” is a Meta description. A presentation of your site in just a few lines, intended to capture a customer’s interest It customer's interest. This will appear in search results
- “Meta Keywords” are keywords Meta Keywords. Keywords that you must define in order to have your site referenced by search engines. You can enter several of them, separated by commas, as well as expressions, which must be indicated in quotation marks. The “Friendly URL” enables
- Friendly URL. Enables you to rewrite the addresses of your categories as you wish.
For example, instead of having an address such as
http://www.mystoremyshop.prestashop.com/category.php?id_category=3
you can have:
http://www.mystoremyshop.prestashop.com/123-name-of-the-category
In this case, all you would need to do is indicate in the field marked “Friendly URL” "Friendly URL" the words that you wish to see appear instead of “name"name-of-the-category” category" separated by dashes. “Groups access” restricts - Groups access. Restricts select categories and products from certain shoppers. To see these categories, your shoppers must belong to a the proper user group. Check out the group functions in the Customers tab for more information.
Once you have finished configuring your categories, you can save them while staying on the same page by clicking on the button “Save” "Save", or saving and coming back to the previous category by clicking on “Save "Save and Back to Parent Category".
Note: Each of the fields has a flag located to its right, indicating that it can be configured in several languages. For more information on this feature, please see the language management feature, in the "Tools" tab.
Managing and Adding Products in the Catalog
At the bottom of the catalog page, under “Products "Products in this category” category", you can manage the products in your store. See the screen shot below. Once you have created your category, you will be able to add products by clicking on "Add a new product". A form with several tabs will appear We will ex plain it step by step.
We begin with the first tab in the form, which enables you to fill out the general information about your products.
Fill out the general product information
The first section contains the essential information about the product.
The first thing to complete is the product informationname. This is the name that what will appear in the search results. Next to the field you will find a flag, which enables you to choose the language into different languages in which you wish to edit or create the namewould like to feature the product.
If you don’t do not want this product to be immediately available or visible to your customers, check the box that says “Disable"Disabled".”
The “Manufacturer” "Manufacturer" field enables you to enter the name of the manufacturer of the product. This is an optional field.
Click “create” "Create" next to the Manufacturer field to add a new manufacturer, or select from the drop-down menu which one to associate with this product.
You can add information to better manage your item listing in the fields “Reference”, “Supplier reference”, “EAN13 or JAN”"Reference", "Supplier Reference", "EAN13 or JAN", "UPC" or “Location”"Location" fields.
You can also indicate the size of the final package.
Finally, add the weight in order to properly calculate the shipping cost of your customer’s orders customer's orders
Create a Pack of
...
Products
You may wish to sell a pack of products composed of several items. Examplei.e.: a computer start-up pack , composed of a CPUthe computer itself, a monitor, and a printer.
You can in this case create a pack and add other products from your catalog to this pack. To do this, check “Pack”"Pack". A simple form will appear, with a button. Start typing in the text field to filter through your existing products, and choose the one a product to add to the pack. Select it, choose the quantity, and click on the green button to validate your choice.
You can add as many products as you would like to the pack.
You can remove a product from the pack simply by clicking the trashcan icon next to it.Tip:
| Tip |
|---|
Packs allow the site administrator to simplify preparing orders. They also allow customers to take advantage of special prices and offers. |
Create a Downloadable
...
Product
Check the box “Is "Is this a downloadable product?” " if you sell downloadable goods, such as mp3s or PDF documents. A form appearswill appear:
- Choose the file that you’re you're making available to your customers by clicking “Upload "Upload a File” File" then find and select it on your computer.
- Filename. Choose a name for your file.
- Number of downloads. Indicate how many times this file can be downloaded after a of downloads. Indicate how many times this file can be downloaded after a customer purchases it.
- Expiration Date. Indicate the date after which the file will no longer be available for sale. Expiration Date. Indicate the date after which the file will no longer be available for sale. When filling out this filefield, remember to write in the date as YYYY-MM-DD.
- Number of Days. Once your customer has bought the file from your store, you can limit the number of days he has until he can download his file. You must fill out this field in order to save your product.
Setting the Price of a
...
Product
The pricing section can be quite intimidating, with fields influencing each other and taxes to take into account.
Set the price that will appear in your store by following the instructions below.
...
:
- Pre-tax wholesale price” lets price. Enables you to instantly know your wholesale, factory price, and thus compare it to your selling price in order to easily calculate your profit.
- In the field “ Pre-tax retail price,” enter the . The price of your product before taxes.
- In the field "Tax rule", enter the . The tax applicable to the product. Choose between the different rates available.
To set the your tax rates, check out the Taxes section on page 86. The field “Retail Price with tax” will display in this guide. - Retail Price with tax. Displays the price of the product with taxes included. You can edit the this value, and it will automatically update the "Pre-tax retail price" field according to the tax rule that you chose.
- The field "Unit price with tax" enables . Enables you to conform to some local legislations that require products to be displayed with their unit price.
For instance, if you are selling a pack of 6 cans of soda, then you should fill this field with the price per can, and indicate "can" in the second field. The description on the same line will update accordingly. The "per" field can take any conapply to any unit of measurement, the most frequent ones being "liter", "fl oz", "pound", "kilogram", "gallon", etc.
To Display "on sale" icon. Check that box to show that your product is on sale, check the box labeled “Display “on sale” icon on both on the product page and in the text on the product listing. ” A logo An "On sale" icon will appear under the product’s file product. You can modify this logo by changing the following file:themes/prestashop/img/onsale_fr.gifgif
The final retail price, including the discount taken, will update as you type.
Note: You can fill out the field “retail "retail price with tax” tax" field and choose the tax rate of tax to apply, and the field will automatically calculate the pre-tax retail price. The opposite operation is also available.
Product Availability
This section enables you to manage the availability of your products.
- The "Initial stock" field represents . Represents the number of products available. If at this point you have already organized your products attributes and variations (i.e. colors, sizes, etc.), this field will represent combine all of the quantities of these variations.
- The "Minimum quantity" field is the minimal . The minimum number of item that the customer can buy. If set to 1, there is no minimal minimum quantity.
- The "Additional shipping cost" enables . Enables you to add a per-product shipping cost to the final order.
- The “Displayed Displayed text when in-stock” field enables stock. Enables you to display a message to your visitors when your product is in stock. It reassures them that your shop can immediately send them the product by showing, for example, the words “Item "Item available.”"
- On the contrary, if the item is not in stock, you can choose whether to allow orders or not using the the "When out of stock" selector.
If you do allow orders, then you can display a message to your visitors using the "Displayed text when allowed to be back-ordered" field.
You can also configure the general settings applied to all of your products. The default option is to deny orders, but this can be modified under the “Preferences” or “Products” "Preferences" or "Products" tabs, discussed further in the "Product Configuration" section.
Default Category and Catalog Display
The default category will be used when an article is filed under several categories.
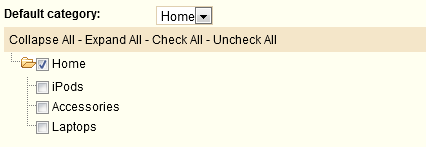
This serves mainly to clarify which category to use in case your customer arrives at your site from a search engine. The name of the category will appear in the product’s product's URL. For instance, "telephone" can appear under the category feature sub-categories of "brandbrands" (Apple, Samsung, Nokia, etc.) and also under the category of "characteristic" (smartphoneas well as "characteristics" (smart-phone, flip-phone, etc.).
| Tip |
|---|
Checking the "Home" box enables you to highlight the product on your shop's homepage, provided your theme supports it. To remove a product from the Featured list, simply uncheck the "Home" box. |
Listing Your Product
To improve your product listing as well as increase your store’s store's visibility we suggest that you carefully fill out the various SEO fields: meta titles, meta descriptions, and keywords and friendly URLs.
...
These fields allow you to directly optimize your catalog’s catalog's visibility on search engines
- “Meta title” is the title Meta title. The title that will appear on the search engines when a request is made by a customer
- “Meta description” is a Meta description. A presentation of the product in just a few lines, intended to capture a customer’s customer's interest. It This will appear in search results.
- “Meta keywords” are Meta keywords. Keywords that you must define in order to have your site referenced by search engines. You can enter several of them, separated by commas, as well as expressions, which must be indicated in quotation marks.
- The “Friendly URL” enables Friendly URL. Enables you to rewrite the addresses of your categories as you wish. For example, instead of having an address such as
http://www.mystoremyprestashop.com/category.php?id_category=3
you can have:
http://www.mystoremyprestashop.com/123-name-of-the-category .
In this case, all you would need to do is indicate in the “Friendly URL” "Friendly URL" field the words that you wish to see appear instead of “name"name-of-the-category” category" separated by dashes.
Adding a Product Description
There are two boxes dedicated to filling out a description. The first box Describing your product well is essential, both for the customer (the more information, the better) and search engines (it will help your shop appear in more search requests).
These two fields are here to fill out your product’s description.
The first field enables you to write a short description that will appear in search engines and in the category description for your product. This field is limited to 400 characters, and can only be written in plain text.
In the second boxfield, you can write a full description of your product, which will appear directly on your online storethe product page. The text editor offers a wide range of options for creating visually attractive descriptions (font, size, text color, etc.).
In the “tags” While the second form has no limits, there is such a thing as too much content: provide the essential information in a compelling way, and your product should be good to go.
In the "tags" field, add some terms and keywords that will help your customers easily find what they are looking for.
The “accessories” "accessories" field gives you the option of choosing relevant products to associate with this product. To suggest a product to your customers, type in the first letters of the product in question, select it, and then click on the green button to the right of the field.
Once you have filled out all this information save your work by clicking on “Save"Save,” " after which you will be sent to your catalog’s catalog's home page or by clicking on “Save "Save and Stay” Stay" to continue working on your product’s product's presentation When you have saved your work with “save "save and stay”stay", some new options will be displayed such as in the follwing following tabs: “3 Combinations”, “4 Features”, “5 Customization”, “6 Discounts”, “7 Attachments.”"Combinations", "Features", "Customization", "Discounts", "Attachments."
Configuring the Product Image
The second tab, "2 Images", is for including photos on your product page.
...
- To add one or more images to your product click the “Browse” "Browse" button , and then select a photo from your computer to upload.
- Write a file name in the “Caption” "Caption" field once you have uploaded the image.
This is the name that search engines will use to reference your product. You must thus give it a name that corresponds to the product description. This way, your product will appear with ease in search engine results. - Check the box that says “Cover” "Cover" if you want this uploaded image to be used as the default image, and appear automatically on the product page of your shop.
Once you have uploaded several images, you can choose to modify the image order by clicking on the arrows in the “position” "position" column and define a different cover image by clicking on the icons under the "cover image" column “cover image” (see bottom of the screenshot).
...
Configuring Product Attributes
You can add multiple attributes to your products. An attribute is a product variation. For example, the same product can have a multiple different color or a different size options. In PrestaShop, we call that a color or size attribute.these are known as "Attributes."
To access this feature you must click on the “Attributes "Attributes and Groups” Groups" tab under "Catalog".
Click on an attribute's row to have its values displayed with the table.
Managing attributes and varieties
To add a group of attributes, or in other words, to add a group of variation possibilities (colors, capacity, material, etc.), click on “Add "Add attributes group”group", fill out the form that appears, and save.
To add a choice to the group of attributes that you just created, you must create a specific variation.
Select the attribute group then click on “Add attribute” "Add attribute" and fill out the form that appears.
...
Fill out the value for your variation, then select the appropriate group from the drop-down menu into which it will belong.
To have a better understanding of this notion, a group of attributes an Attributes Group can be a color Color or a capacity Weight whereas the attributes themselves can be the color colors green, yellow, or brown, or a capacity weights of 4 pounds, 8 pounds, or 16 pounds. For example “size” is a group of attributes and “6 7 8 9 10” are this attributes in this group.
You can see in In the screenshot below, you can see how to edit an attribute: choose select the attribute that you want to modify, and a form appearswill appear.
Click on the "edit" icon on the left of the color you want to edit, and a new form appearswill appear:
Choose the HTML color or upload a photo from your computer (if you’re you are displaying textures instead of colors, for exampleinstance). The HTML colors color will then be replaced by the photo of the texture.
Managing Quantity Discounts
You have the possibility to use a system that changes the total price of a sale depending on the quantity of products your customer buys. For this option, click on tab number 3 of the product filethe "Prices" tab, and the “Prices” price table will appear.
Click "Add a New specific price", and a form appears. Complete Fill it out and click on “Add "Add quantity discount”discount".
- The first row of selectors enables you to be very specific about the various groups to which this price applies to, with including currencies, countries and even your custom customer groups (which we'll talk about later on).discuss in a later chapter).
By default, PrestaShop will only display the installed currencies, countries and groups. If you need more of each, you must respectively go to Payment > Currencies, Shipping > Countries, and Customers > Groups. - You can define a ranger range of dates between which the price is active , using the second row. Clicking each selector will open a calendar, so as to ease simplifying the process.
Wiki Markup - The "Product price" enables you to set an arbitrary price, independent of calculations and previous prices. Keep this field to at "0" to use the default price.
- The "Apply a discount of" is the . The discount that will be applied once the quantity is selected. Use the selector to set the type of discount (either an a specific amount in the default currency, or a percentage of the default price).
Once you have chosen your values click on “Add”"Add": the summary of your discount model appears below. If you wish to delete a value, click on the red cross on "X" in the table.
At this point, you have finished adding your product file, and here it is available in your boutiqueshop! If you chose to start the specific price at 1 unit, the discount is immediately visible on the product's page.
Either way, any discount appears within at the bottom of the product's page.
!_Images^027b-catalog-productDiscountInStore|border=1!
Adding Product Combinations
...
Manual method
Adding different variations to your product takes a few steps. Before proceeding, you must already have already created the necessary groups of attributes and the attributes themselves. Once this is done, click on tab number 4 “Combinations ” and the following named "Combinations", and a creation form will appear.
- From the drop-down menu choose a group of attributes, such as “Colors” "Colors" for example
- Choose the attribute that you would like to include, for example “blue”"blue"
- Click on “Add” "Add" and it will appear in the selector
- If the attribute has an impact on the product’s product's price, go to the "Impact on price" drop-down menu and choose “Increase” or “Reduction”"Increase" or "Reduction". Text fields appear with the menu's row, for you to indicate said change
- If the attribute impacts the weight, the process is identical.
- Next, fill out the different fields such as reference, quantity, etc.
...
If you would like to make this the default combination (attribute + product), check the box labeled “make "make the default combination for this product”product".
Finally, click on “Add this Combination” "Add this Combination" in order to save it. It will appear in the attributes list, like below:.
*Note:
| Tip |
|---|
In this example, an attribute has been associated: "color". If you wish to add several attributes, you just need to add one attribute and then a second attribute. When you click |
...
"Add", the two attributes will be added. |
...
Advanced method
If you have too many different products or varieties you can use the “Product "Product Combinations
Generator.” " This function allows you to automatically generate all of the variations and possibilities.
Clicking the "Product combinations generator" ...
... will take you to the complete form:.
Note: a
| Info |
|---|
A warning window might appear, saying "Are you sure you want to delete entered product information?" This means your product already had |
...
some combinations created. If you agree to this, this will delete the already existing |
...
combinations. Be careful! |
On the right side of this page is are your groups of attributes. Select the varieties by clicking on their name. If you'd like to select several of them at the same time, hold the CTRL Ctrl key while clicking. Then click on “Add”"Add".
For example, in the screenshot aboveour example, you can select the attributes "Blue", "Green" and "32 Go".
Once the varieties have been selected, insert the quantity of each product in the "Quantity" field at the top. Be careful, it needs to be the same for every combination. For instance, 200 products in each combination = 2 colors * 1 disk size * 200 = 400 products in all.
You may add a reference if it serves your administrative needs.
Click the "Generate" button, and tables will appear below for each combination, enabling you to edit their possible specific prices.
Finally, the combination generator helps you save some time when you have numerous attributes to assemble, such as sizes and materials. It automatically creates all of the possible associationscombinations, which will then appear under the product file's "Combinations" tab named “Combinations.”
If you don’t no longer want to have generated combinations, you can delete or modify them.
Configuring Product Features
The fifth next tab, named "Features" is where you specify your products’ products' features (i.e. weight, material, country of origin, etc.). When you create features and values (i.e. wool knit and micro-fiber materials), you assign them to the products when it is appropriate. This means that you do not have to fill out the features fields for each of your products but instead simply fill in the necessary values and apply them later. However, be aware that contrary to the combinations, these values do not change, and are valid for the general product.
Create a feature
To create a feature as well as its values, click on the tab under Catalog that is labeled “Features”"Features". Click on “Add "Add a Feature” Feature" for example, to add the types of headphones provided with a music player.
...
Give a name to this news feature, and click "Save".
Create a value
To add a value to the feature, either go back to the previous page, or go the the "Features" sub-ab tab of the "Catalog" tab.
In either case, click on “Add "Add a new feature value”value".
In the drop-down menu, choose the feature to which you would like to add a value, enter its contents, and click Save. For example, if you select the "Weight" feature as illustrated above, you can add feature values such as 1 lb, 2 lbs, 3 lbs, etc.
Assign a value and feature to a product
Finally, go back to the “Features” "Features" tab for your product (not the Catalog/Features sub-tab!) and choose the feature you want to add from the drop-down menu. Click on “update "update features.”"
We have just created features as well as values to for them. You can now return to the product of your choice, and add features and values.
If a feature does not have any value assigned to it, then it will not appear in the be visible on your store.
Enter a Customized Value
If you want to indicate a value that has not been configured beforehand, you can add it directly in the “Customized” "Customized" field
Managing Customization
Your PrestaShop online store software offers your customers the chance to customize the product that they will buy.
Example: You are a jewelry retailer and your customers have the possibility to engrave their jewelry with a text or an image. Your customers can request the text or the image when they place their order.
Let’s Let's look at how to configure this function. In the tab 6, "Customization" tab, you can indicate what type of field context (file or text) can be personalized.
- Use “File Fields” "File Fields" to indicate the number of files that you are going to receive and want to display.
- If your customer is sending you text, then modify the value in “Text "Text Fields.”"
The number you write in these fields corresponds to how many of them will appear on the product page of your online store.
In our example, we are going to modify the two values by writing “1” "1" in each of the fields. Once this is done, click “Update "Update Settings.” " It will then look like this:
- In Files File Fields, indicate what type of file must be sent (i.e. “Image "Image to engrave”engrave"). Click the box labeled “Required” "Required" if this element is necessary to validate the purchase.
- In Text Field, indicate what type of content must be filled out by your customer (i.e. "Text to engrave"). Click the box labeled “Required” "Required" if this element is necessary to validate the purchase.
Once this is done, click on “Save "Save labels.” " You should know now see the following it appear in the lower part of the screen:.
The advantage of this function is that it offers your customers a personal service, which they will without a doubt appreciate!
Managing Attachments
PrestaShop enables you to make some files available to your customers before their purchase.
For example, let's say you sell electronics, and you would like to advise urge your customers to read a document on how a product works. You can upload a document for that purpose.
First, click on the seventh tab for your product, “Attachments”"Attachments".
- Fill out the name of your attachment.
- Give it a quick description then click on “Browse” "Browse" to select a file on your computer to upload.
- Click on “Add "Add a new attachment file”file".
- The attachment is uploaded, and the page reloads, with the attachment appearing in the "Available attachments" selector.
- Select your attachment and click "<< Add" to add to the current product.
- Click "Update attachments". The message "Update successful" should appear at the top: you're done!.
Now the "Download" tab “Download” will appear in your online store , and you can look at the your customers can download that file that you just saved. See the screenshot below.
You can view all of your store's attachments (and add more) by clicking the "Attachments" sub-tab, under the "Catalog" tab.
...