...
| Info |
|---|
You may choose to not create any category, and have all products grouped into a single global category, "Home". But then customers won't be able to compare products. You may also decide that you are not interested in the comparison feature, et would rather build your categories freely. In that case, you should disable de comparison feature: go the product preference page, et and put 0 for the "Set the maximum number of products that can be selected for comparison |
...
The two forms are almost identical, in that the second one only has two additionnal additional fields to choose which should be the parent category, and whether that new category should be the new root one.
...
- Meta title. The title that will appear on the search engines when a request is made by a customer
- Meta description. A presentation of your category in just a few lines, intended to capture a customer's interest. This will appear in search results
- Meta Keywords. Keywords that you must define in order to have your site referenced by search engines. You can enter several of them, separated by commas, as well as expressions, which must be indicated in quotation marks.
- Friendly URL. Enables you to rewrite the addresses of your categories as you wish.
For example, instead of having an address such as http://www.myshop.prestashop.com/category.php?id_category=3, you can have http://www.myshop.prestashop.com/123-name-of-the-category.
In this case, all you would need to do is indicate in the field marked "Friendly URL" the words that you wish to see appear instead of "name-of-the-category" separated by dashes. - Group access. Restricts access to the category and its products to certain shoppers. To see these categories, your shoppers must belong to a user group. Check out the "Groups" page in the "Customers" tab menu for more information.
Once you have finished configuring your category, save it, and you are ready to fill it with products.
...
- Delete this product. Removes all the data for the current product, including its images, combinations, features, etc.
- Duplicate. Creates an exact copy of the current product. This is very useful when you'd rather use the current product's data as a template for another new product, and not have to create every data of the new product by hand. For instance, two products might be very different, but could share the same associations, carriers or supplier settings.
Note If you need to create different versions of the same product, because of its variety of colors, capacity, size, etc., then you should create product combination for the current product rather than duplicating it X times. See the "Combinations" tab on the left, which is explained in the "Adding Product Combinations" section of this chapter.
- Preview. Displays the front-page page of your product. This is very handy, as it works even if the product is disabled ("Information" tab).
- Product sales. Redirects you to the "Product detail" page of the statistics dashboard ("Stats" tabmenu), which gives you a graphic of both the visits to this product's page, and also its sales.
...
You can changes the total price of produit the product depending on the quantity of products your customer buys, the user group, the country, etc. This is done using the "Specific prices" option of the "Prices" tab.
...
- For. This enables you to be very specific about the various groups to which this price applies, including currencies, countries and even your customer groups (which we'll discuss in a later chapter).
- Customer. You can choose to be even more specific and directly set at who the discount you are creating is targettedtargeted. Start typing the first letters of the clients' first name or last name, and select the ones you want.
- Available from. Here you can define a range of dates between which the discount price is active. Clicking each selector will open a calendar, simplifying the process.
Wiki Markup *Starting at \[\] unit*. Contains the value from which the discount should be applied. Default is "1", which means any quantity.
- Product price (tax excl.). This is where you can set an arbitrary price, independent of calculations and regular prices. Keep this field at "0" to use the default price.
- Leave the default price. Check this box to reset the "Product price" field and prevent yourself to edit from editing it.
- Apply a discount of. The discount that will be applied once the client has chosen a quantity of product. Use the selector to set the type of discount (either a specific amount in the default currency, or a percentage of the default price).
...
| Info | ||
|---|---|---|
| ||
In PrestaShop 1.4, there used to be a "Color picker" form at the bottom of the list of combinations, where you could choose to display a color picker or not on the product page. In PrestaShop 1.5, this option has been moved and improved. When creating a new attribute (in the "Catalog" tabmenu, "Attributes & Values" page), you can use the "Attribute type" drop-down list to choose whether the front-page should display it as a drop-down list, a radio button list, or a color picker. |
...
If you have too many different products or varieties you can use the "Product Combinations Generator." This tool allows you to automatically generate all of the variations combinations and possibilities.
Clicking the "Product combinations generator" takes you to the complete form.
...
As you can see, the combination generator helps you save a lot of time when you have numerous attributes to assemble, such as sizes and materials. It automatically creates all of the possible combinations, which will then appear under the product's "Combinations" tab (if the theme supports it).
If you do not want to keep all generated combinations or if they are in fact not all exactly the same (different references, prices, available dates...), you can delete (trashcan icon) or modify them (file icon). The yellow star icon turns the selected combination into the default one.
Managing Product Quantities
This is a new tab in PrestaShop 1.5. You previously had to manage quantities either in the "Information" tab, or within the "Combinations" tab if you have any product varieties. This is all now managed in a single page.
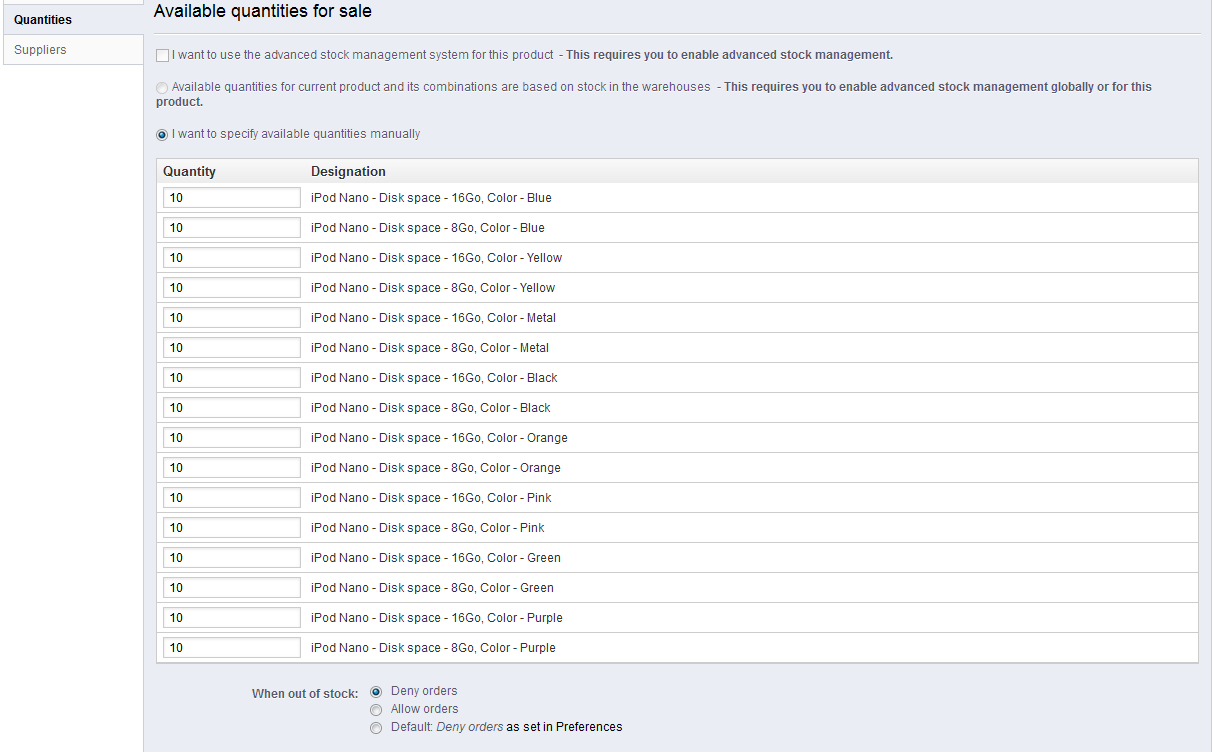
The way it works is quite easy: the page presents you with a table of all the combinations for the current product (if there are no combinations, the table simply has a single row). It is up to you to set the initial stock for all the combinations. PrestaShop will use this to determine when a product is soon out-of-stock or unavailable anymore.
Stock Management Options
The quantities page supports the stock management features, if activated. This means that if the current product's combinations are distributed among several storage locations, PrestaShop is able to handle the exact location of each combination, even with a given warehouse.
To use advanced stock management for the current product, you must first enable the feature for the whole shop: go to the "Products" preference page (under the "Preferences" menu), and in the "Products stock" section, select "Yes" for the "Enable advanced stock management" option.
Once the feature is globally enabled, you can enable it for the current product by checking the checkbox for "I want to use the advanced stock management system for this product".
By default, you have to manage the current product's quantities by hand, for each combination, from this page. With the stock management feature activated, you can rely on PrestaShop's stock management feature to handle this.
Once the checkbox has been clicked, an option becomes available: "Available quantities for current product and its combinations are based on stock in the warehouses". Click it, and you cannot edit the current product's quantities from the "Quantities" page: it has new become dependent of your stock management.
Availability Settings
At the bottom of the page, you can set the exact behavior of PrestaShop depending on the availability of the current product.
- Displayed text when in-stock. Enables you to display a message to your visitors when your product is in stock, for example "Item available". It reassures them that your shop can immediately send them the product.
- On the contrary, if the item is not in stock, you can choose whether to allow orders or not using the "When out of stock" selector. If you do allow orders, then you can display a message to your visitors using the "Displayed text when allowed to be back-ordered" field.
You can also configure the general settings applied to all of your products. The default option is to deny orders, but this can be modified under the "Products" preference ("Allow ordering of out-of-stock products" option), which is fully explained in the "Understanding the Preferences" chapter of this guide.
Configuring the Product Image
...
The "Images" tab on the left is for including photos on your product page. You should upload all the images for this product, including all the available variations existing combinations of this product (color, size, shape, etc...).
To add one or more images to your product:
- Click the "Upload an image" button and then select a photo from your computer to upload. The upload starts automatically.
The default maximal size for an image file is 128 kb (131,072 bytes)set by PrestaShop according to your server's PHP settings. This size can be changed lowered in the "Images" preference page, "Product images" section. - Uploaded The uploaded images appear in a table below the button. If you want this uploaded image have more than one image, you can choose which image is to be used as the default/cover image by clicking on the red "no entry" button and turn it into a green checkmark. That cover image will also appear automatically on the product page of your shop, click on the red button.
Once you have uploaded several images, you can modify the image order by drag-and-dropping each table row when the mouse cursor changes to a "movable" cursor.
...
| Info |
|---|
PrestaShop comparison engine entirely relies on product features: this is what gets compared. Since Also, since product comparison also works on a per-category basis, this means that basically, you should make sure that all the products in a given category do share the same features, with various values to be compared between each other. |
...
Before adding a feature to a product, you must create it for general use in your shop. You either go to the "Features" page of the "Catalog" tabmenu, or directly click on the "Add a new feature" button. A warning will appear, "You will lose all unsaved modifications, do you want to proceed?" – make sure all your changes are saved before validating.
...
In the current product's "Features" pagetab on the left, a table is displayed, listing all of your shop's features. Not all of them pertain to this product: PrestaShop will only take as relevant the features where you actually set a value.
You can either set a value manually, in the field on the far right a feature's row, or you can use one of the pre-defined values (as set when creating the feature) if there are any available.
If no value is available for a feature, the mention "N/A" appears (short for "not available" or "non not applicable"), followed by a "Add pre-defined values first" button.
...
Remember: If a feature does not have any value assigned to it, it will not be taken into account for this product, and will not be visible on your shop.
Managing Customization
...
Now the "Download" tab will appear on the product's page (if the theme supports it), and your customers can download the file(s) that you just uploaded.
...
You can view all of your store's attached files, add some more and remove some, by going to the "Attachments" page under the "Catalog" tabmenu. This also makes it possible to use the attachments that you already uploaded for other files: if you need to apply the associated one file with many products, you will thus only have to upload it once.
Managing Product Quantities
This is a new tab in PrestaShop 1.5. You previously had to manage quantities either in the "Informations" tab, or within the "Combinations" tab if you have any product varieties. This is all now managed in a single page.
The way it works is quite easy: the page presents you with a table of all the combinations for the current product (if there are no combinations, the table simply has a single row). It is up to you to set the initial stock for all the combinations. PrestaShop will use this to determine when a product is soon out-of-stock or unavailable anymore.
Stock Management Options
The quantities page supports the stock management features, if activated. This means that if the current product's combinations are distributed among several storage locations, PrestaShop is able to handle the exact location of each combination, even with a given warehouse.
To use advanced stock management for the current product, you must first enable the feature for the whole shop: go to the "Products" preference page (under the "Preferences" tab), and in the "Products stock" section, select "Yes" for the "Enable advanced stock management" option.
Once the feature is globally enabled, you can enable it for the current product by checking the checkbox for "I want to use the advanced stock management system for this product".
By default, you have to manage the current product's quantities by hand, for each variation, from this page. With the stock management feature activated, you can rely on PrestaShop's stock management feature to handle this.
Once the checkbox has been clicked, an option becomes available: "Available quantities for current product and its combinations are based on stock in the warehouses". Click it, and you cannot edit the current product's quantities from the "Quantities" page: it has new become dependent of your stock management.
Availability Settings
At the bottom of the page, you can set the exact behavior of PrestaShop depending on the availability of the current product.
- Displayed text when in-stock. Enables you to display a message to your visitors when your product is in stock. It reassures them that your shop can immediately send them the product by showing, for example, the words "Item available."
- On the contrary, if the item is not in stock, you can choose whether to allow orders or not using the "When out of stock" selector. If you do allow orders, then you can display a message to your visitors using the "Displayed text when allowed to be back-ordered" field.
You can also configure the general settings applied to all of your products. The default option is to deny orders, but this can be modified under the "Products" preference, which is fully explained in the "Understanding the Preferences" chapter of this guide.
Setting the Product's Supplier
Indicate Indicating the product's supplier is not really important to your customers (very much less so than its manufacturer in any case). Still, it may turn out to be an essential part of your own internal management, not the least when managing your stock: you simply need to know who you bought the product from. The supplier of the current product is to be set from the "Suppliers" tab on the left.
...
| Info |
|---|
You cannot use this feature if you do not already have at least one supplier registered in your shop. Suppliers are created from the "Suppliers" page, under the "Catalog" menu. The complete supplier registration process in explained in details in the next chapter of this guide, "A Look Inside the Catalog". |
...
| Info |
|---|
You cannot use this feature if you do not already have at least one warehouse registered in your shop. Warehouses are created from the "Warehouses" page, under the "CatalogStock" tabmenu. The complete warehouse registration process in explained in details in another chapter of this guide, "Managing Stock". |
The "Warehouses" tab presents you with a table that enables you to set the precise location for each product combination (if any) in each storewarehouse. If you have registered more than one warehouse, the table only shows the first one by default, the others being closed by default. Click on a warehouse's name in order to open its sub-table, and close the others.
...
| Info |
|---|
You cannot currently add combinations or virtual products to a pack. |
The process to do this create a pack is similar to the one for creating a simple regular product:
- Go to the "Product" page, under the "Catalog"
...
- menu.
- Click the "Add New" button.
- From the "Information" tab on the left, change the product type to "Pack".
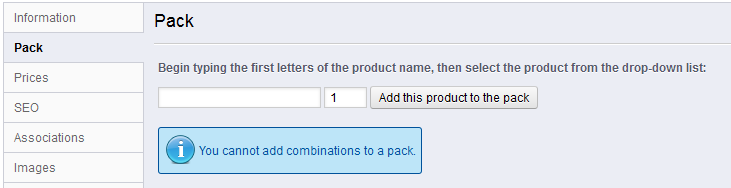
A new tab appears on the left, titled "Pack", to which you are redirected as soon as you change the product type. This tab only features two text fields and a button:
- The first field is used to search for products that are already registered in your shop;.
- The second field is used to indicate the quantity of chosen product should be added to the pack;.
- The button adds the product to the pack.
...
Once you are done with the "Pack" tab, you can edit the content of all the other available tabs as if you would for a regular product.
...
- Go to the "Product" page, under the "Catalog" tabmenu.
- Click the "Add New" button.
- From the "Information" tab on the left, change the product type to "Virtual Product".
...
The new tab only features two radio buttons one option at first: it asks if the virtual product you are creating has a file attached (i.e., if your customer will pay to download something).
...