...
| Tip |
|---|
When adding your first product, you should first start with a clear plan:
You can start adding products with minimal information and edit them at will, but before launching your shop, you should at least have this information written down. |
...
| Info |
|---|
You may choose to not create any category, and have all products grouped into a single global category, "Home". But then customers won't be able to compare products. You may also decide that you are not interested in the comparison feature, et would rather build your categories freely. In that case, you should disable de comparison feature: go the product preference page, et put 0 for the "Set the maximum number of products that can be selected for comparison |
Categories are managed in the "Categories" page of the "Catalog" menu.
...
To create a category, click on the "Add new root category" button and fill out the form.
.
To create a sub-category for any category (even the root one), click on the "Add new" button.
The two forms are almost identical, in that the second one only has two additionnal fields to choose which should be the parent category, and whether that new category should be the new root one.
| Tip |
|---|
Make sure to fill each field in every language that your shop supports. In order to do that, click on the little flag next to the field, and choose the flag of the language in which you wish to edit the text. |
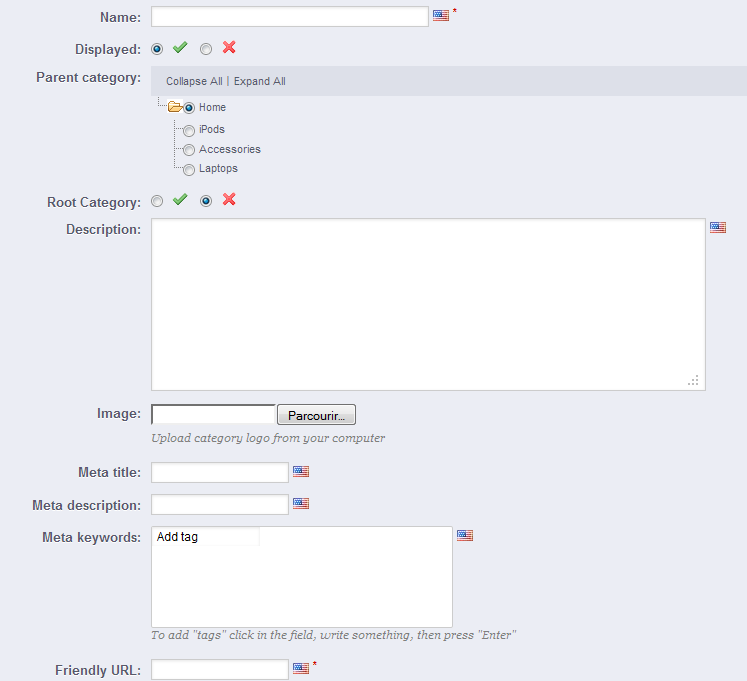
First of all, you must enter a set of general optionsinformation:
- Name. Give your category a name, then indicate if it is "displayed" (i.e., whether or not it will be available to your customers). For example, you may want to postpone displaying a new category to your customers because you have not quite completed it.
- Parent Category. If you wish to create a subcategory belonging to a category other than the home page, choose the category under which it will appear.
- Root Category. You might want to use this new category as the new root category, instead of "Home". If so, check the radio button that applies.
- Description. You should fill this field, because not only will it be useful to you or your employees, but some themes might also make use of it, displaying it to your customers.
- Image. Click on "Browse" to upload an image from your computer which will represent this category.
Then, the form presents you with a few Search Engine Optimization (SEO) fields. This information will help you optimize improve the visibility of your catalog on search engines.
- Meta title. The title that will appear on the search engines when a request is made by a customer
- Meta description. A presentation of your category in just a few lines, intended to capture a customer's interest. This will appear in search results
- Meta Keywords. Keywords that you must define in order to have your site referenced by search engines. You can enter several of them, separated by commas, as well as expressions, which must be indicated in quotation marks.
- Friendly URL. Enables you to rewrite the addresses of your categories as you wish.
For example, instead of having an address such as http://www.myshop.prestashop.com/category.php?id_category=3, you can have http://www.myshop.prestashop.com/123-name-of-the-category.
In this case, all you would need to do is indicate in the field marked "Friendly URL" the words that you wish to see appear instead of "name-of-the-category" separated by dashes. - Group access. Restricts select categories and access to the category and its products to certain shoppers. To see these categories, your shoppers must belong to a user group. Check out the "Groups" page in the "Customers" tab for more information.
...
The Product Page Global Buttons
When you create a give your new product a name, the product page features three buttons at the top:
...
As soon as you save your product, using either the "Save" or the "Save and stay" button, more buttons appear in the product page:
- Delete this product. Removes all the data for the current product, including its images, combinations, features, etc.
- Duplicate. Creates an exact copy of the current product. This is very useful when you'd rather use the current product's data as a template for another new product, and not have to create every data of the new product by hand. For instance, two products might be very different, but could share the same associations, carriers or supplier settings.
Note: if
Note If you need to create different versions of the same product, because of its variety of colors, capacity, size, etc., then you should create product combination for the current product rather than duplicating it X times. See the "Combinations" tab on the left, which is explained in the "Adding Product Combinations" section of this chapter.
- Preview. Displays the front-page page of your product. This is very handy, as it works even if the product is disabled ("InformationsInformation" tab).
- Product sales. Redirects you to the "Product detail" page of the statistics dashboard ("Stats" tab), which gives you a graphic of both the visits to this product's page, and also its sales.
...
The first tab contains the essential basic information about the product.
...
- Name. The first thing to complete is the product name, which will appear in the search engine results. Next to the field you will find a flag, which enables you to choose the language into which you wish to edit or create the name.
Info You must give the product a name in at least the default language before you can save it. You won't be able to save until it has a name – and many other tabs require the product to be saved in order to be accessible.
- Reference. This is your own internal reference. It might be a number, or its reference from the storage location or its supplier, or anything that makes it unique. Optional.
- EAN13 or JAN. These are barcode numbers, which are used worldwide in order to identify products. You can use either an EAN13 or a JAN number.
- An EAN13 is the product's 13-digit international article number. Read more on Wikipedia: http://en.wikipedia.org/wiki/International_Article_Number_%28EAN%29.
- A JAN is specific to Japan, but is compatible with the international EAN. Read more on Wikipedia: http://en.wikipedia.org/wiki/Japanese_Article_Number.
- UPC. A 12-digit barcode, more widely used in North America, UK, Australia and New-Zealand. Read more on Wikipedia: http://en.wikipedia.org/wiki/Universal_Product_Code.
On the right side are four options:
...
| Tip | ||
|---|---|---|
| ||
PrestaShop 1.4 enabled you to indicate the product manufacturer right on this page. In version 1.5, this setting is to be found in the "Associations" tab on the left. Same for the "Default category" field, the associated categories associations, and the "Accessories" field. Version 1.4 also enabled you to indicate the size and weight of the final package. In version 1.5, these settings are to be found in the "Shipping" tab on the left. The "Location" field of version 1.4 " can be found in the optional "Warehouses" tab on the left, which is only available if you have enabled Advanced Stock Management ("Preferences" tabmenu, "Products" page, "Products stock" section). |
...
- Pre-tax wholesale price. Enables you to instantly know your wholesale, factory price, and thus compare it to your selling price in order to easily calculate your profit.
- Pre-tax retail price. The price of your product before taxes.
- Tax rule. The tax applicable to the product. Choose between the different rates that you have registered.
If you need to create new tax rates, click the "Create" button. Tax creation is done in the "Localization" tabmenu, "Taxes" page; it is fully explained in the "LocalizationUnderstanding Local Settings" chapter of this guide. - Eco-tax (tax incl.). The value of the ecotax for this product. This value is already included in your retail price. You are supposed to declare that tax to your country's tax agency.
Note that this field is not displayed by default. If you have to include an ecotax, you must first enable it: go to the "Localization" tabmenu, "Taxes" page, "Tax options" section (bottom of the page), and choose "Yes" for the "Use ecotax" option. - Retail Price with tax. Displays the price of the product with taxes included. You can edit the value, and it will automatically update the "Pre-tax retail price" field according to the tax rule that you chose.
- Unit price. Enables you to conform to local legislations that require products to be displayed with their unit price.
For instance, if you are selling a pack of 6 cans of soda, then you should fill this field with the price per can, and indicate "can" in the text field. The description on the same line will update accordingly. - Display "on sale" icon on product page and text on product listing. Check that box to show that your product is on sale, both on the product page and in the text on the product listing. An "On sale" icon will appear under the product. You can modify this logo by changing the following file:
themes/prestashopdefault/img/onsale_fren.gif - Final retail price. This price, including the discount taken, will update as you type.
...
You can changes the total price of a sale produit depending on the quantity of products your customer buys, the user group, the country, etc. This is done using the "Specific prices" option of the "Prices" tab.
...
- For. This enables you to be very specific about the various groups to which this price applies, including currencies, countries and even your custom customer groups (which we'll discuss in a later chapter).
- Customer. You can choose to be even more specific and directly set at who the discount you are creating is targetted. Start typing the first letters of the clients' first name or last name, and select the ones you want.
- Available from. Here you can define a range of dates between which the discount price is active using the second row. Clicking each selector will open a calendar, simplifying the process.
Wiki Markup *Starting at \[\] unit*. Contains the value from which the discount should be applied. Default is "1", which means any quantity.
- Product price (tax excl.). This is where you can set an arbitrary price, independent of calculations and previous regular prices. Keep this field at "0" to use the default price.
- Leave the default price. Check this box to reset the "Product price" field and prevent yourself to edit it.
- Apply a discount of. The discount that will be applied once the quantity is selectedclient has chosen a quantity of product. Use the selector to set the type of discount (either a specific amount in the default currency, or a percentage of the default price).
Once you have chosen your values click on "Save and stay": the summary of your discount model settings appears below. If you wish to delete a value, click on the trashcan icon in the table.
...
- Meta title. This is the most important field, as the title that will appear on all search engines. Be very factual: you must convince the search engine user to click your link, not one from another site. Make sure the title is unique to this product within your site.
- Good example: "Levi's 501® Original Jeans - Tidal Blue - Original Fit".
- Bad example: "Item #02769869B bestseller".
- Meta description. A presentation of the product in just a couple lines (ideally, less than 155 characters), intended to capture a customer's interest. This will appear in results for some search engines, depending on the search request: some search engine might choose to display the searched keywords directly in the context of the page content. Make sure the description is unique to this product within your site.
- Meta keywords. You can enter several of them, separated by commas, as well as expressions, which must be indicated in quotation marks. For instance: trousers, denims, "blue jeans", jeans.
- Friendly URL. This is another extremely important field. It enables you to rewrite the web addresses of your products as you wish. For example, instead of having an address such as
http://www.myprestashop.prestashop.com/categoryindex.php?id_category=3product=8&controller=product
you can have:
http://www.myprestashop.prestashop.com/1238-name-of-the-categoryproduct.
In this case, all you would html.
All you need to do is indicate in the "Friendly URL" field the words that you wish to see appear instead of "name-of-the-category" the default name, separated by dashes.
The "Generate" button makes it easy to produce a proper friendly URL based on the product name. Once generated, you can edit the URL produced if necessary.
...
The "Associated categories" section enables you to select in which category the product should appear. You can select more than one, but keep in mind that it is better for the customer if the category only contains equivalent and comparable products. Therefore, you should prevent from selecting root categories, and prefer child categories.
For instance, the "telephone" category can feature sub-categories of "brands" (Apple, Samsung, Nokia, etc.) and as well as "characteristics" (smart-phone, flip-phone, etc.). It is up to you to indicate the category most useful to your customers.
If you feel you need to add a category, save the current state of your product before clicking the "Create new category" button. Category creation is explained at the start of this chapter
...
The "Accessories" field gives you the option of choosing relevant products to associate with this product. To suggest a product , to suggest them to your customers , type when the visit the product's page (if the theme supports it). Type in the first letters of the product in question and select it. The product is then added at the bottom of the field.
You can associate a product with as many other products as you deem necessary. Click on the trashcan icon to delete the product association.
An association goes one way only: the associated product will not feature an association to the current product in its setting page.
| Tip |
|---|
Accessories addition/removal is not automatically saved! Do not forget to click on the "Save" button. |
...
A product can only be associated with one manufacturer. Choose one in the dropdown menu, or create a new manufacturer if it is needed (but do save your current product before clicking the "Create a new manufacturer" button).
Manufacturer creation is explained in the next chapter, "A Look Inside the Catalog".
Configuring the Product Image
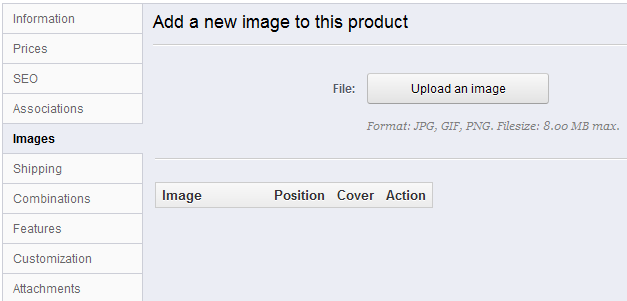
The "Images" tab on the left is for including photos on your product page. You should upload all the images for this product, including all the available variations of this product (color, size, shape...).
To add one or more images to your product:
- Click the "Upload an image" button and then select a photo from your computer to upload. The upload starts automatically.
The maximal size for an image file is 128 kb (131,072 bytes). This size can be changed in the "Images" preference page, "Product images" section. - Uploaded images appear in a table below the button. If you want this uploaded image to be used as the default/cover image and appear automatically on the product page of your shop, click on the red button.
Once you have uploaded several images, you can modify the image order by drag-and-dropping each table row when the mouse cursor changes to a "movable" cursor.
...
Evaluating Shipping Cost: Size, Weight, Carrier
Shipping costs are not be neglected: they can easily double the final cost of an order, and you should be very upfront about them – customers hate bad surprises.
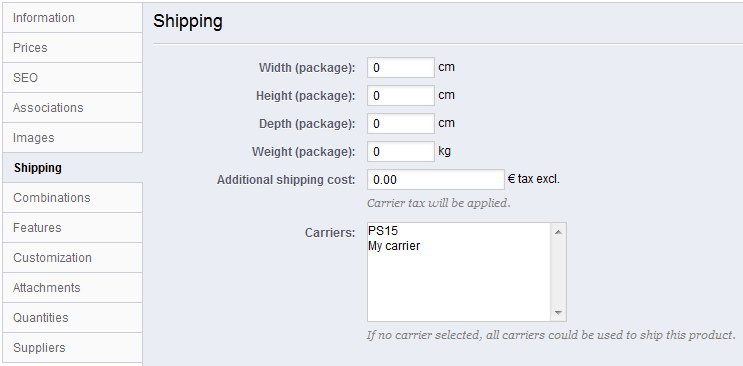
The "Shipping" tab on the left enables you to give some precious details about your product's package:
- Width, Height, Depth & Weight. You should strive to fill each field, because knowing the exact size and weight of a package is not only useful to you, but PrestaShop can also direct specific sizes/weights to specific carriers automatically, based on these settings. Once PrestaShop (or the customer) has selected a carrier, the order's final price will appear to the customer.
- Additional shipping costs. This can prove very useful to you, for instance for product that are particularly tricky to package, or really heavy.
- Carriers. You can choose to have the current product only be shipped by one specific carrier. You can even choose two or three: press the Shift key while clicking on a carrier name to add it to the selection.
...
| Info | ||
|---|---|---|
| ||
Combination quantities are managed from the "Quantities" tab on the left, which is a new feature of PrestaShop 1.5.
When creating a virtual product (see further below), you can now upload a different file for each combination. In PrestaShop 1.4, you had to pack all combinations into a single Zip file, and have the customers download all combinations. |
...
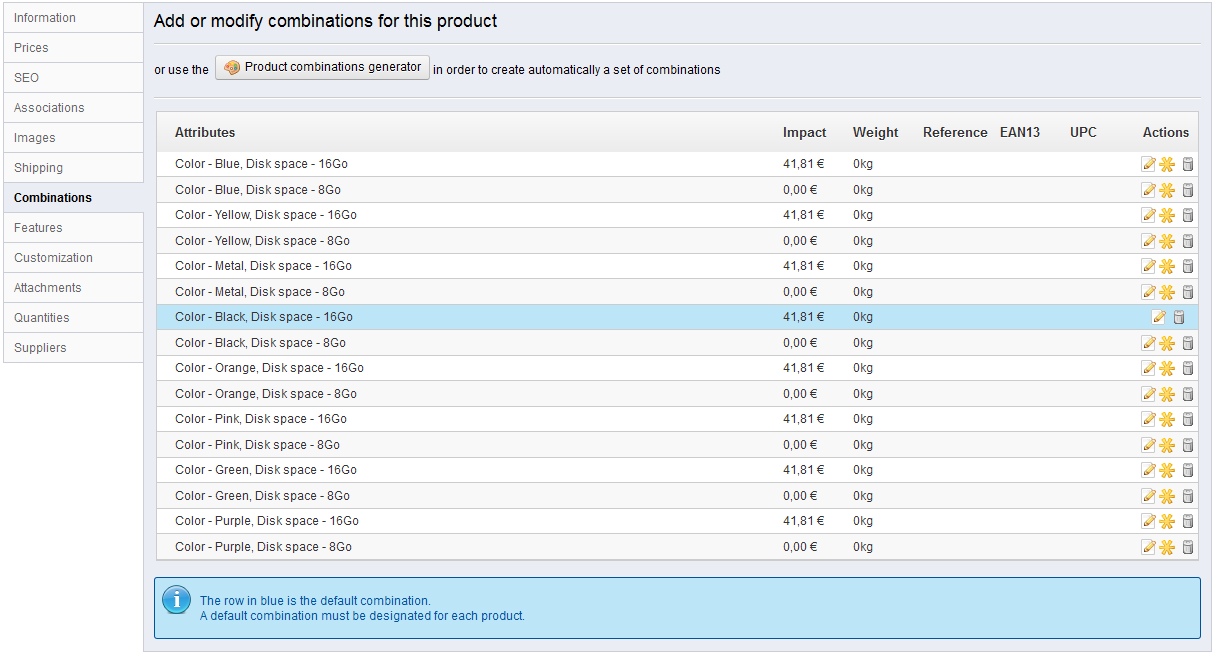
This method helps you create combinations one after the other. Therefore, so it is to be reserved to either products with few combinations, or products with very specific combinations that can't be created reliably using the automatic method (see next section).
...
Adding a new variation to your product takes just a few steps. Click on the "New Combination" button, in the top
...
of the page, next to to the "Save" button. A form will appear:
- Attribute-value pair.
- From the drop-down menu choose a group of attributes, such as "Color" for example
- Choose the attribute value that you would like to include, for example "Blue".
- Click on the "Add" button and it will appear in the selector.
You can add as many attribute-value pairs as necessary to one combination.
You can only add one pair per type of attribute to one combination: it is impossible to have both "Color: Blue" and "Color: Red" in your pairs; if this is necessary, you will have to create new attributes, for instance "Primary color" and "Secondary color".
You can delete an attribute-value pair by selecting it and clicking on the "Delete" button.
- Reference, EAN13 & UPC.
- If necessary, indicate the combination's reference, EAN13 and/or UPC numbers into each field, as if you were creating a brand new product in PrestaShop. These numbers may be used by your warehouse or your carrier, so make sure to fill these fields, they are often essential to your business.
- Wholesale price. This field is useful if the original price of the product changes simply because this is a combination.
- Impact on original product. If the combination is supposed to have an impact on the product's price/weight/unit price, choose the appropriate dropdown menu, select "Increase" or "Reduction" depending on the context, and fill the field that appears with the value of that impact.Wholesale price. This field is useful if the original price of the product changes simply because this is a
- Ecotax. The specific ecotax for this combination.
- Minimum quantity. You might prefer this combination to only be sold in bulk. Use this field to set the number of items to be sold in bulk.
- Available date. If this is a temporary or promotional product combination, you can indicate the date at which this product should not be available for sale anymore.
- ImagesImage. The images that are linked to the whole original product (as uploaded using the form in the "Images" tab on the left) are displayed. Check the box for the images that best represent this combination.
- Default. Check this box if you want the current combination to actually be the main product.
When you have set all of the combination's details, save your product changes using the "Save and stay" button. Your combination will appear in the attributes list at the bottom of the screen.
| Info | ||
|---|---|---|
| ||
In PrestaShop 1.4, there used to be a "Color picker" form at the bottom of the list of combinations, where you could choose to display a color picker or not on the product page. In PrestaShop 1.5, this option has been moved and improved. When creating a new attribute (in the "Catalog" tab, "Attributes & Values" page), you can use the "Attribute type" drop-down list to choose whether the front-page should display it as a drop-down list, a radio button list, or a color picker. |
...
As you can see, the combination generator helps you save a lot of time when you have numerous attributes to assemble, such as sizes and materials. It automatically creates all of the possible combinations, which will then appear under the product's "Combinations" tab.
If you do not want to keep all generated combinations or if they are in fact not all exactly the same (different references, prices, available dates...), you can delete (trashcan icon) or modify them (file icon). The yellow star icon turns the selected combination into the default one.
Configuring the Product Image
The "Images" tab on the left is for including photos on your product page. You should upload all the images for this product, including all the available variations of this product (color, size, shape...).
To add one or more images to your product:
- Click the "Upload an image" button and then select a photo from your computer to upload. The upload starts automatically.
The maximal size for an image file is 128 kb (131,072 bytes). This size can be changed in the "Images" preference page, "Product images" section. - Uploaded images appear in a table below the button. If you want this uploaded image to be used as the default/cover image and appear automatically on the product page of your shop, click on the red button.
Once you have uploaded several images, you can modify the image order by drag-and-dropping each table row when the mouse cursor changes to a "movable" cursor.
Configuring Product Features
The tab named "Features" is where you specify your products' features (i.e. weight, material, country of origin, etc.).
...