...
- Reference and Name. The warehouse's unique reference identifier and name. Make sure to use something recognizable: you must be able to easily differentiate to warehouses from a drop-down list.
- Address, Postcode/Zip Code, City and Country. The warehouse's physical address. This information will be used on the purchase order to suppliers.
- Manager. A person in charge of the warehouse, chosen among your shop's registered employees. If the employee's account is not yet created, you must create it first. Make sure not to use a general user account for anyone: one person is responsible for this warehouse, and the employee account should reflect this.
- Carriers. The carriers who you authorize for orders shipping from this warehouse. Maintain the "Shift" key pressed while clicking to select more than one carrier.
- Management type. A method of accounting valuation, based on your country's regulations. See the "Management Stock management rules" part of this chapter for more information.
- Stock valuation currency. A valuation currency for this warehouse's stock (among the registered currencies).
...
- Set the unique reference number. This is an administrative number; do not put any seemingly unique number.
- Select the supplier. If the supplier you want is not in the drop-down list, you must create it in the "Suppliers" page, under the "Catalog" menu.
- Select the warehouse which will take delivery of the order. You must have created at least one warehouse.
- Select the currency in which the order will be formalized. If needed, you can create or import a currency using, respectively, the "Currencies" or "Localization" page under the "Localization" menu.
- Select the language in which the order will be formalized. If needed, you can create or import a language using, respectively, the "Languages" or "Localization" page under the "Localization" menu.
- If needed, set the global discount on the order (in percentage). You can just leave it at "0" if you do not have a discount on this order.
- If needed, set the physical quantity of a product below which all the products have to be restocked, and are therefore to be added to the order automatically. Each pre-added product will be ordered with a quantity equal to the entered quantity, minus the already available quantity.
- Set the planned delivery date.
Once the order is created, it appears in the list with the "Creation in progress" status. The status bar enables you to view and edit the information that were previously entered as well as add The second step consists of adding actual products to the order, which is the second step. To make that second step, just you can either:
- Click on the "Save order and stay" button.
- Click on the "Save" button. You are taken back to the list of supply orders: click on the "Edit" action for the order you just created.
The displayed interface is the same as the one for the of the order creation , form has been updated with a new second form below the previous fields, which you can use to add product previously-filled fields. You must use that second form to add products to your order, using the integrated search engine. The products that you add appear in a new list.

For each product, you must set or update the unit purchase price (tax excluded), the quantity to order, any applicable tax rate, and any product-specific discount.
Once the order is created, it appears in the list with the "Creation in progress" status. This status enables you to view and edit the information that were previously entered as well as add products to the order. You will not be able to change the order once you change its status to "Order validated".
| Note |
|---|
You can never delete an a supply order: you can only cancel it. |
Once the order is created, you You need to follow it through for the whole order process, always indicating its status change in PrestaShop's interface. This is what the first action button of the list ("Change state") is for. Click on the "Change status" icon : click on it to reach the status changing form. See the "Changing the status of a supplier order" section below for more information on the available statuses, and see the "Registering the reception of products" to understand how to follow through on a supply order.
The "+" icon in the supply order list displays the order's history, which enables you to see who did what and when.
Order template creation
The whole point of creating a template is to serve as a basis for new orders.

The supply order template creation process is the same as the one for a real order, except that:
...
Moreover, contrary to an ordinary supply order:
- A template does not have a status.
- A template can be deleted.
- A template has no edit history.
...
Each order has many available actions (in the "Actions" column of the order list). One of them enables you to edit the status: the "Change state" one. There are six possible default statuses, but you can add your own (see the "Configuration" section of this chapter).
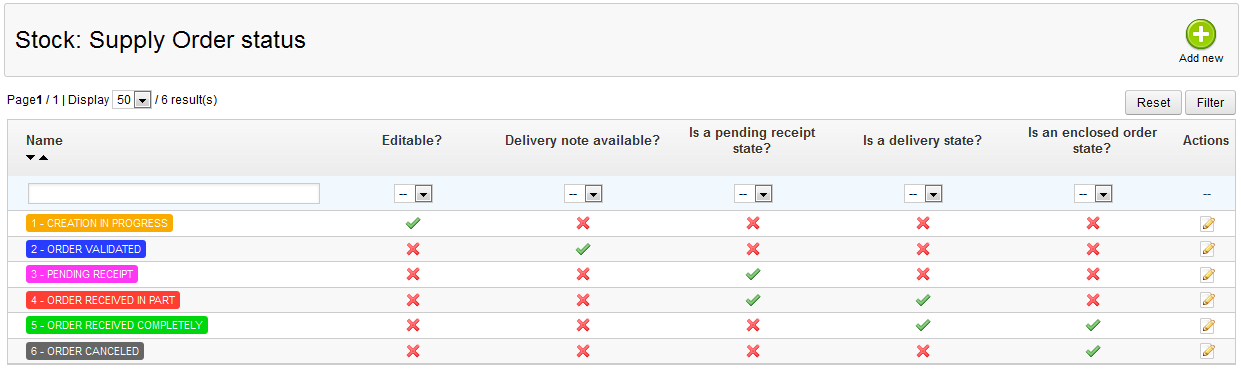
Status help An order's status helps you understand your stock movements more quicklyat a glance thanks to their color code. Here is the significance of the six default statuses:
- Creation in progress. This is when you are in the first step of the creation step, where you can edit everything.
- Order validated. This step enables you to validate status validates the order and freeze freezes the information it contains (purchase priceprices, quantityquantities, etc.). At this step, a new action appears in the list"Actions" column, which enables you to edit the invoice that is sent to the supplier , in PDF format.
- Pending receipt. You have to change the status to this one as As soon as the supplier has received and validated the your invoice. From then on, it is possible to register the products delivery, you have to change the supply order's status to "Pending receipt".
- Order received in part. As soon as a delivery is made, you must switch the order switches to this statestatus. There can be multiple deliveries, and a delivery history is logged for each product. The restocking is made with each delivery.
- Order received completely. Once an order is completely delivered, or partially because of a partial cancellation, it should be switched to this status. Stocks are unaffected in this case, and it is possible to perform actions on the order.
- Order canceled. This status is to be given to canceled orders, whatever the reason. Stocks are unaffected in this case, and it is not possible to perform actions on the order.
With each status change, the status drop-down selector evolves in order to present only the possible status changechanges, according in regard to the current status. The unavailable statuses are grayed out.
Details of a supplier order
The Clicking the "View" icon from the list of supply orders enables you to get a synthetic view of your order, and .
You can also download the invoice generated as a PDF file (which is made available as soon as provided the order is validated by you) .
You can also download the supply order form PDF from the list of orders or from the status change page.
...
Registering the reception of products
Once your order reaches the "Pending receipt" statusYou must change the status of your supply order within PrestaShop as soon as actions are taken in the real world. This is done using the "Change state" icon in the "Actions" column from the list of orders. The form in this page always pre-selects the next logical status, but you are free to choose any of the other statuses available.
While you are preparing the supply order, keep its status to "Creation in progress". Once you are done preparing the order, switch it to "Order validated", then print the invoice PDF and send it to your supplier. As soon as your supplier confirms the reception of the invoice, change the status to "Pending receipt".
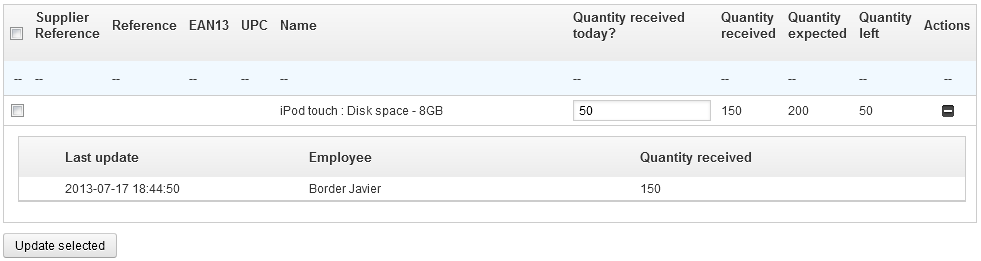
During the "Pending receipt" and "Order received in part" statuses, a new action is available in the "Actions" column. Using the "truck" icon, the "Update ongoing receipt of products" action enables you to register the reception of products for a given order during the current day.
The form that opens after clicking that "truck" action enables you to see how many items were expected, and to indicate the quantity of product delivered for each product that day. Click the "Update selectselected" button to mark the selected products as received with the number of items you indicated in the "Quantity received today?" field. The checkbox on the left of each row must be checked for PrestaShop to take that line into account.
| Note |
|---|
This step can be done as many times as necessary, and it is possible to receive and incorporate more stock than planned. If you receive less stock than expected, PrestaShop automatically changes the order's status |
...
to "Order received in part". |
For each product, a reception history is available ("Details+" action), as well as an indication of the received quantity, the expected onequantity, and the remaining onequantity. If the "received quantity" is equals equal to the "expected quantity", the corresponding row is highlighted in green. If you received more than expected, it is in red.
When all the product products from the order have been received, you must manually change the supply order's status to "Order received completely". This ends the supply order process, and a new action appears: "Export" (with a Microsoft Excel icon), which you can use to download a CSV file of all the information pertaining to that order.
CSV export
Using the supply orders interface, you can filter the list of orders or the details of these orders so that you may export it, according to the current filters (reference, supplier, etc.).
Moreover, you can choose not to display the orders that are completed or canceled, using the appropriate checkbox.
...
- Increasing stock (manually).
- Decreasing stock (manually).
- Decreasing stock following the shipment of a client order.
- Increasing stock following the delivery of products from a supplier's order.
...
Stock management rules
In this section, we will explain the management rules that are automatically applied to stock management.
...
The table below illustrates how the FIFO LIFO method can be used to value stock. We use the same entry and exit values as in the previous example. The principle remains the same as in the FIFO example, except that during exits, we primarily use the units that were the last to be entered in the stock.
...