Table of contentcontents
| Table of Contents | ||
|---|---|---|
|
...
Discovering the Administration Area
Now that you have installed PrestaShop 1.6 and that you are properly logged-in to your administration area, you must spend a good amount of time making sure every part of your future online shop is properly set up, secured, validated and ready for business.While PrestaShop makes it easy for you to install it and build your business online, it cannot possibly be 5-seconds work: you are dealing with products, customers, and most importantly with real actual money that will be flowing from your customers to your bank account. We dare say you want to make sure nothing fails in the process of validating an order, having the products be found on your storage location, packaged, and shipped to your customers without a single glitch, or even without anything unpredicted happening without your knowledge.should make sure to easily find your way through its administration interface, understand its notifications and know where to find one specific bit of information.
| Info |
|---|
The design of the administration area has been completely revamped with version 1.6 of PrestaShop in order to be more intuitive and ergonomic – as well as working better on mobile devices. While most of the 1.5 pages and options are still where you can expect them to be, it might take some time to get used to it all |
We have created this chapter in order to help you make the best most of your discovery of PrestaShop. Follow its directions to the letter's administration interface. It has been designed to be very ergonomic and easy to use, but be aware that you should read the whole guide in order to get a perfect grasp of your new online business tool!
Overview of the main interface
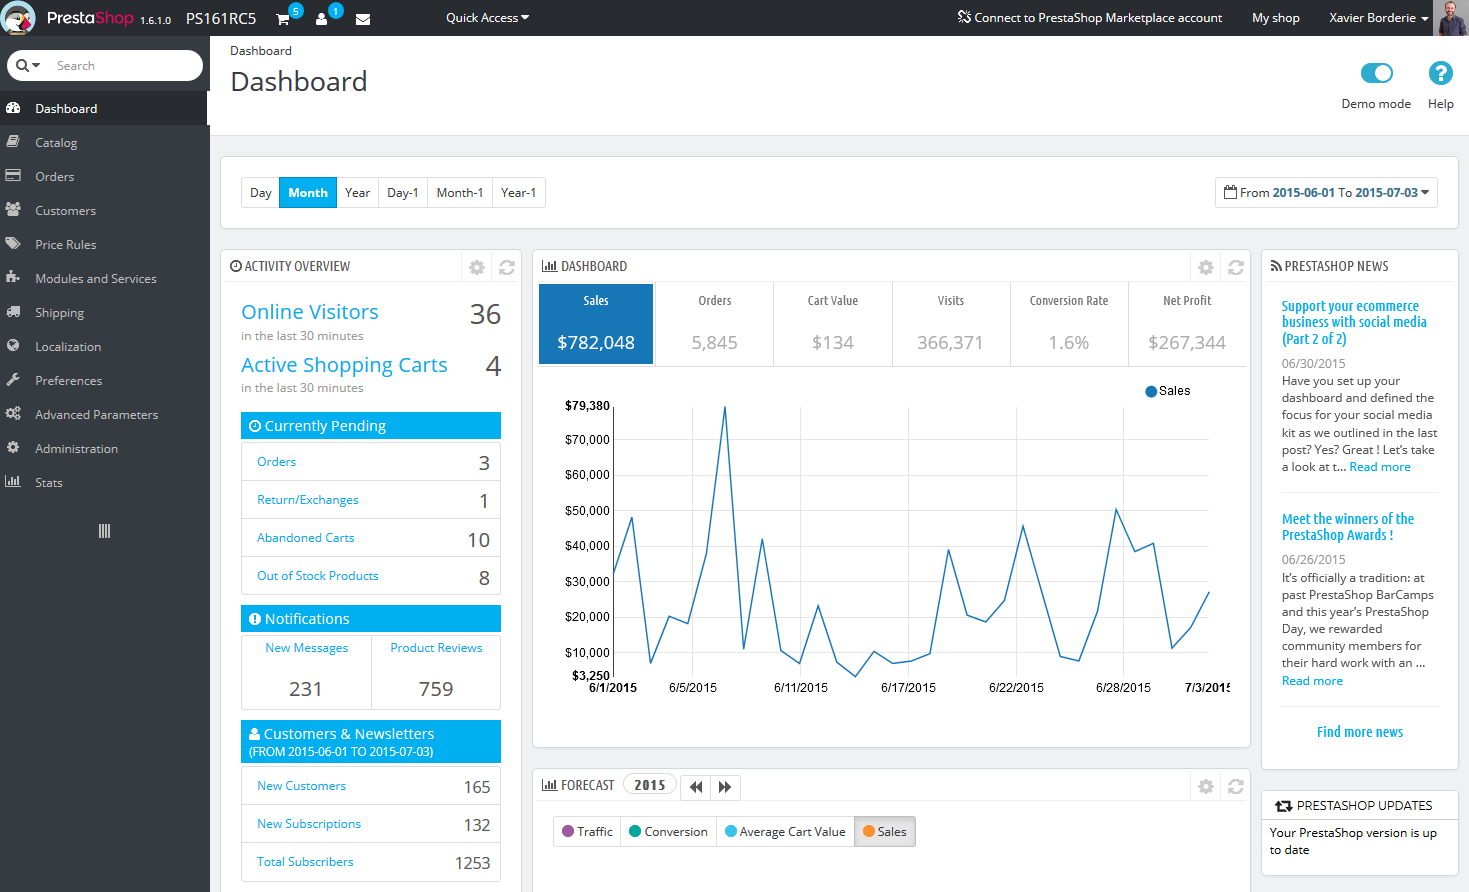
Take the time to survey review the Dashboard – that is, the first page you see when logging into your back - office. Not only does it present you with a summary of everything you need to know about your shop at any given time, along with quick links to the main action page, but as a first-timer in PrestaShop, it also gives you tips about what you should have a look at.
| Info |
|---|
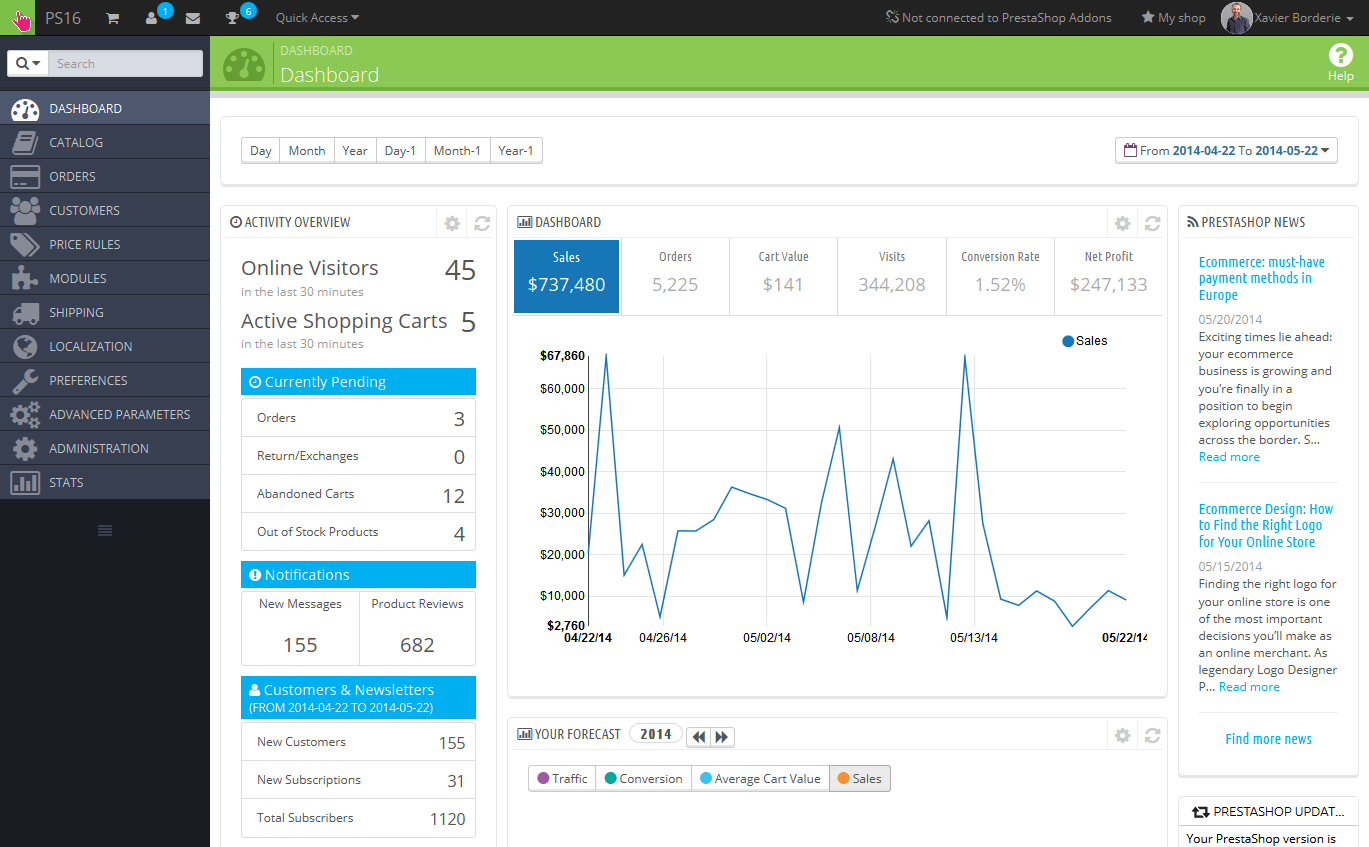
PrestaShop's back office got revamped for version 1.6.1.0, for better readability and ease of use. From version 1.6.0.0 to 1.6.1.0, the back office looked like this:
|
The top bar

At the top of the back - office is a black bar containing a handful of information and links:
- (The PrestaShop logo, along with your current version number.
- The name of your shop). From any page, this takes you back to your the Dashboard.
- Cart icon. Opens a tooltip A tooltip indicates the number of new orders, if any. Clicking it opens a panel presenting the new orders since you last clicked that icon. A red tooltip indicates the number of new orders. From there on, you can either display one of the new orders, or go to the list of orders.
- People Person icon. Opens a tooltip presenting the last registered customers. A red tooltip indicates the number of new customers, if any. Clicking it opens a panel presenting the last registered customers. From there on, you can either display one of the new customers, or go to the list of customers.
- Letter icon. Opens a tooltip presenting the last customer service message. A red tooltip indicates the number of new messages, if any. Clicking it opens a panel presenting the last customer service message. From there on, you can either display one of the new messages, or go to the list of messages.
- Trophy cup icon. New in 1.5.4. Opens a tooltip A tooltip indicates the number of new items, if any. Clicking it opens a panel presenting your progress as a merchant. A red tooltip indicates the number of new items. From there on, you can reach the full page of badges and points, from the "Merchant Expertise" module.
- Search field with dropdown list. Enables you to search within the content of your shop – even within your administration page, if you can't remember where an option is set.
- Quick Access. This is the quick links menu, presenting the most useful links, as set in the "Quick Access" page under the "Administration" menu.
- "View My ShopConnect to PrestaShop Marketplace account" link. Opens a modal window enabling you to connect your shop to the Addons marketplace, and thus get updates from the modules and themes you bought.
- "My shop" link. Opens a new browser tab with your shop's front-end.
- (your name)Personal menu named after your first name and surname. A simple menu dropdown panel with a reminder of the administrative account with which admin account you are currently logged-in with. It contains the following links:
- "My Preferencespreferences" link. Takes you to your account's preferences page, where you can set some personal options (for instance, the back-office language or of your back office or your password).
- "LogoutSign out" link. Logs you out of the current user account.
The menus
All along your daily activities administrating your shop, you will have to browse through the many pages and options of the back - office.
| Info |
|---|
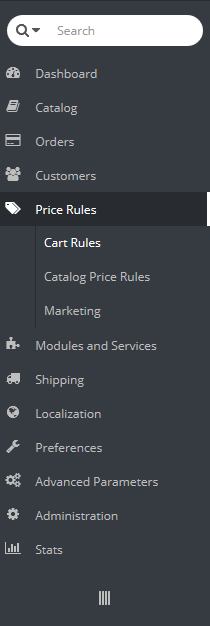
By default, the menu system in PrestaShop 1.6 are is displayed on the left side of the page. You can switch the menu to the top of the page by using the "Display admin Admin menu orientation" option in your user preference page .The (which you can access through the link bearing your name in the top bar).
In either vertical or horizontal format, the content of each menu is displayed either when you click in down arrow in vertical format, or when the mouse hovers the menu label in horizontal format, thus reducing the necessity to load new screens just to access menu options. In addition to that, the vertical format can be minimize minimized to only its icons by clicking on the "parallel lines" icon at the top bottom of it. In that case, the menu options are display when the mouse hovers the menu label |
 Each menu applies to a given set of tasks and contexts:
- Search field with dropdown list. Enables you to search within the content of your shop.
- Dashboard. The homepage of your back office, where you can see the main statistics, live.
- Catalog. This is the heart of your shop, where you will add products, create categories, set up carriers and suppliers, etc...
- Orders. Once clients start adding products in their shopping carts, you will start seeing see orders in this menu, with the resulting invoices. This is also where you handle merchandise returns, credit slips and per-order customer service, among other things.
- Customers. Here you can access all the information about your clients, and edit their addresses, create groups of customers to which you can apply special discounts, handle customer service, and even manage social titles if need be.
- Price Rules. A very specific menu, enabling you to easily create vouchers and price reductions through a set of rules.
- Shipping. Everything pertaining to carriers and shipping costs.
- Localization. Helps you localize your shop with local values, such as language and translation, currency, units, taxes and tax rules, and geographical entities (regions, countries, etc.)
- Modules. Modules and Services. Extend the power and usefulness of your shop by adding and activating modules, : more than a hundred of them being are available by default, and many more are available to buy on the Addons marketplace (http://addons.prestashop.com/). This is also where you handle themes, and where modules' blocks get positioned you can position the blocks of content from your module on the theme (including the Live Edit feature). One last menu page enables you to apply global settings to payment modules.
- Shipping. Everything pertaining to carriers and shipping costs, as well as marketing.
- Localization. Helps you customize your shop with local values, such as language and translation, currency, units, taxes and tax rules, and geographical entities (regions, countries, etc.).
- Preferences. PrestaShop is a very configurable e-commerce solution, and you can edit just about any of its behaviors using the full-featured preferences.
- Advanced Parameters. Contains This menu contains links to tools and informational pages that are too specific to fit in other menus, such as the Web service settings, the database backup tool, or the performance page, among others.
- Administration. Here are the settings pertaining to the back - office itself; for instance, the content of the Quick Access menu, the employees list and permissions, or the menu order, among others.
- Stats. Gives This menu gives you access to all the numerous statistics and graphics that are gathered and generated by PrestaShop.
These are the default menus. Note that modules can add new menusoptions to the existing pages, new pages to the existing menus, and even new options to the existing pagesmenus.
Also, one menu is only available when the proper option is set:
- Stock. This menu gives you access to a whole new feature of PrestaShop 1.5stock management feature, where you can handle warehouses, stock movement and supply orders.
It can be made available through the "Products" preference page: activating simply activate the "Enable advanced stock management" option (in the "Products stock" section) and save your change to see the menu appear.
All the default standard menus, including the "Stock" menu, are explained in depth in this user guide.
The
...
Let's now explore the content of the Dashboard itself. It can feel crowded to first-time user, but you will find it gives an excellent summary your shop's daily activities at a glance.
The dashboard is divided in 4 zones: an horizontal bar, and three columns.
The horizontal bar
At the top of the Dashboard is a single bar which helps you choose the period of time for the currently displayed dashboard statistics. Three sets of options are available:
- Current day, month or year.
- Previous day, month or year.
- Precise date selection.
The left column
This column starts with a handful of quick links, which lead to some of the most useful pages at this stage of your exploration of PrestaShop. These buttons should help you get going with your daily task quicker, as they are some of the most accessed features of PrestaShop. Two partner banners close the section.
It ends with 4 boxes, two giving you information, the other two being links to external content.
The most interesting box at this stage is the "Configuration checklist" box, which displays the state of seven key settings that should be taken care of in order to have a healthy shop. These states are written in colors which indicate their status: green for "OK", yellow/orange for "advice", red for "must be done". We will explore this box in details in the "Preparing your shop" section below.
The "PrestaShop Links" box gives you useful links to this very user guide (online edition), its paper edition and the documentation site itself, along with links to the community forums and the Addons website, where you will be able to buy and sell modules and themes.
The "PrestaShop News" box gives you the latest news about PrestaShop, from the official blog.
Finally, a box is dedicated to a message from our partners.
The right column
The right column is where the term "dashboard" takes its importance: this side of the Dashboard presents the user with the most important numbers pertaining to his shop's daily activities, along with a graph of sales and a list of the latest orders. Every time you log into your shop's administration area, you will be first and foremost looking at the evolution these numbers take. This is where you see your shop live and breathe.
The button bar
...
buttons
Many of the back-end pages use recurring buttons, either at the top or at the bottom of the screen. For instance, the product edition page can have up to 8 buttons available at the same time.
More than simple shortcuts, they open actual features that you will use very often.
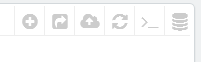
The available buttons vary a lot depending on the context, and therefore two different pages might not feature the same set of iconsbuttons. Still, there are a few that you will often see:
- Add new. Opens the creation page of the current context.
- Save. Saves the content of the current page and returns to the list of existing items.
- Save and stay. Saves the content of the current page and keep the page open.
- Back to list. Returns to the list of existing items.
- Modules list. New in v1.5.4. Open : new product, new product category, new order, etc.
- Recommended Modules and Services. Opens a pop-in window containing the modules available in the current context.
- Help. Opens the online inline documentation for the current page – or "contextual help".
The modules list is a new feature brought by PrestaShop 1.5.4, which makes it possible to see "Recommended modules" button presents you the modules which apply to the current context. For instance, in the "Shipping > Carriers" page, it will display the modules from the "Shipping & Logistics" category of modules. This is very helpful when you need to quickly find which module to install and configure in order to get a given result.
Preparing your shop
You are now getting a pretty good idea of how complete PrestaShop can be, and the number of possibilities can feel overwhelming. This first chapter will therefore lead you through some basic actions to set up your shop before the big launch. A lot can be done before you launch your shop, but these steps are the essential configuration steps of any shop.
Deactivate your shop
We'll consider that you are still within the first hour following your installation of PrestaShop, in a single-shop instance.
Deactivating your shop means making sure that no one can access it while you are busy making changes, creating products, settings prices and taxes, installing payment modules and a new theme, setting carriers... This is called putting your shop in maintenance mode.
In your back-office, go the "Preferences / Maintenance" page. This page features two simple settings:
- Enable Shop. Simply set it to "No", and your front-page will display the maintenance page.
- Maintenance IP. This is where you must put your own IP address, so that you can still get access to your front-page, and browse your shop as if it was available to all. This is a must-do every time you put your shop in maintenance mode, as you will always need to browser your front-end so as to make sure everything is in place as intended.
| Tip |
|---|
If you are already decided on your theme and products, you can simply put your shop in Catalog mode. This means that customers can browse your shop, but no price will be displayed, and they won't be able to add anything to their cart until you disable the Catalog mode. You can activate the Catalog mode by going to the "Preferences / Products" page, where it is the first option. |
Delete the content of the default shop
The default installation features a handful of products – mainly Apple products, along with a couple third-party accessories. Their only use is to help you explore the setup of a functional store. After you've learned the intricacies of the ties between products, categories, orders and customers, you should delete all these items in order to start your shop with a clean slate.
You must therefore delete all the default data, which means:
- products and their...
- categories
- attributes
- features
- manufacturers
- suppliers
- image mappings
- tags
- orders
- order messages
- customers
- customers shopping carts
- carriers
- price ranges
- weight ranges
- contact & stores (delete or adapt to your business' needs)
- CMS pages (delete or adapt to your business' needs)
This means browsing through the many various screens of the back-office and deleting content one page after the other.
| Tip | ||
|---|---|---|
| ||
The iPod Touch from the default installation is tied to the sample order (made by sample customer John Doe), and thus cannot be deleted until the order is deleted. Therefore, in order to delete this product, you first need to delete this sample order. To safely delete the default order (and thus be able to delete the iPod from your catalog), install the "PrestaShop cleaner" module (which is available in the default installation since v1.5.4), open its configuration screen and check the "Orders and customers" box before you click on the "Check & fix" button. |
Configure your shop's information
Now that you have a clean shop, you can start making it your own, and that implies setting everything up to your likings, starting with your personal information and your preferences.
Shop's basic settings
You should pay attention to the following settings, most of which are important because they are displayed on the front-office.
| Tip |
|---|
Configuring a module is easy:
|
Setting | Description | Where to find it |
|---|---|---|
Shop name | Defines your brand, most notably on search engines (Google, Yahoo!, Bing...). | "Preferences" menu, "Store Contacts" page, then in the "Contact details" section, click the shop name. |
Shop logo | Defines your brand visually. The default logo says "YourLogoHere" as an incentive to use yours. | "Preferences" menu, "Themes" page, "Appearance" section, then change the various default images to your logo. |
Default shop currency | The currency in which you want to set the default price for your products. | "Localization" menu, "Localization" page, "Configuration" section. |
Customer service info | A block presenting the phone number for your customer service, and a button to send you an e-mail. | "Block contact" module. |
Company info / | A block presenting your contact address, the phone number for your customer service, and a link to send you an e-mail. | "Block contact infos" module. |
Advertising | A block presenting an image with a link to another site. | "Block advertising" module. |
Image slider | The slider presents several images, scrolling one after the other. It is a strong visual signature for your store and products. | "Image slider for your homepage" module. |
CMS pages | The content of static pages, such as "About Us", "Delivery", "Legal Notice", "Terms and Conditions", and "Secure Payment". Some of them have default content, which you should adapt to your business; some others are empty, and you should paste your own text. | "Preferences" menu, "CMS" page, then edit each page at will. |
| Social networks | A block presenting three links: your company's Facebook page, your company's Twitter account, and the RSS feed for your company's blog (or "current events" site). | "Social networking block" module. |
These are the most visible default settings on your front-end – at least with the default theme.
The "Where to find it" column enables you to see where you can find the interface to change these aspects of your store. This user guide will provide you with more details for each interface.
Shop languages
PrestaShop is able to work with many languages, both on the front-office and the back-office. Each back-office text-field is accompanied with a flag icon, which indicates the current language, and which you can click in order to choose another language in which to write that field's content.
By default, PrestaShop is installed with two languages: the one used when installing the software, and French. To manage the currently installed languages, go to the "Localization / Languages" page. It presents you with a table of the available languages.
The currently enabled language(s) have a green check mark, while the others have a red "X". Click on a green mark to disable the selected language; click on a red "X" to enable it back.
| Info |
|---|
You can enable all available languages if you think your shop needs them, but be aware that you will translate your content for all of the available languages: product name, description, tags; category name and description; static content (CMS pages); etc. |
You can easily import many more languages in the "Localization / Localization" page, and then enable them in the "Localization / Languages" page.
Employees information
Should you have people helping you with your shop, be they your spouse, friends or paid employees, you should make sure to create an employee account for each of them, if only to know who is responsible for which action. The other advantage is that you can give them specific profiles and specific access rights to the administration pages: for instance, you might not want everyone to have access to your statistics, your invoices or your payment settings.
To create a new employee account, go to the "Administration" menu, select "Employees", and click the "Add new" button. Fill in a name, such as "Martin Doe" or "Shipping handler", and save.
Now that you have a proper account for this employee, you should give it specific permissions, tailored to the account's activity. An account can be used for as many people as needed – but we do advise you to create one for each helping person.
To assign permissions to an employee account, you must use the "Profile" option in the account creation page.
You can edit these permissions this way: go to the "Administration" menu, select "Permissions", and select the profile you want to change. A long list of permissions appears.
You can create as many profiles as needed, by using the "Profiles" page in the "Administration" menu, and then clicking on "Add new". Type the profile's name, validate it, then go edit its permission in the "Permissions" page.
By default, a new profile cannot do much. It is up to you to set exactly the parts of your shop to which that profile should have access. It can be a tedious task, but it is an important one.
Configure payment methods
Your shop is meant to earn money, and this can only become a reality if you use at least one payment module. 16 modules are already available in the default install, which you can install and configure (from the "Modules" page under the "Module" menu, in the "Payments & Gateways" category), and create restrictions for them (in the "Payments & Gateways" page under the "Modules" menu). Many payment modules require you to first set up an account on the service they were built for.
See the "Payment" section of the "Making the Native Modules Work" chapter of this guide in order to learn about them all.
You can also install other payment modules, downloaded from the Addons marketplace: http://addons.prestashop.com/en/4-payments-gateways.
| Info |
|---|
Check and bank wire are the only two payment methods which are enabled by default. If you choose to keep them, you need to configure them with your information: check order and address, account owner, bank details (IBAN, BIC, etc.). These payment methods are configured through the "Bank Wire" and "Check" modules, which you can find in the "Payments & Gateways" category or the modules list. |
Configure carriers and shipment
Products sold on your shop must be shipped to your customers – unless you only sell downloadable products, in which case the "Shipping" menu will be of little use to you.
Whether you are sending your products yourself by mail, or you have set up a contract with a carrier, you should set this information within PrestaShop.
See the "Managing Shipping" chapter of this guide in order to learn about shipping and carriers.
| Note |
|---|
Merchandise return is not enabled by default. If you want to allow your customers to return products and get a refund or a voucher, you can do it in the "Merchandise return (RMA) options" of the "Merchandise return" page, under the "Orders" menu. |
Choose your theme
Your shop should have its own theme in order to have a distinctive style, and therefore be more recognizable, separating it from the numerous other shops online.
There are many themes to choose from on the PrestaShop Addons marketplace: http://addons.prestashop.com/en/3-templates-prestashop.
You can also choose to create your own theme, or have it created for you by a developer. Refer to the online Designer Guide for help, at Designer Guide.
Once your theme is installed, you should explore it fully in order to know it by heart and be able to help customers out of a situation.
You can and should customize some of the theme's aspects, most notably its logo in various situations (header, mail, invoice, etc.). This is done using the "Themes" preferences page, which you can find under the "Preferences" menu.
Choose your modules
PrestaShop comes bundled with more than a hundred modules. These are very varied: analytics, front-office features, payment, shipping... You should explore the available modules in full, in order to know which ones you might want to enable, and which you'd rather keep disabled.
See the "Managing Modules" and "Making The Native Modules Work" chapters of this guide in order to learn about them all.
You can also find many other modules on the Addons marketplace: http://addons.prestashop.com/en/2-modules-prestashop
| Tip |
|---|
Every time you activate and configure a module, make sure that it does work well within the confines of your theme, in case its features impact your shop's front-end. |
Create products and product categories
This is described in details in the next chapter, "Adding Products and Product Categories".
Create static content
If you haven't done this already, you should take the time to write the content for the various CMS pages which are either already available in your PrestaShop installation, or ones that you feel are needed.
Some pages already exist, but their content should really be triple-checked, as they can have a lot of impact on your shop's legal status, among other things.
The default pages are "About Us", "Delivery", "Legal Notice", "Terms and Conditions", and "Secure Payment". Some of them have default content, which you should update; some others are empty, and you should paste your own text.
To edit these pages, go to the "Preferences" menu, click the "CMS" page, then choose the page you want to edit, or create new ones.
You can create as many pages as you feel are necessary.
Build your top menu
Now that you have product categories and CMS pages, you should arrange them in a logical and compelling way in the top menu.
This is done using the "Top horizontal menu" module: go to the "Modules" page, type "menu" in the module search form, and you should find the module. Enable it if it is disabled, then configure it: remove the pages or categories you deem unnecessary, add other pages, and move the content around, until you are satisfied with your menu's hierarchy.
Activate your shop
Now that all is set and done, you can finally open your shop to the public.
Go the "Preferences / Maintenance" page, and change the two options:
- Enable Shop: set it back to "Yes".
- Maintenance IP: remove your IP from the list. This is optional: your shop will still work if you leave the field as it is.
Your shop should now be fully ready to receive its first visitors... and its first orders!Many of the back office forms are validated with buttons at the bottom of the screen:
- Save. Saves the content of the current page and returns to the list of existing items.
- Save and stay. Saves the content of the current page and keep the page open.
- Cancel. Returns to the list of existing items.
Data tables (lists of products, of categories, of customers, etc.) have their own set of buttons to manage the listed items:
- Add new. Creates a new item in the current context.
- Export. Downloads a CSV file of all the items.
- Import. Sends you to the CSV Import option page, from where you can import your CSV files.
- Refresh List. Reloads the list of items to display the latest changes.
- Show SQL Query. Provides the SQL query to reproduce your search or filter in your own SQL manager.
- Export to SQL Manager. Opens PrestaShop's SQL Manager tool (in the "Advanced Parameters") menu, from which you can query PrestaShop's database with SQL statements ("
SELECT ... FROM ... WHERE ...").
If your list of items was filtered (by name, for instance), then the default SQL statement will take this into account (for instance, "WHERE 1 AND b.`name` LIKE '%blouse%'" for product list).
Contextual help
Since version 1.6.0.7 of PrestaShop, the software's documentation is directly embedded into the administration interface: clicking on the "Help" button from any back office page reduces the main interface's width in order to add a new column on the right, which contains the documentation for that section of the back office.
Another click on the "Help" button closes the contextual help. If you do not close the help column, PrestaShop understands that you want it displayed on every page of the back office, and thus will maintain the column open until you have clicked to close it.
| Note |
|---|
If the browser's display zone is lower than 1220 pixels width, then PrestaShop will open the contextual documentation in a new browser window rather than reducing the screen space dedicated to the main interface. |
At the bottom of the help column, a small form enables you to tell the PrestaShop team whether the help section has been helpful to you or not. Rate the help page by clicking on one of the 5 levels of satisfaction. If you click on one of the two lowest levels, PrestaShop will open a short form allowing to detail your thoughts? You can either fill it and click on the "Submit" button, or close the form by clicking on the cross, in which case only your rating will be sent to our server.
The Dashboard
Let's now explore the content of the Dashboard itself. It can feel crowded to a first-time user, but you will find that it gives an excellent summary of your shop's daily activities at a glance.
The Dashboard is divided in 4 main areas: a horizontal bar, and three columns.
| Note | ||
|---|---|---|
| ||
By default, the Dashboard uses fake data so that you can better visualize what the various stats are for. When using PrestaShop for a real online store, you must disable this fake data so that your real data is used: deactivate the "Demo mode" option at the top right of the screen, next to the "Help" icon. |
The horizontal bar
At the top of the Dashboard is a single bar which helps you choose the period of time for the currently displayed dashboard statistics. Three sets of options are available:
- Current day, month or year.
- Previous day, month or year.
- Precise date selection (the button on the right, which opens a date selector).
Choosing an option updates all the blocks of content that are on the Dashboard so that they display data for the chosen period of time only. Blocks that are not stats-based do not change.
In order to choose a period of time, you can either click the first and last date of that period in the calendar (the clicking order does not matter), or you can type the dates in the YYYY-MM-DD format in the text boxes. Click "Apply" to see the Dashboard change according to your settings.
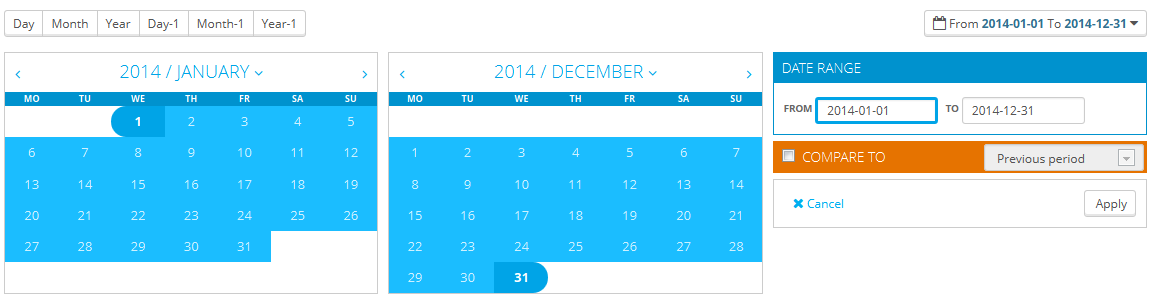
You can also compare two periods of time together by checking the "Compare To" box. Select the second period as would do for the first one (the two can even overlap), then click on the "Apply" button.
When comparing two periods, some of the content blocks will update to indicate the evolution of the data (see for instance the main "Dashboard" block, which presents data from the Dashboard Trends module).
The left column
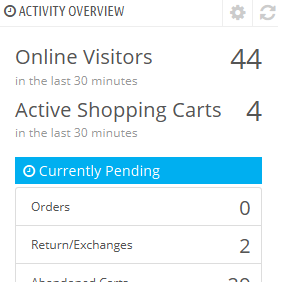 By default, this column presents you with data from the Dashboard Activity module, which gives the main figures from your database in a quick glance:
- Online visitors in the last 30 minutes.
- Active shopping carts in the last 30 minutes.
- Currently pending orders, return/exchange inquiries, abandoned carts and out of stock products.
- Notifications for new messages, order inquiries and product reviews.
- New customers and new newsletter subscriptions.
- Traffic statistics: visits, unique visitors, traffic sources and direct links.
The central column
The central column is where the term "dashboard" takes its importance: this area of the Dashboard presents the user (you) with the most important numbers pertaining to his shop's daily activities, along with a graph of sales and a list of the latest orders. Every time you log into your shop's administration area, you will be first and foremost looking at the evolution that these numbers take. This is where you see your shop live and breathe.
By default, there are three blocks of content in this column, which are handled by modules:
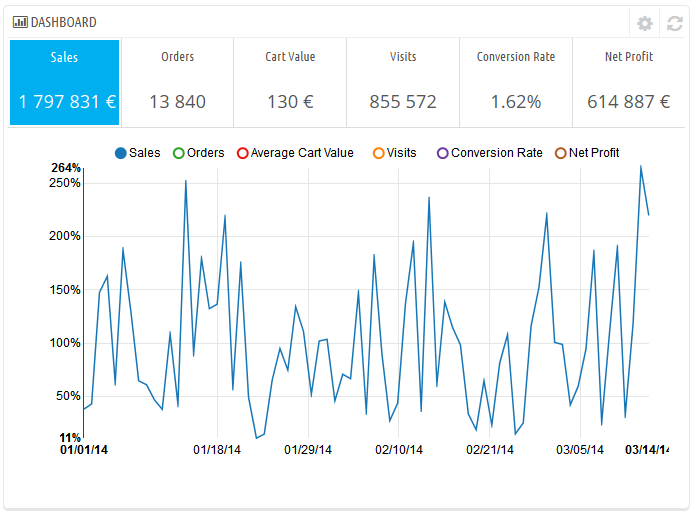
- Dashboard (Dashboard Trends module). This is the main block of information on the dashboard. With its various graphics, it really helps you see if your shop is headed in the right direction or not. Click on one of the graphic type to display it. Additionally, when comparing two time periods, it displays the evolution of each figure in percentages. Hover the graphic with your mouse to see the details.
Clicking on its configuration icon (top right) open a new page where you can set various expenses that your shop has (bank wire fee, average shipping fee, hosting expenses, etc.), in order to better indicate your trends. - Your Forecast (Dashboard Goals module). This block presents you with the goals you have for the coming months, and how your shop is doing as compared to them. Hover the graphic with your mouse to see the details.
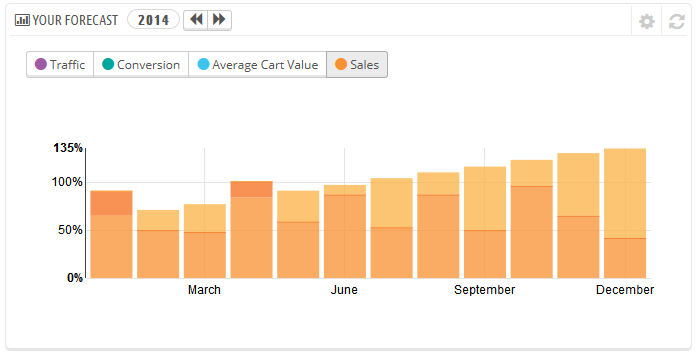
Depending on your monthly results, you should update your forthcoming goals. You can set your goals in the block's configuration form (top right of the block), and fill in your expectations month per month in terms of traffic, conversion rate, and average cart value. The "Sales" column will be updated according to the goals set in the other columns (for instance, for a 1000 visitors with a 2% conversion rate and a $10 average cart, you would get 1000*(2/100)*10 = $200). You can change the currency in the "Currencies" page under the "Localization" menu. - Products and sales (Dashboard Products module). This block presents you with a table of your latest orders and a ranking of your products: best sellers, most viewed and top searches (as searched in your shop's search form, not from search engines).

You can set the number of items to display in each by opening the block's configuration form
The right column
This last column is an informational one: it gives you the latest news from PrestaShop.com, notifications about new PrestaShop versions, and useful links.
It also features the "Demo mode" block, from which you can disable the fake data used by default on the Dashboard and use your own data (as gathered by PrestaShop's statistics system).
 |
|
Reorder the elements
On your dashboard, you have the possibility to change the order of the elements displayed on each column (left and center, see above). It is mostly useful if you have additional modules or if you want to focus on some statistics that are not on the first position.
To change the order, please follow these steps:
- Go to Modules & Services / Position page (via your menu)
- Select "Show: All modules"
- Check the "Display non-positionable hooks" checkbox
- In the "Search of a hook" field, enter "dashboardZoneOne" for the left column, or "dashboardZoneTwo" for the right column.

Now you see all the elements hooked on the left/center columns.
To change the positions, you can drag and drop them or you can click on the small arrow close to the module logos, as shown below :