Images Preferences
The "Images" preference page enables you to configure the various image sizes that your customers will see on your shop.
| Info |
|---|
When you upload an image on PrestaShop, PrestaShop automatically generates various sizes of this image, including thumbnails and a mobile version (depending on what this image will apply to). Therefore, you only have to upload one "master" version of your image, big enough to be resized into all the images sizes. If you want to make sure your image is correctly resized, you should upload an image that fits the size ratio of the various image sizes. If your uploaded image does not have the same width-to-height ratio than the settings in place, you are taking the risk to see whitespace on the resized image. |
You can enable image size for specific types of content, directly in the image sizes list.
| Note |
|---|
In the "Products" page under the "Preferences" menu, you can choose to have a zoom appear when the cursor hovers over a product's image. |
Add a New Images Size
You can easily add a new image size, and even set to which type of content it applies.

Click the "Add new" button, then:
- Type the size's name, width and height.
- Choose to which type of content it applies.
- Validate.
Images preferences
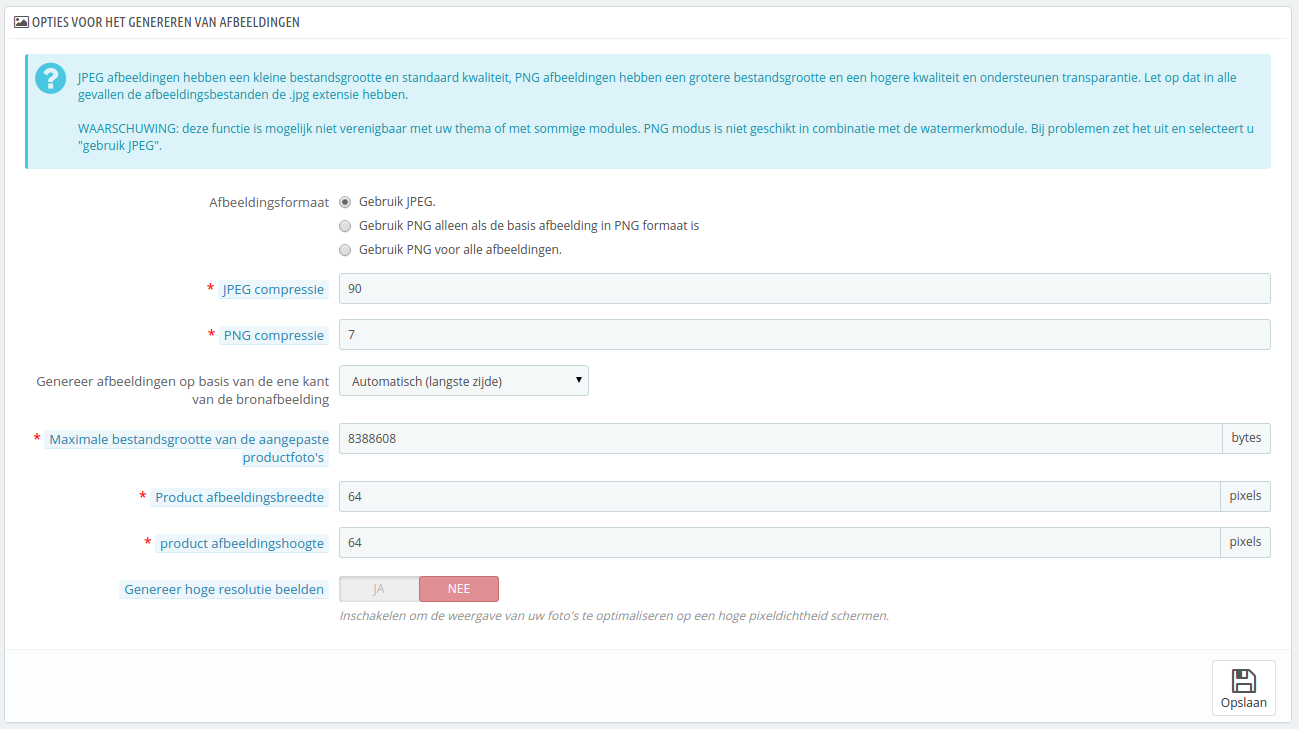
Image format. You have the choice between two of the major file formats: JPEG and PNG. Both are well established among browsers. JPEG has a good compression ratio, but can result in visible artifacts. PNG's compression algorithm is not as good as JPEG's, but there are comparatively fewer visible artifacts; nonetheless, older browsers might not recognize this format.
Choosing between one and the other is often a matter of taste. That being said, JPEG remains the recommended choice. If you would rather prevent information loss because of a format change, choose the second option, "Use PNG only if the base image is in PNG format".Warning PNG format is not compatible with the "Watermark" module.
- JPEG compression. Do not choose anything below 80 or at worst 75, for fear of visible compression artifacts.
- PNG compression. Do not choose anything over 6 or at worst 7, for fear of visible compression artifacts.
- Generate images based on one side of the source image. This feature allows you to position the product image in its pre-established space:
- Choose "height" in order to fill the frame height (the width is then recalculated to maintain the same height/width ratio as in the file of origin).
- Choose "width" so that the image fills the width of the frame (the height is then recalculated to maintain the same proportion).
- Choose "auto" so that the width and height are calculated to maximize the space it can occupy in the frame.
- Maximum file size of product customization pictures. Your customers can upload pictures for customized products. By default, PrestaShop sets this value to the PHP maximum setting – this can mean several megabytes: for instance, 8,388,608 bytes means 8 Mb. You can expand this value if necessary, but make sure that your PHP installation is able to take file uploads of this size.
- Product picture width. By default, customers can upload image with a maximum width of 64 pixels.
- Product picture height. By default, customers can upload image with a maximum height of 64 pixels.
- Generate high resolution images. The most recent screens with high pixel density (Retina and similar technologies) require high resolution images. You can enable this feature to make sure your images will display correctly on this kind of screens. It will generate a new file for each of your images, with a resolution twice higher. This will double your number of image files, so use it wisely if you have limited storage space.
Regenerate Images
You may be dissatisfied with your shop's current thumbnails size. This section makes it possible for you to regenerate them all – or only those for a specific type of content:
- Change the image size settings in the table at the top of the "Images" preference page.
- Select which content's images should be regenerated.
- Indicate whether the previous thumbnails should be kept or not.
- Click "Regenerate thumbnails".
...
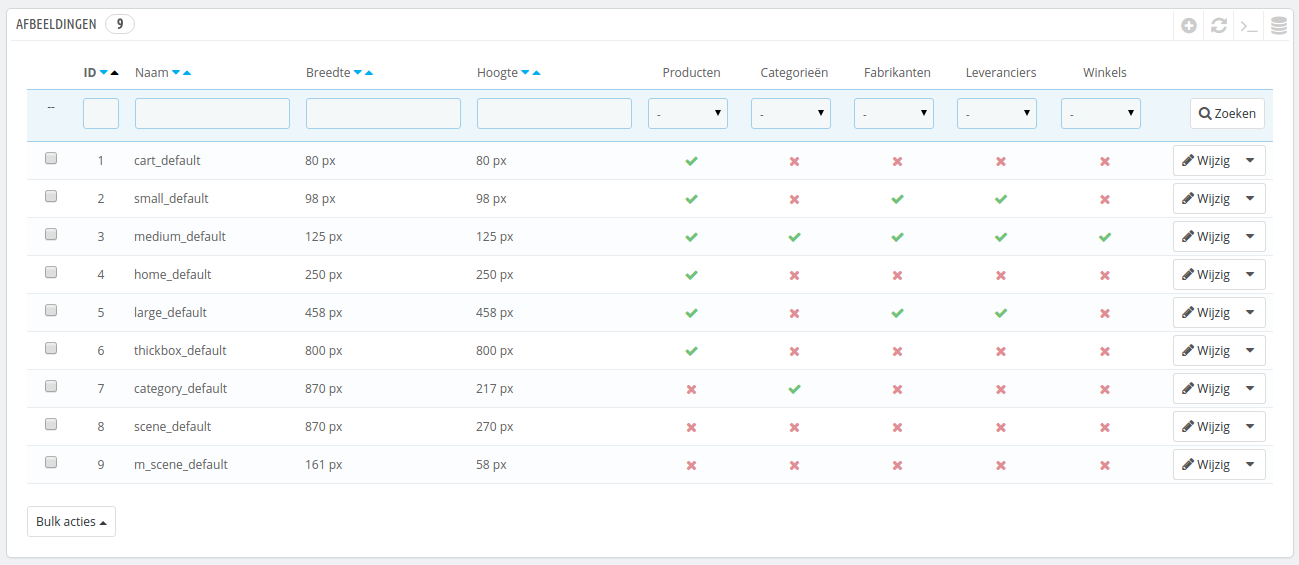
Afbeeldingen instellen
De configuratiepagina "Afbeeldingen" maakt het mogelijk om de verschillende afbeeldingsformaten in te stellen die gebruikers te zien krijgen in uw winkel.
| Info |
|---|
Zodra u een afbeelding uploadt naar PrestaShop, zal PrestaShop automatisch verschillende formaten aanmaken van de afbeelding, inclusief minitatuurweergaven en een mobiele versie (afhankelijk van het doel van de afbeelding). Daarom hoeft u slechts één "master"-versie te uploaden van uw afbeelding, groot genoeg om om te zetten in de andere formaten. Als u ervoor wilt zorgen dat uw afbeelding op de juiste wijze wordt verkleind moet u een afbeelding uploaden met dezelfde hoogte/breedte-verhouding. Als uw geüploade afbeelding niet dezelfde verhoudingen heeft dan de instellingen dan ziet u mogelijk een witte ruimte verschijnen in de afbeelding. |
U kunt een afbeeldingsformaat instellen voor specifieke contenttypes, direct vanuit de formatenlijst.
| Note |
|---|
Op de configuratiepagina "Producten" onder het menu "Instellingen", kunt u ervoor kiezen om een andere zoom-methode te tonen wanneer een klant de muiscursor over een afbeelding houdt. |
Een nieuw afbeeldingsformaat toevoegen
U kunt gemakkelijk een nieuw formaat toevoegen en zelfs kiezen voor welk type content het geschikt is.
Klik op de knop "Nieuw afbeeldingstype toevoegen", daarna:
- Type de naam van het type, hoogte en breedte.
- Kies voor welk type dit formaat is geschikt.
- Voltooien.
Afbeeldingsinstellingen
Afbeeldingsformaat. U hebt de keuze uit twee populaire afbeeldingformaten: JPEG en PNG. Beide genieten een brede ondersteuning onder browsers. JPEG kent een goede compressieverhouding, maar kan veel visuele storingen vertonen. Het compressiealgoritme van PNG is niet zo goed als die van JPEG, maar kent minder zichtbare verstoringen; ook kunnen oudere browsers dit formaat niet herkennen (in 2015 niet echt meer mogelijk, red.).
De keuze is vaak een kwestie van smaak. JPEG blijft desondanks het aanbevolen formaat. Als u liever hebt dat de PNG-compressie niet verloren gaat zodra een PNG-afbeelding wordt geüpload, dan kunt u kiezen voor de tweede optie: "Gebruik PNG alleen als de basis afbeelding in PNG formaat is".Warning Het PNG-formaat is niet compatibel met de module "Watermerk".
- JPEG compressie. Maak deze instelling niet later dan 80 of 75, omdat dan de meeste verstoringen zichtbaar worden.
- PNG compressie. Kies geen waarde hoger dan 6 of 7, omdat dan de meeste verstoringen zichtbaar worden.
- Genereer afbeeldingen op basis van de ene kant van de bronafbeeldingen. Deze feature zorgt ervoor dat u de productafbeelding kunt positioneeren aan de hand van de beschikbare ruimte:
- Kies "Hoogte" om de hoogte van het frame op te vullen (de breedte wordt daarna berekend om de oorspronkelijke hoogte/breedte-verhouding in tact te laten).
- Kies "Breedte" zodat de afbeelding de breedte van het frame opvult (de hoogte wordt opnieuw berekend aan de hand van de oorspronkelijke verhouding).
- Kies "Automatisch (langste zijde)" zodat de breedte en hoogte worden berekend aan de hand van de maximale ruimte die de afbeelding in kan nemen.
- Maximale bestandsgrootte van de aangepaste productfoto's. Uw klanten kunnen afbeeldingen uploaden voor aangepaste producten. Standaard stelt PrestaShop deze waarde gelijk aan de maximale PHP-instelling – dit kan enkele megabytes betekenen: 8.388.608 is gelijk aan 8Mb. U kunt deze waarde vergoten maar houdt rekening met de maximale waarde die uw PHP-installatie aankan.
- Product afbeeldingsbreedte. Standaard hebben productafbeeldingen een maximale breedte van 64 pixels.
- Product afbeeldingshoogte. Standaard hebben productafbeeldingen een maximale hoogte van 64 pixels.
- Genereer hoge resoluties beelden. De meest recente schermen met een hoge pixeldichtheid (Retina en vergelijkbare technologiën) vereisen afbeeldingen met een hoge resolutie. U kunt deze functie inschakelen om ervoor te zorgen dat uw afbeeldingen geschikt zijn voor dergelijke schermen. Het genereert een nieuw bestand waarvan de resolutie twee keer zo hoog is. Dit verdubbelt het aantal afbeeldingsbestanden.
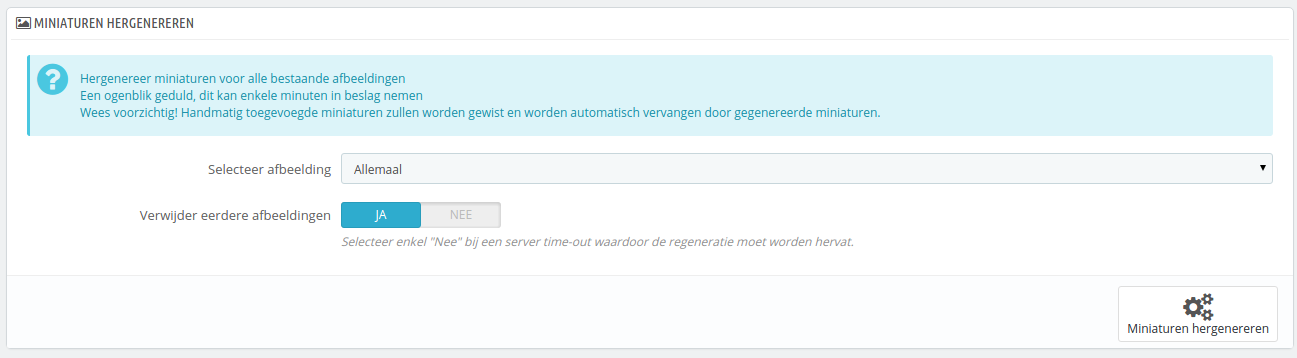
Miniaturen hergenereren
Misschien bent u niet tevreden met de afbeeldingsgrootte van de huidige miniaturen. Deze sectie maakt het mogelijk om ze allemaal opnieuw te genereren – of die van een bepaald type:
- Verander de formaten in de tabel erboven.
- Kies welke afbeeldingen opnieuw gegenereerd moeten worden.
- Geef aan of eerdere afbeeldingen behouden moeten worden.
- Klik op de knop "Miniaturen hergenereren".
| Warning |
|---|
Handmatig geüploade miniatuurweergaven worden verwijderd en vervangen door automatisch gegenereerde miniatuurweergaven. |