...
At the top of the back-office is a black bar containing a handful of links:
- (name of your shop): from . From any page, takes you back to your Dashboard.
- Cart icon: opens . Opens a tooltip presenting the new orders since you clicked that icon. A red tooltip indicates the number of new orders. From there on, you can either display one of the new orders, or go to the list of orders.
- People icon: opens . Opens a tooltip presenting the last registered customers. A red tooltip indicates the number of new customers. From there on, you can either display one of the new customers, or go to the list of customers.
- Speech bubbles icon: opens . Opens a tooltip presenting the last customer service message. A red tooltip indicates the number of new messages. From there on, you can either display one of the new messages, or go to the list of messages.
- Search field with "Everywhere" dropdown list: allows . Allows you to search within the content of your shop – even within your administration page, if you can't remember where an option is set.
- Quick Access: this . This is the quick links menu, presenting the most useful links, as set in the "Quick Access" page under the "Administration" menu.
- (your name): a . A simple reminder of which account you are currently logged-in with.
- "My Preferences" link: takes . Takes you to your account's preferences page, where you can set some personal options (for instance, the back-office language or your password).
- "Logout" link: logs . Logs you out of the current user account.
- "View My Shop": opens . Opens a new browser tab with your shop's front-end.
...
All along your daily activities administrating your shop, you will have to browser browse through the many pages and options of the back-office.
Each menu applies to a given set of tasks:
- Catalog: . This is the heart of your shop, where you will add products, create categories, set up carriers and suppliers...
- Orders: . Once clients start adding products in their carts, you will start seeing orders in this menu, with the resulting invoices. This is also where you handle merchandise returns, credit slips and per-order customer service, among other things.
- Customers: . Here you can access all the information about your clients, and edit their addresses, create groups of customers to which you can apply special discounts, handle customer service, and even manage account genders social titles if need be.
- Price Rules: . A very specific menu, enabling you to easily create vouchers and price reductions through a set of rules.
- Shipping: . Everything pertaining to carriers and shipping costs.
- Localization: . Helps you localize your shop with local values, such as language and translation, currency, units, taxes and tax rules, and geographical entities (regions, countries, etc.)
- Modules: . Extend the power and usefulness of your shop by adding and activating modules, a hundred of them being available by default, and many more to buy on the Addons marketplace. This is also where you handle themes, and where modules' blocks get positioned on the theme. One last menu page enables you to apply global settings to payment modules.
- Preferences: . PrestaShop is a very configurable e-commerce solution, and you can edit just about any of its behaviors using the full-featured preferences.
- Advanced Parameters: . Contains links to tools and informational pages that are too specific to fit in other menus, such as the Web service settings, the database backup tool, or the performance page, among others.
- Administration: . Here are the settings pertaining to the back-office itself; for instance, the content of the Quick Access menu, the employees list and permissions, or the menu order, among others.
- Stats: . Gives access to all the numerous statistics and graphics that are gathered and generated by PrestaShop.
...
Let's now explore the content of the Dashboard itself. It can feel crowded to first-time user, but you will find it gives an excellent summary your shop's daily activities at a glance.
The left column
...
The most interesting box at this stage is the "Configuration checklist" box, which displays the state of seven key settings that should be taken care of for a healthy shop, written in color which indicates their status: green for "OK", yellow/orange for "advicesadvice", red for "must be done". We will explore this box in details in the "Preparing your shop" section below.
The "PrestaShop Links" box gives you useful links to this very user guide (online edition), its paper edition and the documentation site itself, along with links to the community forums and the Addons website, where you will be able to buy and sell modules and themes.
The "PrestaShop News" box gives you the latest news about PrestaShop, from the official blog.
Finally, a box is dedicated to a message from our partners.
...
You are now getting a pretty good idea of how complete PrestaShop can be, and the number of possibilities can feel overwhelming. This first guide chapter will therefore lead you through some basic actions to set up your shop before the big launch. A lot can be done before you launch your shop, but these steps are the essential configuration steps of any shop.
...
In your back-office, go the "Preferences / Maintenance" page. This page features two simple optionssettings:
- The "Enable Shop" option: simply . Simply set it to "No", and your front-page will display the maintenance page.
- The "Maintenance IP" . This is where you must put your own IP address, so that you can still get access to your front-page, and browse your shop as if it was available to all. This is a must-do every time you put your shop in maintenance mode, as you will always need to browser your front-end so as to make sure everything is in place as intended.
| Tip |
|---|
If you are already decided on your theme and products, you can simply put your shop in Catalog mode. This means that customers can browse your shop, but no price will be displayed, and they won't be able to add anything to their cart until you disable the Catalog mode. You can activate the Catalog mode by going to the "Preferences / Products" page, where it is the first option.
|

Delete the content of the default shop
The default installation features a handful of products – mainly Apple products, along with a couple third-party accessories. Their only use is to help you explore the setup of a functional store. After you've learned the intricacies of the ties between products, categories, orders and customers, you should delete all these items in order to start your shop with a clean slate.
...
- products and their...
- categories
- attributes
- features
- manufacturers
- suppliers
- image mappings
- tags
- orders
- order messages
- customers
- customers shopping carts
- carriers
- price ranges
- weight ranges
- contact & stores (delete or adapt to your business' needs)
This means browsing through the many various screens of the back-office and deleting content one page after the other.
...
| Tip | ||||
|---|---|---|---|---|
| ||||
While deleting all this data takes only a handful of minutes, you might prefer to not have to do it at all. In this case, you can install your shop again and choose not to install the sample data during the installation process: simply relaunch the installer, and in the "Shop Configuration" screen, choose "No" for the "Install demo products" option. ONLY DO THIS IF YOU HAVEN'T CUSTOMIZED ANYTHING YET. Note that you will also lose some useful content, such as all the modules, the default theme, as well as the default contacts and contacts, administration profiles and CMS content, which you will have to recreate by yourself. In short: you'd be better off deleting the sample content by hand. |
...
Now that you have a clean shop, you can start making it your own, and that implies setting everything up to your likings, starting with your personal information and your preferences.
Shop's basic settings
You should pay attention to the following settings, most of which are important because they are displayed on the front-office.
...
Setting | Description | Where to find it |
|---|---|---|
Shop name | Defines your brand, most notably on search engines (Google, Yahoo!, Bing...). | "ShopsPreferences" menu, "ShopsStore Contacts" page, then in the "Contact details" section, click the shop name. |
Shop logo | Defines your brand, visually and on your invoices. | "Preferences" menu, "Themes" page, "Appearance" section, then change the various default images to your logo. |
Shop Default shop currency | The currency in which you want to set the default price for your products. | "Localization" menu, "Localization" page, "Configuration" section. |
Customer service info | Displayed in the front-office, right column. | "Block contact" module. |
Contact info | Displayed in the front-office, footer. | "Block contact infos" module. |
Advertising | Image displayed in front-end office, left column. | "Block advertising" module. |
Image slider | A The slider is usually placed front and center of the homepage, and therefore is a strong visual signature for your shop and products. | "Image slider for your homepage" module. |
CMS pages | The content of static pages, such as "About Us", "Delivery", "Legal Notice", "Terms and Conditions", and "Secure Payment". Some of them have default content, which you should updateadapt to your business; some others are empty, and you should paste your own text. | "Preferences" menu, "CMS" page, then edit each page at will. |
These are the most visible default settings on your front-end – at least with the default theme.
Shop languages
PrestaShop is able to work with many languages, both on the front-office and the back-office. Each back-office text-field is accompanied with a flag icon, which indicates the current language, and which you can click in order to choose another language in which to write that field's content.
...
By default, PrestaShop is only installed with one language: Englishthe one used when installing the software. You can easily enable more languages: open the "Localization" menu, choose the "Languages" item, and the page. It opens, with a table of all 5 available languages: English, German, Spanish, French, and Italian. The currently enabled language(s) have green check mark, while the others have a red "X". Click on any of the red "X" in order to enable its language.
| Info |
|---|
You can enable as many all five languages as if you feel think your shop needs them, but be aware that this will means that you will have to create translate your content for all of the available languages: product name, description, tags; category name and description; static content (CMS pages); etc. |
Only 5 languages are available by default. You can add more if you need. Find out how in the "Managing LocalizationUnderstanding Local Settings" chapter.
Employees information
...
To create a new employee profile, go to the "EmployeesAdministration" menu, select "ProfilesEmployees", and click the "Add new" button. Fill in a name, such as "Martin Doe" or "Shipping handler", and save.
Now that you have a proper account, you should give it specific permissions, tailored to the profile's activity. A profile can be used for as many employees people as needed – but we do advise you to create one for each helping person.
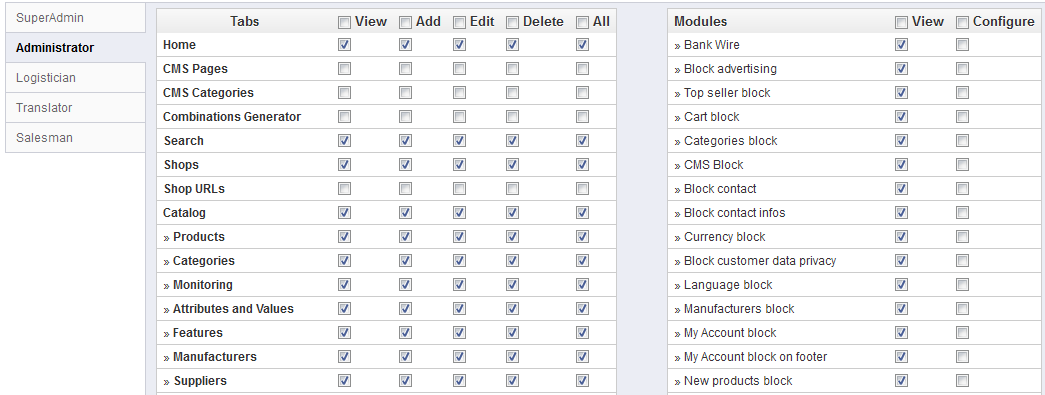
To assign permissions to an employee profile, go to the "EmployeesAdministration" menu, select "Permissions", and select the profile you just created. A long list of permissions appears. By default, a new profile cannot do much. It is up to you to set exactly the parts of your shop which that employee profile should have access to. It can be a tedious task, but it is an important.
To create an employee account, go to the "Employees" menu, select "Employees", and click the "Add new" button. Fill in the details, and do not forget to select the employee profile at the bottom. Once done, click the "Save" button.
...
Configure payment methods
Your shop is meant to earn money, and this can only become a reality if you use at least one payment module. 13 16 modules are already available in the default install, which you can install and configure (from the "Modules" page under the "Module" menu, in the "Payments & Gateways" module section)category), and create restrictions for them (in the "Payments & Gateways" page under the "Modules" menu). Many payment modules require you to first set up an account on the service they were built for.
See the "Payment & Gateways" section of the "Making The Native Modules Work" chapter of this guide in order to learn about them all.
You can also install other payment modules, downloaded from the Addons marketplace: http://addons.prestashop.com/en/4-payments-gateways.
| Info |
|---|
Check and bank wire are the only two payment methods which are enabled by default. If you choose to keep them, you need to configure them with your information: check order and address, account owner, bank details (IBAN, BIC, etc.)... These payment methods are configured through the "Bank Wire" and "Check" modules, which you can find in the "Payments & Gateways" category or the modules list. |
...
See the "Managing Shipping" chapter of this guide in order to learn about shipping and carriers.Note:
| Note |
|---|
Merchandise return is not enabled by default. If you want to allow your customers to return products and get a refund or a voucher, you can do it in the "Merchandise return (RMA) options" of the "Merchandise return" page, under the "Orders" menu. |
Choose your theme
Your shop should have its own theme in order to have a distinctive style, and therefore be more recognizable, separating it from the numerous other shops online.
...
You can and should customize some of the theme's aspects, most notably its logo in various situations (header, mail, invoice, etc...). This is done using the "Themes" preferences page, which you can find under the "Preferences" menu.
...
See the "Managing Modules" chapter and "Making The Native Modules Work" chapters of this guide in order to learn about them all.
You can also install find many other payment modules , downloaded from on the Addons marketplace: http://addons.prestashop.com/en/2-modules-prestashop
| Tip |
|---|
Every time you activate and configure a module, make sure that it does work well within the confines of your theme, |
...
in case its features impact your shop's front-end. |
Create products and product categories
...
If you haven't done this already, you should take the time to write the content for the various CMS pages which are either already available in your PrestaShop installation, or create the ones that you feel are needed.
Some pages already exist, but their content should really be triple-checked, as they can have a lot of impact on your shop's legal status, among other things.
...