...
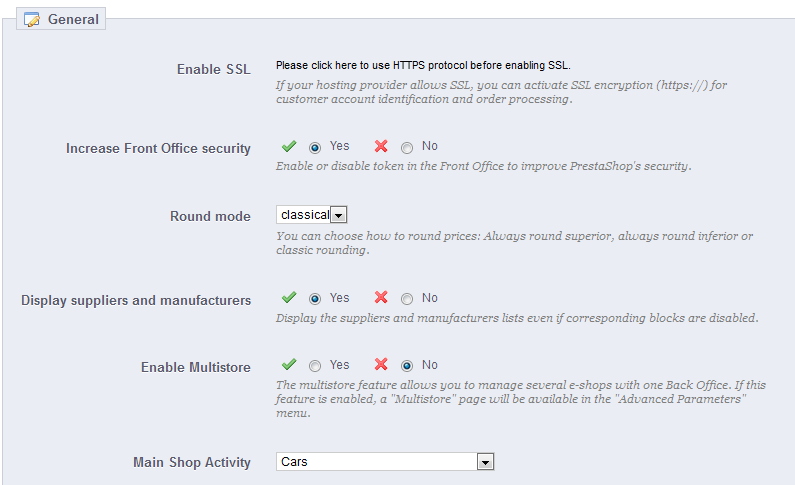
- Enable SSL. SSL means "Secure Sockets Layer", and includes TSL (for "Transport Layer Security"). Both are cryptographic Internet protocols which secure Web communications. You can read more about these protocols on Wikipedia: http://en.wikipedia.org/wiki/Secure_Sockets_Layer.
Providing an SSL connection to your shop is not only excellent for any Internet exchange, but also a great way to reassure your customers about the safety of their own data (authentication, credit card, etc.) on your shop, as modern browsers now display visual cues showing that the connection is secured. If your hosting provider does support SSL, make sure to activate PrestaShop's SSL support, by clicking on the link. This will reveal a selector, where you should choose "Yes". - Increase Front Office security. This adds security tokens to your shop in order to improve its security. In effect, each URL is specific to a customer's session, and cannot be used as-is on another browser, protected whatever information they might have stored during that session.
- Round mode. Once taxes and discount are applied, a price can feature too many decimals, such as $42.333333333. The round mode is used during the price calculation process (taxes, discount, etc.). There are three modes:
- Superior. Rounding up: 42.333333333 becomes 42.34.
- Inferior. Rounding down: 42.333333333 becomes 42.33.
- Classical. It actually truncates the number at the second decimal: 42.333333333 becomes 42.33.
- Display suppliers and manufacturers. The "Suppliers" and "Manufacturers" blocks can be removed from the front-end of your shop, by disabling their respective modules. Yet, using this option, you can have their list still be available, notable using the
/manufacturer.phpand/supplier.phpURLs. - Enable Multistore. New in 1.5. This little option has major implications: it turns your single-shop installation of PrestaShop into a multiple stores installation: this gives you access to the new "Multistore" menu, and every administration page can be contextualized to apply its settings to either all stores, a specific group of stores, or a single store.
You can read more about PrestaShop's multistore feature by reading the "Managing multiple shops" chapter of this guide.
Orders
The settings from the "Orders" preference page apply to the orders that your customers make, but also to some other details, such as gifting.
General preferences
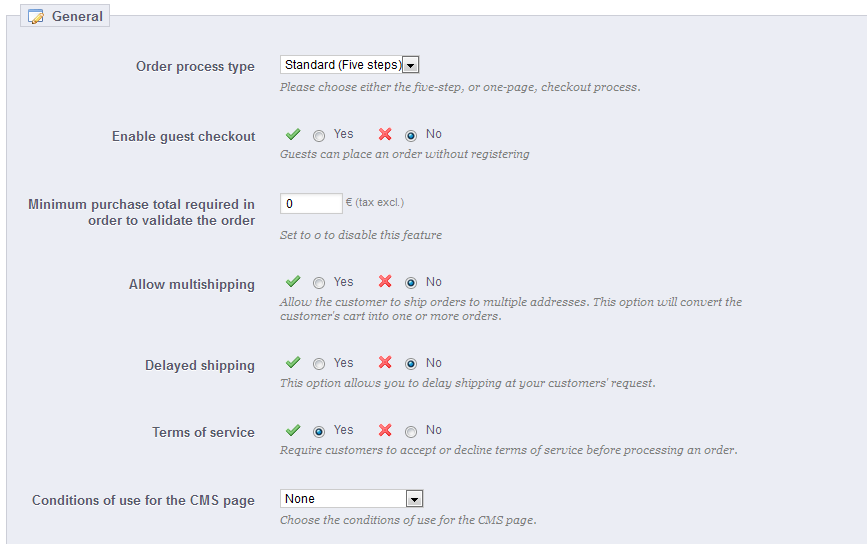
- Order process type. By default, the customer has to complete 5 steps in order to complete checkout process, each on a different page. However, you can choose to have it all done in a single page. The page will be longer, but many customers prefer this approach.
- Enable guest checkout. Allows non-registered visitors to place an order, without having to create an account.
- Minimum purchase total required in order to validate order. Indicates the minimum amount that must be in the shopping cart to submit an order. If the amount in this field is not reached, your customer cannot complete their purchase. If you do not set a minimum amount, enter "0" in the field.
- Allow multi-shipping. New in 1.5. Makes it possible for your customers to have their order split and sent to more than one address. This is very useful for a gifting shop, for instance.
- Delayed shipping. New in 1.5. If you enable the "Allow ordering of out-of-stock products" option (in the "Products" preference page), you can allow order items to be dispatched as they become available, in as many shipment as needed (depending on how you team sees it fit). Initially, PrestaShop will split the order in two: the available items are send right away, while the other items become a second order, waiting to be validated.
- Terms of service. Makes your customers have to accept your terms of service before they can validate an order.
- Conditions of use CMS page. Your shop's "conditions of use" are to be stored in a static page (a "CMS page"). Select which page to use so that PrestaShop can point to it correctly.
Gift options
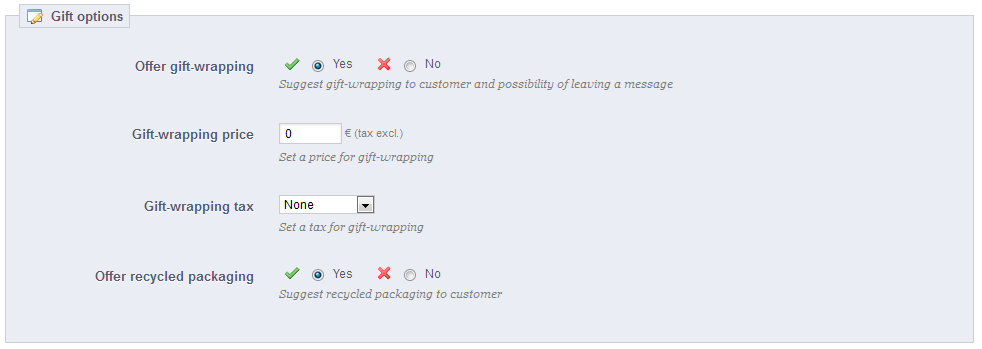
- Offer gift-wrapping. Have PrestaShop suggest gift-wrapping to customer, and the possibility of adding a printed a message. It is always a nice feature for people who want to send gifts through your shop.
- Gift-wrapping price. Sets the price of your gift-wrapping service.
- Gift-wrapping tax. If needed, indicates to which local tax the gift-wrapping is tied. You can add more taxes in the "Taxes" page, in the "Localization" menu.
- Offer recycled packaging. If you can offer this service, many customers will appreciate it.
...
This page contains a few preferences pertaining to how your products are to be handled and displayed by PrestaShop.
General preferences
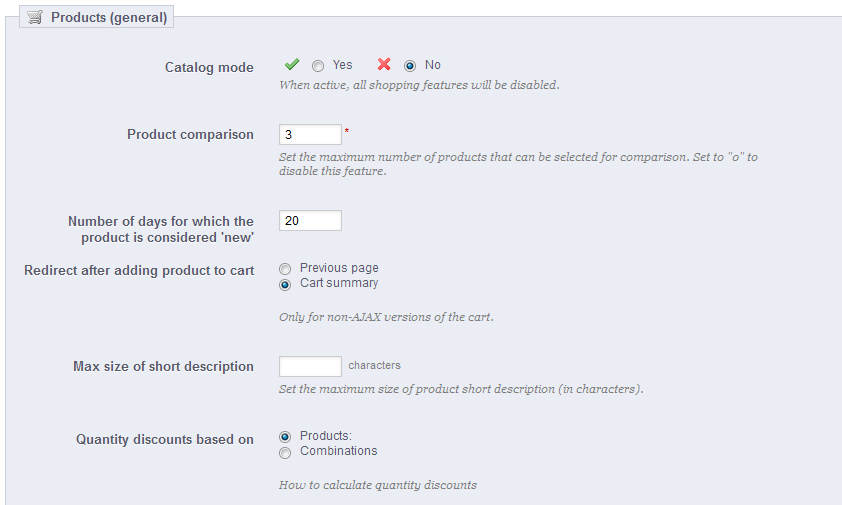
- Catalog mode. Enabling catalog mode turns your shop into a simple gallery of products, with no way to buy the items whatsoever.
- Set the maximum number of products that can be selected for comparison.
- Number of days during which the product is considered 'new'. When you add a product in your shop, it is considered new and it is reported back through the "New products" block and the "New products" page. The field allows you to specify how many days the product will remain visible on the block and page. With this feature, you choose how to display and updated your shop's news. This page is usually most accessed by your regular customers.
- Redirection after adding product to cart.
- Short description max size.
Pagination preferences
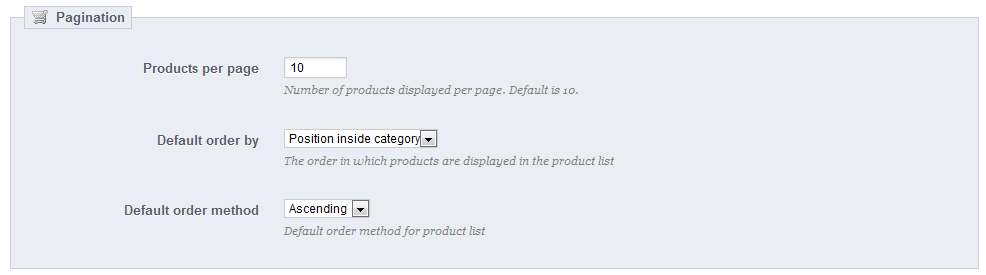
- Products per page. Indicate how many products are displayed on the pages of your categories.
- Default order by. Indicate the order of products in your shop's categories. 6 choices are available:
- Product name. Displays a list of your products based on the first letter of the product.
- Product Price. Displays your products according to their prices.
- Product Added Date. Displays your products according to the date added to your shop.
- Position inside category. Displays your products as they are positioned in the categories in your catalog. The position of the products can be modified directly in the catalog of your shop using the position arrows. This way you have your product in the most attractive fashion for your customers.
- Manufacturer. Displays your products in alphabetical order of their manufacturers' names.
- Project Modified Date. When you edit your products the modification date is changed. They will appear in the order of modification date.
- Default order method. The above options can be sorted by ascending or descending order.
Product page preferences

- Display available quantities on product page. By enabling this feature, your visitors can see the quantities of each object available in stock. Displaying this information can be used to stimulate sales in the case where the quantity in stock is low. The quantities displayed are the selected attributes and combination.
- Display remaining quantities when qty is lower than. You can choose to display an alert when the remaining available stock for a product gets below a certain level. This option is particularly useful for promoting purchases. The text and placement of the alert depend on the theme; in the default theme, it is "Warning: Last items in stock!", and is placed directly below the "Quantity" field.
- Enable JqZoom instead of Thickbox on product page. By default, a bigger version of the product image is displayed as an overlay of the product page, at the click of the mouse. Once you activate this feature, visitors will still be able to click on the image in order to get the zoom, but a zoom will also appears whenever the mouse hovers over the product's image.
- Display unavailable product attributes on product page. Your products can be composed of many different combinations or attributes: color, size, capacity, etc. Attributes can be edited in the "Attributes" page of the "Catalog" menu. Read the chapter titled "A Look Inside the Catalog" to learn more about attributes, and how to use them.
When one or several attributes are not available anymore, you have two possibilities:- First possibility. Leave this preference active. Example: The "iPod Shuffle" is no longer available in "Blue" in our shop. By keeping this option enabled, the product's combination will remain visible in the shop. A message will indicate that the product is no longer available in the chosen option, and invite customers to choose another combination. If you enabled the "Allow ordering of out-of-stock products" option (see below), then they will be able to add the unavailable combination to their carts.
- Second possibility. Disable this preference. If the "Blue" combination of the "iPod Shuffle" product is no longer available, that selection is not displayed the front-office and the customer cannot select it. This feature helps to clearly display the availability of your products.
- Display "add to cart" button when product has attributes. New in 1.5. This option prevents customers from adding a product to their cart directly from the category page, if that product has combinations. This forces customers to visit the product's page and pick a combination, instead of only adding the default one to the cart. Note that products with no combination will still have an "Add to cart" button in the category page.
Products stock preferences
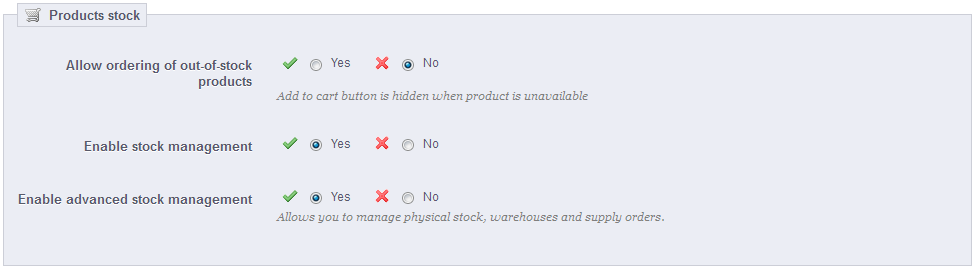
- Allow ordering of out-of-stock products. New in 1.5. If a product does not have any available stock anymore, the customer can still order it.
- Enable stock management. This option gives you access to basic stock management options and features: you can set the current quantity of product, and have PrestaShop lower it for each order, and "re-stock" for each canceled or returned order.
By default you should leave this feature enabled, as disabling it affects the entire inventory management of your shop. Only if you do not have any physical inventory should you disable it – for instance, if you only have virtual products. - Enable advanced stock management. New in 1.5. Another little option which has major implications: it adds a new menu called "Stocks", which makes it possible to manage very precisely your stock, on a per-warehouse basis if necessary. You can see all the details about your stock: movement, coverage, re-stocking orders, etc.
You can read more about PrestaShop's advanced stock management feature by reading the "Managing Stock" chapter of this guide.
...
The "Customers" page appeared in version 1.5 to bring together specifically customer-related options, most notably the B2B mode.
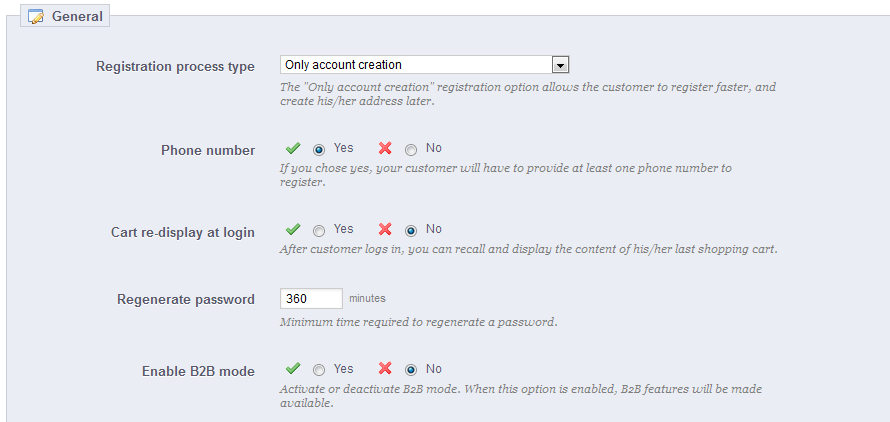
- Registration process type. New in 1.5. You can let visitors create a new account without any immediate obligation to register an address, or force them to register an address as soon as they create their account.
The first option makes it quicker to create account, which is great, but this will add a new mandatory screen once they want to validate an order, which can turn them off
On the other end, the second option makes account creation longer, but at least they will already have an address registered when they want to validate an order. - Cart re-display at login. If the customer had a cart that was not checked-out, display it once he or she logs back in.
- Regenerate password. New in 1.5. You can choose to limit the frequency at which a customer can generate a new password for his or her account. By default, it is set at 360 minutes – 6 hours.
- Enable B2B mode. New in 1.5. The B2B mode brings a handful of new features to your store. Customers are no longer considered as individuals but as companies, and therefore some new options appear: customer profile has new fields related to professional information, prices can be masked and be managed on a per-customer basis for the whole catalog or per category, invoices can be generated manually, etc.
...
The first section of the page gives you a complete list of the themes currently available on your installation of PrestaShop. Their 'edit' section lets you change their name and directory (if any another directory is available).

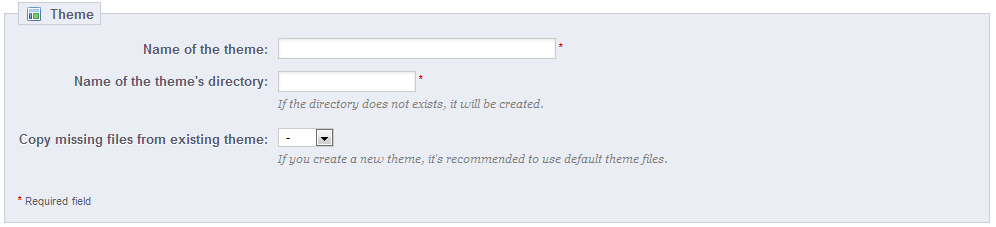
The "Add new" button gives you access to a form that helps you register a theme on your installation. This very useful when you need to create a new theme.
- Name of the theme. Make sure the name is not already used by another theme.
- Name of the theme's directory. If you have not already created a theme folder, PrestaShop will create one for you.
- Copy missing files from existing theme. This is the cleanest method to start a new theme from another theme's files. It is highly recommended, when you begin, to create a new theme from the default theme's files, as this makes sure you have all the needed files.
Select theme for shop <name>
This is where you can change the theme for the current shop. The interface presents you with a list of thumbnails of the currently available themes on your PrestaShop installation, and it is up to you to choose the one theme you want to use for your shop.
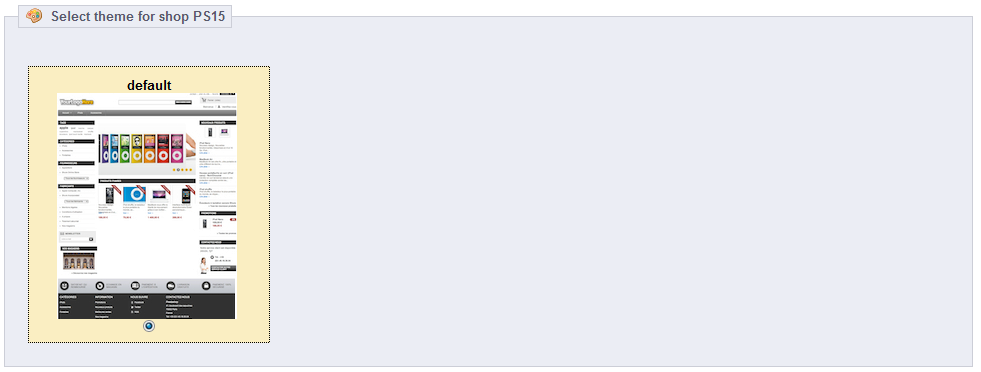
| Note |
|---|
In multistore mode, you cannot apply a theme to all your stores or a group of stores; you must select a single store in the multistore menu, then pick a theme. |
...
This section helps you to quickly customize the current theme: header logo, mail logo, invoice logo, favicon, store icon and even the navigation pipe can be easily modified from there.
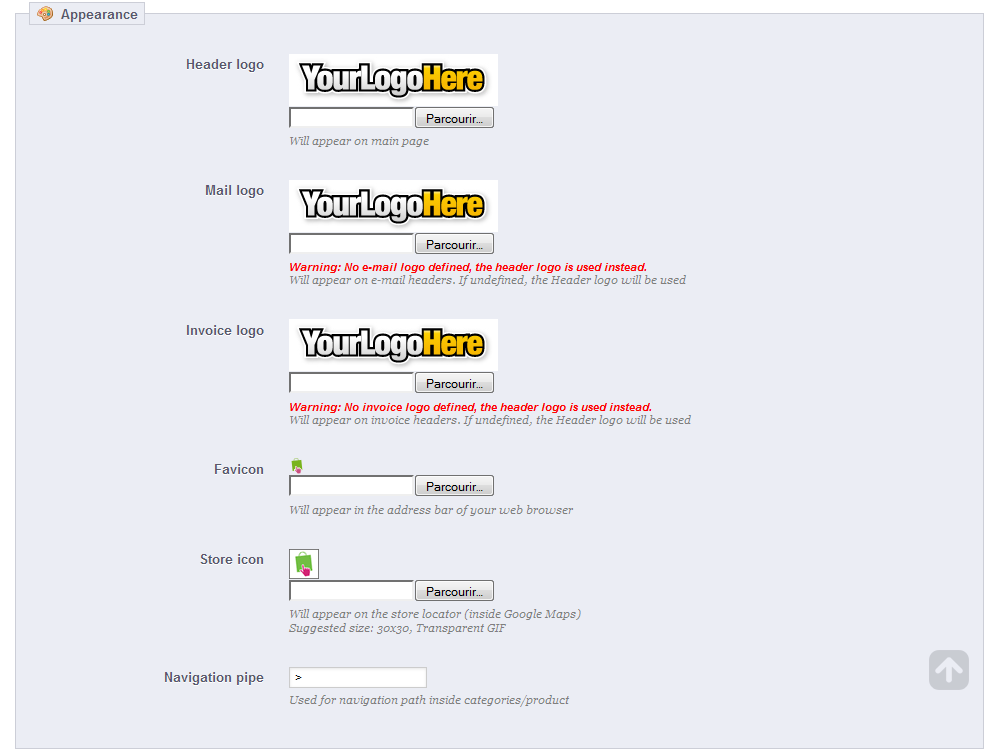
| Note |
|---|
In multistore mode, you can apply these changes to all your stores or a group of stores at one time, using the multistore menu. |
Live from PrestaShop Addons!
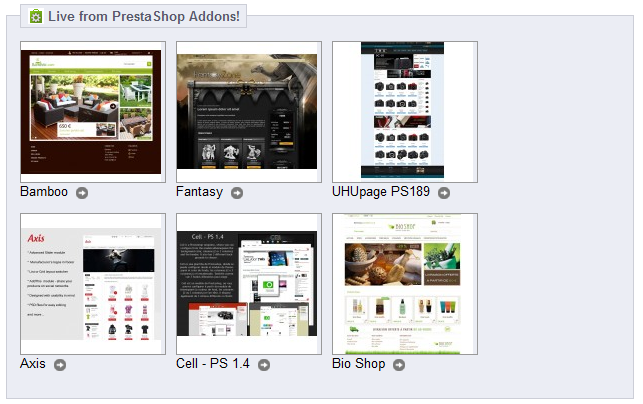
This presents you with 6 of the latest themes from PrestaShop's Addons marketplace. You can click on each image to reach the theme's individual Addons page and get a better view of it, and possibly buy it.
...
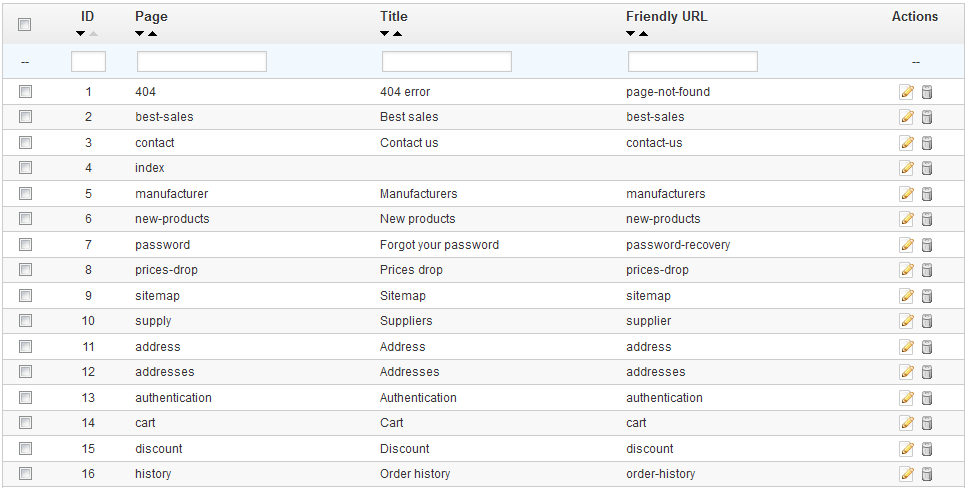
There are other individual pages in your PrestaShop install that would certainly benefit from friendly URLs: CMS pages, user account pages, pages with automatically generated content... The "SEO & URLs" page presents you with a list of these pages, and enables you to edit their friendly URLs.
| Warning |
|---|
Friendly URLs only work with a server setup that supports URL rewriting. Make sure to check that yours does (ask your hosting provider!), as it can make your shop completely unavailable to customers if you enable friendly URLs and the server does not support it! |
...
| Tip |
|---|
Make sure to field the fields for all the available languages on your shop: not only is it immensely useful to local users, but some search engines can even make use of this local information. |
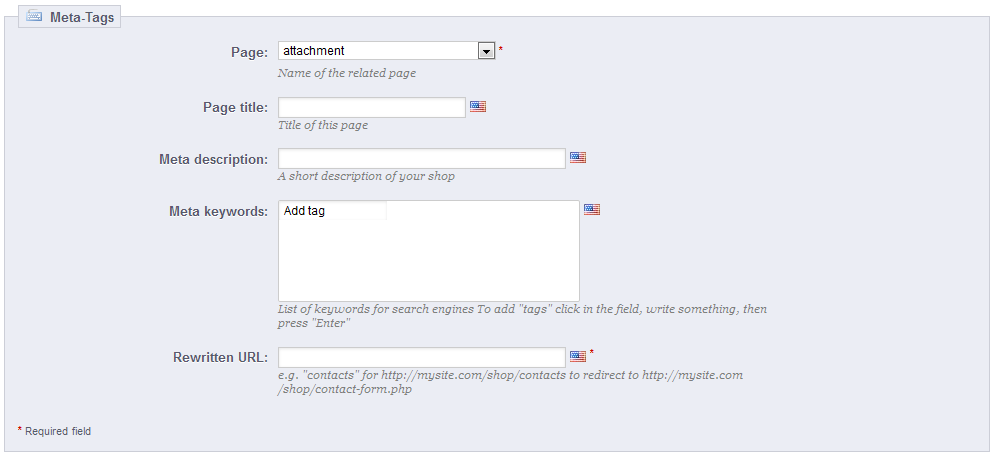
Click the "Add New" link to reach the friendly URL creation form. It has a handful of fields:
...
- Friendly URL. Change this option if you know that your server can support URL rewriting. If not, leave it at "No".
- Automatically redirect to Canonical URL. Canonical URLs are a way to eliminate self-created duplicate content – which can dramatically bring your search engine rank down, as this is considered spam. To avoid search engines thinking you are spamming their index, PrestaShop uses standard
rel="canonical"link tag to indicate which is the one base URL for a given content.
While it is highly recommended to enable this option, it also depends on your theme actually implementing correctly the<link>header tag. Ask the theme designer for more information. - Disable apache multiviews. Apache is the most popular web server, and is most likely the one your web host uses for your site (although you should check this for yourself). Multiviews is a content negotiation system where the web server tries to serve the user a page in what it thinks is the best matching language version, under the same URL. Unfortunately, this might bring trouble to PrestaShop's friendly URLs. If this is the case, you can try to disable multiviews with this option.

| Info |
|---|
In previous version of PrestaShop, you had to manually generate a new |
...
- Shop domain.
- SSL domain.
- Base URI.
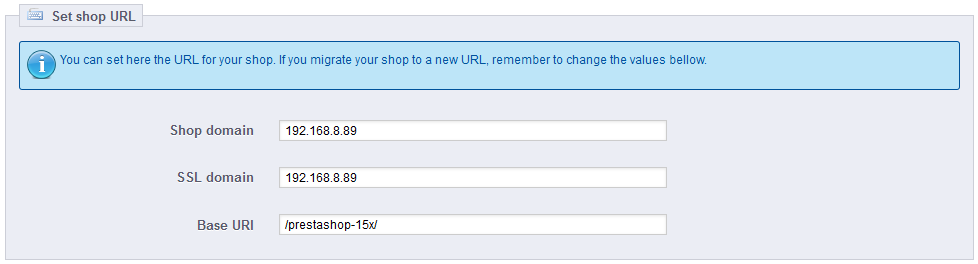
Most of the time, you should not touch these fields without knowing exactly what you are doing. One mistake could break your shop.
...
A robots.txt file enables you to block specific automated bots and web spiders, which crawl the web in order to find more web pages to add to their company's servers. Some bots you want to have full access to your website, such as Google's or Yahoo's, and some others you would rather not, such as spam bots, content stealersthiefs, e-mail collectors, etc. Note that the worst of bots do not respect this file's directives, as it is purely advisory.
...
Clicking on the "Generate robots.txt button" replaces any existing robots.txt file with a new one. Therefore, if you want to add your own rules, do it after PrestaShop has generated its version of the file.

CMS - Managing Static Content
...
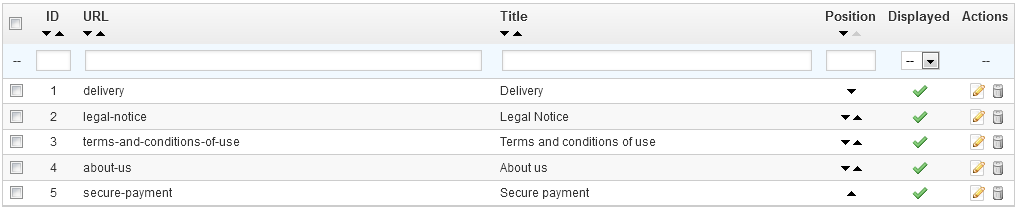
The "CMS" page presents you all the content pages that were previously created on your shop, for the currently selected category (by default, the home page is the only category).
| Tip |
|---|
Do not forget to create one version of each page for each of your supported languages! As usual, click on the flag for each field in order to change language. |
...
Click the usual link to create a CMS category – actually, a sub-category of the root category, "Home". You can create as many categories as needed.
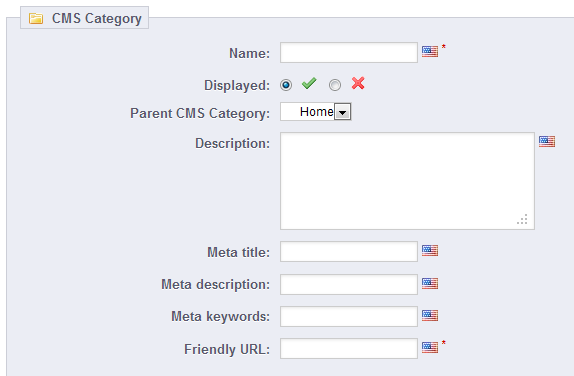
The form is quite basic:
- Name. Make sure to use a short and straightforward word.
- Displayed. Whether the category and its pages are available to the public, or hidden.
- Parent CMS category. The category under which this category is placed. By default, "Home". You can have an unlimited number of levels of categories.
- Description. Do fill this field in all languages, as some theme can display that information to customers.
- Meta title. The name of the category, as displayed in the browser.
- Meta description. Used to describe the content of this category for search engines.
- Meta keywords. Used by search engines to understand what type of information the category is composed of.
- Friendly URL. Makes it easier for search engines to index your content, and for visitors to understand what they will find in the category. This field is automatically filled as you enter the category name, but you can still edit it manually.
Creating a New CMS Page

Click the "Add New" link to reach the content creation form:
...
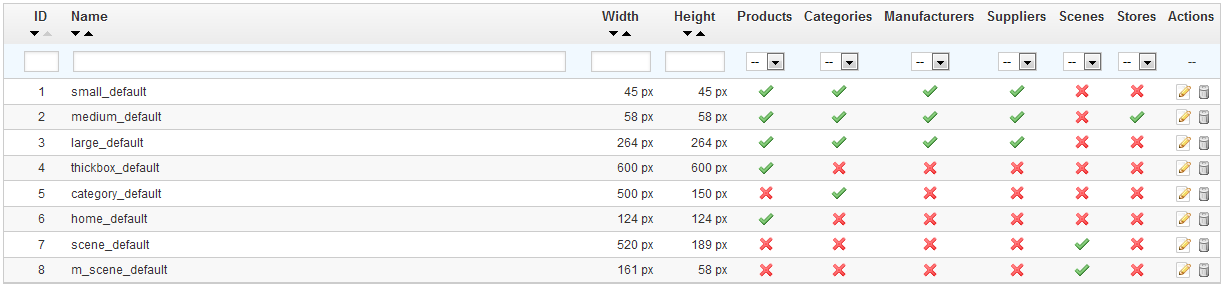
The "Images" preference page enables you to configure the various image sizes that your customers will see on your shop.
| Note |
|---|
In the "Products" page under the "Preferences" menu, you can choose to have a zoom appear when the cursor hovers over a product's image. |
...
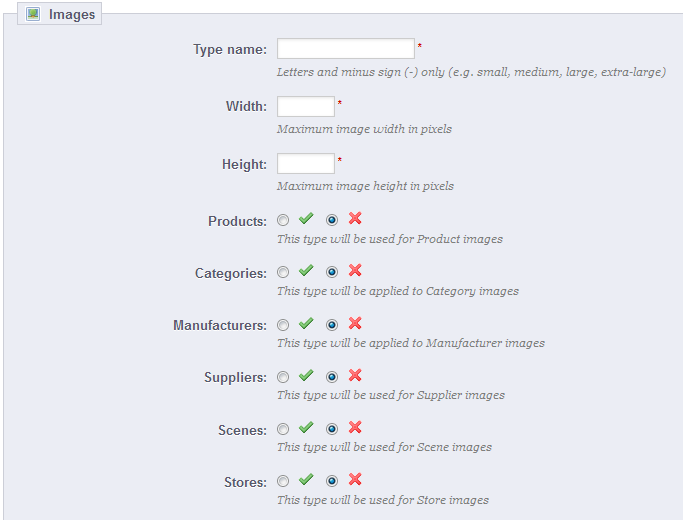
- Type its name, width and height.
- Choose to which type of content it applies.
- Validate.
Images preferences
New in 1.5.
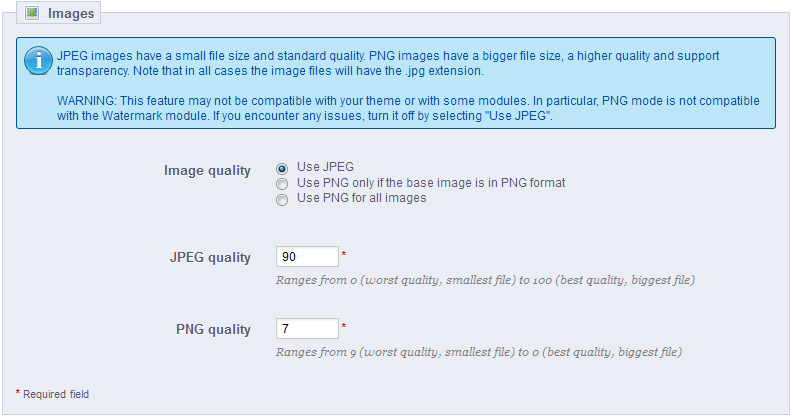
- Image quality. You have the choice between two of the major file formats: JPEG and PNG. Both are well established among browsers. JPEG has a good compression ratio, but can result in visible artifacts. PNG's compression algorithm is not as good as JPEG's, but there are comparatively fewer visible artifacts; nonetheless, older browsers might not recognize this format.
Choosing between one or the other is often a matter of taste. That being said, JPEG remains the recommended choice. If you would rather prevent information loss because of a format change, choose the second option, "Use PNG only if the base image is in PNG format".Warning PNG format is not compatible with the "Watermark" module.
- JPEG quality. Do not choose anything below 80 or at worst 75, for fear of visible compression artifacts.
- PNG quality. Do not choose anything below 7 or at worst 6, for fear of visible compression artifacts.
Product images
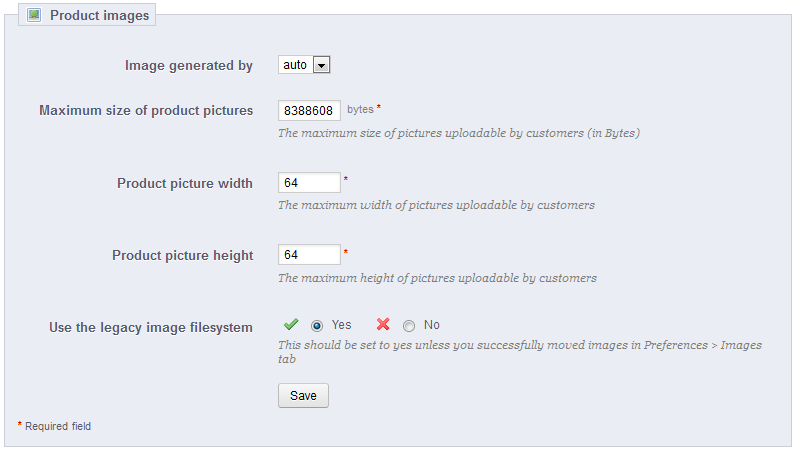
- Image generated by. This feature allows you to position the product image in its pre-established space:
- Choose "height" in order to fill the frame height (the width is then recalculated to maintain the same height/width ratio as in the file of origin).
- Choose "width" so that the image fills the width of the frame (the height is then recalculated to maintain the same proportion).
- Choose "auto" so that the width and height are calculated to maximize the space it can occupy in the frame.
- Maximum size of product pictures. Your customers can upload pictures for customized products. By default, PrestaShop sets this value to the PHP maximum setting – this can mean several megabytes: for instance, 8,388,608 bytes means 8 Mb. You can expand this value if necessary, but make sure that your PHP installation is able to take file uploads of this size.
- Product picture width. By default, customers can upload image with a maximum width of 64 pixels.
- Product picture height. By default, customers can upload image with a maximum height of 64 pixels.
- Use the legacy image filesystem. Only change this setting if you have moved the images folder from its default location.
...
- Change the image size settings in the table at the top of the "Images" preference page.
- Select which content's images should be regenerated.
- Indicate whether the previous thumbnails should be kept or not.
- Click "Regenerate thumbnails".

| Warning |
|---|
Manually uploaded thumbnails will be erased and replaced by automatically generated thumbnails. |
...
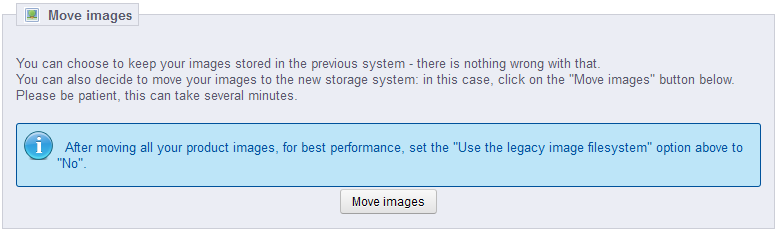
The process is really simple: just click on the "Move images" button, and PrestaShop will take care of everything. Once the process is completed, do not forget to change the "Use the legacy image filesystem" option, and set it to "No".
Store Contacts
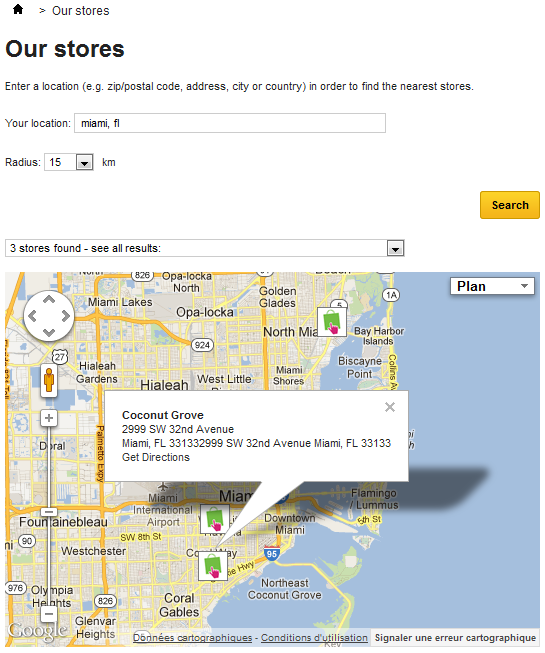
PrestaShop provides a complete physical store locating tool for your customers, with detailed contact information.
...
You can choose how these stores are displayed in the front-office.
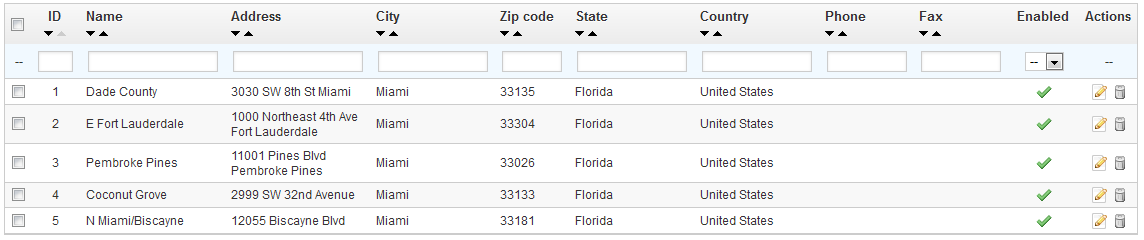
All your stores are listed in a handy list, giving every store's information as well as an indicator telling whether the store is currently active or not – you might for instance want to gather the information for a new store in advance, in order to have its page ready for the launch.
Adding a new physical store
As usual, click "Add New" to reach the store creation form.
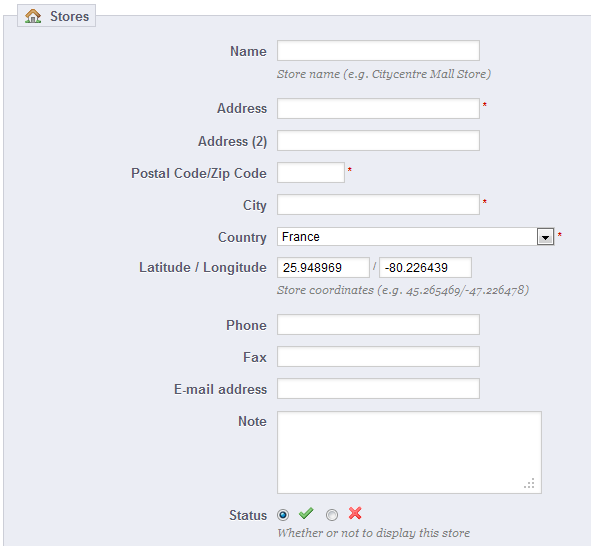
Fill as many of the fields as possible, as they will be displayed to your customers within the map.
One very important field is the "Latitude/Longitude" one, as this is what PrestaShop uses to indicate the location of your store. You can use Steve Morse's online tool to get the lat/long coordinates of a given address: http://stevemorse.org/jcal/latlon.php.
...
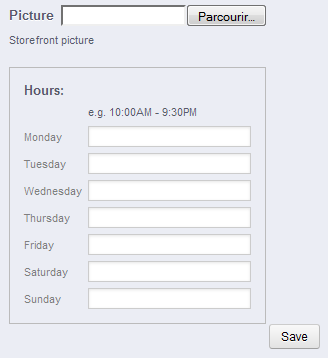
Finally, the business hours are an essential part of any physical store, and you should be as precise as possible about them.
Parameters
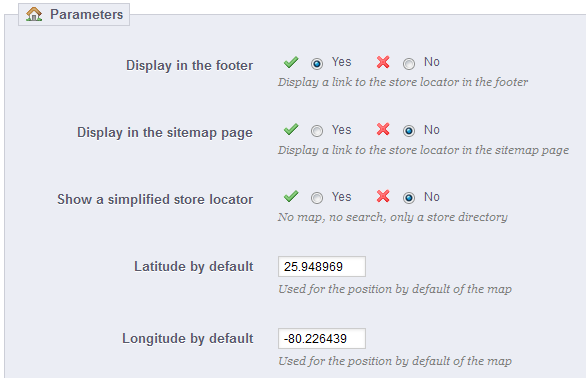
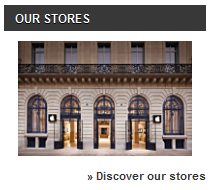
- Display in the footer. By default, PrestaShop displays a link to the store locator, titled "Our stores", in your shop's footer. In the default theme, it appears in the "Information" block, below the special product listing pages (best sellers, new products, specials, etc.). You can choose not to have that link appear here.
- Display in the sitemap page. You can choose to add the "Our stores" link in your shop's sitemap page, which lists all the pages on your site (not to be confused with your Google Sitemap file, which is for SEO purpose).
- Show a simplified store locator. The store locator presents itself as an interactive map with a search field. You can choose to make that interface much simpler by only displaying a list of stores.
- Latitude by default and Longitude by default. The default starting position of your map. Very useful when you have many stores and you would rather primarily point customers to a specific area.
...
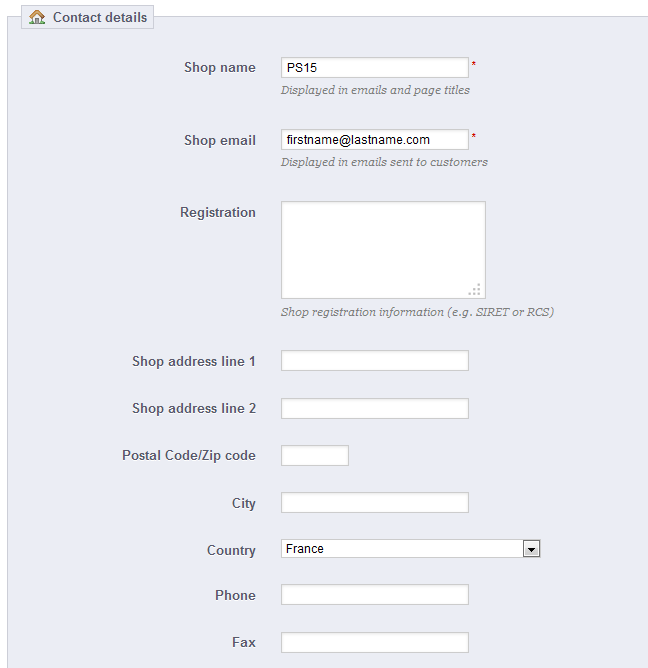
This section enables you to give the main details of your company, rather than those of a specific shop. You should fill all the fields with information on your headquarters, as this is certainly the address customers will use to contact you, or even visit you.
Most of these fields are obvious, but some fields should be carefully crafted:
...
When customers make a request using your shop's internal search engine, they may make mistakes in spelling. If PrestaShop does not display the right results, the "alias" feature can address them. You will be able to take words containing spelling errors, and point them to the real products sought by customers.

To create a new useful alias, you should first find the spelling errors most often typed by your users:
...
The creation form is very straight forward: indicate the typo you want corrected, and the correct word it should lead to.
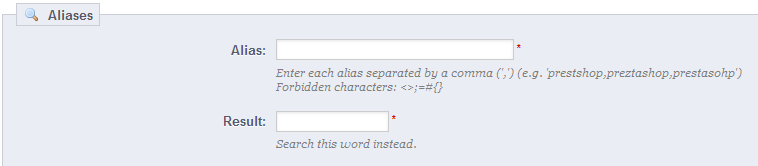
For instance, let's say your visitor frequently type "player" as "palyer" and "plaier". You can create an alias for each of these typos, which will match the word "Player". Your aliases can be used as soon as they are saved.
...
This section provides information on the number of products that can be searched through your shop's search function, and compares it to the number of products present in the database. If the values do not match, you must select the "Add missing products to the index" option. Only the new products will be indexed.
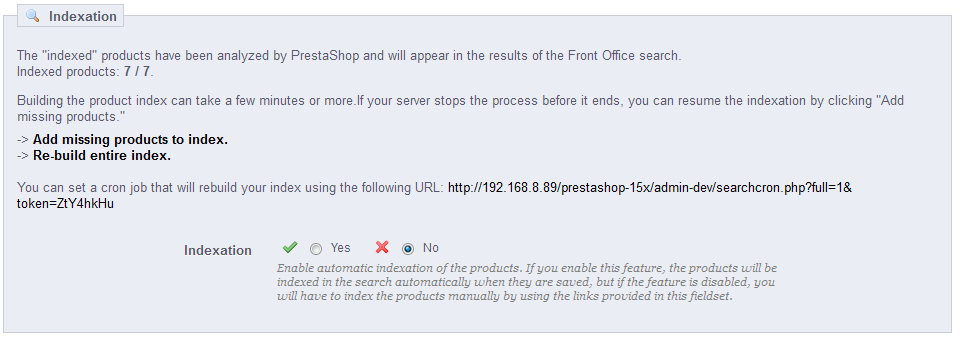
If you have made several changes to already indexed products, you might prefer to choose to re-build the whole index. The "Re-build entire index" process takes more time, but it more thorough.
PrestaShop also gives you the URL to let you create a cron task for regular re-building of the index. If you do not know about cron and crontab, ask your web host about it.
Search options
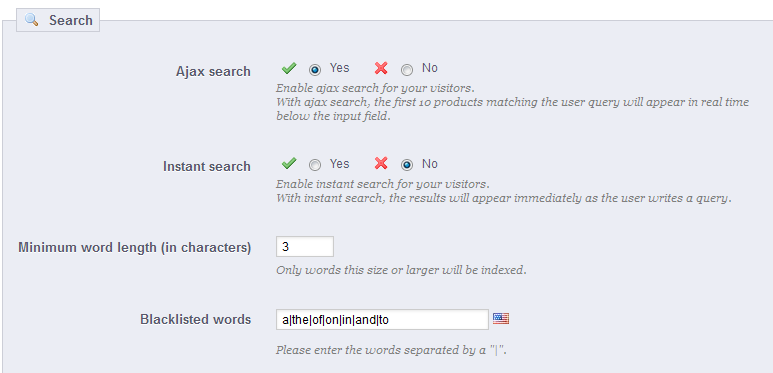
This section enables you to configure the behavior of your shop's search function:
...
PrestaShop enables you to prioritize certain data when a search is performed on your shop.
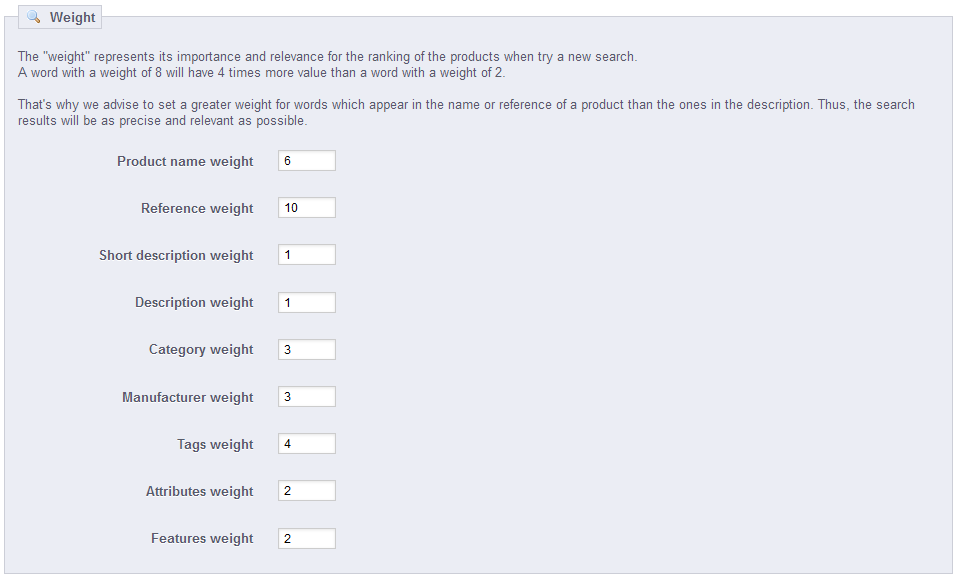
As indicated in the section, the search "weight" of a product represents its importance and relevance for the ranking of the products when customers try a new search.
An item with a weight of 8 will have 4 times more value than an item with a weight of 2.
...
This very simple preference page will be invaluable when you want to make changes to your shop without your customers noticing. For instance, when you are adding several new products at once, or when you want to change the theme and make several tests before making it available to the world.
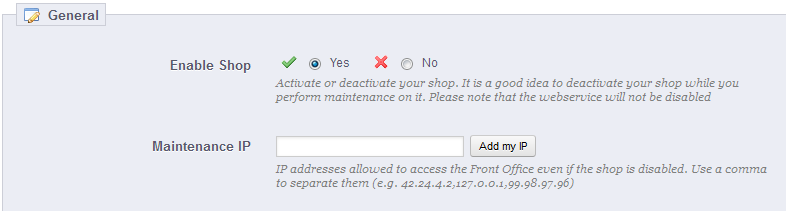
This page only has two options:
...
Once the file is in place, enable the "Geolocation by IP address" option, and you are set.

Options
You can choose which countries can access your shop (by default, all of them), and set PrestaShop's behaviors for restricted and unrestricted countries (or "other" countries). You choose between these three options:
- Visitors cannot see your catalog.
- Visitors can see your catalog but cannot make an order. In effect, you shop is in "Catalog mode".
- All features are available (only for unrestricted countries).
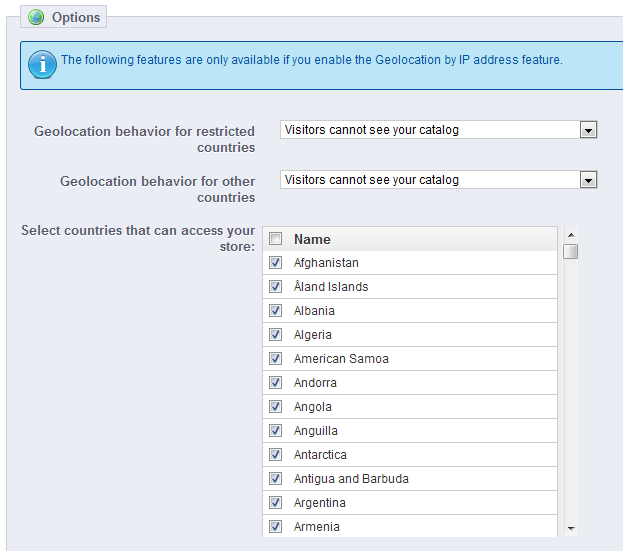
You can select or deselect all countries at once by checking the box at the top of the list. When selecting countries that can access your online shop, make sure to block any country by mistake, as you would lose all potential sales to its inhabitants!
...
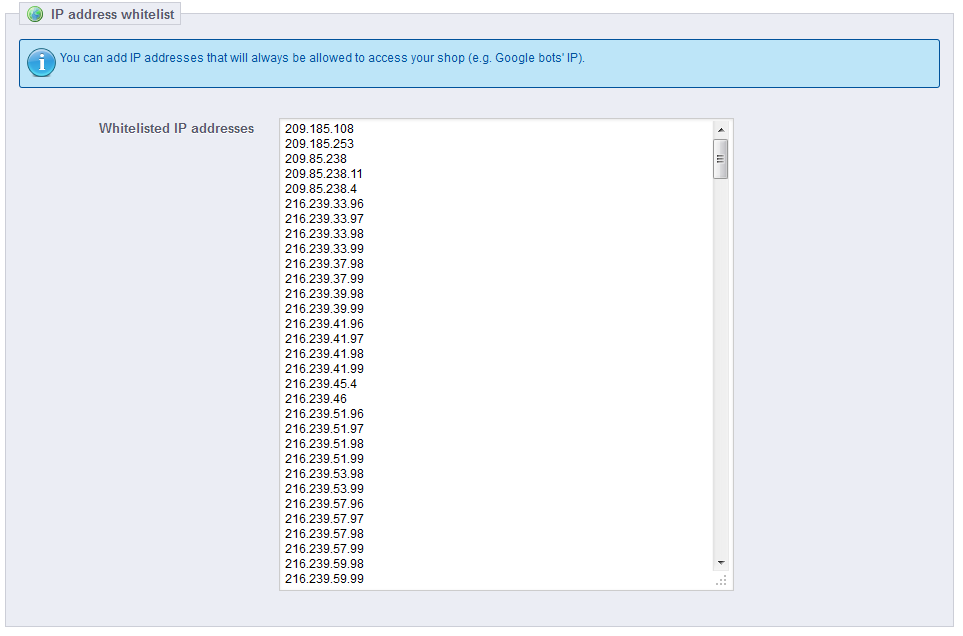
This section enables you to accept specific IPs address. It can be useful in case of spammers, bots or attacks. It is already filled with a list of known good IPs. Add as many as needed, one per line, and click "Save".