Table of contents

Kennis maken met het administratiepaneel
Nu dat u PrestaShop 1.6 hebt geïnstalleerd en dat u bent ingelogd in uw administratiepaneel, moet u ervoor zorgen dat u gemakkelijk de weg kunt vinden door de interface van het administratiepaneel, begrijpen wat de notificaties betekenen en waar u specifieke informatie kunt terugvinden.
Het design van het administratiepaneel is compleet veranderd met versie 1.6 van PrestaShop om nog ergonimischer en intuïtiever te zijn alsook beter te laten werken op mobiele apparaten. Terwijl de meeste pagina's van versie 1.5 nog steeds op dezelfde plek zijn als u verwacht, kan het toch even duren voordat u gewend bent aan de nieuwe interface. |
We hebben dit hoofdstuk gemaakt om u te helpen bij het ontdekken van de nieuwe interface van het administratiepaneel. Het is ontworpen om erg ergnomisch te zijn en gemakkelijk om te gebruiken, maar wees er wel van bewust dat u de gehele handleiding moet doorlezen om uw nieuwe online business perfect onder de knie te krijgen!
Overzicht van de hoofdinterface
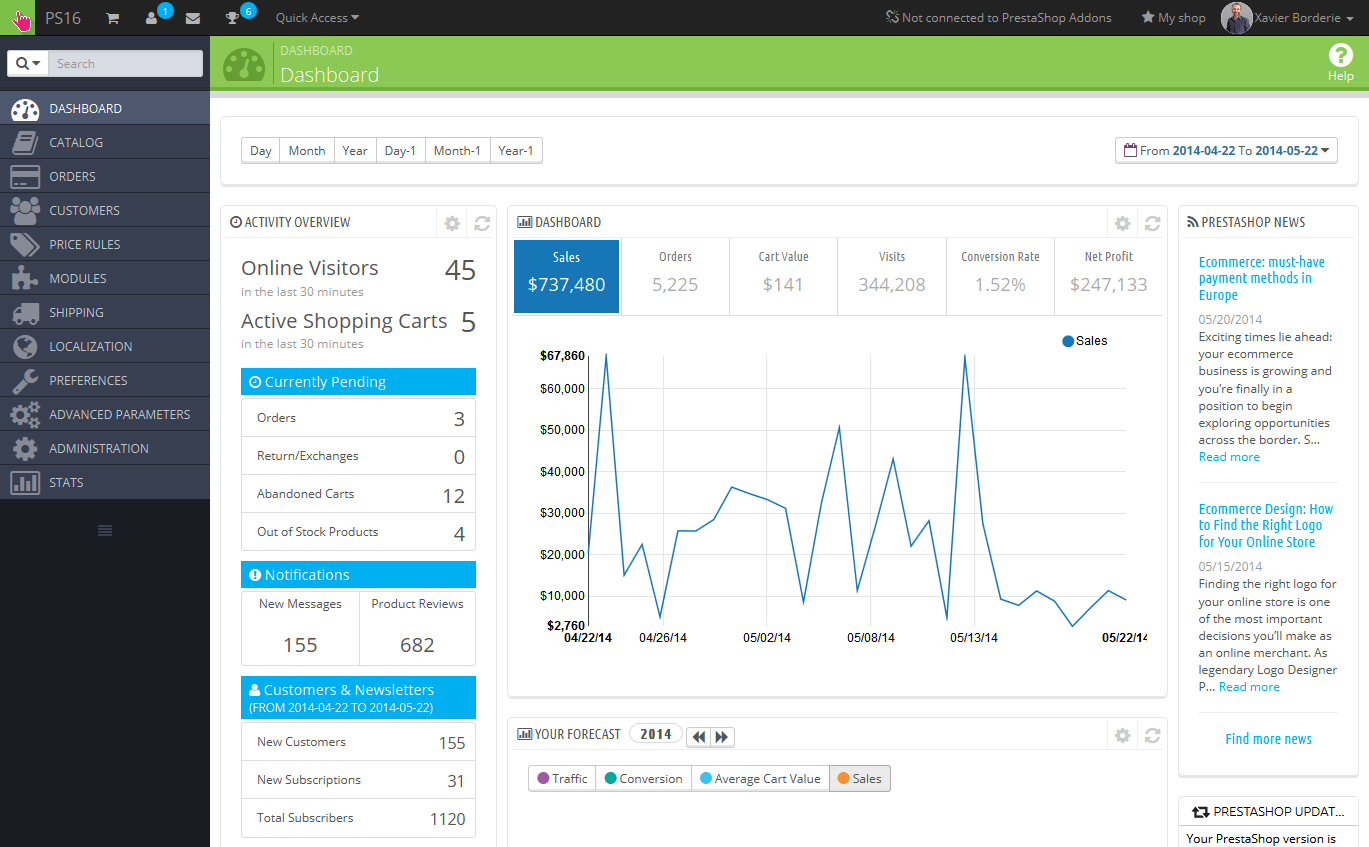
Neem de tijd om het Dashboard te leren kennen – dat is de eerste pagina die u ziet wanneer u inlogt op uw back office. Niet alleen toont het een samenvatting van alles wat u moet weten over uw winkel, samen met een aantal snelle links naar andere delen van het administratiepaneel, maar ook biedt het nieuwe gebruikers van PrestaShop tips met waar zij het beste naar kunnen kijken.
De topbalk

De topbalk van de backoffice is een zwarte balk met een handvol links:
- (naam van uw winkel). Vanaf elke pagina brengt deze link u terug naar het Dashboard.
- Winkelwagenicoon. Een badge geeft het aantal nieuwe bestellingen weer als deze er zijn. Als u hierop klikt komt er een paneel tevoorschijn met de nieuwe bestellingen sinds u voor het laatst op dat icoon hebt geklikt. Vanaf daar kunt u één van de nieuwe bestellingen bekijken of naar de lijst met bestellingen gaan.
- Gebruikersicoon. Een badge geeft het aantal nieuwe klanten aan als deze er zijn. Als u hierop klikt komt er een paneel tevoorschijn die de nieuw geregistreerde gebruikers weergeeft. Vanaf daar kunt u één van de nieuwe gebruikers bekijken of naar de lijst met gebruikers gaan.
- Envelope-icoon. Een badge geeft het aantal nieuwe berichten weer als deze er zijn. Als u hierop klikt komt er een paneel tevoorschijn met de meest recente berichten die de klantenservice heeft ontvangen. Vanaf daar kunt u een dergelijk bericht weergeven of naar de lijst met berichten gaan.
- Trofee-icoon. Een badge geeft het aantal nieuwe items weer als deze er zijn. Als u hierop klikt krijgt u uw vooruitgang als verkoper te zien. Vanaf daar kont u de pagina met trofeeën en punten bekijken afkomstig van de "Merchant Expertise" module.
- Snelle toegang. Dit is een menu met links die ingesteld kunnen worden via de pagina "Snelle toegang" onder het menu "Administratie".
- De link " Verbinden met het PrestaShop Marktplaats-account". Opent een popup die het mogelijk maakt om uw winkel te verbinden met de Addons-maktplaats en vanaf daar updates te ontvangen voor de modules en thema's die u heeft aangeschaft.
- "Mijn winkel" link. Opent een nieuw browsertabblad met de frontend van uw winkel.
- (uw naam) link. Een simpele dropdown met een herinnering van het administratieaccount waarmee u momenteel bent ingelogd.
- "Mijn voorkeuren" link. Dit brengt u naar de configuratiepagina van uw account, waar u enkele persoonlijke opties kunt instellen (bijvoorbeeld, de taal van de back office of uw wachtwoord).
- "Afmelden" link. Logt uw account uit.
De menu's
Om uw winkel dagelijks te beheren moet u bladeren door de vele pagina's en opties in de back office.
Standaard is het menusysteem in PrestaShop 1.6 aan de linkerkant weergegeven. U kunt het menu aan de bovenkant van de pagina laten weergeven door de optie "Oriëntatie beheerdersmenu" te wijzigen op uw "Mijn voorkeuren" pagina (deze kunt u bereiken via de link rechtsboven in de topbalk). 
In zowel verticaal of horizontaal formaat wordt de inhoud van elk menu weergegeven wanneer de muis over het menulabel zweeft. Dit voorkomt dat u telkens een nieuwe pagina moet laden om het menu uit te klappen. Als toevoeging kan de verticale versie verkleind worden tot slechts de iconen door op de "parallelle lijnen" te klikken aan de onderkant van het menu. |
Elke menu heeft een aantal taken en contexts beschikbaar:
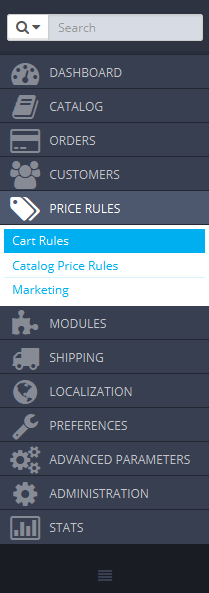
- Zoekveld met dropdown-lijst. Deze optie laat u uw winkel doorzoeken.
- Catalogus. Dit is het hart van uw winkel, waar u producten kunt toevoegen, categoriën aanmaken, vervoerders en leveranciers instellen, etc.
- Bestellingen. Zodra klanten producten toevoegen in hun winkelwagen en afrekenen, ziet u bestellingen staan in dit menu, met de bijbehorende facturen. Dit is ook waar u retouren afhandelt, creditnota's aanmaakt, klantenservice per bestelling kunt beheren, etc.
- Klanten. Hier kunt u alle informatie over uw klanten vinden, hun adressen bewerken, klantgroepen aanmaken waarmee u speciale kortingen kunt geven aan specifieke klanten en ook aanhef/titels van klanten beheren.
- Prijsregels. Een vrij specifiekd menu, deze zorgt ervoor dat u eenvoudig nieuwe waardebonnen en prijsreducties kunt instellen door middel van een aantal regels.
- Modules. Breidt uw winkel uit door nieuwe modules toe te voegen en te activeren: meer dan honderd modules zijn standaard beschikbaar en er zijn er nog veel meer in de Addons-marktplaats (http://addons.prestashop.com/nl). Dit is ook waar u thema's kunt beheren en de posities van modules (inclusief de Live Edit feature). Het onderste menu zorgt ervoor dat uw globale instellingen kunt toepassen op betaalmodules.
- Verzending. Alles dat gerelateerd is aan de verzending en verzendkosten, maar ook een stukje marketing.
- Localisatie. Helpt u bij het aanpassen van uw winkel met lokale instellingen, zoals taal en vertalingen, valuta's, eenheden, belastingen en belastingregels en geografie (regio's, landen, etc.).
- Instellingen. PrestaShop is een erg uitbreidbare e-commerceoplossing, en u kunt bijna alle (standaard)functionaliteit aanpassen in het instellingenmenu.
- Geavanceerde instellingen / Geavanceerde Parameters. Dit menu bevat links naar tools en belangrijke informatiepagina's die te specifiek zijn om in de andere menu's in te delen. Dit menuitem bevat de Webservice-instellingen, de database-backup tool, prestaties-pagina en nog enkele andere configuratiepagina's.
- Administratie. Hier zijn de instellingen die vinden om de back office zelf te beheren. Bijvoorbeeld: de inhoud van het "snelle toegang" menu, de medewerkers met de daarbij behorende toegangsrechten, de volgorde van de menu's en nog enkele andere opties.
- Statistieken. Dit menu geeft u toegang tot de talrijke statistieken en grafieken die verzameld en gegenereerd worden door PrestaShop.
Dit zijn de standaardmenu's. Merk op dat modules nieuwe opties kunnen toevoegen aan bestaande pagina's, nieuwe pagina's aan bestaande menu's kunnen toevoegen en zelf nieuwe menu's kunnen toevoegen.
Er is nog een menu beschikbaar wanneer de bijbehorende optie is ingeschakeld:
- Voorraad. Dit menu geeft u toegang tot de functies om de voorraad te beheren. Hier kunt u magazijnen, voorraadverplaatsing en leveringsbestellingen beheren.
Deze optie kan beschikbaar worden gemaakt op de configuratiepagina van "Producten": activeer simpelweg de optie "Geavanceerd voorraadbeheer" (in het gedeelte "Productvoorraad") en sla uw wijzigingen op om het menu te kunnen zien.
Al de standaardmenu's, inclusief het "Voorraad"-menu, worden in detail uitgelegd in deze handleiding.
De knoppen
Veel van de back office pagina's gebruiken knoppen die vaak terug te zien zijn, vaak aan de boven- of onderkant van het scherm. Bijvoorbeeld de productbewerkingspagina kan soms 8 knoppen tegelijk tonen.
Het zijn meer dan simpele snelkoppelingen, ze openen functies die u erg vaak gebruikt.
Het hangt van de context af welke knoppen beschikbaar zijn en daarom hebben twee pagina's vaak niet dezelfde set aan knoppen. Toch zijn er een aantal die u erg vaak zult zien:
- Nieuwe toevoegne. Open een pagina waarop u een nieuw item aan kunt maken.
- Aanbevolen Modules en Services. Opent een popupvenster met daarin aanbevolen modules.
- Help. Opent de online handleiding van de huidige context.
De knop "aangeraden modules" toont u de modules die u kunt toepassen op de huidige context. Bijvoorbeeld de pagina die te vinden is onder "Verzending > Vervoerders" toont de modules uit de categorie "Verzending & logistiek". Dit is erg nuttig wanneer u snel een module zoek waarmee u nog makkelijker en beter een vervoerder kunt instellen.
Veel van de formulieren in de back office worden bevestigd met knoppen aan de onderkant van het scherm:
- Opslaan. Bewaart de inhoud van de huidige pagina en gaat terug naar de lijst met huidige items.
- Opslaan en blijven. Bewaart de inhoud van de huidige pagina en laat de pagina open.
- Annuleren. Terugkeren naar de luist met huidige items.
Tabellen hebben hun eigen knoppen om de gehele lijst en items te beheren:
- Add new. Creates a new item in the table.
- Export. Downloads a CSV file of all the items.
- Import. Sends you to the CSV Import option page, from where your can import your CSV files.
- Refresh List. Reloads the list of items to display the latest changes.
- Show SQL Query. Provides the SQL query to reproduce your search or filter in your own SQL manager.
- Export to SQL Manager. Opens PrestaShop's SQL Manager tool (in the "Advanced Parameters") menu, from which you can query PrestaShop's database with SQL statements ("
SELECT ... FROM ... WHERE ...").
If your list of items was filtered (by name, for instance), then the default SQL statement will take this into account (for instance, "WHERE 1 AND b.`name` LIKE '%blouse%'" for product list).
Contextual help
Since version 1.6.0.7 of PrestaShop, the software's documentation is directly embedded into administration interface: clicking on the "Help" button from any back office page reduces the main interface's width in order to add a new column on the right, which contains the documentation for that section of the back office.
Another click on the "Help" button closes the contextual help. If you do not close the help column, PrestaShop understands that you want it displayed on every page of the back office, and thus will maintain the column open until you have clicked to close it.
If the browser's display zone is lower than 1220 pixels width, then PrestaShop will open the contextual documentation in a new browser window rather than reducing the screen space dedicated to the main interface. |
At the bottom of the help column, a small form enables you to tell the PrestaShop team whether the help section has been helpful to you or not. Rate the help page by clicking on one of the 5 levels of satisfaction. If you click on one of the two lowest levels, PrestaShop will open a short form allowing to detail your thoughts? You can either fill it and click on the "Submit" button, or close the form by clicking on the cross, in which case only your rating will be sent to our server.
The Dashboard
Let's now explore the content of the Dashboard itself. It can feel crowded to a first-time user, but you will find that it gives an excellent summary of your shop's daily activities at a glance.
The Dashboard is divided in 4 main areas: a horizontal bar, and three columns.
By default, the Dashboard uses fake data so that you can better visualize what the various stats are for. When using PrestaShop for a real online store, you must disable this fake data so that your real data is used: click on "No" in the "Demo mode" block at the bottom right of the screen. |
The horizontal bar
At the top of the Dashboard is a single bar which helps you choose the period of time for the currently displayed dashboard statistics. Three sets of options are available:
- Current day, month or year.
- Previous day, month or year.
- Precise date selection (the button on the right, which opens a date selector).
Choosing an option updates all the blocks of content that are on the Dashboard so that they display data for the chosen period of time only. Blocks that are not stats-based do not change.
In order to choose a period of time, you can either click the first and last date of that period in the calendar (the clicking order does not matter), or you can type the dates in the YYYY-MM-DD format in the text boxes. Click "Apply" to see the Dashboard change according to your settings.

You can also compare two periods of time together by checking the "Compare To" box. Select the second period as would do for the first one (the two can even overlap), then click on the "Apply" button.
When comparing two periods, some of the content blocks will update to indicate the evolution of the data (see for instance the main "Dashboard" block, which presents data from the Dashboard Trends module).
The left column
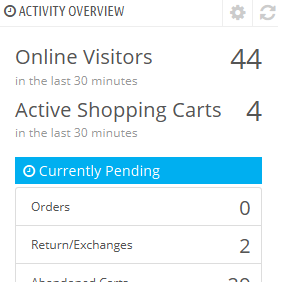 By default, this column presents you with data from the Dashboard Activity module, which gives the main figures from your database in a quick glance:
- Online visitors in the last 30 minutes.
- Active shopping carts in the last 30 minutes.
- Currently pending orders, return/exchange inquiries, abandoned carts and out of stock products.
- Notifications for new messages, order inquiries and product reviews.
- New customers and new newsletter subscriptions.
- Traffic statistics: visits, unique visitors, traffic sources and direct links.
The central column
The central column is where the term "dashboard" takes its importance: this area of the Dashboard presents the user (you) with the most important numbers pertaining to his shop's daily activities, along with a graph of sales and a list of the latest orders. Every time you log into your shop's administration area, you will be first and foremost looking at the evolution that these numbers take. This is where you see your shop live and breathe.
By default, there are three blocks of content in this column, which are handled by modules:
- Dashboard (Dashboard Trends module). This is the main block of information on the dashboard. With its various graphics, it really helps you see if your shop is headed in the right direction or not. Click on one of the graphic type to display it. Additionally, when comparing two time periods, it displays the evolution of each figure in percentages. Hover the graphic with your mouse to see the details.
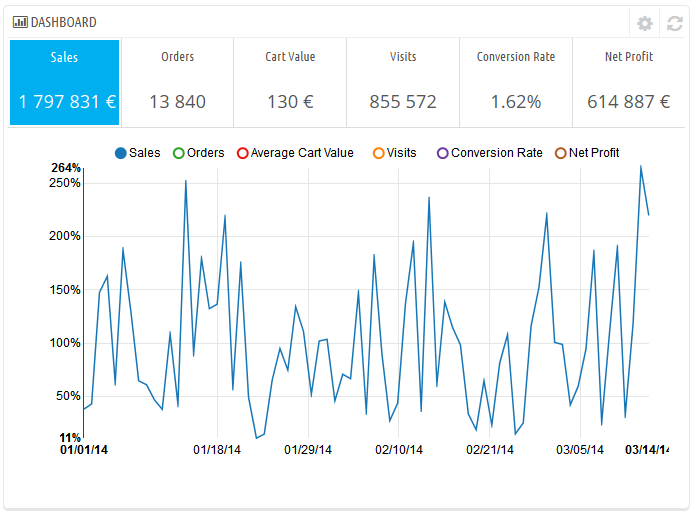
Clicking on its configuration icon (top right) open a new page where you can set various expenses that your shop has (bank wire fee, average shipping fee, hosting expenses, etc.), in order to better indicate your trends. - Your Forecast (Dashboard Goals module). This block presents you with the goals you have for the coming months, and how your shop is doing as compared to them. Hover the graphic with your mouse to see the details.
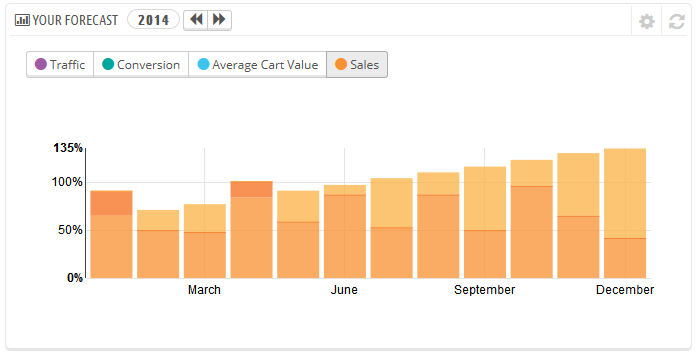
Depending on your monthly results, you should update your forthcoming goals. You can set your goals in the block's configuration form (top right of the block), and fill in your expectations month per month in terms of traffic, conversion rate, and average cart value. The "Sales" column will be updated according to the goals set in the other columns (for instance, for a 1000 visitors with a 2% conversion rate and a $10 average cart, you would get 1000*(2/100)*10 = $200). You can change the currency in the "Currencies" page under the "Localization" menu. - Products and sales (Dashboard Products module). This block presents you with a table of your latest orders and a ranking of your products: best sellers, most viewed and top searches (as searched in your shop's search form, not from search engines).
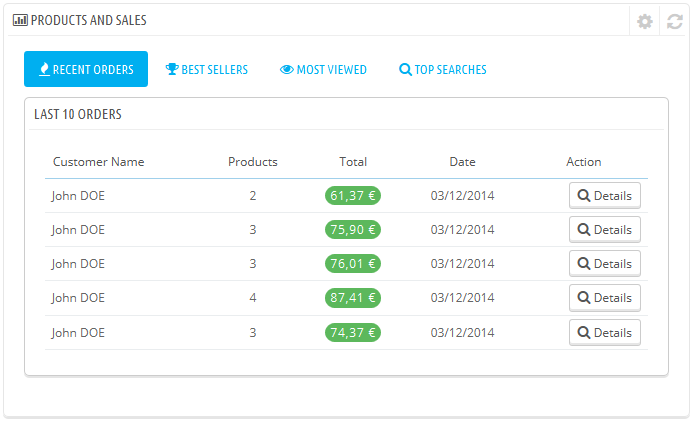
You can set the number of items to display in each by opening the block's configuration form
The right column
This last column is an informational one: it gives you the latest news from PrestaShop.com, notifications about new PrestaShop versions, and useful links.
It also features the "Demo mode" block, from which you can disable the fake data used by default on the Dashboard and use your own data (as gathered by PrestaShop's statistics system).


 By default, this column presents you with data from the Dashboard Activity module, which gives the main figures from your database in a quick glance:

