Puede gestionar / administrar los productos de su tienda utilizando la página "Productos", en el menú "Catálogo".
Secciones en este capítulo:
Al hacer clic en la opción "Productos" del menú "Catálogo" será dirigido al listado de los productos actualmente disponibles en su tienda, mostrados con sus detalles principales: ID, foto, nombre, referencia, categoría, etc.
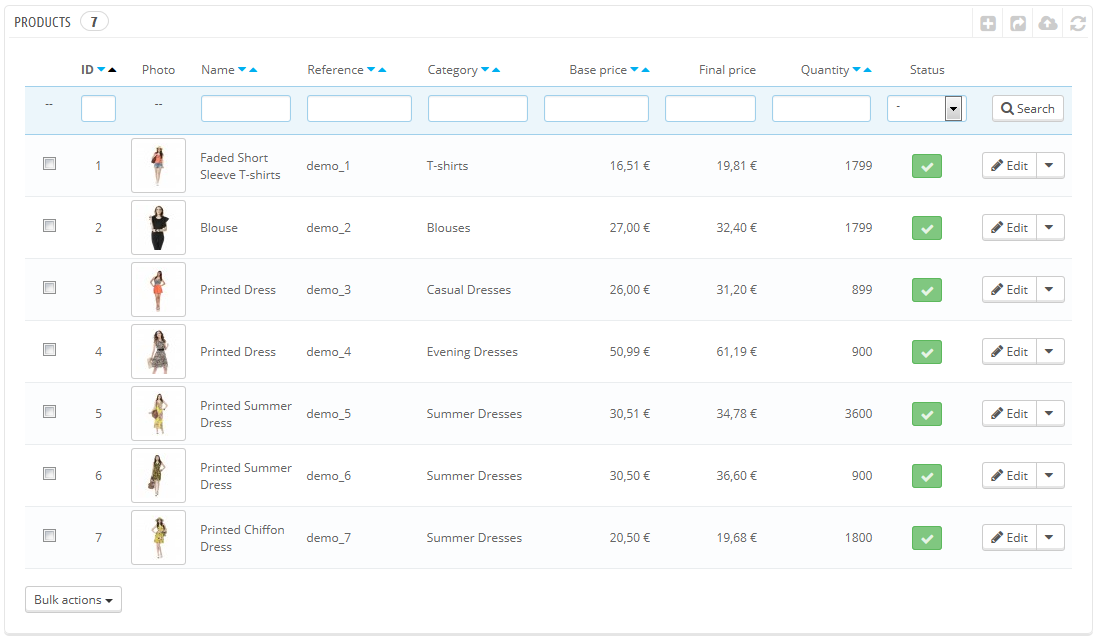
En la parte superior, esta página le presenta cuatro estadísticas de su tienda:
La opción "Filtrar por categoría" le permite mostrar tan sólo productos relacionados con su búsqueda actual, así como reorganizar la posición de los productos dentro de una categoría.
No puede reorganizar toda la lista de productos. Los productos se muestran en el mismo orden en el que se introducen en su tienda (ordenados incrementalmente por su número identificativo, ID), y el cliente puede ordenar los productos utilizando los algoritmos de ordenación disponibles: los más baratos primero, los más caros primero, productos ordenados por su nombre alfabéticamente de A a Z, productos ordenados alfabéticamente de forma inversa por su nombre de Z a A, los productos en stock primero, los productos con referencia más baja primero, los productos con referencia más alta primero. Puede organizar los productos por categoría haciendo clic en la casilla de verificación "Filtrar por categoría". Se abrirá una pequeña interface listando todas sus categorías y subcategorías. Seleccionando una categoría se filtra automáticamente la lista de productos para mostrar tan sólo los productos de la categoría seleccionada. Esto también añade una columna "Posición" a la tabla, con la que puede ordenar el producto en la página de la categoría. Para ello, puede mover las filas de la tabla con el ratón, o haciendo clic en las flechas (arriba - abajo) disponibles en dicha columna. El orden de sus productos puede ser invalidado por el orden de clasificación seleccionado por el cliente . Tenga en cuenta que cuando se cambia el orden de visualización en la lista de productos en el back-office (haciendo clic en la flecha del nombre de la columna para ordenar los productos conforme a esa columna), la columna "Posición" ya no muestra las flechas y no puede mover las filas de la tabla. En su lugar, la columna muestra el número de posición del producto. Para poder reorganizar los productos de nuevo, haga clic en el botón "Borrar filtro". |
Por último, la parte superior de la lista de productos presenta cuatro botones:
![]()
Puede añadir nuevos productos haciendo clic en "Añadir nuevo". Aparecerá un formulario, acompañado de varias pestañas en la columna izquierda y dos botones en la parte superior: "Módulos recomendados" y "Ayuda".
Por defecto, la página de creación de producto presenta dos botones que se encuentran en la mayoría de las páginas de administración: "Módulos recomendados" y "Ayuda".
En la parte inferior de la página hay tres botones:

Tan pronto como guarde el producto, utilizando los botones "Guardar" o "Guardar y permanecer", más botones adicionales aparecerán en la página del producto:
Duplicar. Crea una copia exacta del producto actual. Esto es muy útil cuando prefiera utilizar los datos del producto actual como una plantilla para otro nuevo producto, y así no tiene que volver a escribir todos los datos del nuevo producto manualmente. Por ejemplo, dos productos pueden ser muy diferentes, pero pueden compartir las mismas combinaciones, los mismos transportistas o el mismo proveedor.
Si necesita crear diferentes versiones de un mismo producto, a causa de su variedad de colores, capacidad, tamaño, etc., debe crear combinaciones para el producto actual en lugar de duplicarlo X veces. Revise la pestaña "Combinaciones" en la columna izquierda del formulario, la cual se explica en la sección "Añadir combinaciones de productos" de este capítulo. |
![]()
La primera pestaña contiene la información básica sobre el producto.
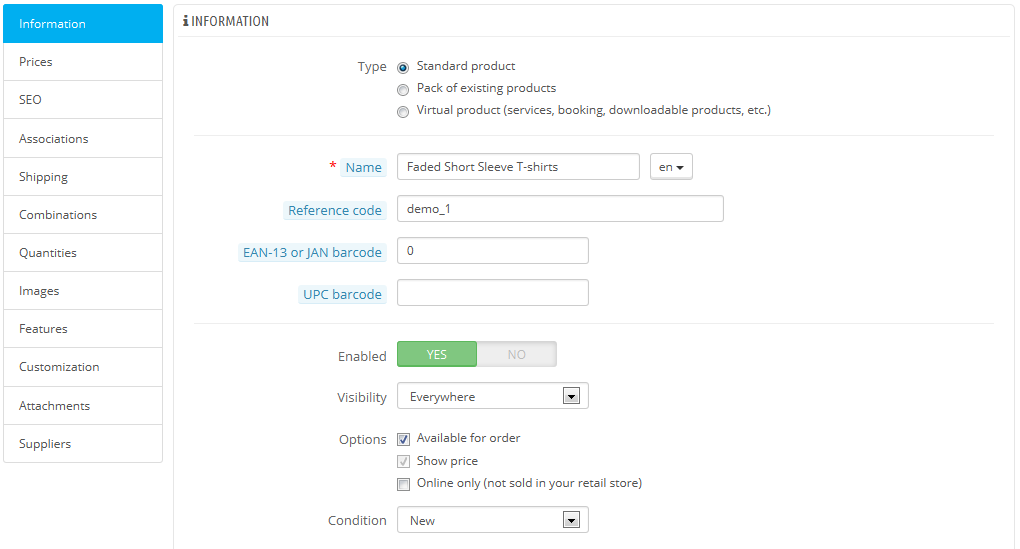
La primera línea es un elemento esencial: indica si el producto es un paquete (una combinación de al menos dos productos existentes), un producto virtual (archivo descargable, servicio, etc.), o simplemente un clásico producto que se envía por correo. Por ahora, sólo analizaremos la primera opción de estas tres, y trataremos los paquetes y productos virtuales en próximas secciones de este capítulo.
Hay muchas más opciones disponibles relacionadas con los productos, puede acceder a ellas dirigiéndose a la página "Productos" del menú "Preferencias":
Debe comprobar que estos ajustes globales se encuentran configurados como desea. |
Se inicia con cuatro campos de texto:
Nombre. Lo primero que debe rellenar es el nombre del producto, el cual aparecerá en los resultados de los motores de búsqueda. Justo al lado derecho de este campo encontrará un código de idioma, que le permite elegir el idioma en el que desea editar o crear el nombre.
Debe dar un nombre al producto en al menos el idioma por defecto utilizado en su tienda antes de poder guardarlo. Además, no tendrá acceso a algunas de las fichas que tiene que rellenar del producto hasta que no lo guarde. Asegúrese de traducir cada campo en todos los idiomas disponibles en su tienda. Para ello, haga clic en el código de idioma situado al lado derecho del campo, y seleccione el idioma en el que desea editar el texto. |
A continuación se presentan cuatro opciones:
Ahora que estos detalles han sido establecidos, puede comenzar a añadir una descripción para su producto.
Describir su producto es esencial, tanto para el cliente (contra mayor información, mejor) como para los motores de búsqueda (esto ayudará a que su tienda aparezca en más solicitudes de búsqueda).
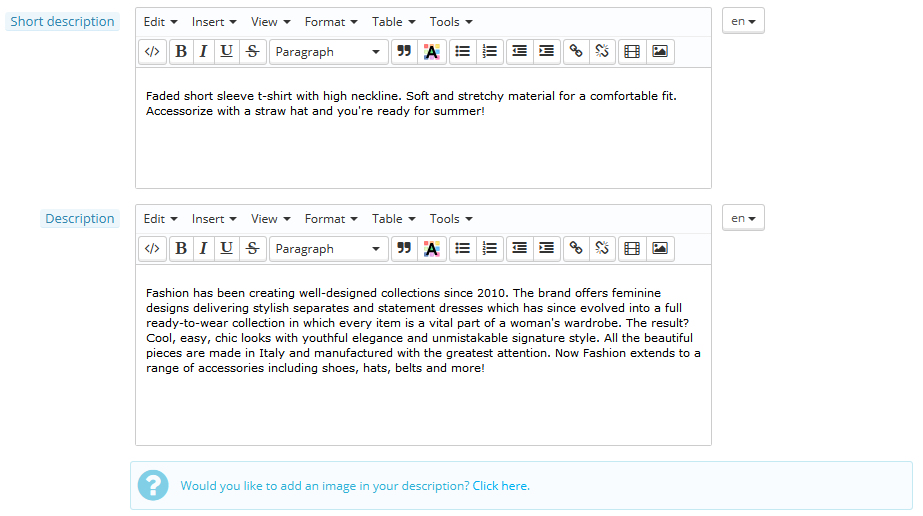
En la parte inferior de la pantalla, se presentan dos campos de descripción que sirven para diferentes propósitos:
Bajo los campos de "Descripción", puede encontrar una pequeña herramienta que le permite añadir imágenes adjuntas a la "Descripción" del producto (a través de la pestaña "Imágenes"), utilizando las etiquetas de imagen. Haga clic en "Pulse aquí (Haga clic aquí)" para abrirla.
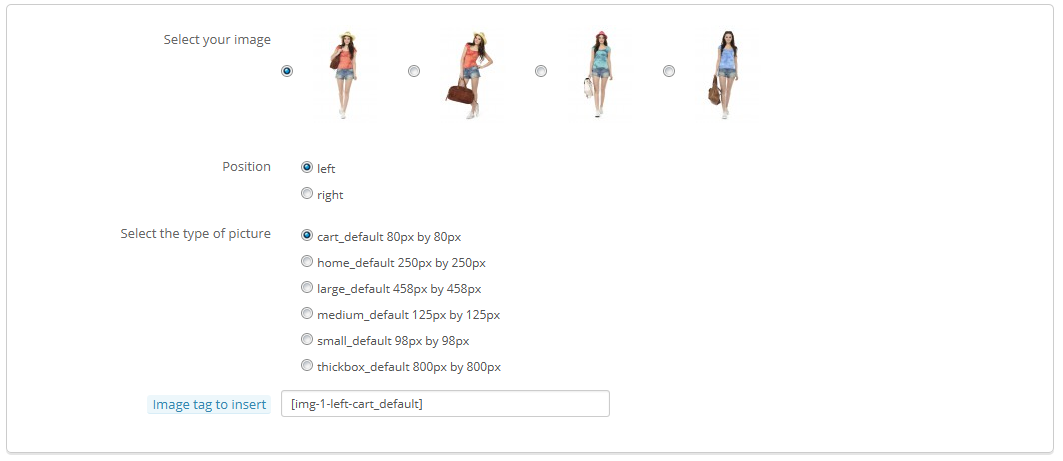
Sólo tiene que seleccionar la imagen que desea, elegir su posición de acuerdo con el texto y su tamaño, y PrestaShop generará una etiqueta de imagen que posteriormente puede poner a la derecha dentro de la descripción (preferiblemente entre dos párrafos, o al comienzo de un párrafo).
En el campo "Etiquetas ", añada algunos términos y palabras clave que ayuden a sus clientes a encontrar fácilmente lo que están buscando.
![]()
Éstas serán mostradas en la tienda dentro de un bloque "Etiquetas" (si está disponible). Si no quiere que el bloque de etiquetas aparezca, simplemente desactive el módulo "Bloque de Etiquetas" (en la página "Módulos").
PrestaShop 1.4 le permitía indicar el fabricante del producto a la derecha de esta página. Desde la version 1.5, este ajuste se encuentra en la pestaña "Asociaciones" a la izquierda del formulario. Lo mismo ocurre para el campo "Categoría predeterminada", las categorías asociadas, y el campo "Accessorios". La versión 1.4 también le permitía indicar el tamaño y el peso del paquete final. Desde la version 1.5, estos ajustes se encuentran en la pestaña "Transporte" a la izquierda del formulario. El campo "Ubicación" de la versión 1.4 se puede encontrar en la pestaña opcional "Almacenes" a la izquierda del formulario, el cual sólo está disponible si se ha habilitado la Administración avanzada de stock (menú "Preferencias", página "Productos", sección "Inventario de Productos"). |
Una vez que haya rellenado toda esta información, guarde su trabajo, tras lo cual será redireccionado a su listado de productos. Si guarda su trabajo haciendo clic en el botón "Guardar y permanecer", continuará trabajando en la página de presentación de su producto.
Todo esto se realiza en la pestaña "Precio" situada a la izquierda del formulario. La sección Precio puede ser intimidante y desalentadora al principio, con campos que se influyen entre ellos mutuamente, y con los impuestos fiscales que hay que tenerlos en cuenta – pero no se preocupe porque es bastante más fácil de lo que parece.

Establezca el precio que aparecerá en su tienda siguiendo las siguientes instrucciones:
themes/default/img/onsale_en.gifPuede rellenar el "precio de venta con IVA" y seleccionar una regla tributaria a aplicar, y el precio al por menor sin IVA será calculado automáticamente. La operación inversa también es posible. |
Una vez introducida esta información, habrá completado la información esencial de la página del producto. Puede guardar los cambios realizados y ver inmediatamente como su producto se encuentra a la venta en su tienda.
Pero siga leyendo, porque todavía hay muchos detalles que puede, e incluso debe añadir a su producto para lograr que sus productos sean más llamativos de cara a sus clientes.
Puede cambia el precio total del producto en función de la cantidad de productos que compre su cliente, el grupo de usuario al que pertenezca, el país, etc. Esto se hace usando la opción "Precios específicos" de la pestaña "Precios".
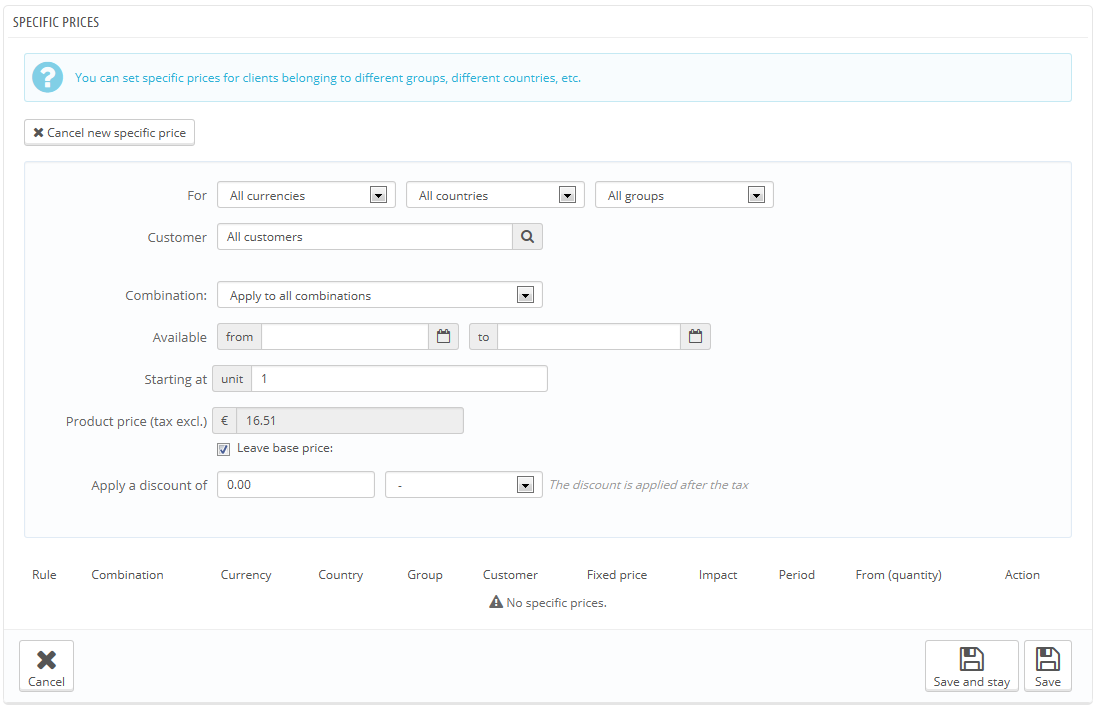
Esta es una manera muy fácil de crear un precio de descuento para este producto (y todas sus combinaciones).
Haga clic en "Añadir un precio específico", y un formulario con las siguientes opciones aparecerá.
Una vez que haya elegido sus valores, haga clic en "Guardar y permanecer": el resumen de la configuración de descuento aparecerá a continuación. El descuento será inmediatamente visible en la tienda.
Si desea eliminar un valor, haga clic en el icono de la papelera en la tabla.
Si quiere hacer descuentos más complejos, lea la sección "Regla de precios" en el capítulo "Crear reglas de precio y vales de descuento" de esta guía.
Un cliente podría estar relacionado y "afectado" por multiples precios o por varias reglas de descuento, incluso aunque haya creado reglas muy específicas, descuentos por cantidades, grupos personalizados de clientes y tiendas (en el caso que estemos hablando dentro de un contexto multitienda). restaShop utiliza un conjunto de prioridades con el fin de aplicar una sola regla de precios a dichos clientes. Es posible que, por ejemplo, desee que el grupo usuarios sea más importante que la moneda utilizada .
Puede cambiar la configuración predeterminada por PrestaShop utilizando la sección "Establecer prioridades" que encontrará dentro de pestaña de “Precio” (al editar el producto).

El orden predeterminado por importancia es:
Una casilla de verificación en la parte inferior le permite aplicar la configuración establecida a todos los productos. Si la casilla de verificación queda desmarcada, los cambios sólo se aplicarán al producto actual.
Para optimizar su lista de productos así como también aumentar la visibilidad de su tienda, le sugerimos que rellene cuidadosamentelos diversos campos SEO: Meta títulos, meta descripciones, palabras clave y URLs amigables.
"SEO" significa "Search Engine Optimization", en español "Optimización en los Motores de búsqueda". Más información en la Wikipedia: http://es.wikipedia.org/wiki/Posicionamiento_en_buscadores ¡Aprenda las mejores técnicas SEO para el comercio electrónico!. Descargue y lea gratuitamente la "Guía SEO": http://www.prestashop.com/es/white-paper-seo |
Para acceder a la información SEO del producto, abra la pestaña "SEO" a la izquierda del formulario.

Los campos de esta página le permiten mejorar la visibilidad de su catálogo en los buscadores.
Las URLs amigables sólo funcionarán si la reescritura URL está habilitada. Puede hacer esto en la sección "Configuración de los enlaces" de la página de preferencias "SEO y URLs". ncontrará más información de la página de preferencias "SEO y URLs" en el capítulo "Comprender las preferencias" de esta guía. |
La creación de asociaciones para su producto significa la vinculación de éste con otro contenido en su base de datos:
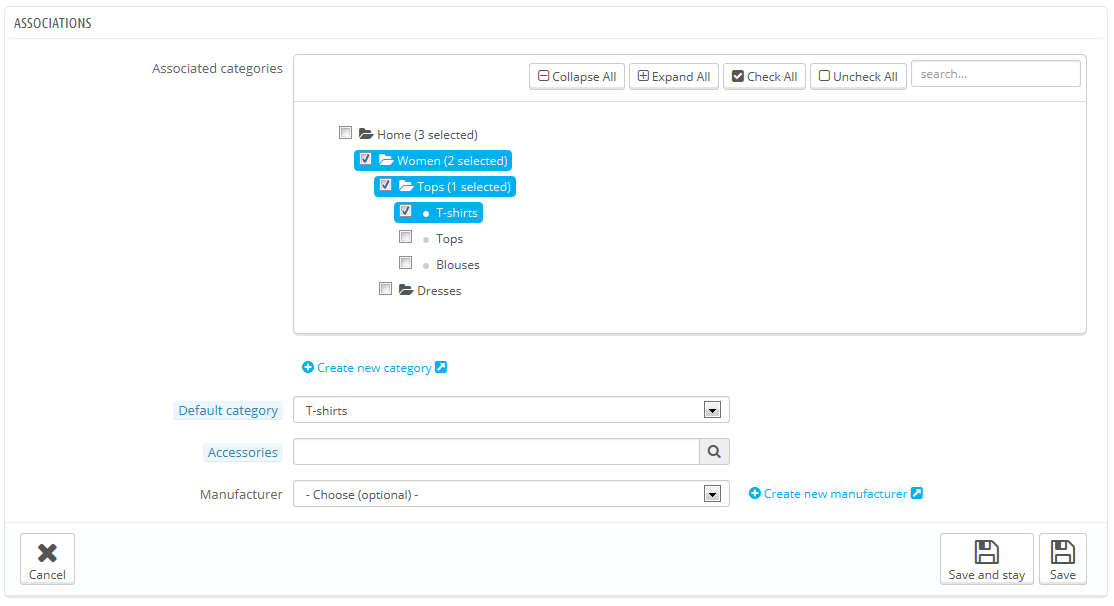
La sección "Asociar categorías" le permite seleccionar en qué categoría debe aparecer el producto. Puede seleccionar más de una, pero tenga en cuenta que es mejor para los clientes si las categorías sólo contienen productos equivalentes y comparables. Por lo tanto, se debe evitar la selección de las categorías raíces, y dar prioridad a las categorías hijas.
Por ejemplo, la categoría "teléfono" puede incluir una subcategoría de "marcas" (Apple, Samsung, Nokia, etc.) y al igual que ocurre con las "características" (teléfonos inteligentes, teléfonos plegables, etc.), debe establecer las categorías más útiles a sus clientes.
Si cree que necesita añadir una categoría, guarde el estado actual de su producto antes de hacer clic en el botón "Crear nueva categoría". La creación de una categoría se explica al principio de este capítulo.
La sección "Categoría predeterminada por defecto" es útil cuando un artículo está incluido en varias categorías. Esta sirve principalmente para aclarar qué categoría usar en caso de que su cliente llegue a su tienda desde un buscador, ya que el nombre de la categoría aparecerá en la URL del producto.
Marcar la casilla de verificación "Inicio" le permite mostrar el producto en la página principal de su tienda, siempre que su tema sea compatible con esta característica. Para eliminar un producto de la lista destacada de productos, simplemente desmarque la casilla de verificación "Inicio". |
El campo "Accesorios" le da la opción de elegir los productos relevantes asociados con este producto, para sugerirlos a sus clientes cuando visiten la página del producto (si el tema es compatible con esta característica). Teclee las primeras letras de producto y selecciónelo. El producto se añadirá a continuación, en la parte inferior de este campo.

Puede asociar un producto con tantos otros productos como considere necesario. Haga clic en el icono de la cruz para eliminar la asociación del producto.
Una asociación sólo tiene sentido único: el producto asociado no contará con una asociación del producto actual en su página de configuración.
Accessories addition/removal is not automatically saved! Do not forget to click on the "Save" button. |
A product can only be associated with one manufacturer. Choose one in the dropdown menu, or create a new manufacturer if it is needed (but do save your current product before clicking the "Create a new manufacturer" link).
Shipping costs are not be neglected: they can easily double the final cost of an order, and you should be very upfront about them – customers hate bad surprises.
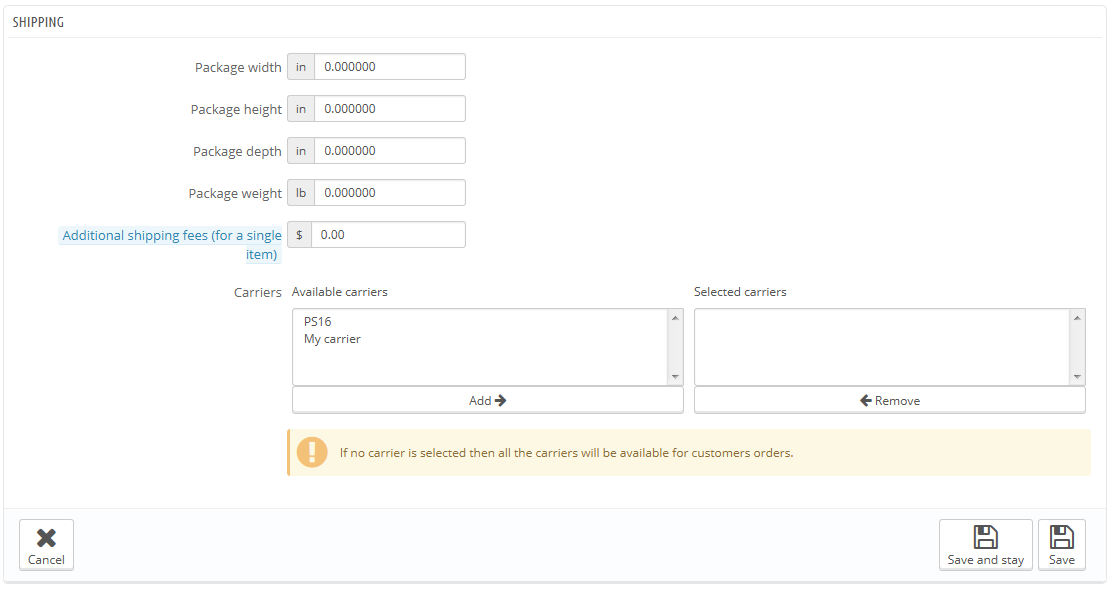
The "Shipping" tab on the left enables you to give some precious details about your product's package:
Package width, height, depth & weight. You should strive to fill each field, because knowing the exact size and weight of a package is not only useful to you, but PrestaShop can also direct specific sizes/weights to specific carriers automatically, based on these settings. The order's final price will appear to the customer once PrestaShop (or the customer) has selected a carrier.
These values use the default weight, volume, distance and dimension units, as set in the "Localization" page of the "Localization" menu. These values do not have to be integers. If your products weight less than 1 lbs, you can simply use a period (.) to indicate the fractions:
|
You will often sell the same product under different versions: they share the same overall name, but they might differ by their color, their capacity, their screen size, and other attributes. Most of the time, these attributes come together: you could have the red version of the product available with either 1 Gb capacity or 2 Gb, or with 12'' screen or a 15'' screen. This is why PrestaShop calls these versions "combinations": your stock of products can be made of several variations of a single product, which in effect are simply its attributes combined in specific ways.
You cannot create combinations if you do not already have product attributes properly set in PrestaShop. Attributes creation is done in the "Product Attributes" page from the "Catalog" menu, and is explained in details in the chapter of the same name of this guide. |
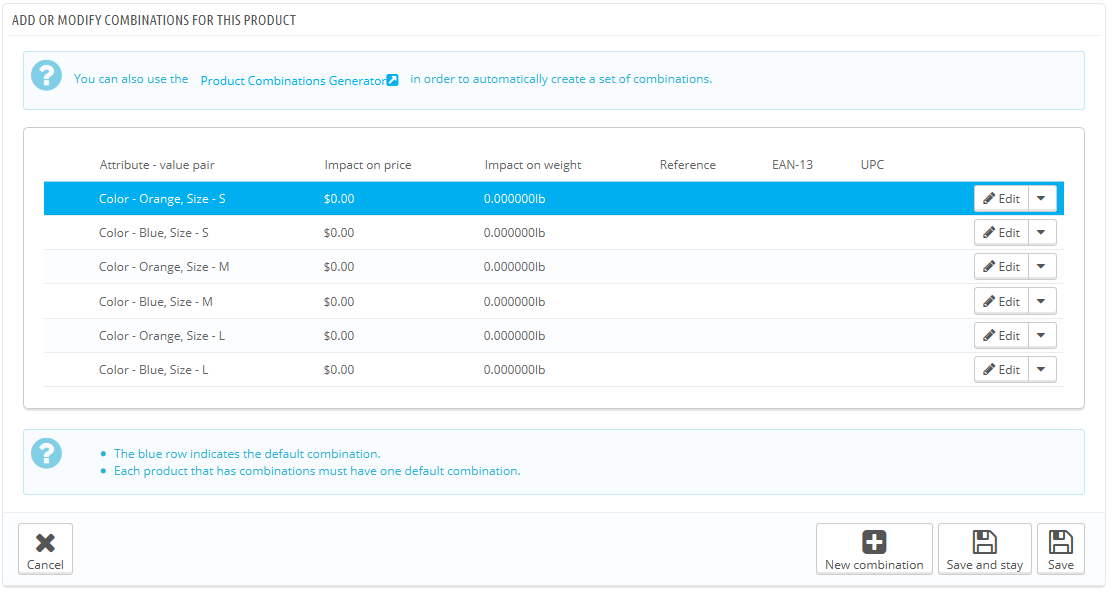
How your product attributes are combined into combinations is up to you, and PrestaShop gives you two methods to achieve this.
This method helps you create combinations one after the other. Therefore, it is to be reserved to either products with few combinations, or products with very specific combinations that can't be created reliably using the automatic method (see next section).
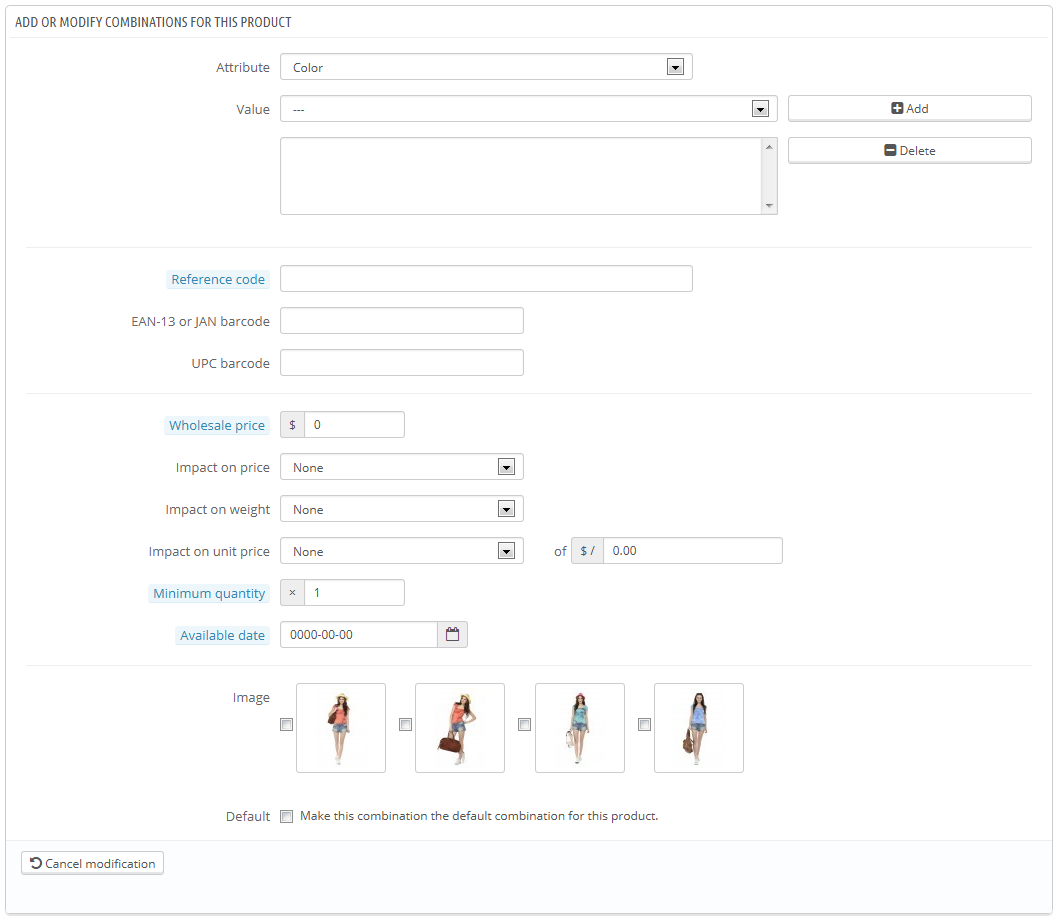
Adding a new variation to your product takes just a few steps. Click on the "New Combination" button at the bottom of the page, next to the "Save" buttons. A form appears:
When you have set all of the combination's details, save your product changes using the "Save and stay" button. Your combination will appear in the attributes list at the bottom of the screen.
In PrestaShop 1.4, there used to be a "Color picker" form at the bottom of the list of combinations, where you could choose to display a color picker or not on the product page. Since PrestaShop 1.5, this option has been moved and improved. When creating a new attribute (in the "Catalog" menu, "Attributes & Values" page), you can use the "Attribute type" drop-down list to choose whether the front-page should display it as a drop-down list, a radio button list, or a color picker. |
If you have too many different products versions or varieties, you can use the "Product Combinations Generator." This tool allows you to automatically generate all of the combinations and possibilities.
Clicking the "Product combinations generator" takes you to the complete form.
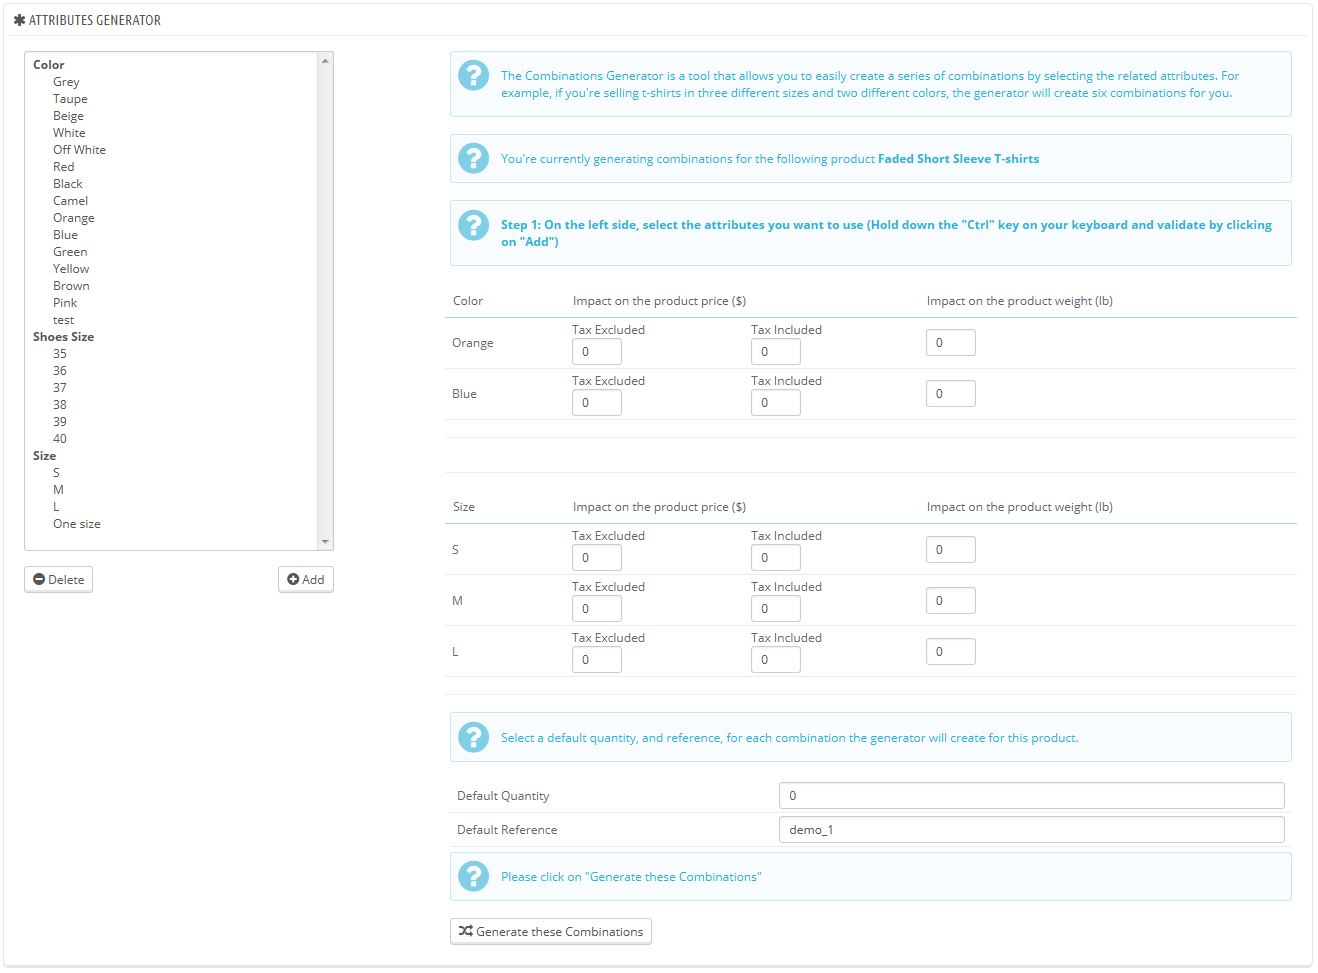
A warning window might appear, saying "You will lose all unsaved modifications. Are you sure that you'd like to proceed?" This means your product already had some combinations created. If you agree to this, this will delete the combinations that have not yet been saved. Be careful, and always save your work before using the generator! |
On the left side of this page are your attributes and their values. Select the combinations by clicking on the value names (if want to select more than one value, hold the Ctrl key while clicking), then click on "Add".
For example, you might select the "Blue", "S, M, L" values.
To remove an existing attribute selection, simply select their values and click on "Delete".
Once the varieties have been selected, you can edit the impact on product price and on product weight for each selection. You do not have to: they might simply be the same price and weight.
Insert the quantity of each product in the "Default quantity" field at the bottom. Be careful, it needs to be the same for every combination. For instance, 200 products in each combination = 2 colors * 1 size * 200 = 400 items in all.
You may add a default reference for this combination if it serves your administrative needs.
Click the "Generate these Combinations" button, and PrestaShop sends you back to the "Combinations" tab, with all the generated combinations. If you need to, you can now edit them one by one.
As you can see, the combination generator helps you save a lot of time when you have numerous attributes to assemble, such as sizes and materials. It automatically creates all of the possible combinations, which will then appear under the product's public page, in the "Combinations" tab (if the theme supports it).
If you do not want to keep all generated combinations or if they are in fact not all exactly the same (different references, prices, available dates...), you can delete them (trashcan icon) or modify them (file icon) from the product's combination list. The star icon turns the selected combination into the default one – in which case it is highlighted in blue.
Product quantities are managed in a single tab. The way it works is quite easy: the page presents you with a table of all the combinations for the current product (if there are no combinations, the table simply has a single row). It is up to you to set the initial stock for all the combinations. PrestaShop will use this to determine when a product is soon out-of-stock or unavailable anymore.
The quantities tab supports the advanced stock management feature, if activated. This means that if the current product's combinations are distributed among several storage locations, PrestaShop is able to handle the exact location of each combination, even within a given warehouse.
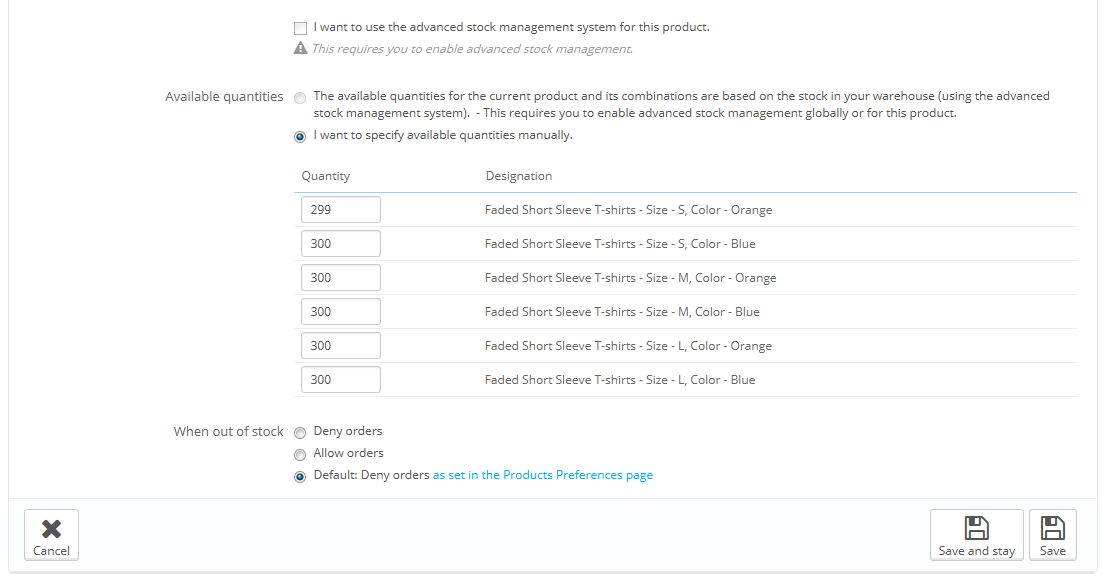
By default, you have to manage the current product's quantities by hand, for each combination, from this page. With the advanced stock management feature activated, you can rely on PrestaShop's stock management feature to handle this.
To use advanced stock management for the current product, checking the box for "I want to use the advanced stock management system for this product". Once this is done, an option becomes available: "Available quantities for current product and its combinations are based on warehouse stock". Click it, and you cannot edit the current product's quantities from the "Quantities" page anymore: it has new become dependent of your stock management.
The "When out of stock" option enables you to set PrestaShop behavior when the product is out of stock: deny orders (the product is not available for sale anymore) or allow order (in essence, you are doing pre-sales). The third and default option simple uses the global default setting ("Preferences" menu, "Products" page, "Product Stock" section, "Allow ordering of out-of-stock products" option).
At the bottom of the page, you can set the exact behavior of PrestaShop depending on the availability of the current product.

The options are:
You can also configure the general settings applied to all of your products: the default option is to deny orders, but this can be modified under the "Products" preference ("Allow ordering of out-of-stock products" option), which is fully explained in the "Understanding the Preferences" chapter of this guide.
The "Images" tab on the left is for including photos on your product page. You should upload all the images for this product, including all of its combinations (color, size, shape, etc.).
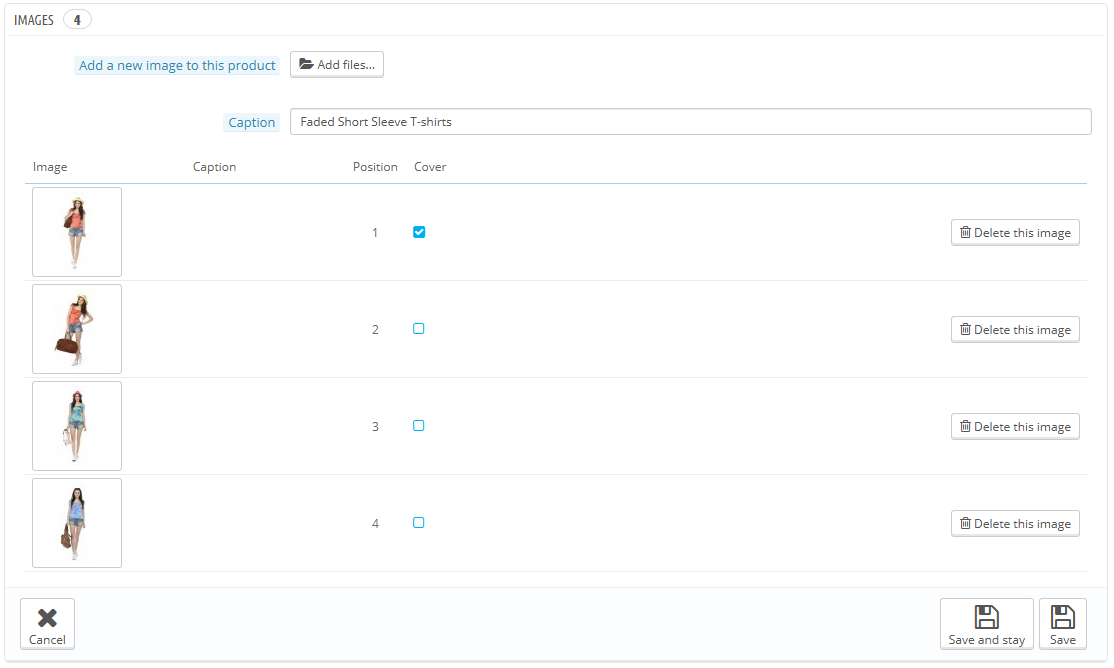
To add one or more images to your product:
Once you have uploaded all your product images, you can modify the image order by drag-and-dropping each table row when the mouse cursor changes to a "movable" cursor.
The "Features" tab is where you specify your products' features (i.e. weight, material, country of origin, etc.).
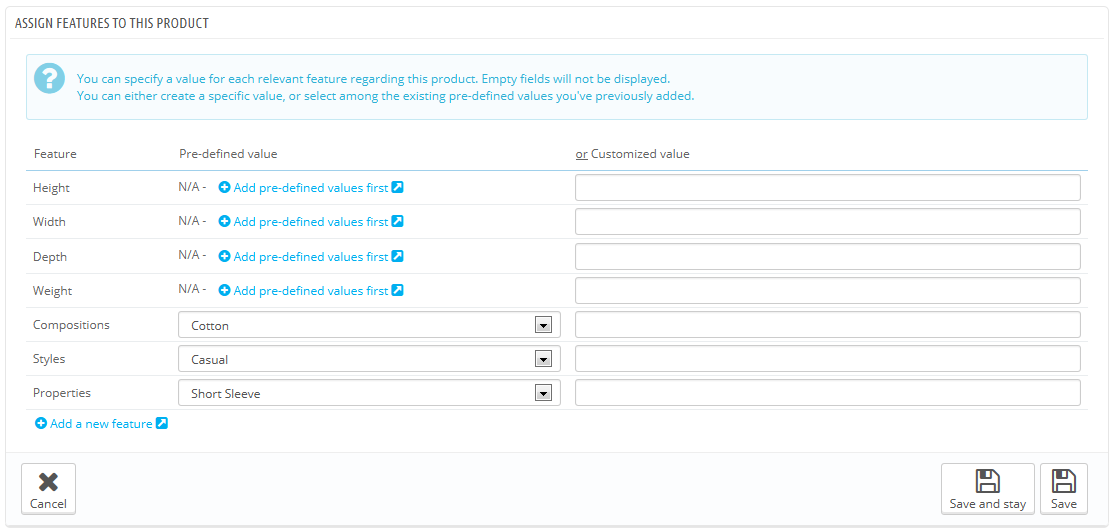
When you create features and values (i.e. wool knit and micro-fiber materials), you assign them to the products when it is appropriate. This means that you do not have to fill out the features fields for each of your products but instead simply fill in the necessary values and apply them later.
PrestaShop's comparison engine relies entirely on product features: this is what gets compared. Also, since product comparison works on a per-category basis, you should make sure that all the products in a given category do share the same features, with various values to be compared between each other. |
Be aware that contrary to the combinations, these values do not change, and are valid for the general product (meaning: all your combinations will share these same features).
Before adding a feature to a product, you must create it for general use in your shop. You either go to the "Features" page of the "Catalog" menu, or directly click on the "Add a new feature" button. A warning will appear, "You will lose all unsaved modifications. Are you sure that you'd like to proceed?" – make sure all your changes are saved before validating.
Feature and feature value creation are explained in details in the dedicated section of the guide.
We will assume here that you have already set all your features and feature values.
In the current product's "Features" tab on the left, a table is displayed, listing all of your shop's features. Not all of them pertain to this product: PrestaShop will only take as relevant the features where you actually set a value.
You can either set a value manually, in the field on the far right a feature's row, or you can use one of the pre-defined values (as set when creating the feature) if there are any available.
If no value is available for a feature, the mention "N/A" appears (short for "not available" or "not applicable"), followed by a "Add pre-defined values first" button.
If you choose to use a custom value, do not forget to set it for every language that your shop supports. Use the language code selector to change language.
If there are pre-defined values available, they will appear in a dropdown list. Simply click it and choose the correct value.
Once you have set all the relevant features, save your changes to see them immediately applied in the front-page.
Remember: If a feature does not have any value assigned to it, it will not be taken into account for this product, and will not be visible on your shop.
PrestaShop makes it possible for your customers to customize the product that they will buy.
Example: You are a jewelry retailer and your customers have the possibility to engrave their jewelry with a text or an image. Your customers can submit the text and/or the image when they place their order.
The advantage of this function is that it offers your customers a personal service, which they will without a doubt appreciate!
Let's look at how to configure this function. In the "Customization" tab on the left, you can indicate what type of context (file and/or text) can be personalized.

Once you have added the needed number for each field, click "Save and stay". The page will reload and display as many text fields as necessary. Fill every one of them with the appropriate public label: this will be an indicator for the customer, so be very specific about what you expect.
For instance, if you allow images for a book cover, you could use the following:
Same for text: if customers can engrave words to a product, you could use the following:
Removing fields. If in the end you added too many fields, simply change the number of needed fields for each of the two types and click "Save and stay". The page will reload with the right number of fields, with the first ones preserved.
Once all the label fields have been filled, do not forget to save your changes.
Once a product has customizable properties set, its front-end product page has a new tab, next to the "More info" tab: "Product customization".
The customer must choose the file(s) and/or add some text and save them before they add the product in the cart.
The custom image(s) and text(s) will appear in the final cart.
The rest of the purchase process is the same as usual.
Once the order has been validated by the customer, the merchant gets a notification of the order in the back-office.
He can then check on the order, which will indicate the image(s) and the text(s) in the list of products, for each product. The merchant then simply has to download the image(s) (simply by clicking on the image in the order) or copy/paste the text and use that in its customization tool.
The rest of the order and delivery process is the same as usual.
PrestaShop enables you to make some files available to your customers before their purchase. This is done in the "Attachments" tab on the left.

For example, let's say you sell electronics, and you would like to urge your customers to read a document on how a product works. You can upload a document for that purpose.
You could also simply have the product's PDF manual directly available for download right on the product page.
Adding an attachment is really quick:
Now the "Download" tab will appear on the product's page (if the theme supports it), and your customers can download the file(s) that you just uploaded.
If you need to remove an attachment, select it in the "Attachments for this product" selector and click on the "<- Remove" button. The file will be moved to the "Available attachments" selector if you need to set it back online later on.
You can view all of your store's attached files, add some more and remove some, by going to the "Attachments" page under the "Catalog" menu. This also makes it possible to use the attachments that you already uploaded for other files: if you need to apply the associated one file with many products, you will thus only have to upload it once.
Indicating the product's supplier is not really important to your customers (very much less so than its manufacturer in any case), but it may turn out to be an essential part of your own internal management, not the least when managing your stock: you simply need to know who you bought the product from. The supplier of the current product is to be set from the "Suppliers" tab on the left.
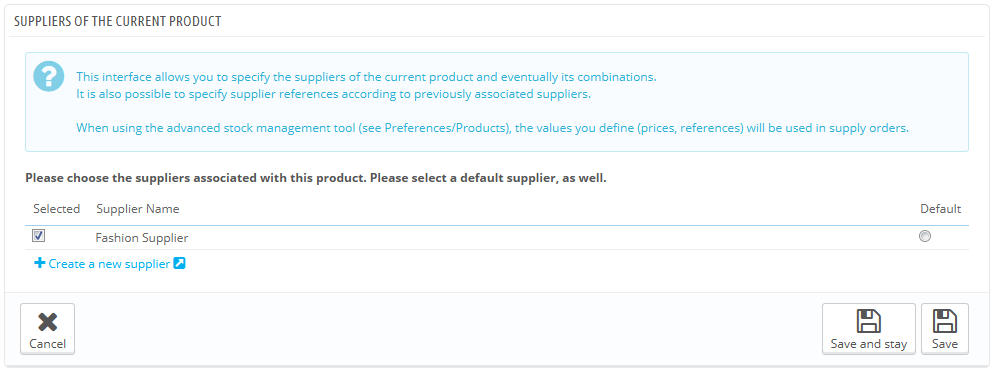
You cannot use this feature if you do not already have at least one supplier registered in your shop. Suppliers are created from the "Suppliers" page, under the "Catalog" menu. The complete supplier registration process in explained in details in the current chapter of this guide. |
Associating the current product with one or more suppliers is really easy: simply click the box corresponding to the supplier, and save your changes.
If the product is associated with more than one supplier, you can choose which one should be the default one using the radio button on the right.
Note: the "Default" radio buttons are unavailable by default. In order to select them, you must first click the "Save and stay" button" in order to select another supplier as default.
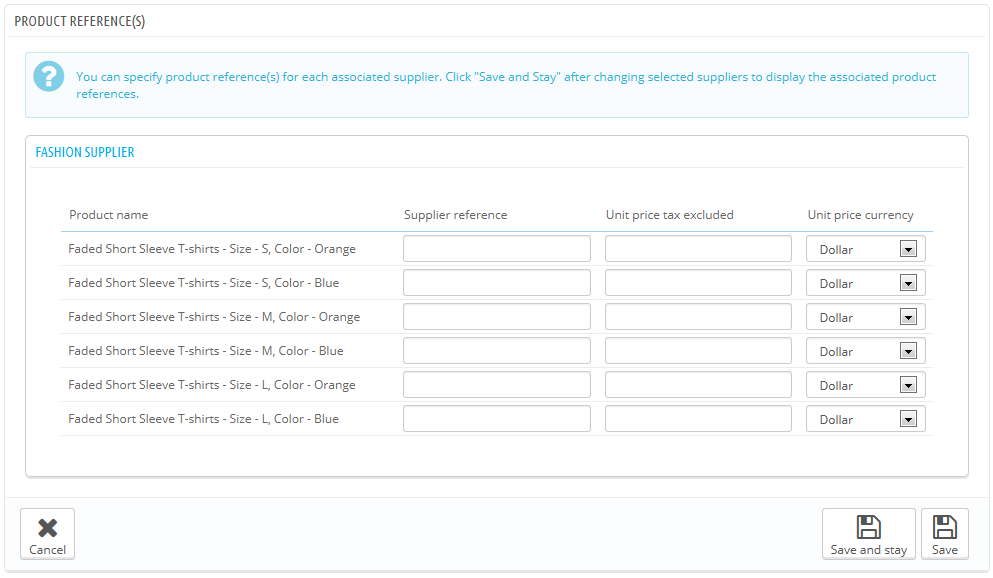
The product's supplier page also features a table that enables you to set the precise reference and unit price/currency for each product combination. If the product has more than one supplier, the table only opens the combination tied to the first supplier, the others being closed by default. Click on a supplier's name in order to open its references table, and close the others.
Once you have enabled the advanced stock management option (in the "Products" preference page), this new tab gets available for all products, and enables you to indicate in which warehouse the current product is stored.
You cannot use this feature if you do not already have at least one warehouse registered in your shop. Warehouses are created from the "Warehouses" page, under the "Stock" menu. The complete warehouse registration process in explained in details in another chapter of this guide, "Managing Stock". |
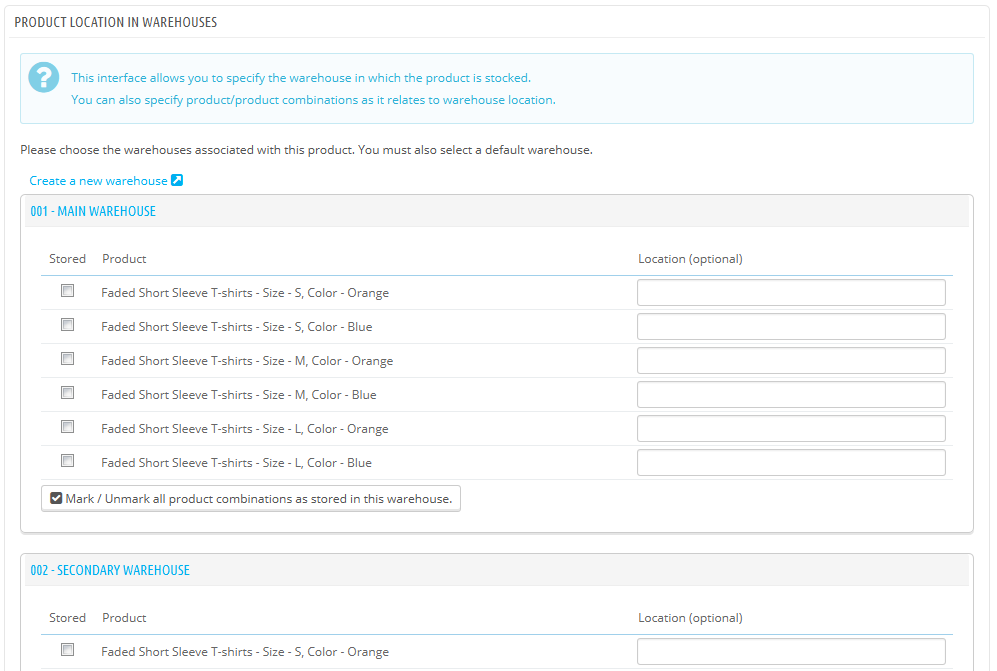
The "Warehouses" tab presents you with a table that enables you to set the precise location for each product combination (if any) in each warehouse. If you have registered more than one warehouse, the table only shows the first one by default, the others being closed by default. Click on a warehouse's name in order to open its sub-table, and close the others.
For each warehouse, you can set which combination of the current product is stored, and a text field enables you to indicate precisely where it is stored in that warehouse. You can write anything in that field: "Aisle 5", "Next to the Radiohead albums", "A07 E08 H14", or anything that helps you or your packaging team to find the product as quickly as possible.
You may wish to sell a pack of products made of several items. I.e.: a computer start-up pack composed of the computer itself, a monitor, and a printer. PrestaShop makes it easy for you to create a "pack" product and add other products from your catalog to this pack.
Packs enable you to simplify preparing orders. They also allow customers to take advantage of special prices and offers.
You cannot currently add combinations or virtual products to a pack. |
You cannot add an existing pack within a new pack, or import the content of an existing pack into a new pack. |
The process to create a pack is similar to the one for creating a regular product:
A new tab appears on the left, titled "Pack". This tab only features two text fields and a button:
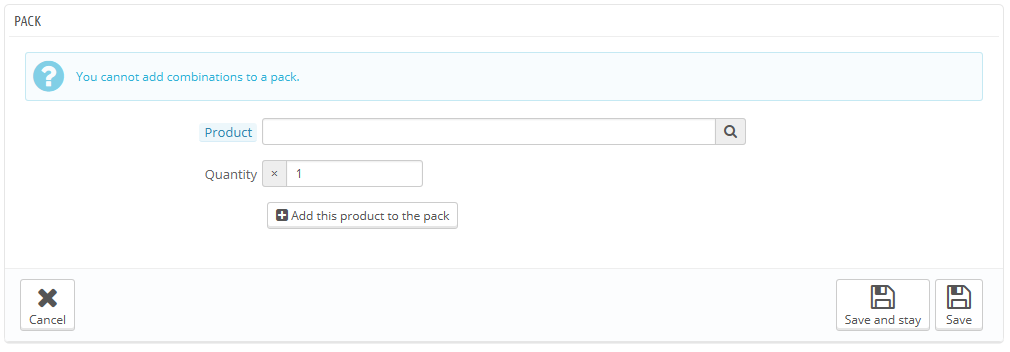
You can add as many products as you would like to the pack.
You can remove a product from the pack simply by clicking the trashcan icon next to it.
Once you are done with the "Pack" tab, you can edit the content of all the other available tabs as if you would for a regular product.
Your shop may feature (partly or exclusively) virtual products – that is, products that are not shipped, but rather downloaded: entertainment tickets, e-books/PDF files, real-life services...
PrestaShop makes it easy for you to create a virtual product
The process to do this is similar to the one for creating a simple product:
The tabs on the left change:
The new tab only features one option at first: it asks if the virtual product you are creating has a file attached (i.e., if your customer will pay to download something).
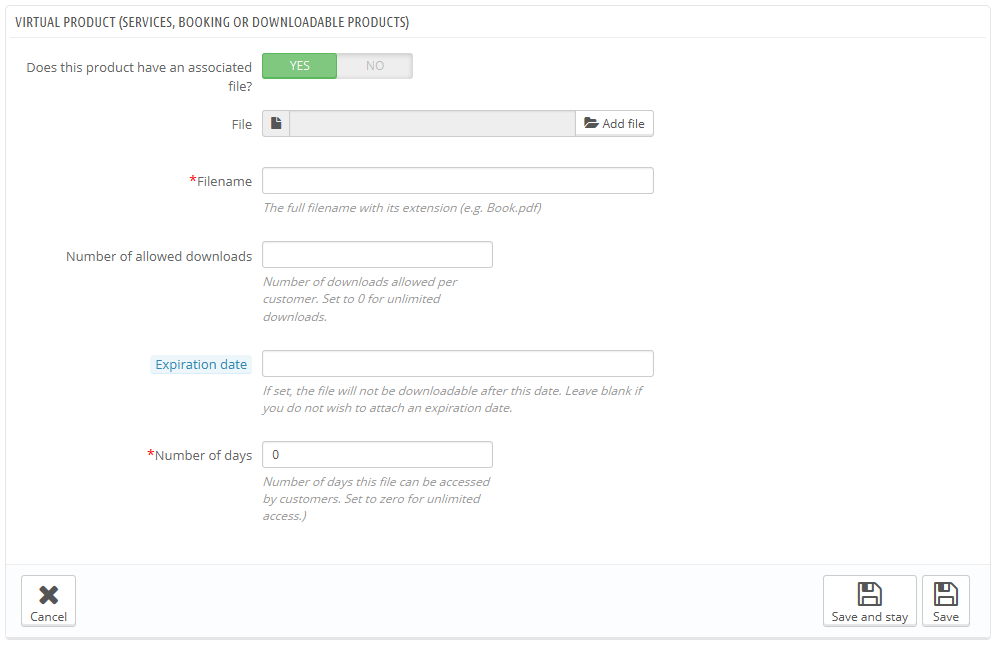
When you click "Yes", PrestaShop opens a new form within the tab, from which you can upload the file you intend to sell:
File. Click the "Browse" button to find the file on your hard drive. As soon as you have selected a file, the upload begins.
The maximum file-upload size setting depends on your server's settings, and cannot be increased from PrestaShop. If you have access to your server's
If you do not have access to the |
You should compress your file in zip format, in order to avoid the browser misinterpreting If you are selling a high resolution image, uploading it using this form does not prevent you from uploading its thumbnail in the "Images" tab on the left. |
Once you are done with the "Virtual Product" tab, you can edit all the other available tabs as if you would for a regular product.