Tabla de contenidos
Por obvio que pueda parecer, esto es Internet, y gente de todo el mundo visitará su tienda, y pedirán sus productos. Como propietario de una tienda, debe atender a tantos clientes como sea posible. Esto significa que su sitio web debe estar totalmente traducido en tantos idiomas como sea necesario, con los impuestos locales, las unidades de peso y moneda, las zonas geográficas locales, etc
El menú "Localización" apareció con PrestaShop 1.5, y reune conjuntamente muchos ajustes y herramientas de localización que estaban dispersas en varios menús en versiones anteriores .
La página principal bajo el menú "Localización" le permite configurar las unidades utilizadas para sus productos.
Esta sección le ofrece una extensa lista de los paquetes de localización existentes que puede importar. No sólo le permite configurar su instalación de PrestaShop con sus propias unidades locales , sino también le permite añadir otros datos:

Como puede ver, estos datos adicionales son opcionales: puede optar por importar la moneda y el idioma de un país determinado, y no sus impuestos, por ejemplo.
Aunque no debe añadir demasiados datos locales ya que esto puede abrumar a sus clientes, puede ser útil importar el paquete de localización de aquellos países que más visitan su tienda (según sus estadísticas).
Además de las unidades por defecto, no puede eliminar automáticamente todos los datos de un determinado país; si necesita eliminar datos, tendrá que hacerlo manualmente, en sus respectivas páginas bajo el menú "Localización".
Esta sección agrupa cuatro ajustes locales predeterminados, de primordial importancia:
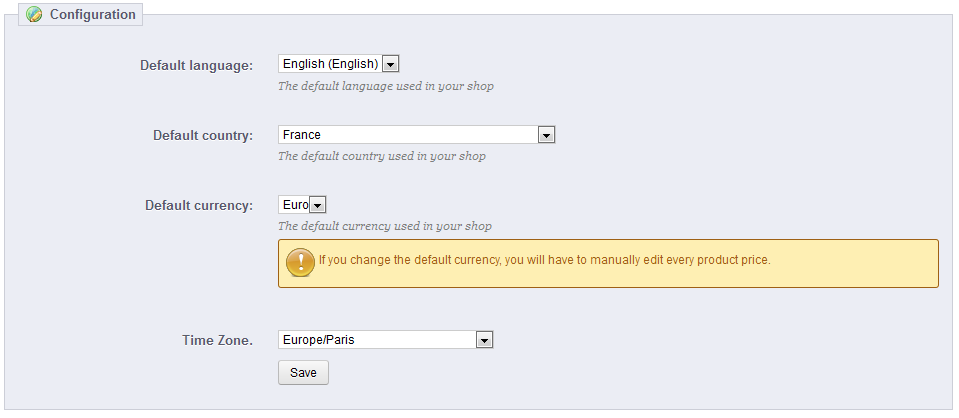
Las unidades físicas que se presentan en esta sección (peso, distancia, volumen, dimensión) se utilizan tanto en las páginas de sus productos como para sus propias necesidades de embalaje – y en última instancia, son una parte esencial en su relación con su transportista.
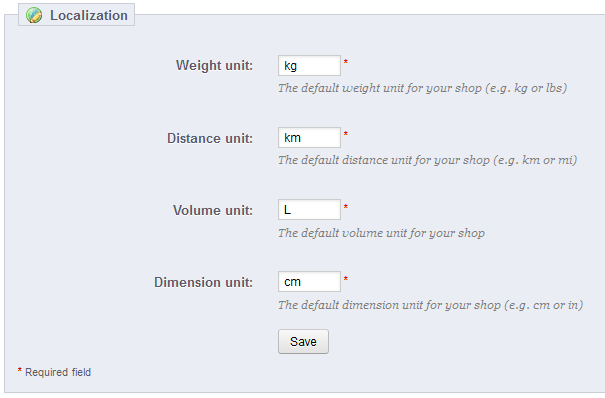
Estos valores pueden ser establecidos al importar el paquete de localización para un país, pero puede editarlos manualmente tras la importación . Por ejemplo, si quiere tener centilitros en lugar de litros para la unidad de volumen, cambie el valor predeterminado "L" a "cL".
Los valores deben ser símbolos de las unidades del Sistema Internacional de Unidades (http://es.wikipedia.org/wiki/Sistema_Internacional_de_Unidades).
Esta última sección le pedirá que configure el idioma y el país local de su servidor, en formato de código ISO:
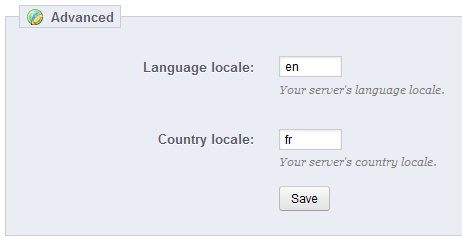
Estos valores pueden ser establecidos al importar el paquete de localización para un país, pero puede editarlos manualmente tras la importación .
PrestaShop fue diseñado para ser multilingüe: hay 5 idiomas predeterminados (Inglés, Francés, Español, Alemán e Italiano), y muchos más están disponibles para descargar.
La página "Idiomas" gestiona los idiomas que se pueden ver en su back office y su tienda.
La página muestra los idiomas ya instalados en su tienda, junto con alguna otra información: código ISO, código del idioma, formato de fecha (corto y completo). Puede activar o desactivar un idioma haciendo clic en el icono de la columna "Activo".
Para añadir un idioma, basta con importar la ubicación del paquete de un país que utilice ese idioma (en la página "Localización"). Si esto no funciona, o si necesita algo que se adapte mejor a sus necesidades, puede añadir un nuevo idioma manualmente, utilizando el formulario que se encuentra tras del botón "Añadir nuevo".

Crear un nuevo idioma significa que tendrá que traducir todos los textos del front-end de PrestaShop, así como el back-end, los módulos, etc., o arriesgarse a utilizar las cadenas en inglés por defecto. La traducción se realiza con la herramienta de la página "Traducciones", bajo el menú "Localización". También puede crear un nuevo lenguaje para integrar mejor un paquete de idioma que haya descargado desde el sitio de PrestaShop. |
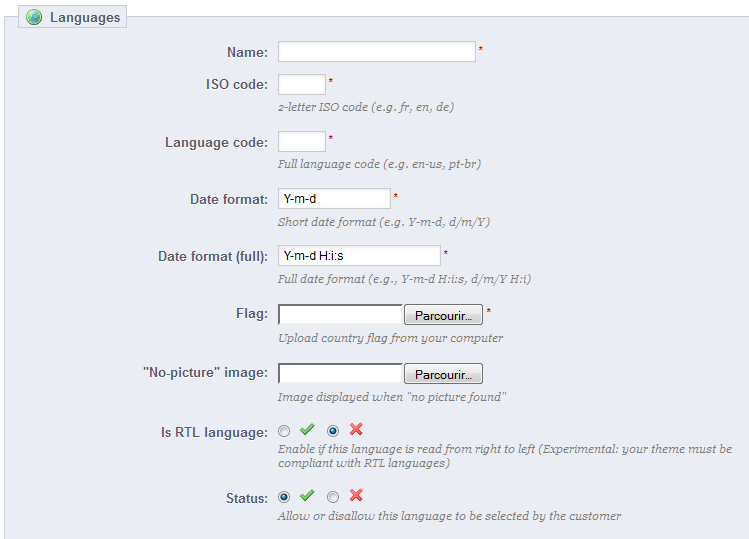
Para crear un nuevo idioma, debe rellenar tantos campo del formulario como sea posible
xx-yy, siendo xx el código ISO del idioma (igual que el anterior), e yy el código ISO del país, utilizando ISO 3166-1 alpha-2 (http://en.wikipedia.org/wiki/ISO_3166-1_alpha-2). Para obtener mayor información, consulte: http://es.wikipedia.org/wiki/C%C3%B3digo_de_idioma_IETF.date(): http://www.php.net/manual/es/function.date.php./img/l de la instalación de PrestaShop.Una vez que haya guardado y activado este idioma , puede importar su paquete de idiomas. Esto se realiza en la página "Traducción de mensajes", bajo el menú "Localización". Utilice la opción "Importar un paquete de idioma manualmente".
Por último, asegúrese de que todo funciona correctamente: diríjase al front-office de su tienda y haga clic en las banderas situadas en la parte superior. Del mismo modo, los clientes pueden seleccionar un idioma adicional mediante el uso de estos iconos.
Las zonas PrestaShop son una lista de las subregiones del mundo (http://es.wikipedia.org/wiki/Subregi%C3%B3n). Esto ayuda a categorizar los países.

Si lo necesita, puede crear más zonas: haga clic sobre el botón "Añadir nuevo" para visualizar el formulario de creación.

Todo lo que necesita es un nombre y un estado, para indicar por ejemplo que no se realizan entregas en Oceanía.
Si tiene establecido el modo multitienda, puede también asociar una zona con una selección de tiendas.
PrestaShop debe conocer todos los países existentes para que sus clientes indiquen claramente en qué lugar del mundo viven.
Hay alrededor de 195 países en el mundo, aunque PrestaShop tiene 244 registrados. Esto es debido a que algunos países ya incluyen las regiones de ultramar que forman parte del propio país.
Por ejemplo, los departamentos de ultramar franceses antes conocido como DOM (Guadalupe, Martinica, Mayotte, Reunión y la Guayana Francesa) tienen hoy en día el mismo nivel de importancia que una región metropolitana de Francia. Del mismo modo, Alaska y Hawai son estados propios de EE.UU.
Sin embargo, el envío de un paquete a Guadalupe no significa enviarlo a Francia, sobre todo para los gastos de envío. De hecho, para calcular los precios de los envíos PrestaShop distingue los países de los estados y regiones.
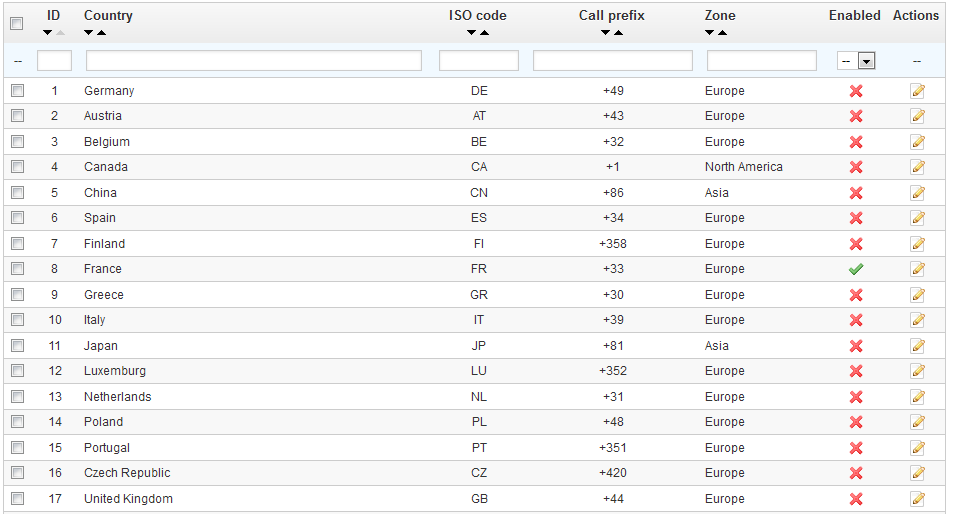
Por defecto, sólo su propio país está activado. Debe activar los paises necesarios para sus clientes, uno por uno . Si no está seguro de cuales debe activar, revise sus estadísticas para ver los países de donde proceden la mayoría de sus visitantes.
En la parte inferior de la lista, la sección "Opciones de Países" sólo muestra en su front-office los países que cubren los transportistas habilitados. Le recomendamos que habilita esta opción, ya que evita que los clientes tengan que desplazarse a través de los nombres de todos los países para encontrar el suyo.

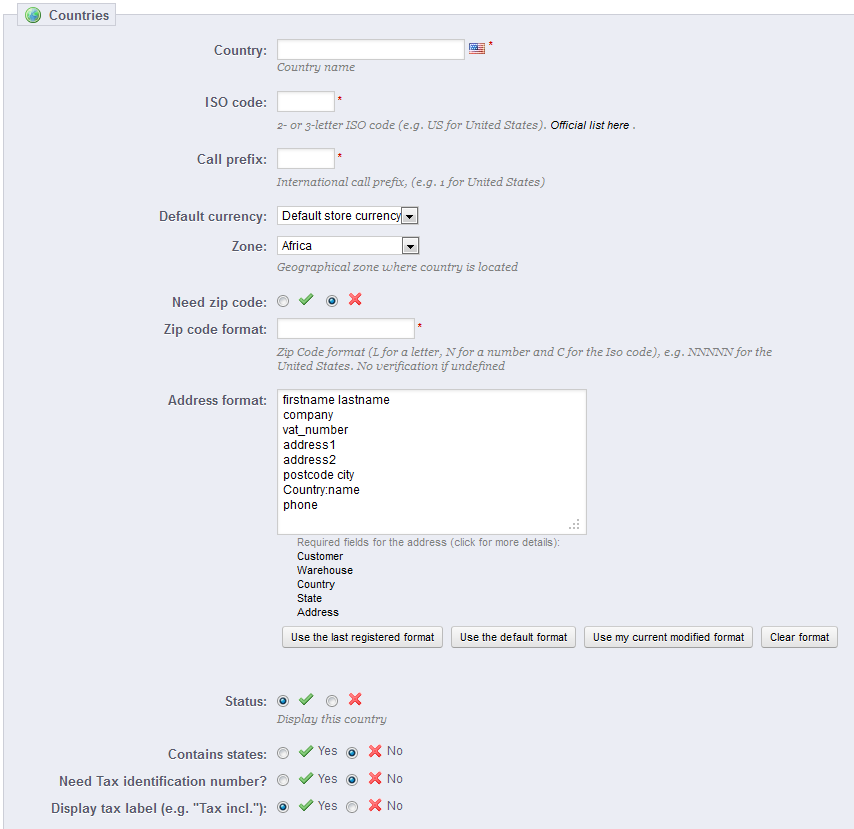
Normalmente PrestaShop ya incluye todos los países existentes en su base de datos. Pero en el caso de que uno nuevo sea creado, tendría que añadirlo.
PrestaShop llama "Estados" al primer nivel de división administrativa de un país. En los Estados Unidos, son llamados estados; en Italia, se las conoce como regioni (singular: regione); en Francia, como régions; en Reino Unido, regions. Por defecto, PrestaShop le proporciona el siguiente conjunto de estados: los 50 estados de EE.UU., las 13 provincias y territorios canadienses, las 24 provincias de Argentina, y las 110 provincias de Italia.
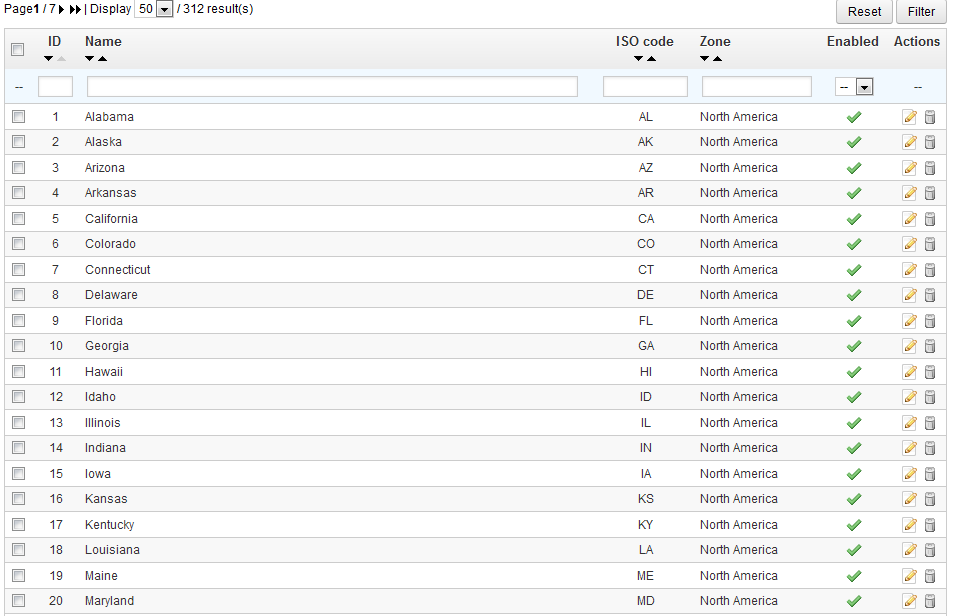
Tener estados correctamente definidos en su base de datos ayuda a mejorar representativamente las posibilidades de entrega que ofrecen sus transportistas. Estos estados también pueden ser esenciales para calcular las tasas de impuestos, dependiendo del país. Por tanto, es importante introducir todas las divisiones administrativas de un país si son importantes para sus transportistas. Puede encontrar una lista de estas divisiones en la siguiente página de la Wikipedia: http://en.wikipedia.org/wiki/Table_of_administrative_divisions_by_country.
El formulario de dirección de PrestaShop sólo lista los estados que se encuentran disponibles para el cliente. Así pues, asegúrese de razonar el contenido que añada a este listado de estados. Esta es la razón por la cual, por ejemplo, la lista contiene provincias de Italia en lugar de regioni. |
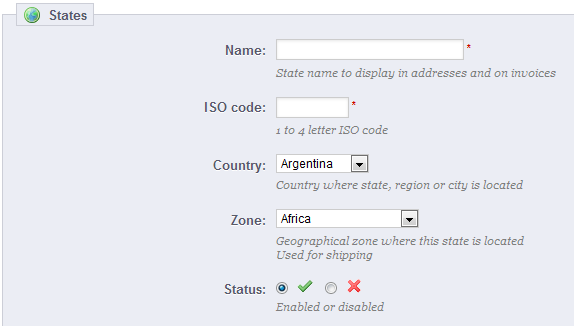
Vamos a crear un nuevo estado. Haga clic en el botón "Añadir nuevo" para abrir el formulario de creación.
PrestaShop puede aceptar una gran cantidad de monedas. Por defecto, sólo hay una moneda estándar: el Euro. Sin embargo, debe añadir y configurar nuevas monedas en función de las necesidades de sus clientes. De hecho, los clientes apreciarán la posibilidad de visualizar los precios de su tienda en la moneda de su país.

Las dos secciones que aparecen en la parte inferior de la página "Monedas" son muy simples pero esenciales, ya que están relacionadas con las tasas de cambio de las divisas (o "tasas de conversión"). Citando a Wikipedia, "En financias, el tipo o tasa de cambio entre dos divisas es la tasa o relación de proporción que existe entre el valor de una y la otra. Dicha tasa es un indicador que expresa cuántas unidades de una divisa se necesitan para obtener una unidad de la otra." Las tasas cambian diariamente, a veces drásticamente dependiendo de los acontecimientos actuales, y su tienda siempre debe estar actualizada con los últimos valores.
Para cambiar la moneda por defecto, debe ir a la página "Localización" en el menú "Localización", y utilizar la opción "Moneda por defecto" de la sección "Configuración". |
En PrestaShop, hay dos formas de actualizar sus tasas de cambio:
crontab para activar la actualización automática. Si no sabe lo que es una tarea cron o un archivo crontab , póngase en contacto con su proveedor de hosting.
Tenga en cuenta que las tasas se proporcionan tal cual: el equipo de PrestaShop pone mucha atención para tener las tasas correctas en estos archivos, pero pueden diferir ligeramente de los valores reales, ya que estas tasas pueden fluctuar considerablemente en un corto período de tiempo. |
The easiest way to add a country's currency is to import its localization package. This is done in the "Localization" page, under the "Localization" menu. Once import, you must go the "Currencies" page to enable it.
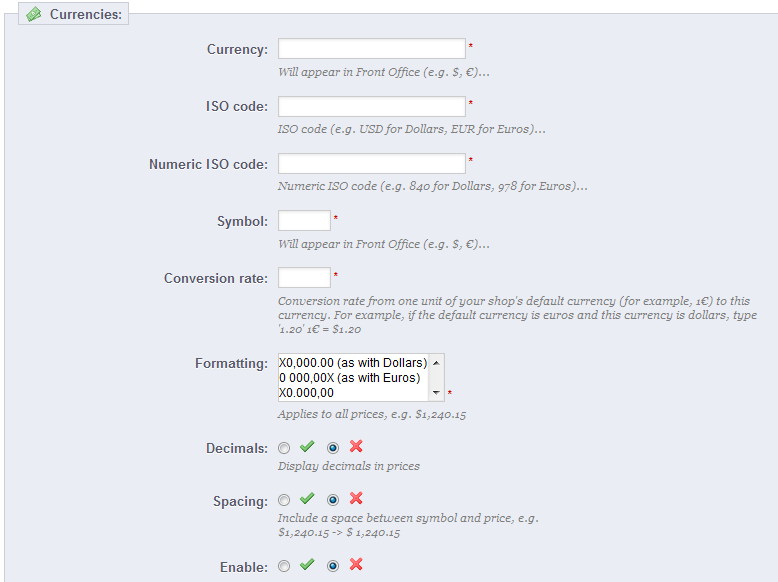
You might need to add a currency not featured in any the localization packages. In that case, you can use the creation form.
Taxes are a complex subject, which should be fully understood as it can have a significant impact on your product prices or your shipping fees. While this user-guide is not meant to teach all the ins-and-outs of taxes, we will try our best to give you pointers. Taxes are "compulsory contribution to state revenue, levied by the government on workers' income and business profits or added to the cost of some goods, services, and transactions". In short, every product you sell is subject to sales taxes, which depend on your state's tax laws. In effect, you contribute to your state or government functioning (public goods and services) with a percentage of all your sales, as defined by local tax rates. There are hosts of tax rates in the World, and they vary considerably from one country to another, and even within a single country if it has federal states (USA, Germany, Spain, Russia...). You should therefore make sure to strictly conform to your country's tax laws, and even those of your state or town if they apply to you. Check with your local tax representative as soon as possible in order to get all the official details. |
By default in PrestaShop, a tax applies to all countries/states/zones. If order to apply a specific tax rate for a single country or a set of countries (and not some others), you must create a tax rule. The tax rule is then applied on a per-product basis, during the creation of the product ("Prices" tab).
You cannot directly apply a tax to a product; you can only apply tax rules. Therefore, you must first register all relevant taxes, and then create a tax rule for that tax in order to specify the countries the tax applies, and finally set the tax rule to the product.

At the bottom of the page is the "Tax options" section. These options apply to the whole shop, and all of the orders.
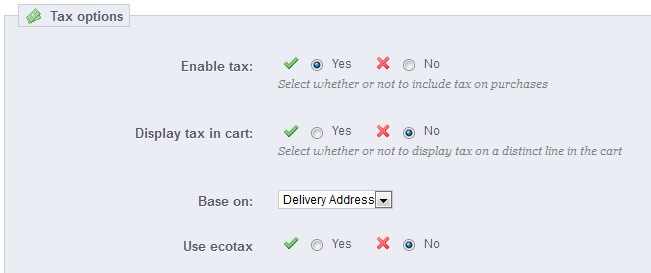
If you decide to enable the ecotax after having added products, you will have to edit them all in order to set the tax properly for each product.
Note that if you have set ecotaxes for your products already, and that you choose to disable ecotax, then all your products will lose their ecotax settings. Re-enabling the ecotaxe will mean having to set all your products' ecotaxes again.
The ecotax will also appear to the customer, on the product's page.
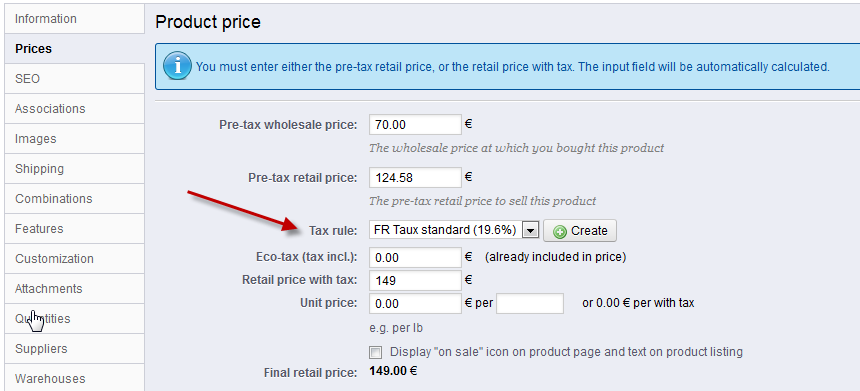
Adding a new tax is very easy, because tax rules take out all the burden of having to specify the countries where the tax applies. The tax creation form is therefore very short:

Tax rules make it so that taxes are only applied to select countries. |
By default in PrestaShop, a tax applies to all countries/states/zones. In order to apply a specific tax rate for a single country or a set of countries (and not some others), you must create a tax rule. The tax rule is then applied on a per-product basis, during the creation of the product ("Prices" tab).
You cannot directly apply a tax to a product; you can only apply tax rules. Therefore, you must first register all relevant taxes, then create a tax rule for that tax in order to specify the countries the tax applies, and finally set the tax rule to the product.
A few sample taxes rules are already in place, which depend on the country you chose for your shop during the installation of PrestaShop. The tax rules are set for each tax: the rules actually serve as a kind of country filter, limiting the use of that tax to a specific set of countries.
You should edit a couple of the presented rules in order to get a better grasp of how tax rules can be set.
You can add as many tax rules as needed to your PrestaShop installation. Not only that, but you should make sure that all of the needed tax rules are registered in your shop.
Creating a new tax rule is done in two steps:
Note that the default rate applied to your products will be based on your store's default country.
PrestaShop provides you with full translation tool for your shop. This helps you add and edit your pages translations. This way, you are the master of your shop, and can handle your translated strings without having to wait for official translators to publish their corrections.
Even if you do not want to correct the translators' work, you might want to change the wording they chose to use (less formal, less wordy, etc.), and customize the various available text, thus tailoring your website to your audience; for instance, a hip-hop clothing shop might be better off using different expressions from that of a luxury watches shop.
The process of adapting a program to foreign languages is called internationalization and localization, or i18n and L10n for short. The PrestaShop team has chosen to use its own built-in translation tool, so that anyone with a PrestaShop installation may customize their shop to their needs. The official translation packs can be downloaded manually from this address: http://www.prestashop.com/en/translations. |
The most important tool of the "Translation" page is in the "Modify translations" section. This is where you can choose to edit a translation, and completely customize each and every sentence if you wish so.

Select the part of the current translation that you wish to edit:
Some categories have a second drop-down list, which lists the available themes. PrestaShop themes have their own strings, but can also have their own modules, PDF templates and e-mail templates. The drop-down list therefore enables you to choose which theme you want to work with.
Once your selection is done, click the flag of the language in which you wish to edit that category of translation.
A long page then appears. It contains the hundreds of available strings for that category, sometimes split in tens of fieldsets.
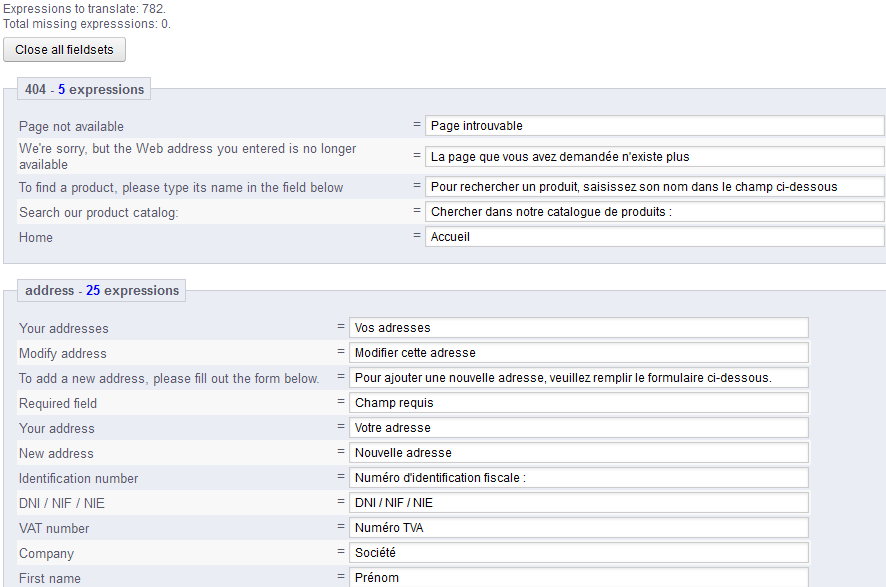
By default, only the fieldsets which have untranslated strings are open. If you wish to open them all, click on the button on the top left twice: once to close all of them, once more to expand them all. You can open and close fieldsets one by one by clicking on its title.
Editing a translation is easy:
PrestaShop 1.5 introduces a new syntax where strings can contain placeholders, such as When you find a string with such placeholder, it means that PrestaShop will replace it with an actual dynamic value before displaying the translated string. Technically, having placeholders prevents strings from being split in parts. Thereby, in previous version of PrestaShop, "Your order on %s is complete." would have been split in two: "Your order on" and "is complete.". While the literal translation of these worked for some language, it made translation nearly impossible for many other languages, none the less RTL languages such as Arabic or Hebrew. Thanks to the placeholders added in PrestaShop 1.5, such strings are now fully translatable in any language. |
Some strings might have a warning icon to their right. This indicates strings with placeholders. You can click on the icon to get more information.
In case of a string with a placeholder, you should make sure that the content of that placeholder will be placed in the correct flow of the sentence, and avoid literal translation.
Numbered placeholders (%1$s, %2$d, etc.) enable translators to rearrange the order of the placeholders in the string while maintaining the information each is replaced with. This way, a French translator could choose to translate "Order #%1$d from %2$s" into "Commande n°%1$s du %2$s" or "Le %2$s, commande n°%1$s".

Most translation categories present their strings in the same way: the category's strings are grouped into fieldsets that you can close or expand by clicking on their title. The title indicates the number of expressions that the fieldset contains, and when needed, the number of missing expressions, in brackets and in red.
This is true for most categories, except three:
{lastname} or {shop_name}, which PrestaShop replaces with the actual values when sending the e-mail. Make sure to keep them in both your translation.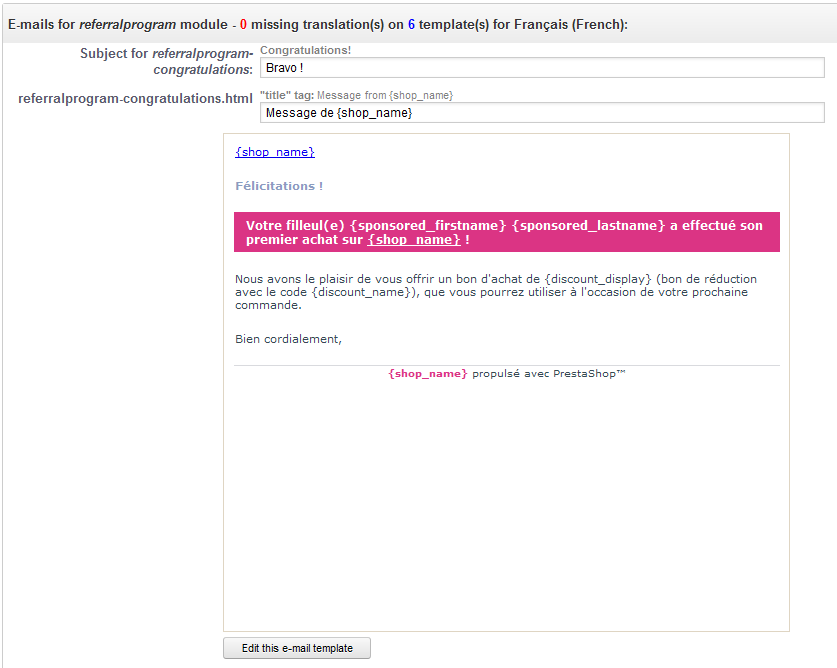
PrestaShop translations are available in packs, which combine all the different translation categories into a zip file. Many language packs are available freely for you to download and install, directly from the PrestaShop.com servers. PrestaShop will take care of downloading the language pack, unpacking it and creating the correct sub-folder in your installation's /translation folder.

You can also update the currently installed languages, likewise directly from the PrestaShop.com servers, but be reminded that any change that you might have made to your own translations will be lost once you update it.
In the case where you do not want to use an official PrestaShop translation pack, but rather a custom one (either provided by someone you know, or one that you exported from another PrestaShop installation), then this tool is for you.

Select the Zip file, select the theme to which you want that pack to be applied to, then click the "Import" button, and it will install the pack in the /translation folder.
If there is already a language folder with the same ISO 639-1 code, it will be replaced by the files from the pack you are importing. |
You can create your own language pack using this tool, either as a way of making a backup of your customizations, or in order to share your translations with other PrestaShop installation – your own or someone else's.
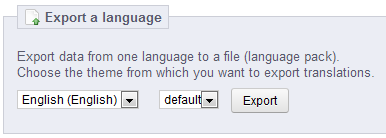
Simple choose the language and the theme of the translation you wish to export, and click the "Export button.
Note that the pack will contain the theme that your translation is supposed to support.
You can copy the content of one language to another. This is especially useful when you wish to replace a theme's language with the same language from another theme.
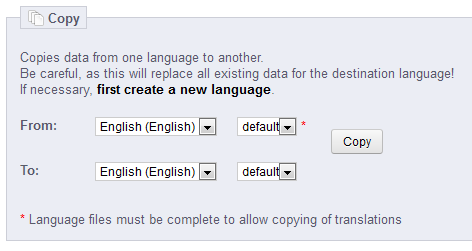
Choose the source language and theme, then the destination language and theme, then click the "Copy" button. In most case, the language should remain the same in both drop-down lists.
If there is already a language folder for this language in the destination theme, it will be replaced by the files from the language and theme you are copying. You might prefer to first create a new language for the destination theme before copying the source language to it. |