Tabla de contenidos
Como gerente de la tienda, tendrá que lidiar con un montón de pedidos, adjuntar facturas, y dar respuestas y soluciones a las preguntas y problemas de sus clientes – al menos, eso es lo que le deseamos . La tarea diaria de gestionar númerosos pedidos puede ser laboriosa. Afortunadamente, PrestaShop hace todo lo posible para ayudarle a vadear todas estas tareas y así conseguir que los pedidos lleguen satisfactoriamente a sus clientes, con los bonos de entrega y con las inevitables devoluciones de mercancía.
La página "Pedidos" bajo el menú "Pedidos" le permite ver toda la información de todas las compras de su tienda. Todas las transacciones de su tienda están disponibles aquí, organizadas por fecha (por defecto, estas se encuentran ordenadas desde la compra más reciente a la más antigua).

Puede filtrar los resultados y encontrar fácilmente los pedidos que esté buscando utilizando los campos de arriba. Por ejemplo, para identificar los pedidos del Sr. Doe, escriba "Doe" en el campo "Cliente" y haga clic en el botón "Filtrar".
NO PUEDE ELIMINAR UN PEDIDO. En Europa está prohibido eliminar pagos o solicitar información y/o factura de una empresa. Por lo tanto, la implementación de un botón "Eliminar" para los pedidos haría que PrestaShop fuera ilegal en Europa Para eliminar de forma segura el pedido predeterminado (y así poder eliminar el iPod de su catálogo), instale el módulo "PrestaShop cleaner" (que se encuentra disponible en la instalación por defecto desde la versión 1.5.4), abra su pantalla de configuración y marque la casilla "Pedidos y Clientes" antes de hacer clic en el botón "Comprobar y corregir". |
Puede exportar una lista de sus pedidos haciendo clic en el botón "Exportar" en la parte superior.
No se puede importar pedidos.
Una de las grandes novedades de PrestaShop 1.5 es la capacidad de crear un pedido directamente desde el back-office. Por ejemplo, esto es tremendamente útil cuando un cliente quiere comprar un producto pero por algun causa es incapaz de hacerlo, y usted necesite tomar el control y realizar el pedido por él mientras hablan por teléfono o durante una conversación por correo electrónico.
Al hacer clic en "Añadir nuevo" se abre una nueva página con un único campo de texto, con la etiqueta "Buscar clientes" Al crear un nuevo pedido a través del back-office, la primera tarea consiste en asociar ese pedido con un cliente. Escriba las primeras letras del nombre, apellido o dirección de correo electrónico y PrestaShop mostrará las coincidencias correspondientes.
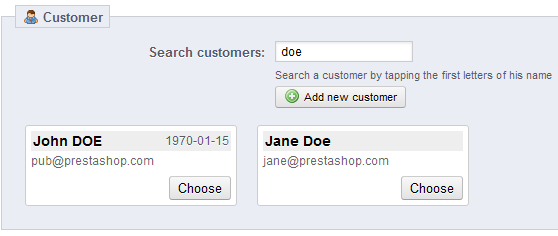
Si el cliente para el que tiene que crear el pedido no tiene ni siquiera una cuenta en su tienda, puede crear una sobre la marcha: haga clic en el botón "Añadir cliente" para abrir una ventana con los principales datos de la cuenta preparados para rellenar. Una vez guarde la cuenta, esta se convertirá en la cuenta seleccionada para el pedido.
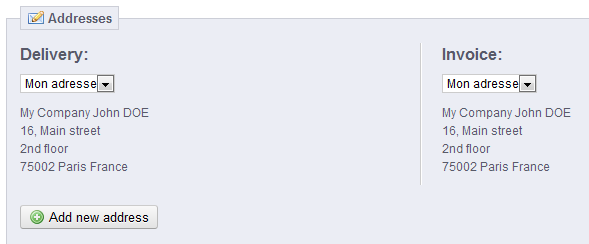
Tenga en cuenta que también tendrá que registrar la dirección del cliente - un botón "Añadir nueva dirección" está disponible en la parte inferior de la página, en la sección "Direcciones". |
Haga clic en el botón "Seleccionar" para elegir el cliente correcto, y aparecerá el formulario para completar el pedido. En esta sección principal, "Carrito", es en donde tomará todas las decisiones necesarias para realizar el pedido del producto.
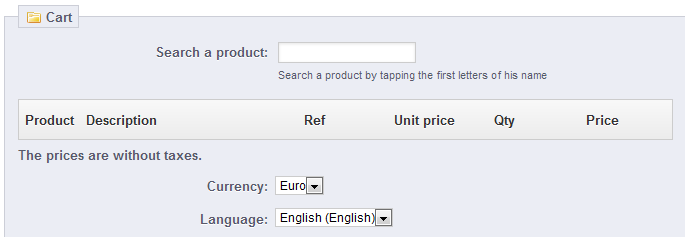
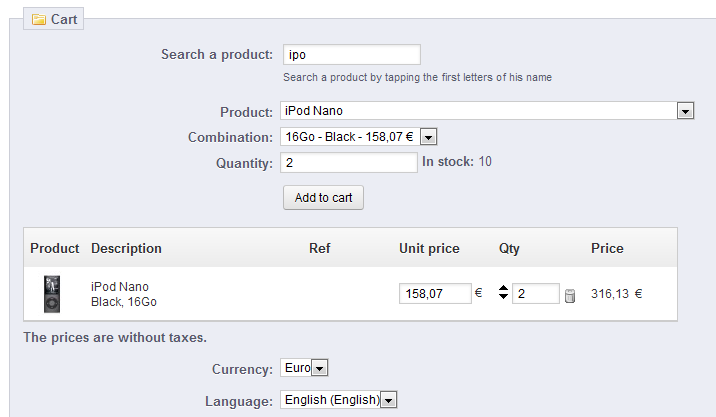
El campo "Buscar un producto" le permite de forma dinámica encontrar productos para añadirlos : escriba las primeras letras de su nombre y PrestaShop le mostrará una lista desplegable rellenada con los productos coincidentes. Elija un producto, seleccione la cantidad y pulse el botón "Añadir al carrito". Por supuesto, puede elegir entre todas las combinaciones disponibles para un producto, si las hay, desde la lista desplegable "Combinación" que aparece en ese caso.
Tenga en cuenta que PrestaShop le da una indicación del stock restante que existe en un producto dado, que le permitirá decirle al cliente si el producto se encuentra fuera de stock desde este mismo formulario de pedido.
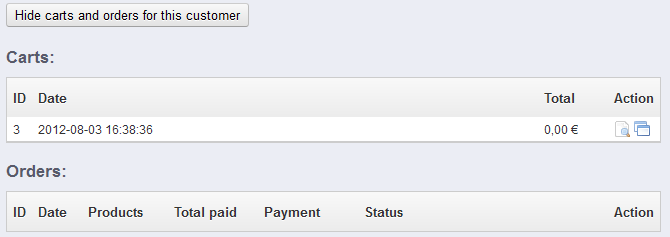
La página también permite ver los carritos anteriores y pedidos realizados por ese cliente, si los hay. Si lo que ocurre es que está tratando con un carrito que el cliente no puede validar de ninguna manera , puede utilizar ese carrito para este pedido aciendo clic en el botón de acción "Usar este carrito" (icono de "dos ventanas").
Si es necesario también puede añadir un cupón/regla de compra, e incluso crear uno sobre la marcha haciendo clic en el botón "Añadir un nuevo cupón".

Por último, tiene que especificar a qué dirección debe realizar el envío del pedido (y posiblemente la facturación). Aquí, de nuevo, puede crear nuevas direcciones sobre la marcha usando el botón "Añadir nueva dirección".
Para poder procesar los pedidos que reciba, debe tener acceso a la información que contienen.
Haga clic sobre la línea que contiene el pedido, o haga clic en el botón "Ver" situado a la derecha del pedido.
La hoja de detalles del pedido es mostrada ocupando toda una hoja completa.
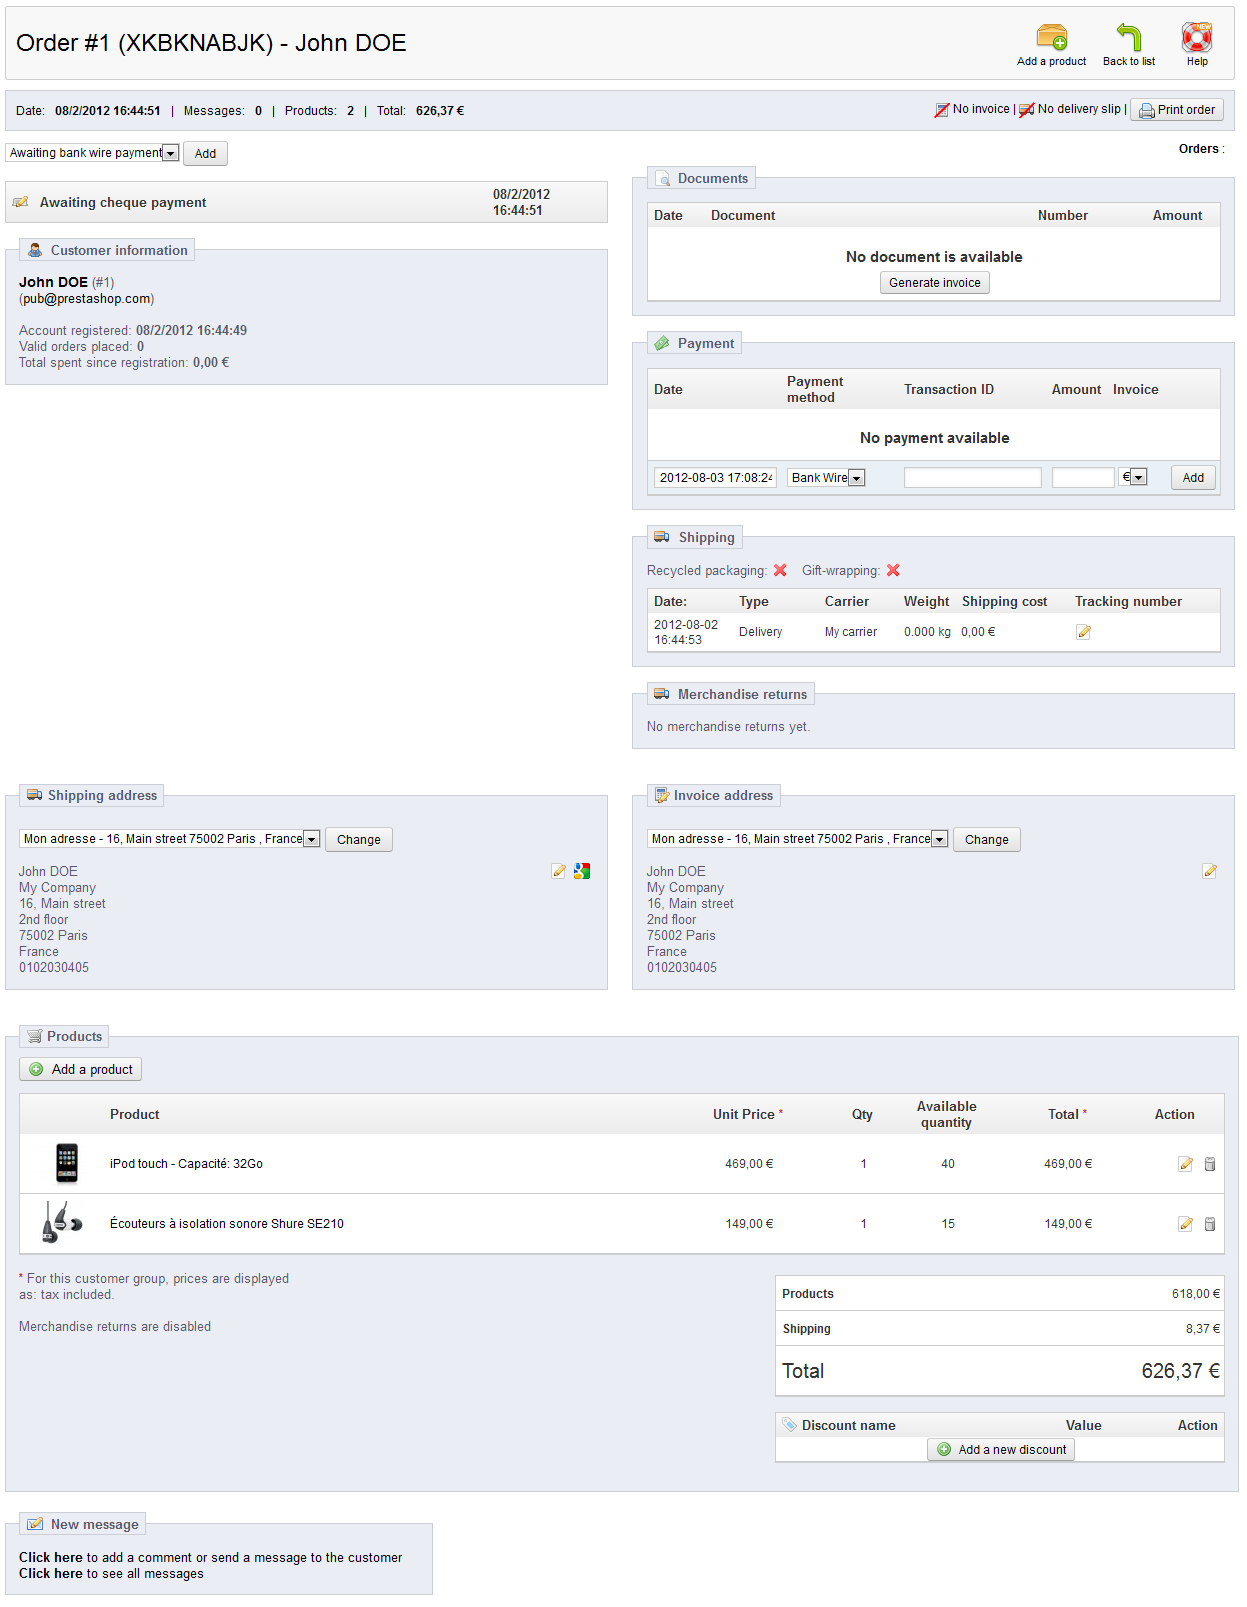
Este resumen del pedido le da acceso a:
En la sección "Dirección de envío" de la página, puede ver el icono de una "G": que le permitirá utilizar Google Maps para localizar la dirección en un mapa.
Los pedidos no son inalterables. Hay muchas razones por las que necesitará modificar un pedido antes de que su pedido sea tramitado y enviado a su destinatario: uno de los productos se encuentra fuera de stock, el cliente ha cambiado de opinión , etc.
En la parte superior de la página, puede encontrar el botón "Añadir un producto", el cual desencadena dos acciones al hacer clic sobre él:

Al añadir un producto, la tabla de productos crea una nueva fila añadiendo unos cuantos campos. El primer campo de texto es en realidad un pequeño motor de búsqueda: escriba las primeras letras de un producto para ver una lista de productos coincidentes. Seleccione el que desee agregar, y el campo color gris de la fila pasará a estar disponible.
Si el producto tiene combinaciones, puede seleccionarlas en la lista desplegable que aparece debajo del nombre: el precio unitario se actualizará en consecuencia.
Establezca la cantidad de productos, y a continuación haga clic en el botón "Añadir producto": el producto es añadido.
Tenga en cuenta que el botón "Añadir un producto" de la sección "Productos" desencadena la misma acción que el botón del mismo nombre en la barra superior.
No puede añadir mayor cantidad de un producto de la que hay disponible.
Para cancelar un producto, diríjase a la lista de productos, y elimine el producto haciendo clic en el botón de acción "Eliminar" (con el icono del "bote de basura"), o bien haga clic en el botón de acción "Editar" si lo que necesitas es eliminar una cierta cantidad de un producto .

Puede modificar la cantidad de muchos productos al mismo tiempo.
Si la cantidad de un producto llega a 0, se elimina del pedido por completo.
No puede eliminar más cantidad de la que tiene un producto.
Haga clic en el icono de la "cruz roja" para cancelar la edición.
Muchas de las secciones de la hoja de pedido pueden ser editadas, lo que le permite actualizar o corregir algunos de los datos facilitados por el cliente.
La primera lista desplegable que aparece en la página del pedido le permite cambiar su estado. Este es un aspecto muy importante del proceso de seguimiento de un pedido, ya que con cada cambio de estado, nuevas funcionalidades y documentación estarán disponibles para el pedido.

Puede elegir entre los siguientes estados:
Con el fin de obtener una mejor visión de la actividad del pedido , se registra cada cambio de estado , apareciendo este registro justo debajo de la lista desplegable de estado. Por lo tanto, sólo se debe cambiar el estado si se ha confirmado: no marque el pedido como "Entregado" cuando envie el paquete, utilice "Enviado"; no utilice "Preparación en curso" cuando en realidad sólo ha dado un vistazo rápido al pedido, etc
Los botones de acción cambian según el estado del pedido . Por ejemplo, una vez que el pedido está en el estado "Entregado", las opciones "Añadir producto" y "Eliminar producto" se convierten en dos nuevos botones: "Devolver productos" y "Reembolso parcial".
La devolución del producto no está activada de forma predeterminada. Para activar esta opción, diríjase a la página "Devoluciones" bajo el menú "Pedidos", y active la opción que se encuentra en la parte inferior de la página. Esto se aplicará a todos los productos y pedidos. |

Cuando establece un producto como devuelto o reembolsado, cuatro opciones están disponibles bajo la lista de productos:
Crear un bono. Cuando se activa, un bono será creado por el importe de los elementos seleccionados. Un bono es realmente un código de descuento que el cliente puede introducir durante el proceso de compra.
Puede editar los bonos existentes visualizando la página del cliente: desde la página actual del pedido, haga clic en el enlace bajo el nombre del cliente en la sección "Información del cliente"; una vez en la página del cliente, diríjase a la sección "Cupones". Puede editar cada uno de los cupones haciendo clic en el icono "Editar".
En PrestaShop 1.5, los cupones son parte de una nueva característica de descuento: las "reglas de compra". Ellas pueden ser creadas y editadas desde la página "Reglas de compra", bajo el menú "Reglas de precios". El proceso de creación de las Reglas de compra será explicado en detalle en el próximo capítulo, "Creación de reglas de compra y bonos". |
Si el cliente pagó el pedido utilizando una tarjeta de crédito, el sistema de pago debe reembolsará la compra automáticamente. Si el pedido fue pagado utilizando un cheque o una transferencia bancaria, tednrá que realizar el reembolso por sí mismo, a continuación marque de forma manual que el pedido ha sido reembolsado en el back-office (en la página de pedidos).
Un vale de descuento es ante todo una prueba por escrito de que un producto ha sido devuelto. La mayoría de las veces, el cliente puede utilizar esto como un cupón. Un cupón es un código de descuento, que no tiene que estar relacionado con una devolución de mercancía o reembolso, y que puede tomar más formas que un simple vale de descuento:
Puede aplicar un bono a todos los clientes, o a un grupo de clientes, o a un cliente único; también puede establecer su fecha de caducidad. Una regla de la compra es básicamente una versión avanzada de un bono: además de lo que un bono podía hacer en PrestaShop 1.4, el sistema de reglas de compra introducido en PrestaShop 1.5 le permite:
|
Puede obtener muchos documentos en formato PDF desde la página del pedido. Cuando estén disponibles, serán listados en la sección "Documentos" de la página.

Por defecto, puede descargar el propio pedido en formato PDF haciendo clic en el botón "Imprimir pedido" en la parte superior derecha.
Puede obtener una factura para el pedido haciendo clic en el botón "Generar factura" de la sección "Documentos". La factura se genera una vez ha establecido el producto en el estado de "Pago aceptado".
Una vez esta es generada , el botón "Ver factura" aparece en la barra principal.
Puede personalizar el diseño de factura con facilidad: los archivos de la plantilla PDF se encuentran en la carpeta |
Cuando establezca el pedido en el estado de "Preparación en curso", se generará un comprobante de envío en formato PDF, que puede posteriormente descargar desde la sección "Documentos".
The shipping details of the current order can be partly edited. More specifically, you can change the tracking number: in the "Shipping" section, click on the "Edit" icon in the "Tracking number" column, and enter the new number.

The "Shipping address" section enables you to edit the destination address of the package your team is about to send. You can either use the drop-down list to choose another of the addresses that the customers has already registered on your shop, or you can use the "Edit" icon to edit the currently chosen address.

If you need to send the package to an address that is not already registered in PrestaShop, you must first create it. To do this, go to the "Customers" menu, open the "Addresses" page, and click in the "Add new" button. Do not forget to put the correct e-mail of the customer, as this is the way PrestaShop will know to associate that new address with your existing customer! Once done, go back to the order's page, and change the address using the drop-down list.
Note that a small "G" icon enables you to visualize the destination of the package on Google Maps.
The "Invoice address" section enables you to edit the payment address of the order. Just as for the shipping address, you can either choose the drop-down menu to choose another of the addresses that the customers has already registered on your shop, or you can use the "Edit" icon to edit the currently chosen address.
If you need the payment to be tied to an address that is not already registered in PrestaShop, you must first create it. To do this, go to the "Customers" menu, open the "Addresses" page, and click in the "Add new" button. Do not forget to put the correct e-mail of the customer, as this is the way PrestaShop will know to associate that new address with your existing customer! Once done, go back to the order's page, and change the address using the drop-down menu.
In the "Products" section, at the bottom of the products listing, you can find an empty table with an "Add new discount" button. This creates a simple discount, not as advanced as the vouchers/cart rules system but still useful.
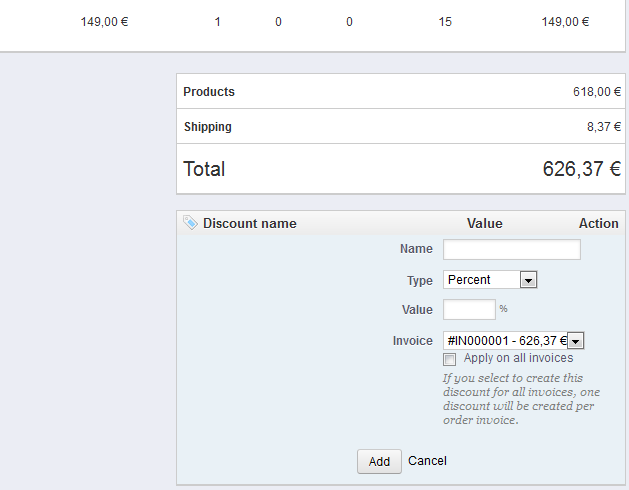
Clicking it will open a new form, with the following items:
The discount will be applied to the total before the shipping costs.
In the "New Message" section, at the bottom of the page, you can attach a comment on the order for your team.
You can also have this comment be sent to the customer, in order to give him or her information concerning the order, a delay, a surprise, or keep him or her informed on offers and specials. This is a key point of customer relationship.

There are two links available:
Each time an order from your shop is validated, an invoice is sent out to the customer. You can download the invoices for a single order from the order's page. The "Invoices" page under the "Orders" menu enables you to download a selection of invoices from past orders in PDF format, all at the same time (in the same PDF file).
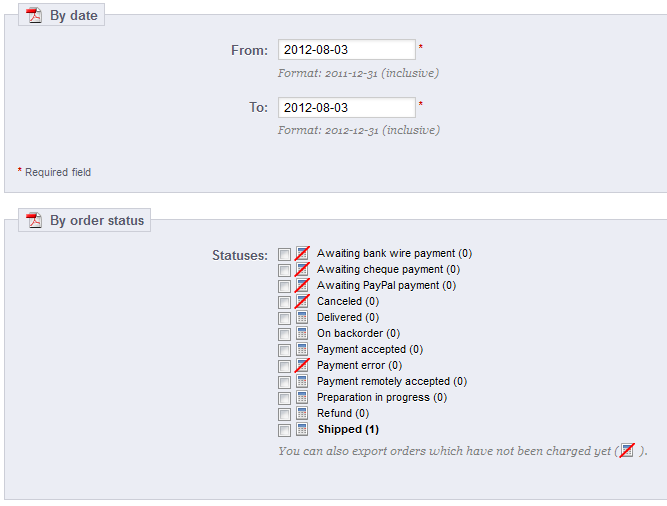
You can get a PDF of several invoices depending on two main criteria:
In both cases, the invoices are generated into a single PDF file, each with their own pages. You cannot get a single PDF file for each invoice of the given period or statuses using this page.
If you want to customize the look of your store's invoices, you must change its template files. PDF template files are located in the |
You can choose whether or not invoices should available to your customers as soon as the order is made, as well as the Invoice Prefix and the invoice number you want listed on the printed version of the invoice. This feature can help you simplify the management of your account.
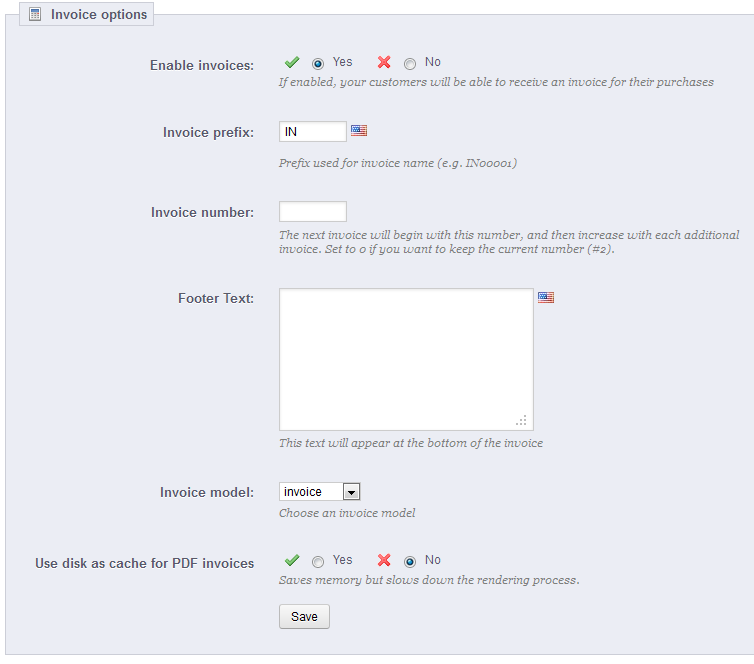
/pdf/ folder of your PrestaShop installation.Do not forget to save your changes.
When your customers ask for their invoices, you can redirect them to the "Order History" section of their user accounts, which keeps all of their invoices available for them.
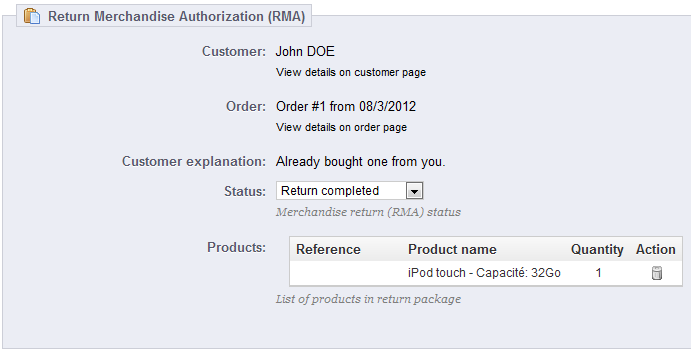
The "Merchandise Returns" page gives you a list of all the RMA process.
At the bottom of the page, you have the possibility of enabling customers to send products back to you. Simply make a choice, indicate the number of days during which a return request can be made, and save your settings.

Once you have activated the RMA option in your back-office, the customer can choose to return an item (provided the order is still in the time of validity). In order to do this, s/he must do the following:

Once the form is complete, the customer clicks on "Make an RMA slip", and the request is sent to you. The request appears in the customer's "Return Merchandise Authorization" page, accessible from the account page.

The return request appears in your back-office.

It is now up to you to accept it or deny it:
The refund process can take several steps, which are indicated by the RMA status. There is just a handful of statuses, which can follow the whole RMA process:
If you want to stop the return process (and deny the customer a refund), simply choose the "Return denied" status.
If you agree with the product being returned and the customer being refunded, follow each step precisely:
An order can be refunded, either partially or totally. This is done using two actions buttons located in the top bar of the order's page itself rather than in the RMA page.
The action buttons change depending on the order's status. For instance, once the order is in the "Delivered" state, the "Add a product" and "Remove products" turn into two new buttons: "Return products" and "Partial refund".
Product return is not activated by default. To activate it, go to the "Product returns" page under the "Orders" menu, and activate the option in the option section at the bottom of the page. This will apply to all products and all orders. |

When you set a product as returned or to be refunded, four options are available below the list of products:
Generate a voucher. When checked, a voucher will be created for the amount of the selected items. A voucher takes the form of a discount code that the customer can enter during the checkout process.
You can edit the customer's existing vouchers by viewing the customer's page: from the current order's page, click on the link under the customer's name in the "Customer information" section; once in the customer's page, reach the "Vouchers" section. You can edit each voucher by clicking on the "Edit" icon.
If the customer paid the order using a credit card, the payment system should refund the cart automatically. If the order was paid using a check or a bank transfer, you have to issue the refund yourself, then mark the order as having been refunded manually in the back-office (in the order's page).
A delivery slip is a notification of delivery. It can also be called "delivery note" or "advice note".
It is supposed to be put in the shipped package, along with the ordered products. It will have your shop's logo, and indicate the content. On receiving the package, the customer will be able to use the delivery slip in order to double-check the content of the package, see that nothing is missing from the order.
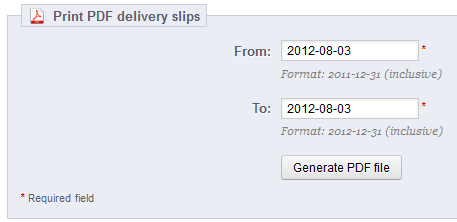
Get a delivery slip is exactly like getting an invoice. Select the dates, as well as the options you would like, and then confirm them to create your documents.
You can get a PDF file of several delivery slips depending only by date, which is very useful when you need to print all delivery slips for a given day or a given quarter. Select the start and end date, and click on the "Generate PDF file" button.
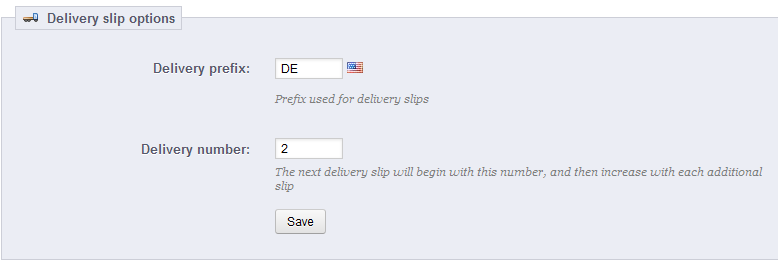
The two options are the same as for the invoice options:
PrestaShop will then generate the delivery slips number according to you settings: "#DE000001", "#LI000002", etc.
Do not forget to save your changes.
Following your agreement on a product return, you should receive a package from the customer. Once you have received that package, you must create a credit slip. It can also be called "credit note" or "credit memo".
Credit slips are not created in the "Credit Slips" page, but only listed there
In your list of orders ("Orders" page), click on the order for which the customer is returning some items for more details.
Below the "Products" table, do the following:
Once you have selected all the options you want, confirm by clicking on "Refund Products."
The credit slip is now created and will be available in the Order Details well as in the "Credit Slips" page.
From there, you can click the link to download the PDF file.
The customer will see the slip in his or her "My Account" section.
If you have created a voucher, customers will see it in the "My vouchers" section of their account. If they click on it, it should look something like this:
The amount of the returned item(s) is added to the voucher. The customer can use the discount code (listed in the far left of the column) next time he or she places an order.
Having different order or return statuses enables you to easily manage your orders and returns, and keep you customers informed of the evolution of their purchase.
The various available statuses are visible and editable in the "Statuses" page, under the "Orders" menu.
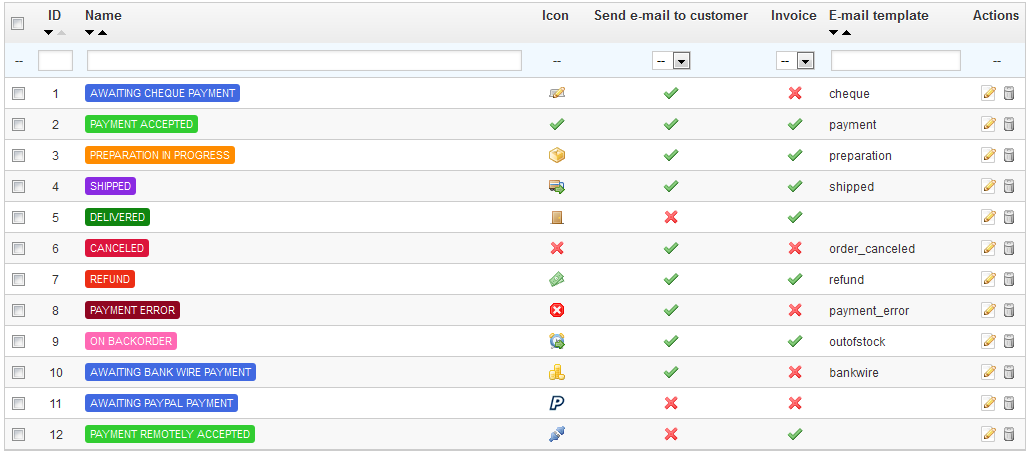
The page displays a list of the currently registered order statuses, along with:
The return status list features less information, because those statuses are merely labels with no impact on the order.

You can create a new status with the "Add New" button at the top. The creation form opens.
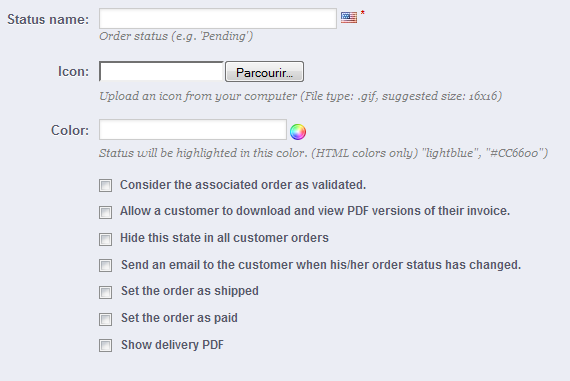
Fill out the form:
You can create a return status with the "Add New" button at the bottom. The creation form opens.

It only features two fields: set your desired status name and its color, and save your creation.
When you have to send a message to your customers using the PrestaShop administrative interface, you can choose to save this message in order to send it out again to other customers with similar questions, comments, or concerns.
To do this, go to the "Order Messages" page under the "Orders" menu. One default message is already saved: "Delay".

To add others, click on the "Add New" button. You can also edit the default message.
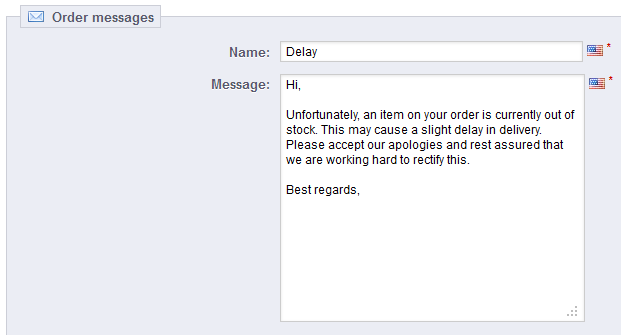
The form goes to the essentials:
Once done, click on "Save".
You can create as many messages as needed.
Once you pre-written messages are all set, you can send them by going directly into a customer's order:
Your customer will receive the message on the email address associated with this account.