Table of content
How you choose to ship your products is a key element to the management and success of your store. You must account for the great variety of available methods, which can mix carriers, regional and international taxes, package weight and the price of a product itself. Luckily, PrestaShop makes it easy for you to handle it all in just a few screens.
Shipping price is basically calculated using either of two methods: order total price, and order total weight. This is how most carriers calculate their shipping fees, and this is why you should fill-in the weight setting when creating a product in the catalog, and also why you absolutely must indicate the per-weight and per-price costs for each carrier
PrestaShop computes shipping price according to a system of either weight ranges or a price range. That system can only work for one or the other of these types of ranges. |
The shipping settings work closely with the local settings of your PrestaShop installation. While in PrestaShop 1.4 some of these settings were also found "Shipping" menu, in version 1.5 all local settings have been moved in a new menu, named "Localization". This is where you will be able to edit geographical zones, countries, currencies, etc. Therefore, make sure to have a serious look at the "Localization" menu, which is explained in the next chapter of this guide, "Understanding Local Settings". For instance, in order to create a complete carrier in PrestaShop, you must have clearly defined your geographical zones; this is done in the "Zones" page under the "Localization" menu.
The more general settings of you shop's shipping configuration are found in the "Shipping" page, under the "Shipping" menu.
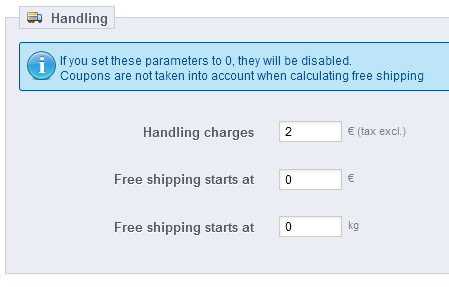
The three sections of this page provide global settings:
That last portion of the page is extremely important, as this is where all your shipping settings come to meet, and where you enter the actual shipping fees. After you have created carriers, price ranges and weight ranges in their respective pages, this seemingly harmless section will be the tool to use to make them all work in conjunction with an actual price.
Having correct shipping fees is very important, so make sure not to skip this setting – unless of course if you only sell downloadable products. |
Once you have created all your carriers and set all the weight and price ranges for these carriers (with the "Carriers", "Price Ranges" and "Weight Ranges" pages under the "Shipping" menu, which are fully explained later in this chapter), it is high time to set their shipping fees per zone/range.
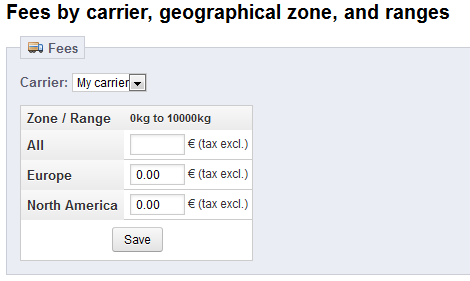
When selecting a carrier in the drop-down menu, PrestaShop displays a table with all the weight range and geographical zone that were set for this carrier, along with the shipping fee for each, tax excluded. The default value is "0.00", which is certainly not what you will want to leave as this pretty much means "free shipping, whatever the weight". You must therefore precisely set the shipping fees for each zone and range, as provided by the carrier itself, or as estimated by you. For instance, if you are sending packages from the US, the fee to Europe might be double or triple the domestic fee.
An empty field has a real impact on the availability of the carrier in the matching zone:
If the selected carrier does not have any range set, PrestaShop will let you know with the message "No ranges set for this carrier". You then must create at least one weight range for this carrier, or else you will not be able to set its shipping fees.
You must perform this for all of your carriers.
You must have carriers added to your PrestaShop installation – that is, a clear indicator of who will deliver your products. It might be just yourself or your shop (for instance if you are selling downloadable products, or only work locally), but as soon as you are actually sending packages using stamps and a 3rd-party delivery such as your local postal service, or FedEx, UPS and such, then you must have their details added to your shop's database. This will enable your customers to better choose which carrier to use, based on their delivery ranges, fees and dates.

The "Carrier" page presents you with a list of all your current carriers. From there, you can directly change their status, indicate whether they are included in your "free shipping" discounts, and change their position when presented to customers.
By default, you have two carriers in your database:
It is up to you to remove these default carriers and add new ones for your customers. At the very least, you should edit the "My carrier" carrier and replace its data with that of a real carrier: name, details, and ranges.
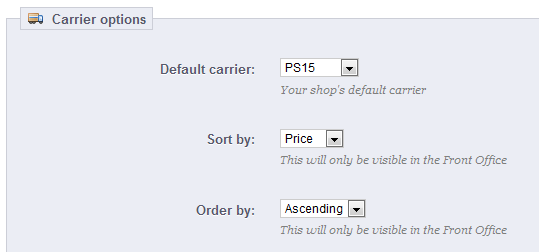
The "Carrier options" section gives you access to 3 settings, which impact the front-office in order to help the customer make a choice:
In this section, we are going to create a complete carrier, from A to Z. You can create as many carriers as you wish.
If one carrier has different shipping services, you should create as many carriers in PrestaShop, and differentiate them with their names.
Many of the details asked by PrestaShop's forms should be provided by your carriers once you have set up an account or are under contract with them directly. Check with them in order to make sure everything is configured correctly.
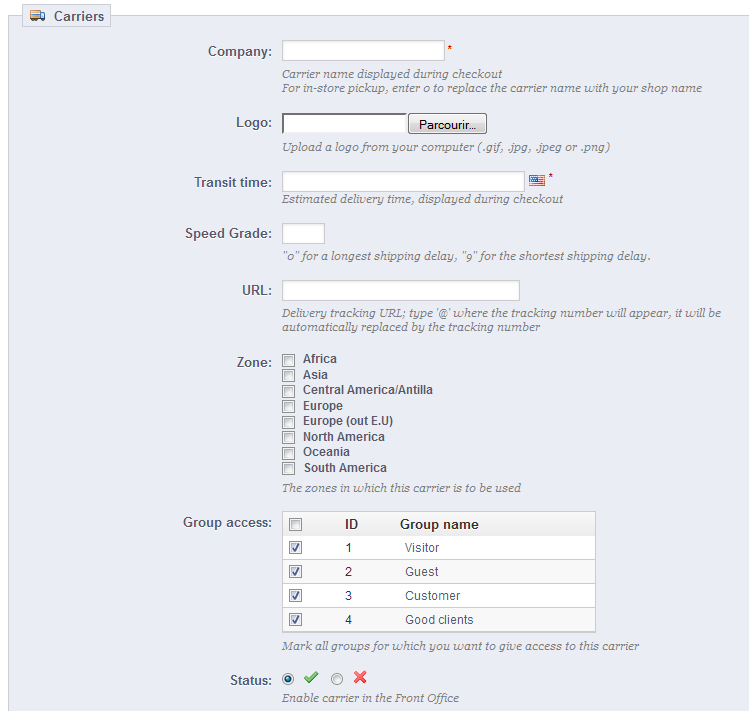
Let's examine all of the information you need to enter:
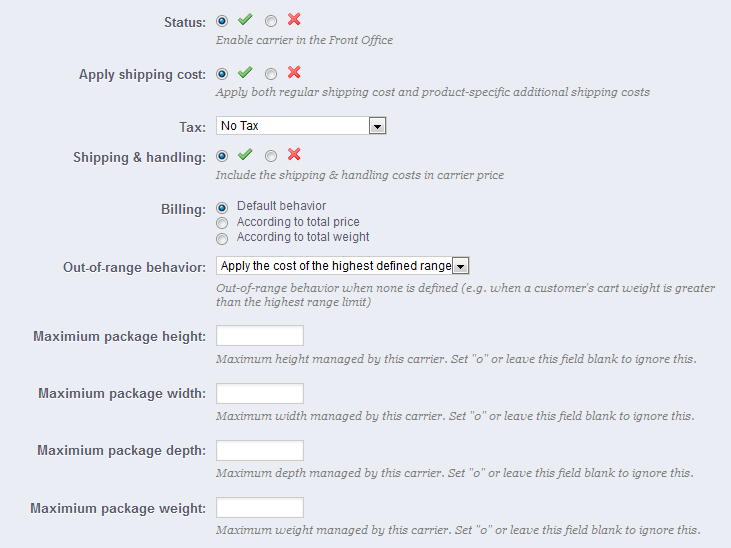
Here is an example of out-of-range behavior: Let's say you have set up a weight range from 0 to 10 lbs. Your customer wants to place an order that is 15 lbs., and no behavior has been configured for this weight. By choosing "Apply the cost of the highest defined range", PrestaShop will apply the price conditions that you have set up for orders from 5-10 lbs. If you choose "Deactivate the carrier", then this carrier will not be offered to the customer in this case.
Carriers can be set to accept orders within a given price range. For example, if you want orders between $1 and $15 to be sent by the US Post Office, create a price range from 1 to 15, and set it to "US Postal Service". Put together, ranges should fill the entire prices spectrum, up to your most expensive possible order.

The form that opens when click on the "Add new" button is very simple:

Remember that you can create as many ranges per carrier as needed, so if a carrier can handle more than one, but each in a different way, you should create the complete set of ranges.
Make sure to have the ranges overlap! Therefore, the "To" value of a range should be equal to the "From" value of the next one. For instance, if one range ends at $20, the next one should start at $20 too. Likewise, if you have to add a range before one that starts at $20, the new one should end at $20. |
Carriers must be set to accept orders within a given weight range. For example, if you want orders between 1 lbs and 15 lbs to be sent by the US Post Office, create a weight range from 1 to 15, and set it to "US Postal Service". Ranges should fill the entire weight spectrum, up to your heaviest possible order.
A carrier should have at least one range. In that case, as you cannot set an infinite maximum weight, set it to an abnormal number, such as 10,000.00 kg.


The form that opens when click on the "Add new" button is very simple:
Remember that you can create as many ranges per carrier as needed, so if a carrier can handle more than one, but each in a different way, you should create the complete set of ranges.
Make sure to have the ranges overlap! Therefore, the "To" value of a range should be equal to the "From" value of the next one. For instance, if one range ends at 20 kg, the next one should start at 20 kg too. Likewise, if you have to add a range before one that starts at 20 kg, the new one should end at 20 kg. |
Once the ranges are determined and allotted to a carrier, you can define the shipping and handling for each range. Go to the first page of the "Shipping" menu, and fill out the table found at the bottom of the page.