
Tabla de contenidos
Descubriendo el Área de Administración
Ahora que ya tiene instalado PrestaShop 1.7 y que ha iniciado sesión satisfactoriamente en su área de administración, debe asegurarse de aprender a navegar y a manejar con soltura esta interfaz de administración, comprendiendo sus notificaciones y sabiendo donde encontrar cada información específica.
El diseño del área de administración ha sido parcialmente renovado en la versión 1.7 de PrestaShop con el fin de presentar una interfaz más intuitiva y ergonómica (como podrá comprobar por ejemplo en la página de creación de productos y en la página del listado de módulos). La navegación y el menú principal también han sido renovados con respecto a la versión 1.6: aunque las distintas funcionalidades, se encuentran todavía en donde espera encontrarlas, es posible que le lleve un tiempo acostumbrarse a esta nueva distribución.
El propósito de este rediseño es, por supuesto, hacer más sencillo a los comerciantes administrar sus tiendas.
Hemos creado este capítulo para ayudarle a descubrir y aprovechar al máximo, la interfaz de administración de PrestaShop. Aunque esta interfaz ha sido diseñada para ser muy ergonómica y fácil de utilizar, ¡debería leer esta guía de principio a fin para comprender perfectamente todo el potencial de su nueva herramienta de negocios en línea!
Visión general de la interfaz principal
Tómese un tiempo para examinar el Panel de control. La primera página que verá al iniciar sesión en su back-office es la página de Inicio. Ésta no sólo le presenta un resumen de todo lo que necesita saber sobre su tienda en cualquier momento determinado, junto con enlaces rápidos a las páginas principales más utilizadas, sino que como principiante en PrestaShop, también le ofrece consejos sobre asuntos que debería revisar.

La barra superior
![]()
En la parte superior del back-office se encuentra una barra de color blanco que contiene un puñado de enlaces:
- El logotipo de Prestashop.
- Acceso rápido. Este es el menú de Enlaces rápidos, que presenta los enlaces más útilizados. Puede personalizarlo haciendo clic en "Administrar accesos rápidos".
- Campo de búsqueda con lista desplegable. Le permite realizar búsquedas dentro del contenido de su tienda.
- Modo de depuración (opcional). Si establece su tienda en el modo de depuración, se mostrará un icono para recordarle que este modo está activado.
- Enlace "Nombre de la tienda". Abre en una nueva pestaña del navegador, el front-end de su tienda.
- Icono campana y número. Indica el número de nuevas notificaciones, que por defecto le mostrarán los últimos pedidos.
- Pedidos. Abre un panel presentando los nuevos pedidos recibidos desde la última vez que hizo clic en este icono. Desde aquí, puede visualizar los detalles de uno de estos nuevos pedidos, o ir a la página que muestra el listado completo de pedidos.
- Clientes. Abre un panel que presenta los últimos clientes registrados. Desde aquí, puede visualizar los detalles de uno de estos nuevos clientes, o ir a la página que muestra el listado completo de clientes.
- Mensajes. Abre un panel que presenta el último mensaje recibido desde el servicio de al cliente. Desde aquí, puede visualizar los detalles de uno de estos nuevos mensajes, o ir a la página que muestra el listado completo de mensajes recibidos.
- Menú personal con su foto de perfil. Un panel desplegable que le sirve como recordatorio de la cuenta que con la que está conectado actualmente. Éste contiene los siguientes enlaces:
- Enlace "Mis preferencias". Redirecciona al navegador a la página de preferencias de su cuenta, donde puede establecer algunas opciones personales (por ejemplo, el idioma del back-office o su contraseña).
- Enlace "Cerrar sesión". Le desconecta de la cuenta de usuario actual.
Los menús
A lo largo de sus actividades diarias administrando su tienda, tendrá que navegar a través de muchas páginas y opciones del back-office.
En PrestaShop 1.7, el menú ha sido reorganizado en tres secciones principales, desde las páginas que utiliza con mayor frecuencia, a la que abre con menor frecuencia. Bajo estas secciones, Cada menú se aplica a un conjunto específico de tareas y contextos:
- Inicio. La página principal del back office, donde puede ver las estadísticas principales, en vivo.
Ventas
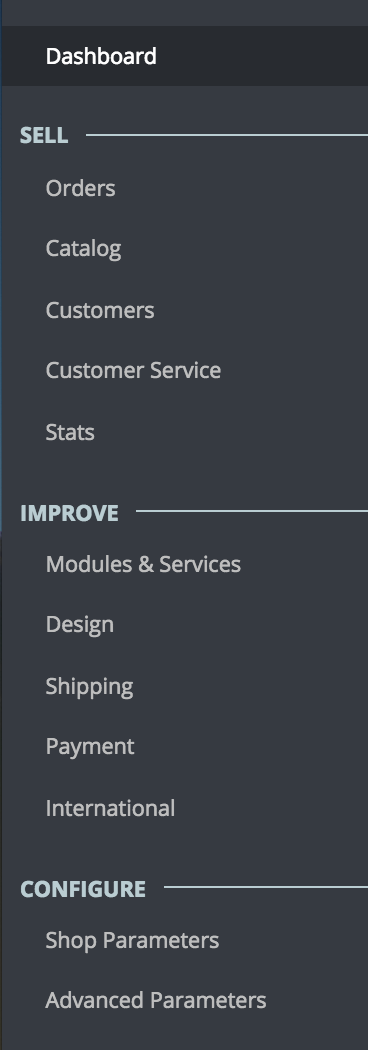
Aquí se presenta su actividad cotidiana. Pedidos, catálogo, clientes, etc. This section presents the essence of your business, where you go each day to get your business going.
- Pedidos. Una vez que los clientes empiezan a añadir productos en sus carritos, comenzará a ver los pedidos en este menú, junto con las facturas resultantes. Aquí es también donde usted gestionará las devoluciones de mercancía y las facturas por abono, entre otras cosas.
- Catálogo. Este es el corazón de su tienda, donde podrá añadir productos, crear categorías, establecer transportistas y proveedores, definir descuentos, etc.
- Clientes. Desde aquí puede acceder a toda la información acerca de sus clientes, y editar sus direcciones .
- Atención al cliente. En esta sección se gestiona el servicio de atención al cliente y el servicio postventa: devoluciones de mercancías, y atención al cliente por pedido, etc..
- Estadísticas. Este menú le da acceso a todas las numerosas estadísticas y gráficas recogidas y generadas por PrestaShop.
Mejoras
Aquí encontrará todo lo que necesita para personlizar su tienda and take your business further. Configure y establezca el aspecto del front office, adapte los métodos de pago a sus mercados objetivos, expanda su negocio internacionalmente o mejore su tienda ¡con nuevos módulos y características!
- Módulos. Amplíe el poder y la utilidad de su tienda añadiendo y activando módulos: más de un centenar de ellos vienen incluidos por defecto junto con Prestashop, pero puede adquirir muchos más en PrestaShop Addons, el mercado de complementos oficial de PrestaShop (http://addons.prestashop.com/).
- Diseño. Bajo la página de este título se manejan los temas, y puede posicionar los bloques de contenido de los módulos que forman parte del tema de su tienda. En general, aquí es donde se puede modificar la apariencia de su tienda.
- Shipping. Everything pertaining to carriers and shipping costs.
- Payment. Select which payment methods are available on your shop and apply global settings to payment modules.
- International. Helps you customize your shop with local values, such as language and translation, currency, units, taxes and tax rules, and geographical entities (regions, countries, etc.).
Configure
It is divided into two submenus. The first one is your shop parameters. You’ll find here all the settings you need to configure when you launch your activity. Once you made your initial choices, you won’t go there very often. The second menu can be seen as the technical section, with more advanced settings that aren’t used often either.
- Shop Parameters. PrestaShop is a very configurable e-commerce solution, and you can edit just about any of its behaviors using these full-featured preferences.
- Advanced Parameters. This menu contains links to tools and informational pages that are too specific to fit in other menus, such as the Web service settings, the database backup tool, or the performance page, among others. This is also where are the settings pertaining to the back office itself; for instance, the content of the employee list and permissions.
- Administration.
These are the default menus. Note that modules can add new options to the existing pages, new pages to the existing menus, and even new menus. Some of these menus are further divided into pages with tabs to present you with the variety of features available in PrestaShop.
Also, one menu is only available when the proper option is set:
- Stock. This menu gives you access to stock management feature, where you can handle warehouses, stock movement and supply orders.
It can be made available through the "Products" preference page: simply activate the "Enable advanced stock management" option (in the "Products stock" section) and save your change to see the menu appear.
All the default standard menus are explained in depth in this user guide.
The buttons
Many of the back-end pages use recurring buttons, either at the top or at the bottom of the screen. For instance, the product edition page can have up to 8 buttons available at the same time.
More than simple shortcuts, they open actual features that you will use very often.
The available buttons vary a lot depending on the context, and therefore two different pages might not feature the same set of buttons. Still, there are a few that you will often see:
- Add new. Opens the creation page of the current context: new product, new product category, new order, etc.
- Recommended Modules and Services. Opens a pop-in window containing the modules available in the current context.
- Help. Opens the inline documentation for the current page – or "contextual help".
The "Recommended modules" button presents you the modules which apply to the current context. For instance, in the "Shipping > Carriers" page, it will display the modules from the "Shipping & Logistics" category of modules. This is very helpful when you need to quickly find which module to install and configure in order to get a given result.
Many of the back office forms are validated with buttons at the bottom of the screen:
- Save. Saves the content of the current page and returns to the list of existing items.
- Save and stay. Saves the content of the current page and keep the page open.
- Cancel. Returns to the list of existing items.
Data tables (lists of products, of categories, of customers, etc.) have their own set of buttons to manage the listed items:
- Add new. Creates a new item in the current context.
- Export. Downloads a CSV file of all the items.
- Import. Sends you to the CSV Import option page, from where you can import your CSV files.
- Refresh List. Reloads the list of items to display the latest changes.
- Show SQL Query. Provides the SQL query to reproduce your search or filter in your own SQL manager.
- Export to SQL Manager. Opens PrestaShop's SQL Manager tool (in the "Advanced Parameters") menu, from which you can query PrestaShop's database with SQL statements ("
SELECT ... FROM ... WHERE ...").
If your list of items was filtered (by name, for instance), then the default SQL statement will take this into account (for instance, "WHERE 1 AND b.`name` LIKE '%blouse%'" for product list).
Contextual help
Since version 1.6.0.7 of PrestaShop, the software's documentation is directly embedded into the administration interface: clicking on the "Help" button from any back office page reduces the main interface's width in order to add a new column on the right, which contains the documentation for that section of the back office.
Another click on the "Help" button closes the contextual help. If you do not close the help column, PrestaShop understands that you want it displayed on every page of the back office, and thus will maintain the column open until you have clicked to close it.
If the browser's display zone is lower than 1220 pixels width, then PrestaShop will open the contextual documentation in a new browser window rather than reducing the screen space dedicated to the main interface.
At the bottom of the help column, a small form enables you to tell the PrestaShop team whether the help section has been helpful to you or not. Rate the help page by clicking on one of the 5 levels of satisfaction. If you click on one of the two lowest levels, PrestaShop will open a short form allowing to detail your thoughts? You can either fill it and click on the "Submit" button, or close the form by clicking on the cross, in which case only your rating will be sent to our server.
The Dashboard
Let's now explore the content of the Dashboard itself. It can feel crowded to a first-time user, but you will find that it gives an excellent summary of your shop's daily activities at a glance.
The Dashboard is divided into 4 main areas: a horizontal bar, and three columns.
Demo mode
By default, the Dashboard uses fake data so that you can better visualize what the various stats are for.
When using PrestaShop for a real online store, you must disable this fake data so that your real data is used: deactivate the "Demo mode" option at the top right of the screen, next to the "Help" icon.
The header and demo mode
In addition to the contextual help, it also features the "Demo mode" option, from which you can disable the fake data used by default on the Dashboard and use your own data (as gathered by PrestaShop's statistics system).
The horizontal bar
At the top of the Dashboard is a single bar which helps you choose the period of time for the currently displayed dashboard statistics. Three sets of options are available:
- Current day, month or year.
- Previous day, month or year.
- Precise date selection (the button on the right, which opens a date selector).
Choosing an option updates all the blocks of content that are on the Dashboard so that they display data for the chosen period of time only. Blocks that are not stats-based do not change.
In order to choose a period of time, you can either click the first and last date of that period in the calendar (the clicking order does not matter), or you can type the dates in the YYYY-MM-DD format in the text boxes. Click "Apply" to see the Dashboard change according to your settings.
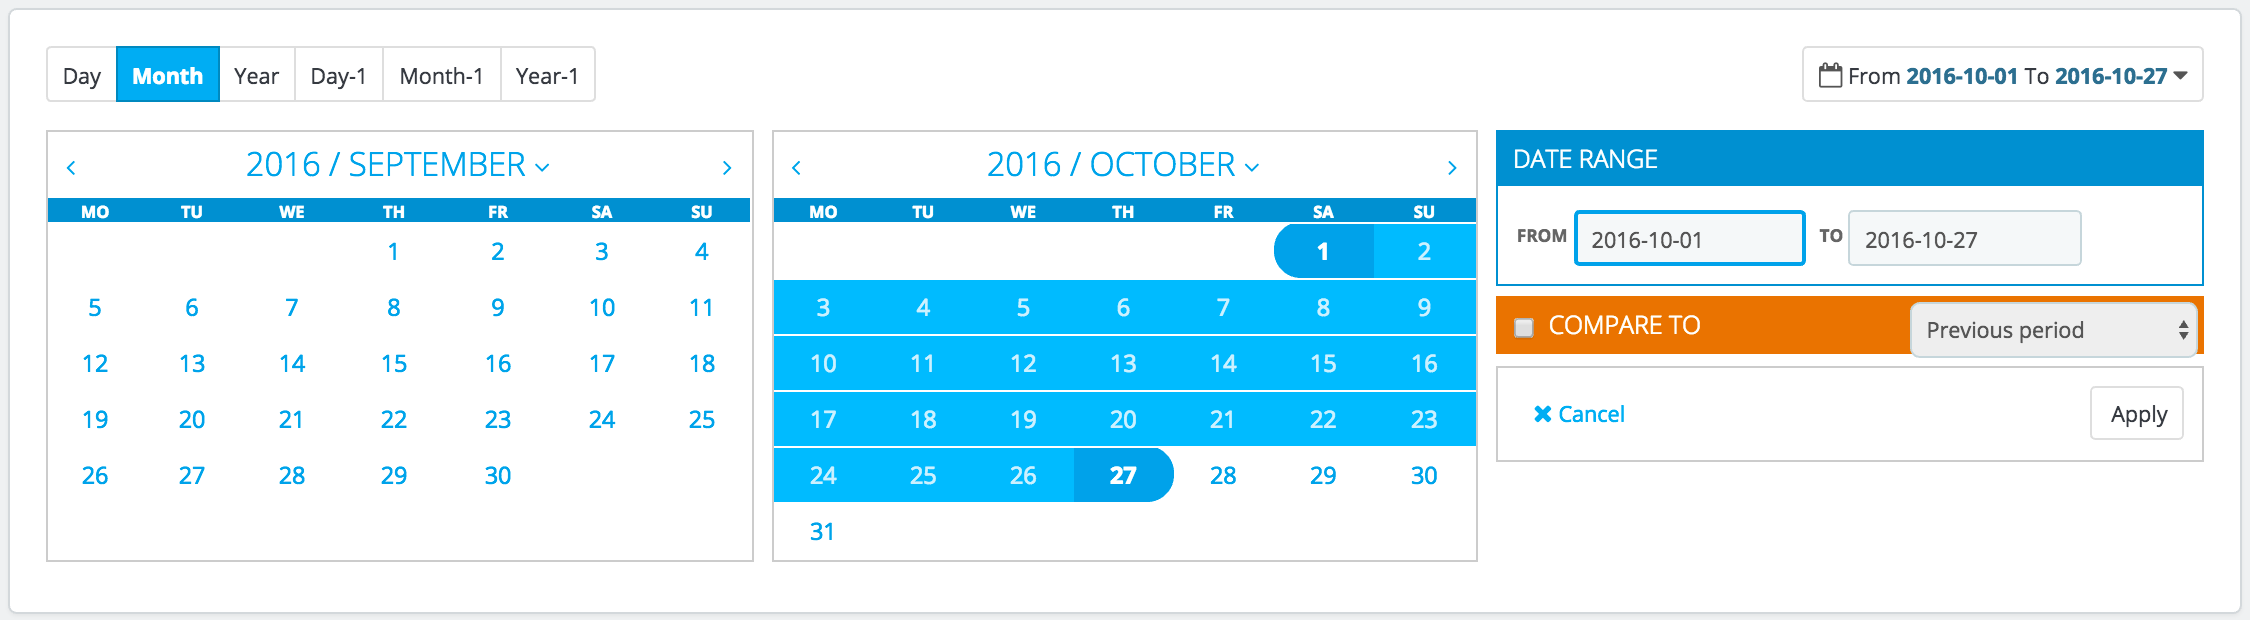
You can also compare two periods of time together by checking the "Compare To" box. Select the second period as would do for the first one (the two can even overlap), then click on the "Apply" button.
When comparing two periods, some of the content blocks will update to indicate the evolution of the data (see for instance the main "Dashboard" block, which presents data from the Dashboard Trends module).
The left column
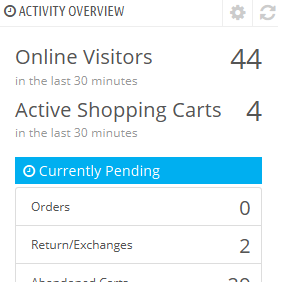 By default, this column presents you with data from the Dashboard Activity module, which gives the main figures from your database in a quick glance:
- Online visitors in the last 30 minutes.
- Active shopping carts in the last 30 minutes.
- Currently pending orders, return/exchange inquiries, abandoned carts and out of stock products.
- Notifications for new messages, order inquiries and product reviews.
- New customers and new newsletter subscriptions.
- Traffic statistics: visits, unique visitors, traffic sources and direct links.
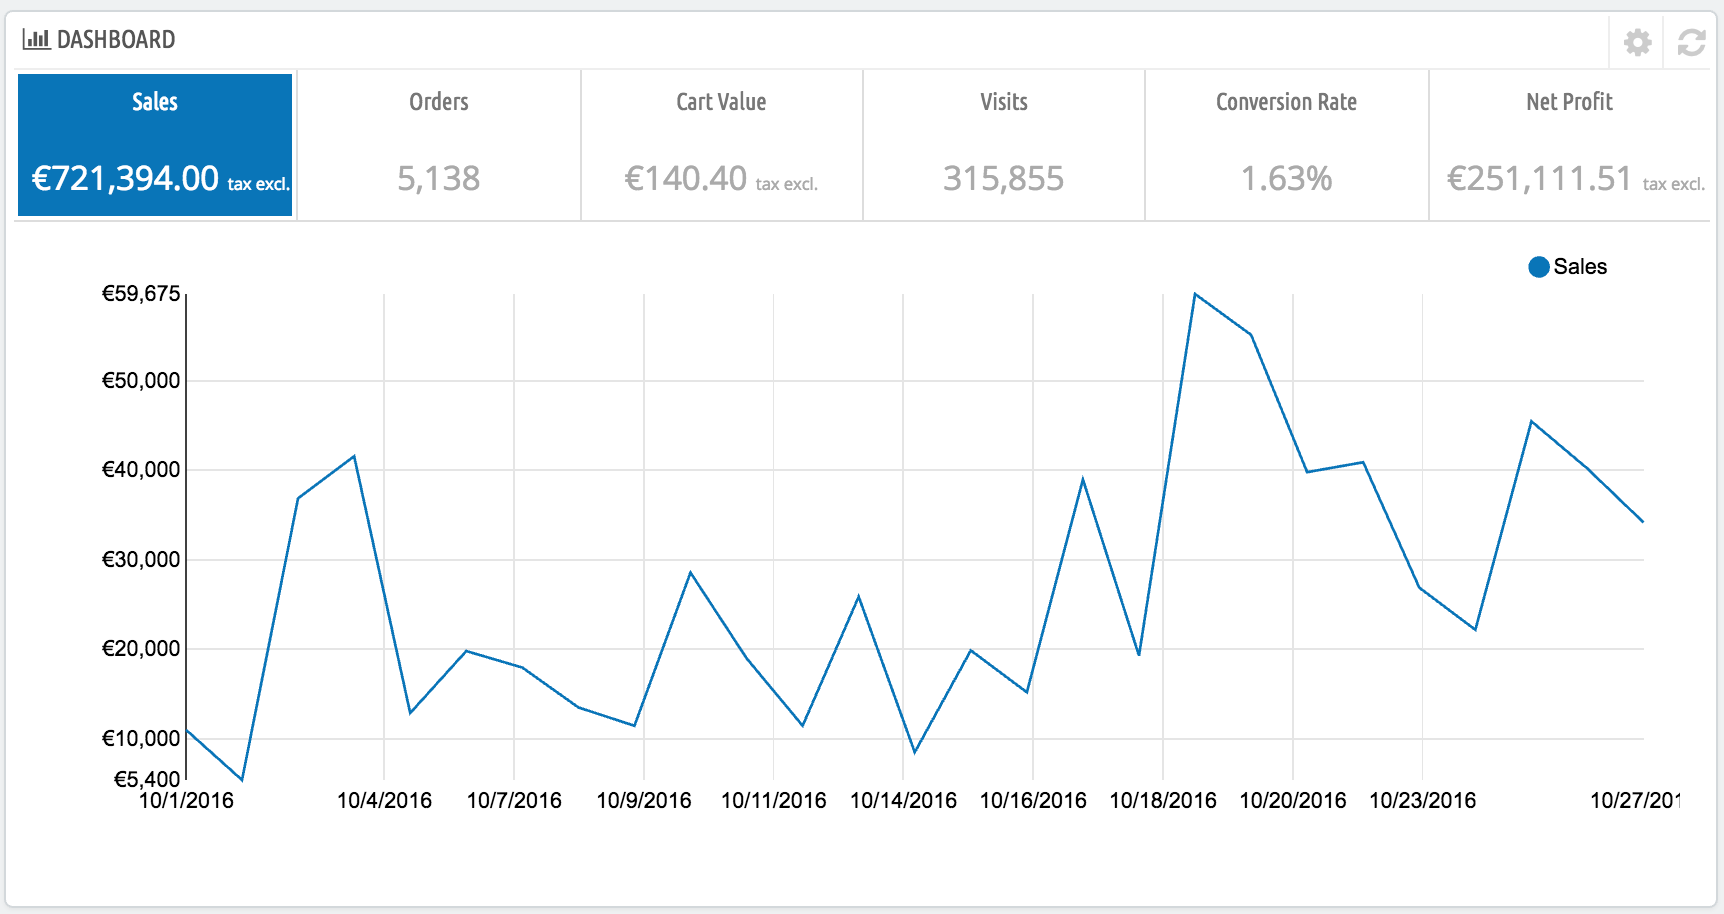
The central column
The central column is where the term "dashboard" takes its importance: this area of the Dashboard presents the user (you) with the most important numbers pertaining to his shop's daily activities, along with a graph of sales and a list of the latest orders. Every time you log into your shop's administration area, you will be first and foremost looking at the evolution that these numbers take. This is where you see your shop live and breathe.
By default, there are three blocks of content in this column, which are handled by modules:
- Dashboard (Dashboard Trends module). This is the main block of information on the dashboard. With its various graphics, it really helps you see if your shop is headed in the right direction or not. Click on one of the graphic type to display it. Additionally, when comparing two time periods, it displays the evolution of each figure in percentages. Hover the graphic with your mouse to see the details.
Clicking on its configuration icon (top right) open a new page where you can set various expenses that your shop has (bank wire fee, average shipping fee, hosting expenses, etc.), in order to better indicate your trends. - Your Forecast (Dashboard Goals module). This block presents you with the goals you have for the coming months, and how your shop is doing as compared to them. Hover the graphic with your mouse to see the details.
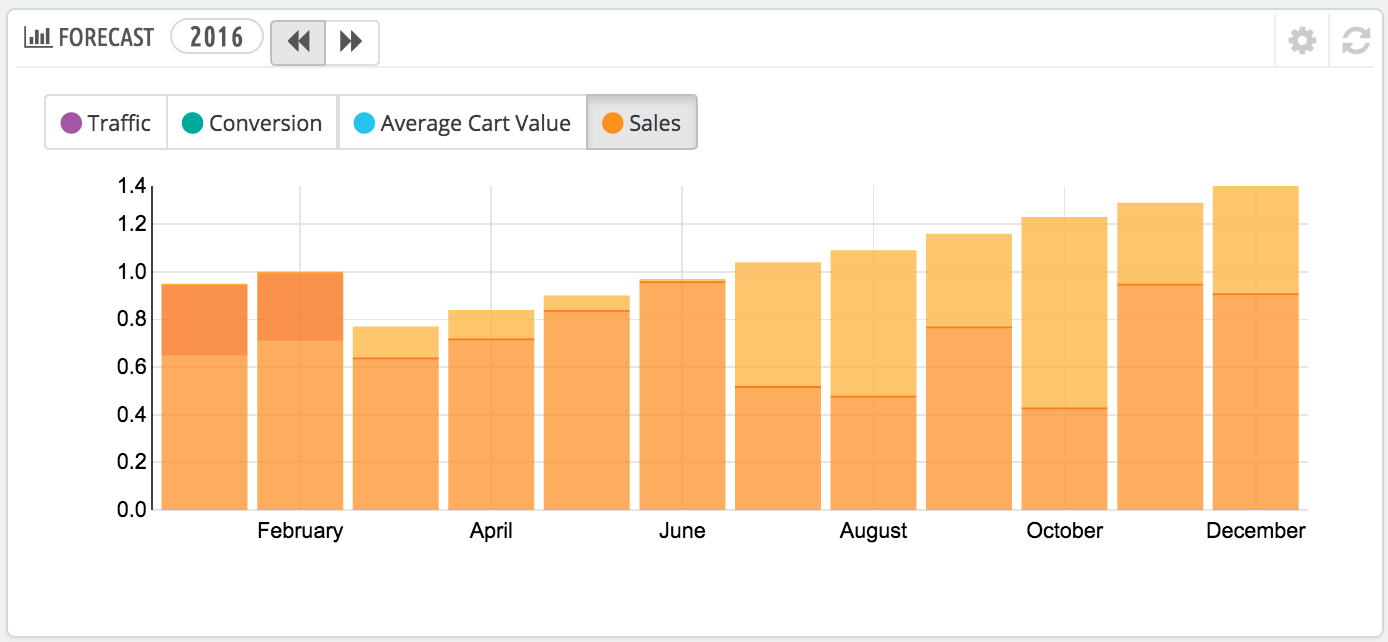
Depending on your monthly results, you should update your forthcoming goals. You can set your goals in the block's configuration form (top right of the block), and fill in your expectations month per month in terms of traffic, conversion rate, and average cart value. The "Sales" column will be updated according to the goals set in the other columns (for instance, for a 1000 visitors with a 2% conversion rate and a $10 average cart, you would get 1000*(2/100)*10 = $200). You can change the currency in the "Currencies" page under the "Localization" menu.
- Products and sales (Dashboard Products module). This block presents you with a table of your latest orders and a ranking of your products: best sellers, most viewed and top searches (as searched in your shop's search form, not from search engines).
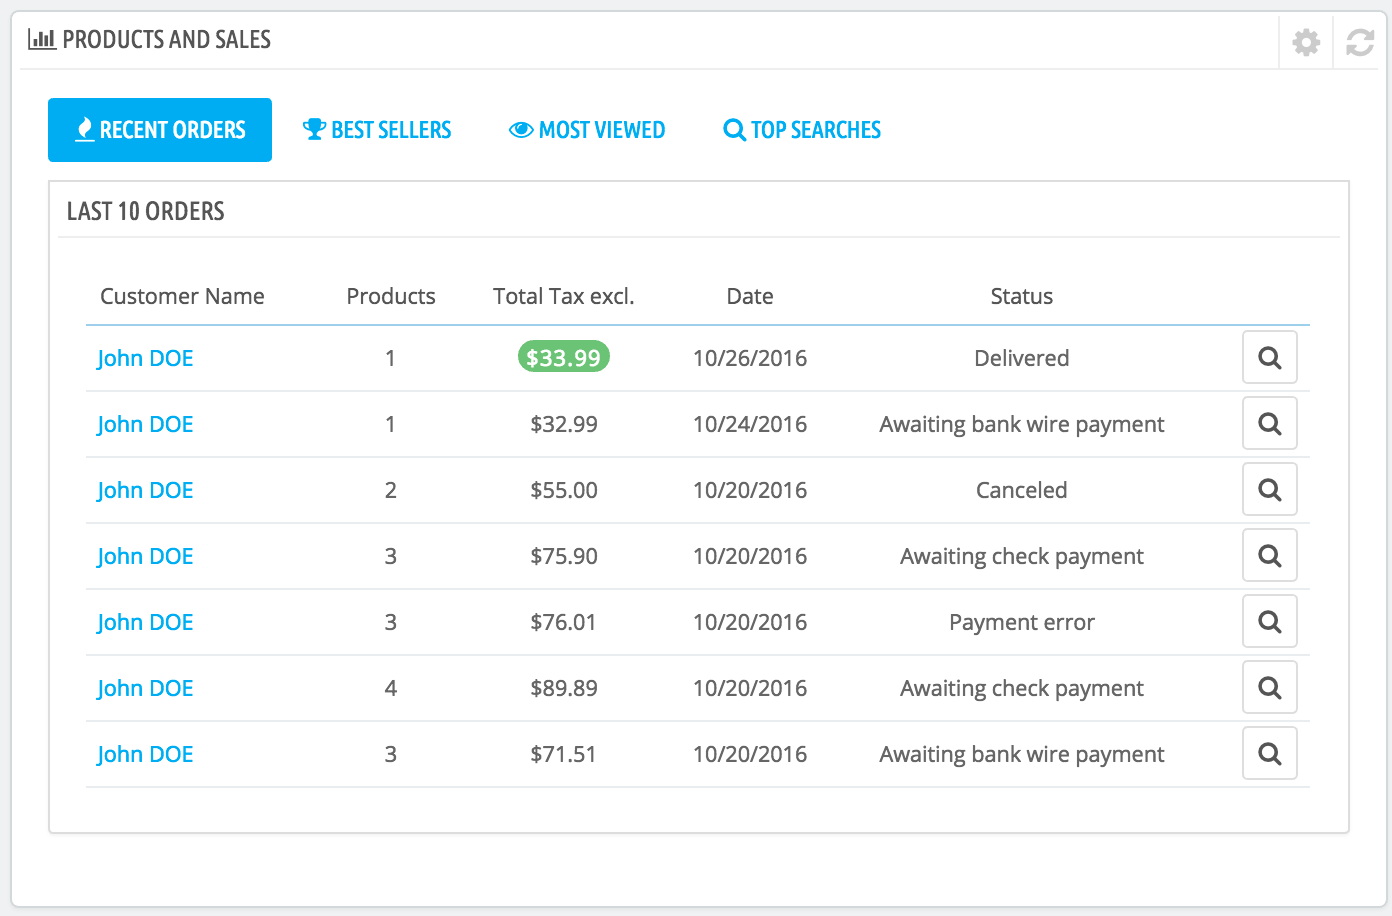
You can set the number of items to display in each by opening the block's configuration form
The right column
This last column is an informational one: it gives you the latest news from PrestaShop.com, notifications about new PrestaShop versions, and useful links.