
Súbase a bordo de Prestashop - Haga un recorrido guiado
Desde la versión 1.6.0.11 de PrestaShop, toda nueva instalación de este software cuenta con el módulo "Primeros pasos" activado por defecto. Dicho módulo se ha construido desde cero para ayudar a los nuevos usuarios a comprender rápidamente la forma en que el back-office funciona, guíandoles desde la personalización básica hasta el lanzamiento de su tienda, mediante pasos que cubren la adición de un producto al catálogo, configurar los métodos de pago de la tienda, y seleccionar las opciones de envío por defecto. Todo esto se realiza desde una interfaz lúdica.
Si ya está habituado y conoce cómo funciona el panel de administración de PrestaShop, probablemente debería deshabilitar este módulo:
- Diríjase a la página de módulos.
- Busque el módulo "Primeros pasos".
- Deshabilítelo.
¿Cómo funciona el módulo?
La interfaz del módulo no puede ser ignorada: ésta será la primera cosa que verá en la parte superior de cada página del back-office, antes incluso que el contenido en sí de la propia página.
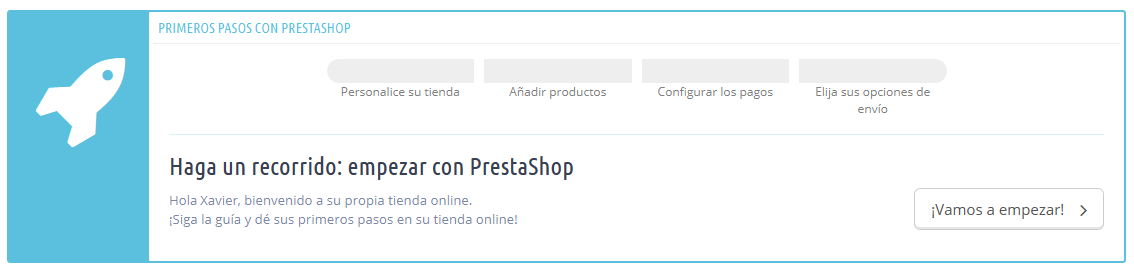
A primera vista, entenderá como funciona el módulo: en un puñado de sencillos pasos, éste tomará a los principiantes de la mano y les ayudará a establecer las opciones de configuración de su tienda.
Al hacer clic en el botón "¡Vamos a empezar!" se inicia todo el proceso – que puede interrumpir en cualquier momento, para finalizarlo más adelante. Ese proceso se comparte entre una ventana que aparece en la parte superior de la interfaz de back-office, que le dará las instrucciones a seguir, y la propia interfaz principal, donde se espera que siga esas instrucciones.
Paso 1: Personalice su tienda
El primer paso le ayuda a personalizar su tienda, con el fin de adecuarla a su gusto. Esto se realiza mediante la instalación de un nuevo tema y la subida del logo de su marca.
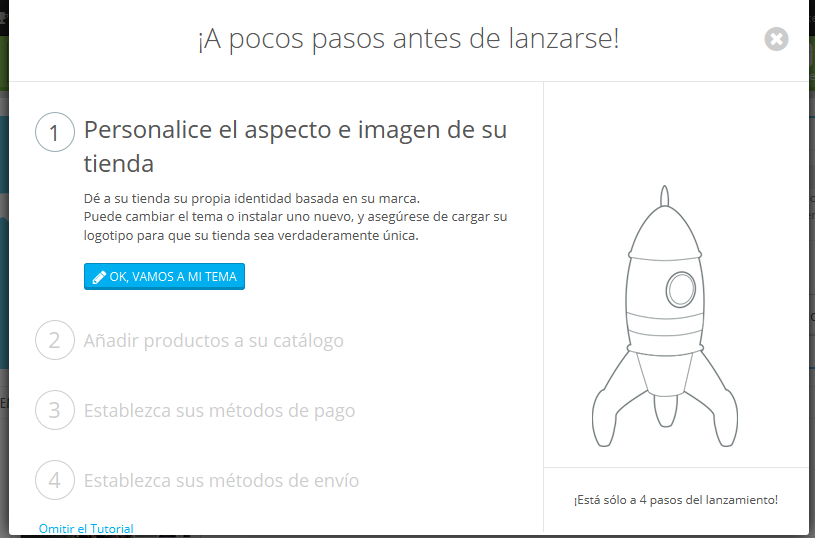
En el trasfondo,el módulo ya ha cambiado la página actual a la página de preferencias del Temas . Haga clic en "OK, vamos a mi tema" para ocultar la ventana modal del módulo y poder trabajar en su tema: usted puede cambiar el tema por defecto por otro que tenga, o puede obtener un nuevo tema desde el mercado oficial de Complementos de PrestaShop : http://addons.prestashop.com/
Once you have installed and activated your new theme, you should spend some time on the Themes preference page in order to check all the available settings, and to make sure that they are set the way you want them to be.
When you are done with customizing your shop, click on the module's "I'm done, take me to the next step" button.
Step 2: Adding products to your catalog
The second step takes you to the heart of your shop: the products you sell.
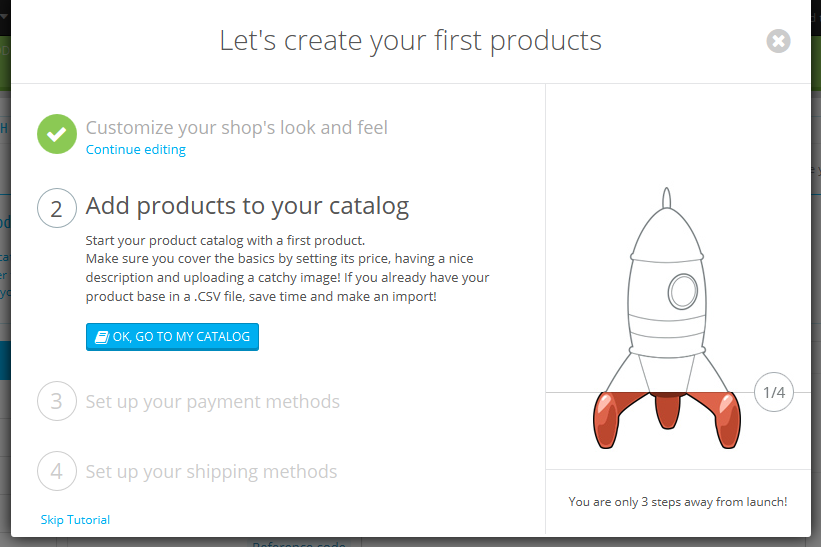
Click on the "OK, go to my catalog" button to make the module's window disappear. The back-office page is now the product creation form. Follow through the available fields and various tabs on the left, and do not hesitate to click on the Help button in order to learn more about all the possibilities the PrestaShop offers.
Create several products, even fake ones, in order to get a good feel of how the interface works. Then, once you are confident with your knowledge, create your real products.
When you are done with creating products, click on the module's "I'm done, take me to the next step" button.
Step 3: Setting up your payment methods
The third step is an essential one: if you do not set your payment methods, you will NOT receive payment for your products sold!
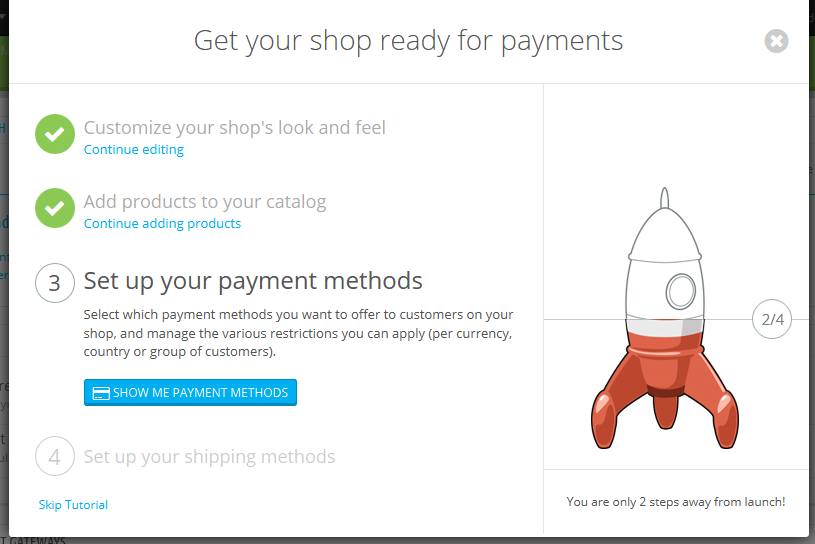
Click on the "Show me payment methods" button to make the module's window disappear. The back-office page is now the Payment settings page. It presents you with several payment methods.
The ones available by default do not require an account, but mean that shipping will be delayed until you have verified payment: bank wire and payment by check both require you to manual check the payment and validate the order.
PrestaShop recommends several payment methods on this screen, which are in effect modules that you can install. The ones presented are secure, well-known and supported by PrestaShop. They also depend on where your shop is installed: an American seller will not get the same methods as a Polish one. Choose the one with which you already have an account, or with which you wish to work with, and configure the module with your account information. You can have as many payment methods as needed.
Further below that screen, you can set payment restrictions based on currency, customer group and country. Choose wisely, as these restrictions can prevent customers from using a given payment method, or even from buying from your shop altogether!
When you are done with setting up your payment methods, click on the module's "I'm done, take me to the next step" button.
Step 4: Set up your shipping methods
The fourth step is also an essential one: if you do not set your shipping options, you have no way to make customers pay for shipping. If you are only selling digital products (PDF, etc.), then it makes sense not to have a shipping partner, but if you do sell real products, you have to indicate who your shipping partner is.
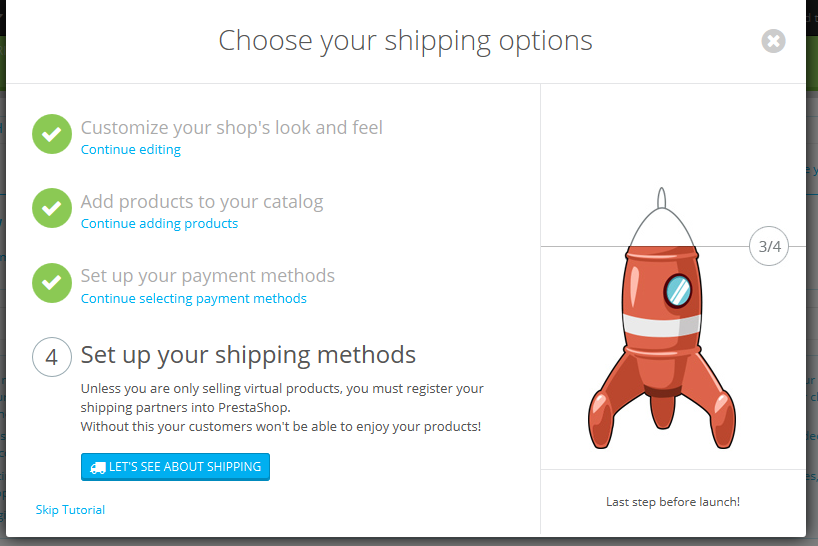
Click on the "Let's see about shipping" button to make the module's window disappear. The back-office page is now the Carriers settings page. It presents you with two options: adding a carrier yourself, or using a carrier module.
If you are only selling digital products, click on "Skip tutorial".
Adding a new carrier is done through a handy wizard of its own, which will help you set everything up: name, transit time, shipping locations and costs, size/weight limits, etc.
You might prefer to use a faster way and install a carrier module. A few are listed by default on the main page, but you find more on the "Modules" page. Install the one with which you have a contract, and configure the module with your contract information.
When you are done with setting up your shipping methods, click on the module's "I'm done, take me to the next step" button.
All done!
You're (mostly) done!
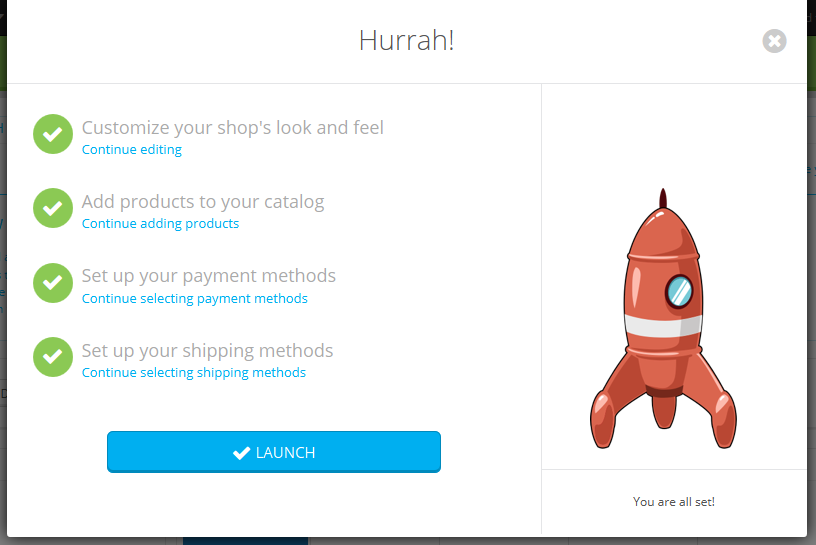
You have gone through all the essential steps in configuring your shop. There are many other steps, but those are necessary for selling on the Internet.
Clicking the "Launch" button will end the module's instructions, and will give you the animation of the rocket rising in the sky!
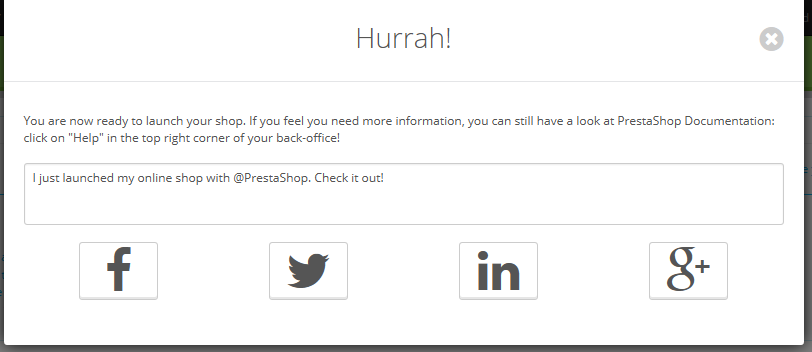
Before you put your shop out of maintenance mode and make it available to everyone on the Internet, you might want to wait a bit and check all the other preference pages in the back-office, making sure that they are all set the way you want them to. If so, do not click on "Launch" and click on the cross button in order to close the module's window.
Once you have it all set, go to the Maintenance preference page and enable your shop. Done! Good luck with your online endeavors! Start them by promoting your shop: share your launch on social networks using the final window of the module.
Once you are done, the module does not appear anymore in your back-office.