
Fundamentals
Concepts
You should be familiar with PHP and Object-Oriented Programming before attempting to write your own module.
PrestaShop was conceived so that third-party modules could easily upon its foundations, making it an extremely customizable e-commerce software.
A module is an addition to PrestaShop that enables any developer to add the following:
- Provide additional functionality to PrestaShop.
- View additional items on the site (product selection, etc..).
- Communicate with other e-commerce players (buying guides, payment platforms, logistics...)
- etc...
The company behind PrestaShop provides more than 100 modules for free with the tool itself, enabling you to launch your business quickly and for free.
More than 750 add-ons are also available at the official add-ons site.
These additional modules were build ??by the company PrestaShop or members of the PrestaShop community, and are sold at affordable prices.
As a developer, you can also share your modules on this site, and receive 70% of the amounts associated with the sale of your creations. Sign up now!
Technical principles behind a module
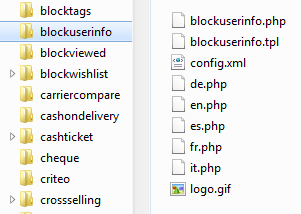
A PrestaShop module consists of:
- A root folder, named after the module, which will hold all of the modules files, and will reside in PrestaShop's
/modulesfolder. - A main PHP file, named after the module, located in that root folder. This PHP file should have the same name as its root folder.
- An icon file, named
logo.gif, representing this module. - Optional: some
.tplfiles, containing the module's theme. - Optional: language files, if the module of its theme have text to display (and therefore, that should be translatable).
- Optional: in a
/themes/modules, a folder with the same name as the module, containing.tpland language files if necessary. This last folder is essential during modifications of existing module, so that you can adapt it without having to touch its original files. Notably, it enables you to handle the module's display in various ways, according to the current theme.
Let's see an example with PrestaShop's blockuserinfo module:
Any PrestaShop module, once installed on an online shop, can interact with one or more "hooks". Hooks enable you to "hook" your code to the current View at the time of the code parsing (i.e., when displaying the cart or the product sheet, when displaying the current stock...). Specifically, a hook is a shortcut to the various methods available from the Module object, as assigned to that hook.
A list of PrestaShop hooks
Here is a list of 53 hooks, available in PrestaShop.
When one of the site's page is loaded, the PrestaShop engine check which are the modules to call for each of the hooks that make up the page.
Front-office
Homepage and general website items
Hook name |
File location |
Visible |
Description |
|---|---|---|---|
header |
header.php |
No |
Called between the HEAD tags. Ideal location for adding JavaScript and CSS files. |
top |
header.php |
Yes |
Called in the page's header. |
leftColumn |
header.php |
Yes |
Called when loading the left column. |
rightColumn |
footer.php |
Yes |
Called when loading the right column. |
footer |
footer.php |
Yes |
Called in the page's footer. |
home |
index.php |
Yes |
Called at the center of the homepage. |
Product sheet
Hook name |
File location |
Visible |
Description |
|---|---|---|---|
extraLeft |
product.php |
Yes |
Called right before the "Print" link, under the picture. |
extraRight |
product.php |
Yes |
Called right after the block for the "Add to Cart" button. |
productActions |
product.php |
Yes |
Called inside the block for the "Add to Cart" button, right after that button. |
productOutOfStock |
product.php |
Yes |
Called inside the block for the "Add to Cart" button, right after the "Availability" information. |
productfooter |
product.php |
Yes |
Called right before the tabs. |
productTab |
product.php |
Yes |
Called in tabs list, such as "More info", "Data sheet", "Accessories"... Ideal location for one more tab, the content of which is handled by the |
productTabContent |
product.php |
Yes |
Called when a tab is clicked. Ideal location for the content of a tab that has been defined using the |
Cart
Hook name |
File location |
Visible |
Description |
|---|---|---|---|
cart |
Class: Cart.php |
No |
Called right after a cart creation or update. |
shoppingCart |
order.php |
Yes |
Called right below the cart items table. |
shoppingCartExtra |
order.php |
Yes |
Called after the cart's table of items, right above the navigation buttons. |
createAccountTop |
authentication.php |
Yes |
Called within the client account creation form, right above the the "Your personal information" block. |
createAccountForm |
authentication.php |
Yes |
Called within the client account creation form, right before the "Register" button. |
createAccount |
authentication.php |
No |
Called right after the client account creation. |
customerAccount |
my-account.php |
Yes |
Called on the client account homepage, after the list of available links. Ideal location to add a link to this list. |
myAccountBlock |
Module: blockmyaccount.php |
Yes |
Called within the "My account" block, in the left column, below the list of available links. Ideal location to add a link to this list. |
authentication |
authentication.php |
No |
Called right after the client identification, only if the authentication is valid (e-mail address and password are both OK). |
Search
Hook name |
File location |
Visible |
Description |
|---|---|---|---|
search |
Class: Search.php |
No |
Called after a search is performed. Ideal location to parse and/or handle the search query and results. |
Carrier choice
Hook name |
File location |
Visible |
Description |
|---|---|---|---|
extraCarrier |
order.php |
Yes |
Called after the list of available carriers, during the order process. Ideal location to add a carrier, as added by a module. |
Payment
Hook name |
File location |
Visible |
Description |
|---|---|---|---|
payment |
order.php |
Yes |
Called when needing to build a list of the available payment solutions, during the order process. Ideal location to enable the choice of a payment module that you have developed. |
paymentReturn |
order-confirmation.php |
Yes |
Called when the user is sent back to the store after having paid on the 3rd-party website. Ideal location to display a confirmation message or to give some details on the payment. |
orderConfirmation |
order-confirmation.php |
Yes |
A duplicate of |
backBeforePayment |
order.php |
No |
Called when displaying the list of available payment solutions. Ideal location to redirect the user instead of displaying said list (i.e., 1-click PayPal checkout).. |
Merchandise Returns
Hook name |
File location |
Visible |
Description |
|---|---|---|---|
orderReturn |
order-follow.php |
No |
Called when the customer request to send his merchandise back to the store, and if now error occurs. |
PDFInvoice |
Class: PDF.php |
Yes |
Called when displaying the invoice in PDF format. Ideal location to display dynamic or static content within the invoice. |
Back-office
General
Hook name |
File location |
Visible |
Description |
|---|---|---|---|
backOfficeTop |
header.inc.php |
Yes |
Called within the header, above the tabs. |
backOfficeHeader |
header.inc.php |
No |
Called between the HEAD tags. Ideal location for adding JavaScript and CSS files. |
backOfficeFooter |
footer.inc.php |
Yes |
Called within the page footer, above the "Power By PrestaShop" line. |
backOfficeHome |
index.php |
Yes |
Called at the center of the homepage. |
Orders and order details
Hook name |
File location |
Visible |
Description |
|---|---|---|---|
newOrder |
Class: PaymentModule.php |
No |
Called during the new order creation process, right after it has been created. |
paymentConfirm |
Class: Hook.php |
No |
Called when an order's status becomes "Payment accepted". |
updateOrderStatus |
Class: OrderHistory.php |
No |
Called when an order's status is changed, right before it is actually changed. |
postUpdateOrderStatus |
Class: OrderHistory.php |
No |
Called when an order's status is changed, right after it is actually changed. |
cancelProduct |
AdminOrders.php |
No |
Called when an item is deleted from an order, right after the deletion. |
invoice |
AdminOrders.php |
Yes |
Called when the order's details are displayed, above the Client Information block. |
adminOrder |
AdminOrders.php |
Yes |
Called when the order's details are displayed, below the Client Information block. |
orderSlip |
AdminOrders.php |
No |
Called during the creation of a credit note, right after it has been created. |
Products
Hook name |
File location |
Visible |
Description |
|---|---|---|---|
addproduct |
AdminProducts.php |
No |
Called when a product is created or duplicated, right after said creation/duplication. |
updateproduct |
AdminProducts.php |
No |
Called when a product is update with a new picture, right after said update. |
deleteproduct |
Class: Product.php |
No |
Called when a product is deleted, right before said deletion.. |
updateQuantity |
Class: PaymentModule.php |
No |
Called during an the validation of an order, the status of which being something other than "canceled" or "Payment error", for each of the order's items. |
updateProductAttribute |
Class: Product.php |
No |
Called when a product declination is updated, right after said update. |
watermark |
AdminProducts.php |
No |
Called when an image is added to an product, right after said addition. |
Statistics
Hook name |
File location |
Visible |
Description |
|---|---|---|---|
GraphEngine |
Class: ModuleGraph.php |
Yes |
Called when a stats graph is displayed. |
GridEngine |
Module: GridEngine.php |
Yes |
Called when the grid of stats is displayed. |
AdminStatsModules |
AdminStatsTab.php |
Yes |
Called when the list of stats modules is displayed. |
Clients
Hook name |
File location |
Visible |
Description |
|---|---|---|---|
adminCustomers |
AdminCustomers.php |
Yes |
Called when a client's details are displayed, right after the list of the clients groups the current client belongs to. |
Carriers
Hook name |
File location |
Visible |
Description |
|---|---|---|---|
updateCarrier |
AdminCarriers.php |
No |
Called during a carrier's update, right after said update. |
Creating a PrestaShop module
Modules' operating principles
Modules are the ideal way to let your talent and imagination as a developer express themselves, as the creative possibilities are many.
They can display a variety of content (blocks, text, etc.), perform many tasks (batch update, import, export, etc.), interface with other tools...
Modules can be made as configurable as necessary; the more configurable it is, the easier it will be to use, and thus will be able to address the need of a wider range of users.
One of the main interest of a module is to add functionalities to PrestaShop without having to edit its core files, this making it easier to perform an update without having the transpose all core changes.
That is way you should always strive to stay away from core files when building a module, even though this can prove hard to do in some situations...
Module file tree
All PrestaShop modules are found in the /modules folder, which is at the root of the PrestaShop main folder. This is true for both default modules (provided with PrestaShop) and 3rd-party modules that are subsequently installed.
Each modules has its own sub-folder inside the /modules folder: /bankwire, /birthdaypresent, etc.
Basic structure of a module
All modules use the same basic structure, which makes it easier to learn by observing existing modules' source code.
Let's create a simple first module; this will enable us to better describe its structure. We'll call it "My module".
Let's first create the module folder. It should have the same name as the module, with no space, only alphanumerical characters, the hyphen and the underscore, all in lowercase: /mymodule.
This folder must contain a PHP file of the same name, which will handle most of the processing: mymodule.php.
That is enough for a very basic module, but obviously more files and folders can complement it.
The front-office part of the module is defined in a .tpl file placed at the root of the module's folder. TPL files can have just about any name. It there's only one such file, it is good practice to give it the same name as the folder and main file: mymodule.tpl.
The mymodule.php must contain the module's class. PrestaShop is Object-Oriented Programming, and so does its modules.
That class must bear the same name as the module and its folder, in CamelCase: MyModule.
Furthermore, that class must extend the Module class, and thus inherits all methods and attributes. It can just as well extend any class derived from Module: PaymentModule, ModuleGridEngine, ModuleGraph...
<?php
class MyModule extends Module
  {
  public function __construct()
    {
    $this->name = 'mymodule';
    $this->tab = 'Test';
    $this->version = 1.0;

    parent::__construct();

    $this->displayName = $this->l('My module');
    $this->description = $this->l('Description of my module.');
    }

  public function install()
    {
    if (parent::install() == false)
      return false;
    return true;
    }
  }
?>
Let's examine each line from our MyModule object...
public function __construct()
Defines the class' constructor.
$this->name = 'mymodule';
Assigns a 'name' attribute to our class' instance.
$this->tab = 'Test';
Assigns a 'tab' attribute to our class' instance. This is the title for the table that shall contain this module in PrestaShop's back-office modules list. You may use an existing name, such as Products, Blocks or Stats, or a custom, as we did here. In this last case, a new table will be created with your title.
$this->version = 1.0;
Version number for the module, displayed in the modules list.
parent::__construct();
Calling the parent's constructor. This must be done before any use of the $this->l(), and after the creation of $this->name.
$this->displayName = $this->l('My module');
Assigning a public name for the module, which will be displayed in the back-office's modules list.
The l() method is part of PrestaShop translation's tools, and is explained further below.
$this->description = $this->l('Description of my module.');
Assigning a public description for the module, which will be displayed in the back-office's modules list.
public function install()
  {
  if (parent::install() == false)
    return false;
  return true;
  }
As it is, this method is useless, since all it does is check the value returned by the Module class' install() method. Moreover, if we hadn't created that method, the superclass' method would have been called instead anyway, making the end result identical.
Nevertheless, we must mention this method, because it will be very useful once we have to perform checks and actions during the module's installation process: creating SQL tables, copying files, creation configuration variables, etc.
Likewise, should contain an uninstall() method, so as to have a custom uninstallation process. This method could look as such:
public function uninstall()
  {
  Db::getInstance()->Execute( 'DELETE FROM `' . _DB_PREFIX_ . 'block_cms` WHERE `id_block` = ' . intval($this->id) );
  parent::uninstall();
  }
To put the finishing touch to this basic module, we can add an icon, which will be displayed next to the module's name in the back-office modules list.
The icon file must respect these requirements:
- 16*16 image.
- named
logo.gif. - place on the module's main folder.
You can find an excellent free set of icons to pick from on the FamFamFam website.
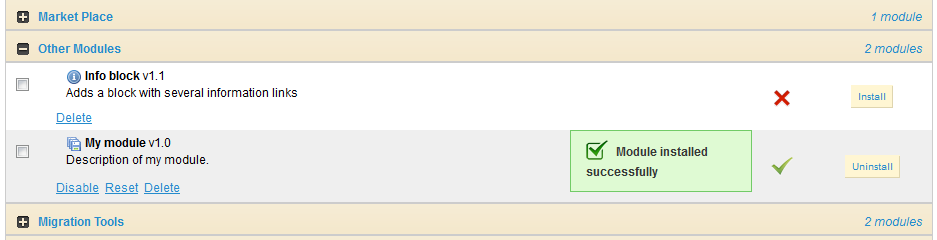
Now that all basics are in place, put the module's folder in the /modules folder of your PrestaShop test install, open PrestaShop, and in the "Modules" tab, under "Other Modules", you should find your module. Install it in order to be able to manager it for the rest of this guide.
Hooking a module
Displaying data, starting a process at a specific time: in order for a module to be "attached" to a location on the front-office or the back-office, you need to give it access to one of the above cited hooks.
To that effect, we are going to change your module's code, and add these lines:
public function install()
  {
  if ( parent::install() == false OR !$this->registerHook('leftColumn') )
    return false;
  return true;
  }

...

public function hookLeftColumn($params)
  {
  global $smarty;
  return $this->display(__FILE__, 'mymodule.tpl');
  }

public function hookRightColumn($params)
  {
  return $this->hookLeftColumn($params);
  }
Let's explore these new or changed lines.
if ( parent::install() == false OR !$this->registerHook('leftColumn') )
We changed the original line to add a second test. Now this line reads this way: if installation or hooking fail, we inform PrestaShop.
public function hookLeftColumn($params)
  {
  global $smarty;
  return $this->display(__FILE__, 'mymodule.tpl');
  }
The hookLeftColumn() method makes it possible for the module to hook into the theme's left column.
$smarty is the global variable for the Smarty template system, which PrestaShop uses, and which we need to access.
The display() method returns the content of the mymodule.tpl template file, if it exists.
public function hookRightColumn($params)
  {
  return $this->hookLeftColumn($params);
  }
Likewise, hookRightColumn() gives access to the theme's right column. In this example, we simply call the hookLeftColumn() method, in order to have the very same display, whatever the column.
Save your file, and already you can hook it into the theme, move it around and transplant it: go to the "Positions" sub-tab for the "Modules" tab in the back-office, then click on the "Transplant a module" link.
In the transplantation form, find "My module" in the modules drop-down menu, then choose "Left column blocks" in the "Hook into" drop-down menu. Save.
![]()
The "Positions" page should reload, with the following message: "Module transplanted successfully to hook". Congratulations! Scroll down, and you should indeed see your module among the other modules from the "Left column blocks" list.