
Presentación de la interfaz back-office para gestionar el stock
Gestionar las existencias es esencial desde el momento en el que empieza a vender productos y las cantidades en stock de los productos se agotan en cada venta que realiza.
Para asegurarse si necesita utilizar la funcionalidad de la gestión avanzada de existencias de PrestaShop's, lea el anterior capítulo "Conceptos generales": http://doc.prestashop.com/display/PS16/Conceptos+Generales.
Si desea utilizar la gestión avanzada de existencias, usted debe:
- Asociar sus productos a los almacenes.
- Asociar sus almacenes a los transportistas.
- Asociar sus almacenes a las tiendas correspondientes.
Gestionar el stock dentro de PrestaShop se realiza a través de varias pantallas, y puede utilizar uno de los dos niveles disponibles.
Estos niveles son:
- No gestionar el stock: no hay cantidades de productos, PrestaShop asume que el stockaje de un producto es infinito. Utilice éste si tan sólo vende productos virtuales (archivos, servicios, etc.).
- Gestionar el stock en modo Simple: para cada producto que que venda, puede indicar la cantidad disponible actualmente (incluyendo las combinaciones de los productos). Utilice esta opción si tiene pocos productos o un sólo almacén .
- Gestionar el stock en modo Avanzado: para cada producto que que venda (y sus combinaciones), puedes indicar dónde se encuentran las cantidades disponible en un número ilimitado de almacenes (con diversos transportistas y métodos de valoración). También puede ver sus movimientos de stock, el estado actual de su stock, su cobertura de stock, y hacer un pedido a sus proveedores de productos.
Estas pantallas son:
- Preferencias > Productos > "
- Catálogo > Productos > página de producto: una o dos pestañas son añadidas a la página de creación / edición de un producto :
- Cantidades:
- En modo Simple: puede indicar manualmente la cantidad de cada producto.
- En modo Avanzado: las cantidades son gestionadas desde el menú "Existencias" de Prestashop.
- Almacenes: En modo Avanzado, puede indicar la ubicación de un producto o sus combinaciones dentro de un almacén.
- Cantidades:
- Existencias de Stock: En modo Avanzado, puede hacer uso de todas las páginas de gestión de existencias (creación de almacenes, movimiento de stock, estado de existencias, cobertura de stock, pedidos a proveedores).
La siguiente sección describe estas páginas una por una.
Gestionar el stock desde la página del producto
Gestionar cantidades
En PrestaShop 1.4, podía establecer manualmente las cantidades de los productos disponibles para la venta en su tienda.
En PrestaShop 1.5, todavía puede establecer manualmente las cantidades de productos disponibles para cada producto. Pero una vez se active el gestor avanzado de stock, también puede automáticamente determinar esta cantidad en función de las cantidades físicas existentes para cada producto. Tenga en cuenta que es posible habilitar globalmente la gestión avanzada de stock, aunque sólo utilice ésta para uno o varios productos.
Cuando la opción "Activar el manejo automático del inventario" está activa, todos los productos tienen una nueva pestaña en su página de administración, llamada "Cantidades". Esta interfaz clara y sencilla le permite gestionar las cantidades disponibles para la venta en su tienda(s) para un producto específico, y todas sus posibles combinaciones.
Con sólo esta opción habilitada, puede gestionar las cantidades de productos de los productos individuales, una por una.
Si prefiere que las cantidades de todos sus productos sean gestionadas directamente utilizando la funcionalidad de la gestión avanzada de stock de PrestaShop y desde las páginas de sus productos, tiene que habilitar la otra opción disponible en la página "Preferencias > Productos: "Habilitar la administración avanzada de stock".

se abre con una sección explicativa, que le recomendamos que lea completamente. Esa sección es seguida por la propia interfaz de gestión de cantidades disponibles, que se abre con tres opciones:
- Quiero usar el sistema de gestión avanzada de existencias para este producto.
- Cantidades disponibles para el producto actual y sus combinaciones están basadas en el inventario de los almacenes.
- Quiero especificar cantidades disponibles manualmente.
Por defecto, la tercera opción ("Quiero especificar cantidades disponibles manualmente") se encuentra activa. Siempre y cuando no marque la primera opción ("Quiero usar el sistema de gestión avanzada de existencias para este producto"), las cantidades son gestionadas de la misma forma que eran gestionadas en la versión 1.4 de PrestaShop, lo que significa que tendrá que añadir manualmente las cantidades, y PrestaShop eliminará las cantidades que venda.
Si prefiere sincronizar las cantidades disponibles con las existencias de su almacén, tiene que cambiar el método de gestión de cantidades:
- Marque la casilla "Quiero usar el sistema de gestión avanzada de existencias para este producto" para cambiar el método.
- Esta acción hace que la segunda opción, "Cantidades disponibles para el producto actual y sus combinaciones están basadas en el inventario de los almacenes", pase a estar disponible. Seleccione esta opción para sincronizar la cantidad disponible de este producto con el stock de su almacén.
Tan pronto como haya seleccionado la segunda opción, la columna "Cantidad" de la tabla dejará de ser modificable: las cantidades son ahora gestionadas a partir de su stock.
Los packs de productos son un caso especial. Dado que no es posible añadir combinaciones de productos a un pack, los desarrolladores PrestaShop han decidido que, cuando sea necesario, PrestaShop utilice la combinación por defecto para decrementar las existencias físicas.
Además, un aviso indica el número máximo recomendado de packs.
El resto de esta página se explica en el capítulo "Añadir Productos y Categorías de productos" de esta guía.
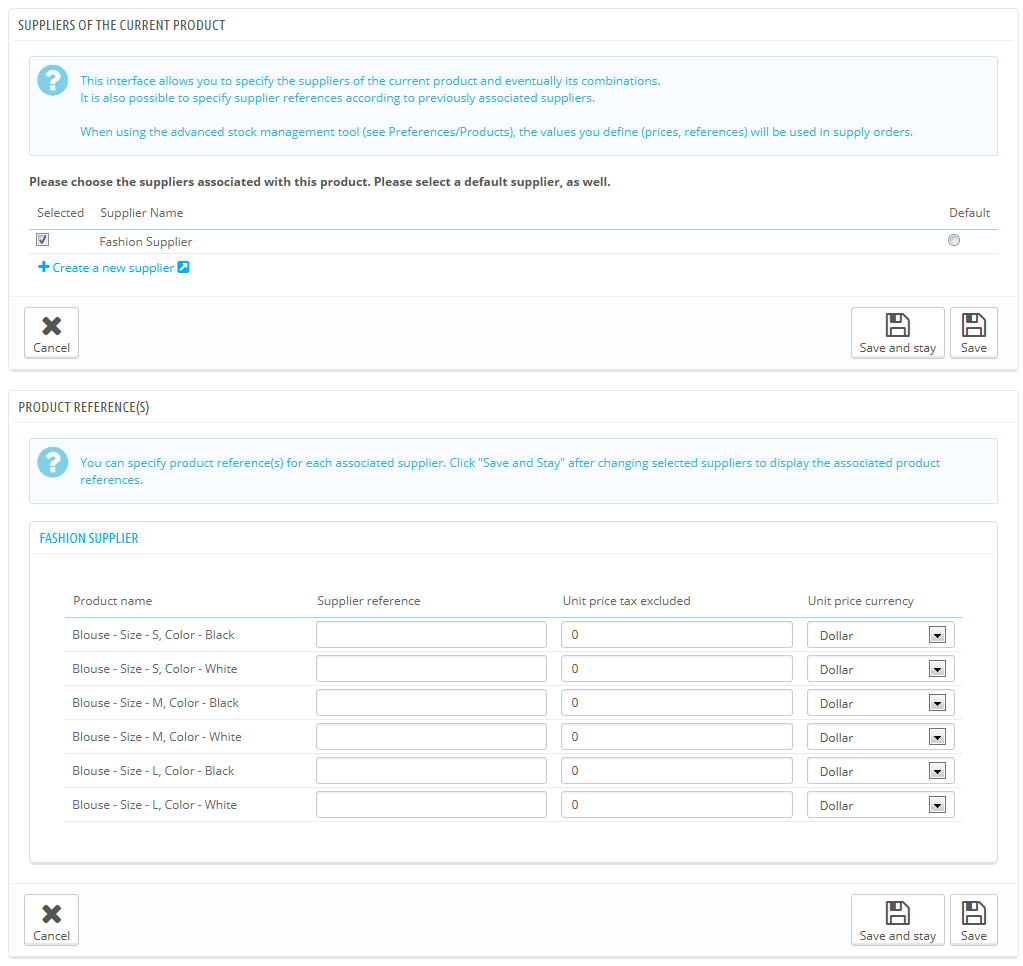
Gestionar proveedores
Ahora puede establecer más de un proveedor para un producto determinado. Para cada proveedor asociado a un producto, puede establecer el número de referencia del proveedor y un precio de compra por defecto para ese producto, así como a su combinación. Esta información se utiliza cuando se realiza un pedido al proveedor.
Gestionar almacenes
Si el gestor avanzado de stock está habilitado, una pestaña "Almacenes" aparece en la ficha del producto, donde puede especificar en qué almacén(es) se encuentra el producto y cada una de sus combinaciones. También puede especificar la ubicación del producto y sus combinaciones.
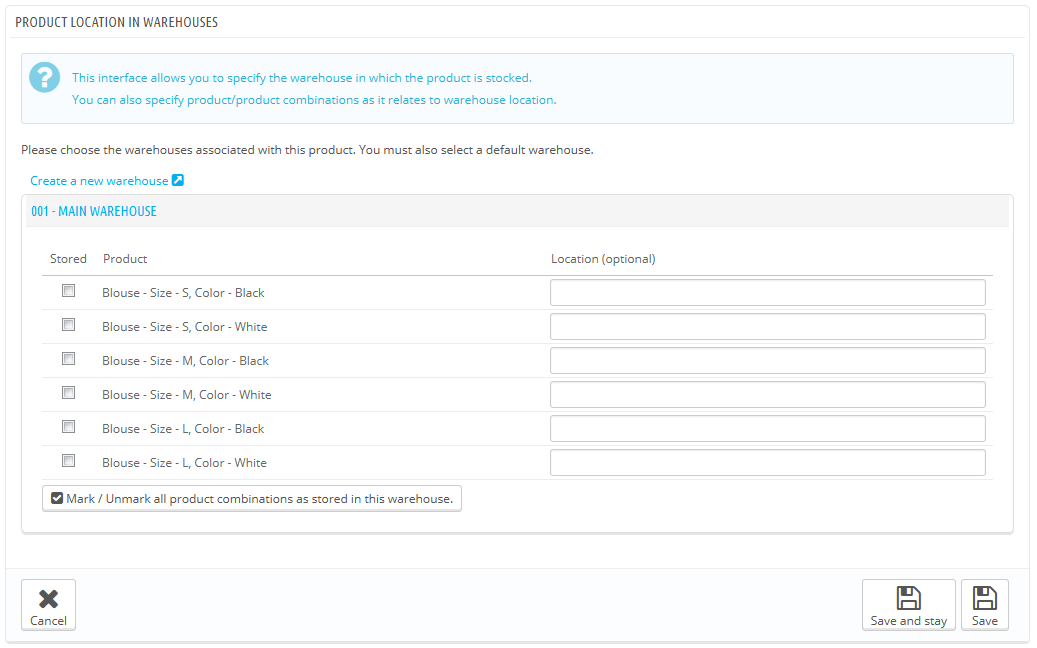
Primeramente, deberá crear al menos un almacén (véase más adelante) antes de asociar un producto a este y establecer la ubicación del producto en él. Este paso es esencial: es importante para establecer al menos un almacén en el que un producto pueda ser almacenado. Esto tendrá un enorme impacto en la preparación de pedidos en el contexto multi-envío.
Gestión de almacenes
El gestor avanzado de stock hace que sea posible la creación de uno o más almacenes. Para crear uno, diríjase a la página "Almacenes" bajo el menú "Existencias".

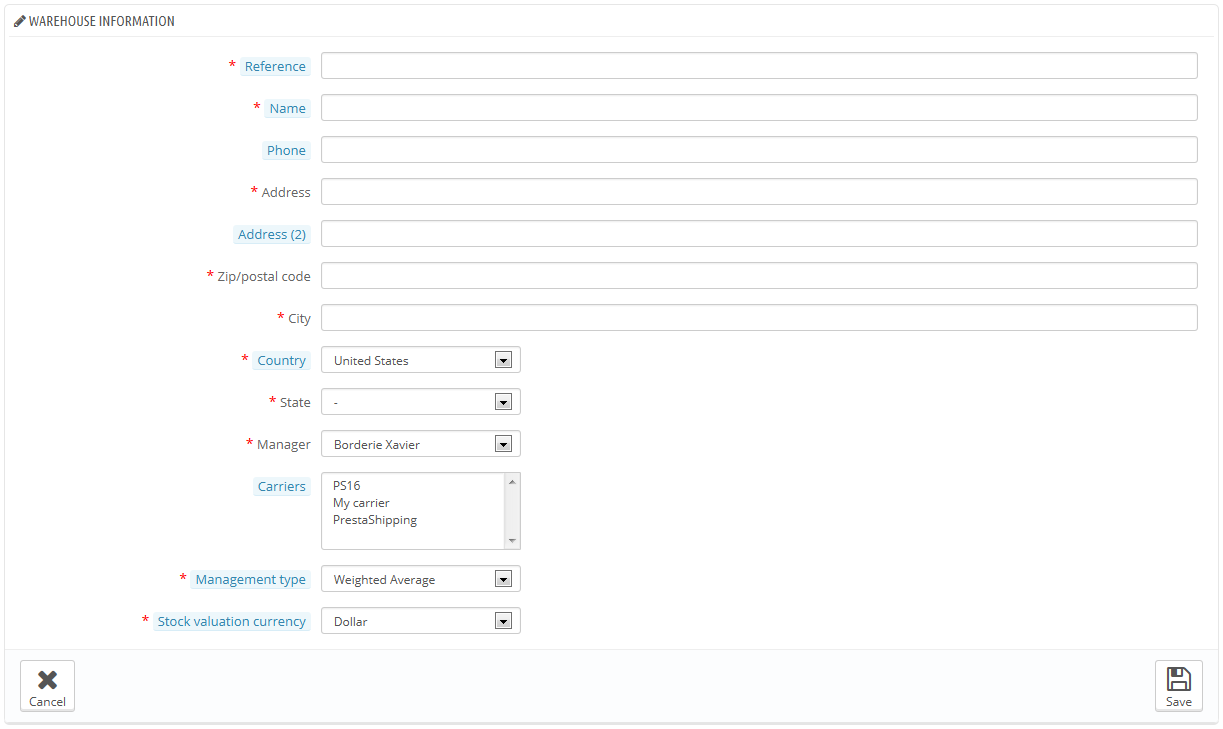
Para crear un nuevo almacén, debe rellenar los siguientes campos:
- Reference and Name. The warehouse's unique reference identifier and name. Make sure to use something recognizable: you must be able to easily differentiate to warehouses from a drop-down list.
- Address, Postcode/Zip Code, City and Country. The warehouse's physical address. This information will be used on the purchase order to suppliers.
- Manager. A person in charge of the warehouse, chosen among your shop's registered employees. If the employee's account is not yet created, you must create it first.
- Carriers. The carriers who you authorize for orders shipping from this warehouse. Maintain the "Shift" key pressed while clicking to select more than one carrier.
- Management type. A method of accounting valuation, based on your country's regulations. See the "Stock management rules" part of this chapter for more information.
- Stock valuation currency. A valuation currency for this warehouse's stock (among the registered currencies).
It is not possible to change a warehouse's valuation method and currency once it has been set. If you need to change that information, you will have to recreate the warehouse, and delete the wrong one. You can only delete a warehouse if it does not contain any product anymore.
Be careful of the carriers you choose to authorize, as this will a huge impact on the order preparation in the multishipping scenario.
In the situation where you manage more than one shop, you will also have to associate each shop to one or more warehouses. This enables you to set from which warehouse the client orders for a given shop can be sent.
Once the warehouse has been created, you are taken back to the list of warehouses. Click the "View" icon on the right of its row to access a bird's eye view of its information, including the references of all the products stored in it, the sum of all the available quantities, a global accounting valuation, details of the stored products, and the history of the stock movements for that warehouse.
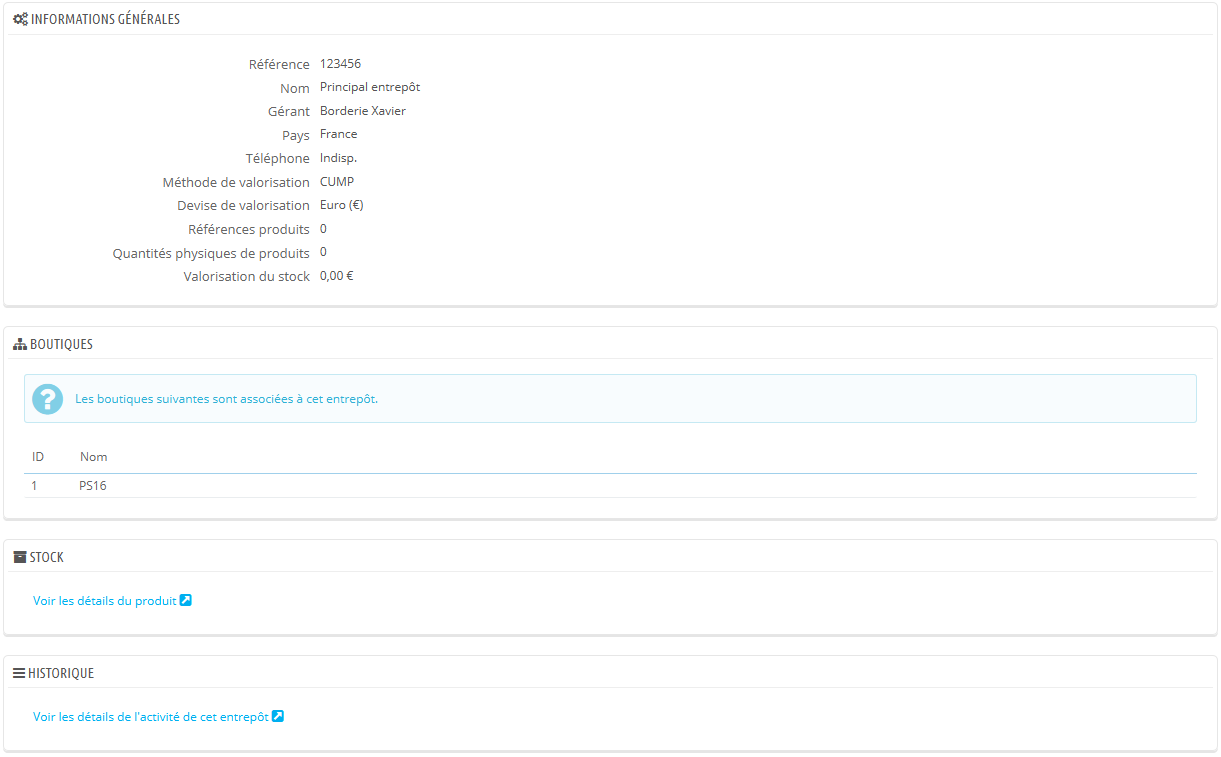
Each warehouse page also contains two links at the bottom:
- See product details. Takes you to the warehouse's "Instant Stock Status" page.
- See warehouse's activity details. Takes you to the warehouse's "Stock Movement" page.
Stock management
Now that you have created one or more warehouses, you have to set stock for each of them. To that end, go to the "Stock Management" page under the "Stock" menu.
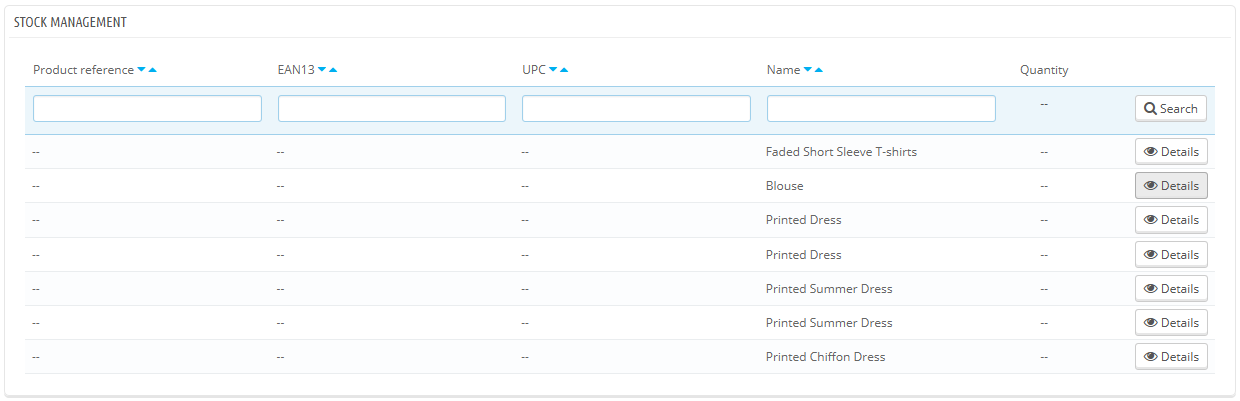
All available products from your catalog are listed in this interface. If you have any combination of product, you can manage them from the "Details" action.
In your daily activities, you can use this interface in order to manually:
- Add stock. This button adds stock for a specific product in a given warehouse.
- Remove stock. This button removes stock for a specific product in a given warehouse.
- Transfer stock. This button transfers stock from one warehouse to another.
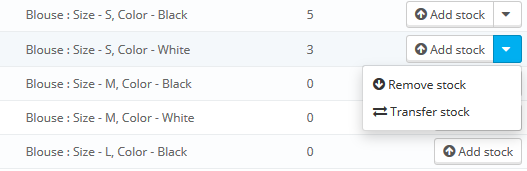
The last two actions only appear if there already is some stock of the chosen product in any warehouse.
The "Transfer stock" only appears if you have at least two registered warehouses.
Adding stock to a warehouse
To add more stock to a product, use the "Add stock" action (up arrow) for said product or product combination. A new page opens, containing a form where the most important information is displayed in order to help you identify a product with certainty (reference, EAN13 and UPC code, and name). This information cannot be changed from this form, therefore it is grayed out.
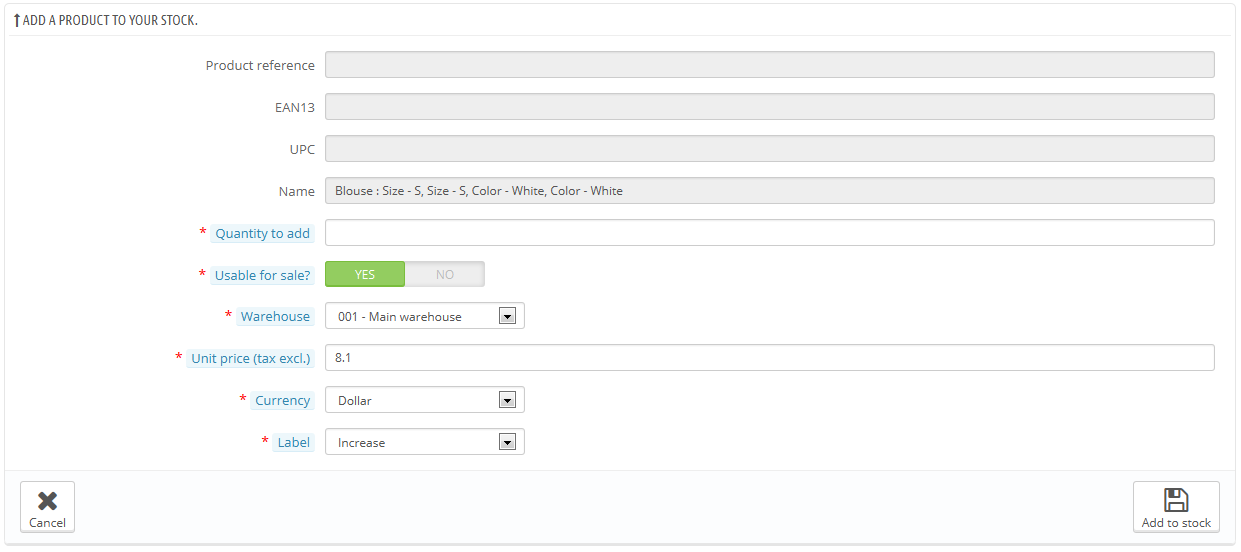
You must then set:
- Quantity to add. This must be a positive number. You cannot remove stock by using a negative number.
- Usable for sale?. Whether that quantity of stock is usable for sale, or simply stored until you make a decision about it. In the second case, it is considered "reserved".
- Warehouse. The warehouse where the stock is to be added. The form lets you add product stock to only one warehouse at a time. If you need to add stock for this product in more than one warehouse, you must make the entire adding process again for each warehouse.
- Unit price (tax excl.). The unit price for the product at the time of the addition. This is for valuation purpose.
- Currency. The currency of the unit price. If the currency is not available, you can create one from the "Currencies" page, under the "Localization" menu, or import from the "Localization" page under the "Localization" menu, by importing the localization pack of the country whose currency you want to use.
- Label. A label for the stock movement that you are generating, for future reference. This is purely informational.
When hovering the "Quantity to add" and "Unit price (tax excl.)" fields with the mouse cursor, the interface will display a reminder of their values the last time you added some stock.
Removing stock from a warehouse
When you want to remove a certain quantity of product stock, you must use the "Remove stock" action (down arrow, available only when there already are products in stock). A new page opens, containing a form where the most important information is displayed in order to help you identify a product with certainty (reference, EAN13 and UPC code, and name). This information cannot be changed from this form, therefore it is grayed out.
You must then set:
- Quantity to remove. This must be a positive number. You cannot add stock by using a negative number.
- Usable for sale. Whether this quantity should be removed from the usable quantity or from the whole physical quantity (including the reserved one).
- Warehouse. From which warehouse that quantity should be removed. The form lets you remove product stock from only one warehouse at a time. If you need to remove stock for this product in more than one warehouse, you must make the entire removing process again for each warehouse.
- Label. A label for the stock movement that you are generating, for future reference. This is purely informational.
Transferring stock from one warehouse to another
The stock transfer enables you to transfer stock from one warehouse to another, or from one status to another (usable in store / reserved) within a single warehouse. Click on the "Transfer stock" action (sideways arrows, available only when there already are products in stock). A new page opens, containing a form where the most important information is displayed in order to help you identify a product with certainty (reference, EAN13 and UPC code, and name). This information cannot be changed from this form, therefore it is grayed out.
You must then set:
- Quantity to transfer. This must be a positive number.
- Source warehouse. The warehouse from which you want to transfer some products, or where you want to change the status of some of the stock.
- Is this product for sale in your source warehouse?. Whether the quantity to remove from the "source" warehouse should be from the "usable for sale" stock or the "reserved" stock.
- Destination warehouse. The warehouse to which you want to transfer some products. If you simply want to change the status of some of the stock from your source warehouse, make sure to select the same warehouse in this form.
- Is this product usable for sale in your destination warehouse?. Whether the quantity to add to the "destination" warehouse is usable for sale or reserved. This is also the option to use when you simply want to change the status of some of the stock in the source warehouse:
- If you do not want to change status while moving warehouses: make sure both "Use for sale?" option are set alike.
- If you do want to change status, whether within the same warehouse or while moving warehouses: make sure both "Use for sale?" option are set differently.
For these operations, all that is related to valuations is run automatically according to the management method chosen for each warehouse. Currency conversions work the same.
Stock Movement
This interface enables you to view the stock movement history. You can display all of the stock movements, or only those tied to one warehouse. Filters can be applied to refine your search.
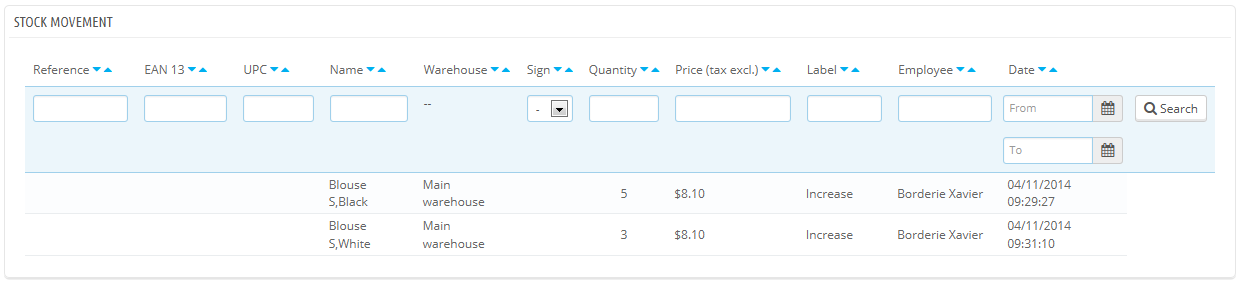
When the "Filter movements by warehouse" drop-down list is set to a warehouse, you can make a CSV export of the obtained list.
Instant Stock Status
This interface enables you to have an instant overview of your stock, either globally or per warehouse. The numbers are current.

For each product or product combination in stock, the following indicators are available:
- Unit price (tax excluded).
- Product valuation depending on the physical quantity of stock. The sum (for all prices) is not available for all warehouses, please filter by warehouse.
- Physically available stock.
- Stock that is usable for sale.
- Real quantity (physical usable quantity - client orders + supply Orders).
As appropriate, and depending on the chosen valuation method, the breakdown of the unit prices and of the associated valuations is available by clicking on the "Details" action.
Moreover, for a given warehouse, you have two ways to export the current list in CSV format:
- Export the indicators tied to the quantities.
- Export the indicators tied to the valuation (prices).
Stock Coverage
This interface enables you to overview the coverage of your stock. The coverage indicates how many days your current stock can last. This information is very useful, as it helps you predict the necessary restocking. Coverage is calculated according to previously registered stock movements.

You can get the stock coverage for all the warehouses, or for a single warehouse.
You can also set the time period (one week, two weeks, three weeks, one month, six months, a year) of registered stock movement which is to be taken into account when calculating the coverage.
Finally, you can highlight the stock coverage which is below a given number of days. This will highlight the relevant products, helping you identify them quicker.
In order to view the stock coverage of product combinations, you have to click the "Details" action of the product.
It is possible to receive notifications of the stock coverage for a product. The e-mail notification module (mail alerts) can take product stock coverage into account. It is thus possible to set a number of coverage days below which you will receive a notification. See the configuration for this module.
Supply orders
One of the major features of the stock manager is the ability to place orders to suppliers so as to better manage your restocking.
This interface enables you to manage all your supplier orders, as well as reusable order templates.

The order template creation process is the same as the order creation process (except for the "Expected delivery date" field). We will therefore only explain the order creation process.
Creating a new order
The creation of an order for a supplier can be broken down in two steps: creating the order, then adding products to it.
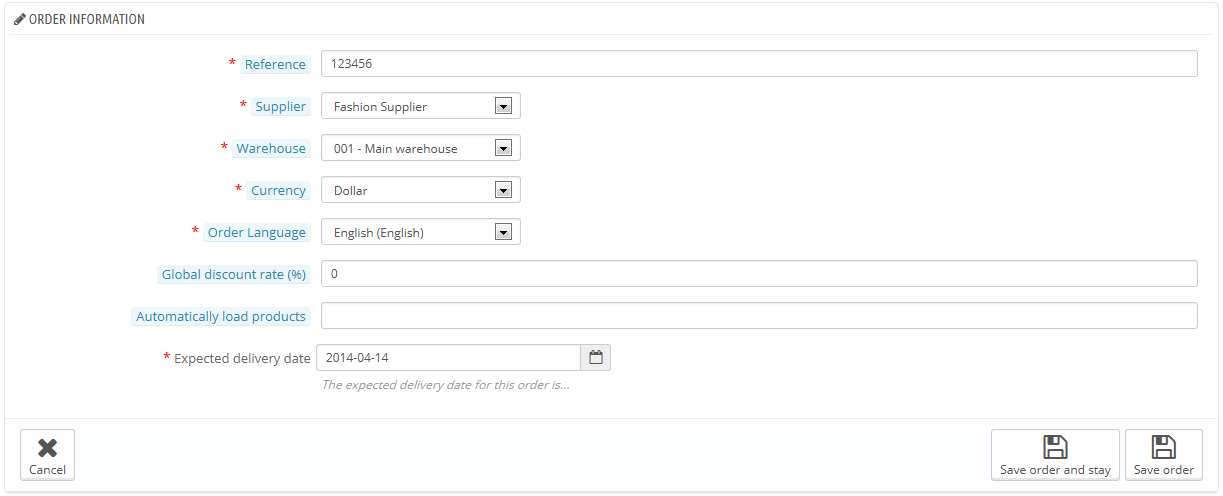
So, the first step is to define the order's headers:
- Set the unique reference number. This is an administrative number; do not put any seemingly unique number.
- Select the supplier. If the supplier you want is not in the drop-down list, you must create it in the "Suppliers" page, under the "Catalog" menu.
- Select the warehouse which will take delivery of the order. You must have created at least one warehouse.
- Select the currency in which the order will be formalized. If needed, you can create or import a currency using, respectively, the "Currencies" or "Localization" page under the "Localization" menu.
- Select the language in which the order will be formalized. If needed, you can create or import a language using, respectively, the "Languages" or "Localization" page under the "Localization" menu.
- If needed, set the global discount on the order (in percentage). You can just leave it at "0" if you do not have a discount on this order.
- If needed, set the physical quantity of a product below which all the products have to be restocked, and are therefore to be added to the order automatically. Each pre-added product will be ordered with a quantity equal to the entered quantity, minus the already available quantity.
- Set the expected delivery date.
The second step consists of adding actual products to the order. To make that second step, you can either:
- Click on the "Save order and stay" button.
- Click on the "Save order" button. You are taken back to the list of supply orders: click on the "Edit" action for the order you just created.
The interface of the order creation form has been updated with a second form below the previously-filled fields. You must use that second form to add products to your order, using the integrated search engine. The products that you add appear in a new list.

For each product, you must set or update the unit purchase price (tax excluded), the quantity to order, any applicable tax rate, and any product-specific discount.
Once the order is created, it appears in the list with the "Creation in progress" status. This status enables you to view and edit the information that were previously entered as well as add products to the order. You will not be able to change the order once you change its status to "Order validated".
You can never delete a supply order: you can only cancel it.
You need to follow through for the whole order process, always indicating its status change in PrestaShop's interface. This is what the first action button of the list ("Change state") is for: click on it to reach the status changing form. See the "Changing the status of a supplier order" section below for more information on the available statuses, and see the "Registering the reception of products" to understand how to follow through on a supply order.
The "+" icon in the supply order list displays the order's history, which enables you to see who did what and when.
Order template creation
The whole point of creating a template is to serve as a basis for new orders.

The supply order template creation process is the same as the one for a real order, except that:
- You do not have to set a planned delivery date.
- The "Automatically load products" value will be the quantity to order for the loaded products, not the stock/typed value difference.
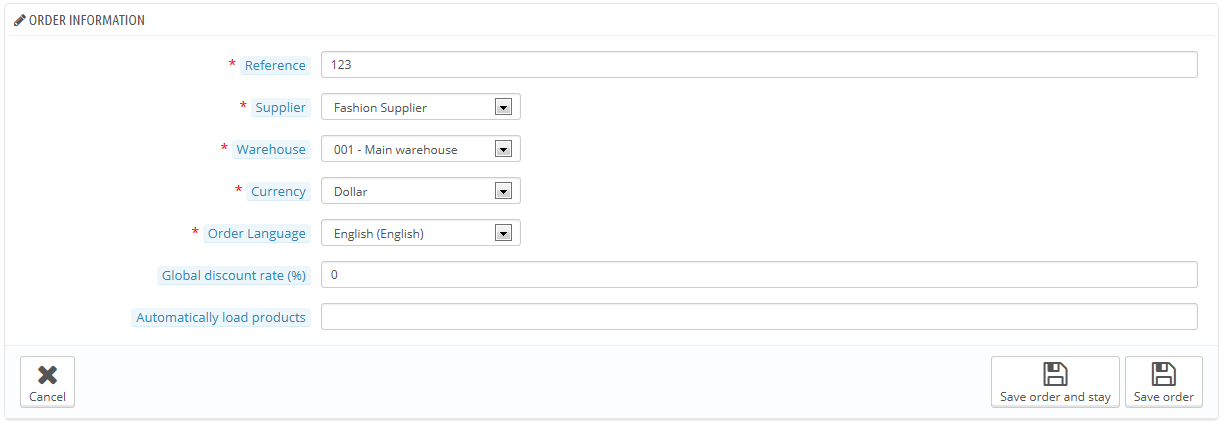
Moreover, contrary to an ordinary supply order:
- A template does not have a status.
- A template can be deleted.
- A template has no edit history.
Once you have created your template, you only need to use the "Use this template to create a supply order" action from the template list (the "two windows" icon) to start creating an order.
Changing the status of a supply order
Each order has many available actions (in the "Actions" column of the order list). One of them enables you to edit the status: the "Change state" one. There are six possible default statuses, but you can add your own (see the "Configuration" section of this chapter).
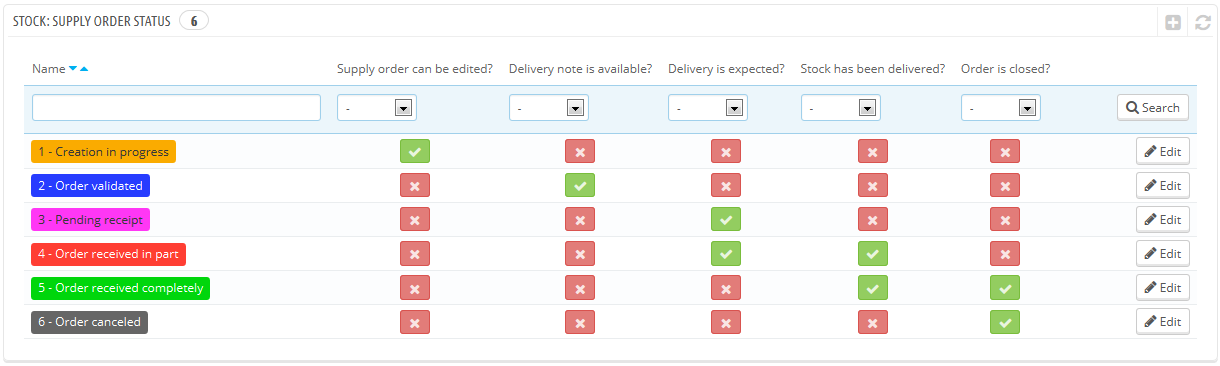
An order's status helps you understand your stock movements at a glance thanks to their color code. Here is the significance of the six default statuses:
- Creation in progress. This is when you are in the first step of the creation step, where you can edit everything.
- Order validated. This status validates the order and freezes the information it contains (purchase prices, quantities, etc.). At this step, a new action appears in the "Actions" column, which enables you to edit the invoice that is sent to the supplier in PDF format.
- Pending receipt. As soon as the supplier has received and validated your invoice, you have to change the supply order's status to "Pending receipt".
- Order received in part. As soon as a delivery is made, you must switch the order to this status. There can be multiple deliveries, and a delivery history is logged for each product. The restocking is made with each delivery.
- Order received completely. Once an order is completely delivered, or partially because of a partial cancellation, it should be switched to this status. Stocks are unaffected in this case, and it is possible to perform actions on the order.
- Order canceled. This status is to be given to canceled orders, whatever the reason. Stocks are unaffected in this case, and it is not possible to perform actions on the order.
With each status change, the status drop-down selector evolves in order to present only the possible status changes, in regard to the current status. The unavailable statuses are grayed out.
Details of a supplier order
Clicking the "View" icon from the list of supply orders enables you to get a synthetic view of your order.
You can also download the invoice generated as a PDF file (provided the order is validated by you) from the list of orders or from the status change page.
The "Details" action enables you to display the status change history for the current order.
Registering the reception of products
You must change the status of your supply order within PrestaShop as soon as actions are taken in the real world. This is done using the "Change state" action in the "Actions" column from the list of orders. The form in this page always preselects the next logical status, but you are free to choose any of the other statuses available.
While you are preparing the supply order, keep its status to "Creation in progress". Once you are done preparing the order, switch it to "Order validated", then print the invoice PDF and send it to your supplier. As soon as your supplier confirms the reception of the invoice, change the status to "Pending receipt".
During the "Pending receipt" and "Order received in part" statuses, a new action is available in the "Actions" column. Using the "truck" icon, the "Update ongoing receipt of products" action enables you to register the reception of products for a given order during the current day.
The form that opens after clicking that "truck" action enables you to see how many items were expected, and to indicate the quantity of product delivered for each product that day. Click the "Update selected" button to mark the selected products as received with the number of items you indicated in the "Quantity received today?" field. The checkbox on the left of each row must be checked for PrestaShop to take that line into account.
This step can be done as many times as necessary, and it is possible to receive and incorporate more stock than planned.
If you receive less stock than expected, PrestaShop automatically changes the order's status to "Order received in part".
For each product, a reception history is available ("+" action), as well as an indication of the received quantity, the expected quantity, and the remaining quantity. If the "received quantity" is equal to the "expected quantity", the corresponding row is highlighted in green. If you received more than expected, it is in red.
When all the products from the order have been received, you must manually change the supply order's status to "Order received completely". This ends the supply order process, and a new "Export" action appears, which you can use to download a CSV file of all the information pertaining to that order.
CSV export
Using the supply orders interface, you can filter the list of orders or the details of these orders so that you may export it, according to the current filters (reference, supplier, etc.).
Moreover, you can choose not to display the orders that are completed or canceled, using the appropriate checkbox.
Configuration
The configuration page enables you to customize the way certain parts of the advanced stock manager work:
- The available statuses for a supply order.
- The labels for the stock movements.
- The default statuses for some stock movements which are used throughout the solution.
Adding a new default order status
You can add custom statuses corresponding to your business line. You cannot delete a default status.
The list on the main page enables you to get a better perspective of the available statuses, and how they can impact an order.
Click the "Add new" button to reach the creation form.
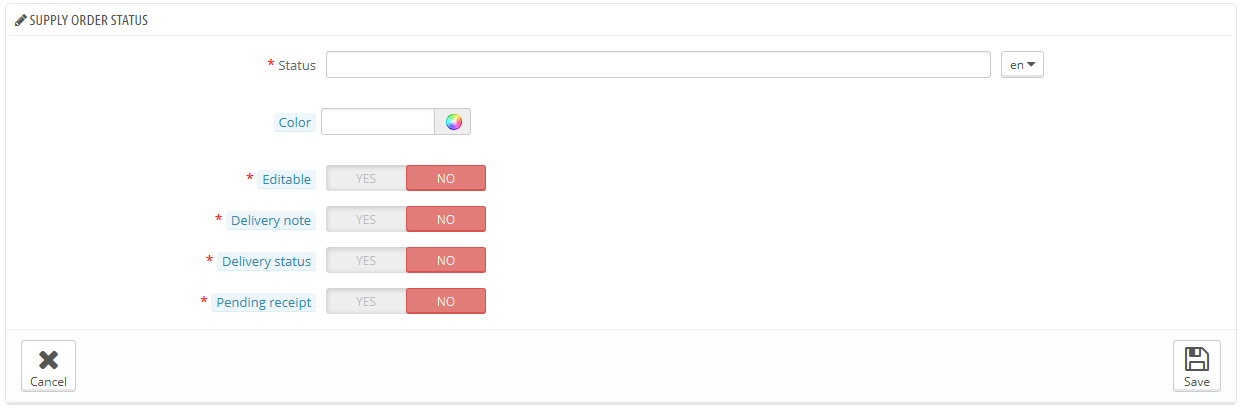
A status has a label, a color, and enables you to define whether:
- The order can be edited. As long as the order is editable, it cannot be sent to the supplier.
- The order delivery note can be generated.
- Product reception is ongoing, meaning that you have not yet received all the ordered products.
- Product delivery is still pending, meaning that you are still waiting for any product to arrive.
Adding a stock movement label
It is possible to add more labels to stock movements. Click the "Add new" button from the "Stock movement labels" section to access the creation form.

You simply have to set a name for the label, and indicate whether it pertains to stock increase or decrease. Those labels can be used when adding/removing/transferring stock manually (as explained earlier).
Changing default supply order labels
It is possible to choose the default stock movement labels in the following standard cases:
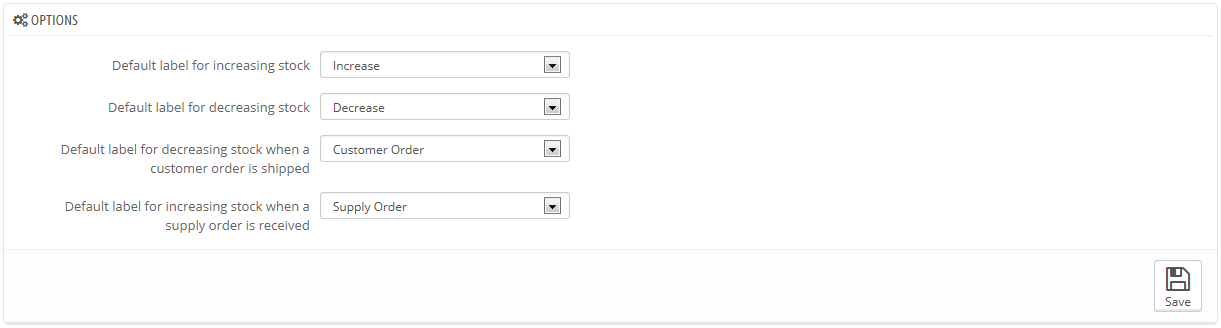
- Increasing stock (manually).
- Decreasing stock (manually).
- Decreasing stock following the shipment of a client order.
- Increasing stock following the delivery of products from a supplier's order.