Sus clientes
La primera página bajo el menú "Clientes" le ofrece un listado de todos los usuarios registrados en su tienda.
Ésta le proporciona a vista de pájaro una visión general de todos sus clientes, con algunos detalles que puede utilizar para ordenar y buscar cuentas:
- Tratamiento (Títulos). Los clientes pueden declarar su título social, que se corresponden a un género y que puede ayudarle a darle una experiencia más personalizada a sus clientes. Hay dos títulos sociales predeterminados (Sr., y Sra.), pero puede crear más en la página "Tratamiento (Títulos)" bajo el menú "Clientes".
- Edad. Para conocer y entender mejor a sus clientes, puede controlar la edad media de los registrados en su tienda, y los productos que son más adecuados ofertar según estos apuntes demográficos.
- Activado. Indica si el cliente está activado o no. Puede desactivar una cuenta haciendo clic en la marca de verificación de color verde "Sí".
- Boletín de noticias. Indica si el cliente está suscrito al boletín de noticias de la tienda o no. Puede darle de baja, haciendo clic en la marca de verificación de color verde "Sí".
- Opt.. Indica si el cliente de esta cuenta ha aceptado recibir e-mails de sus socios o no. Puede darle de baja, haciendo clic en la marca de verificación de color verde "Sí". No suscriba a un usuario a recibir estos mensajes de correo electrónico sin su consentimiento, ya que esto se considera spam.
- Las fechas de Registro y de Última visita siempre pueden serle útiles para ordenar las cuentas de usuario.
- Acciones. Puede modificar la cuenta del usuario, simplemente ver estas con detalle (sus mensajes, pedidos, direcciones, cupones, etc.), o eliminar ésta para siempre.
Cuando se instala Prestashop con datos de ejemplo, observará que tiene un usuario predeterminado, llamado John DOE.
Puede utilizar este falso cliente para probar algunas de las características de su tienda, y navegar a través de su tienda para ver la forma en la que un cliente real lo haría.
Para iniciar sesión en su tienda con esta cuenta pública, utilize estas credenciales:
- Correo electrónico: [email protected]
- Contraseña: 123456789
¡Antes de abrir su tienda al público, asegúrese de eliminar este usuario por defecto, o por lo menos modifique sus credenciales!. Si no realiza esto, algún visitante con malas intenciones puede utilizarlo para realizar compras falsas y provocar otros tipos de daños.
Below the customers table is the "Set required fields for this section" button. It opens a form where you can indicate if a database field is necessary or not by checking the appropriate boxes: this way, you can make it so fields such as "newsletter" or "optin" are mandatory when a visitor is creating a customer account on your shop.
You can export a list of your clients by clicking on the "Export" button at the top.
You can also import customers using the "Import" button. You will need your CSV file to follow this format:
ID;Title;Last name;First Name;Email address;Age;Enabled;News.;Opt.;Registration;Last visit;
2;1;Gorred;Francis;[email protected];-;1;0;0;2013-07-04 15:20:02;2013-07-04 15:18:50;
1;1;DOE;John;[email protected];43;1;1;1;2013-07-02 17:36:07;2013-07-03 16:04:15;
More import options are available in the "CSV Import" page of the "Advanced parameters" menu.
Creating a New Customer Account
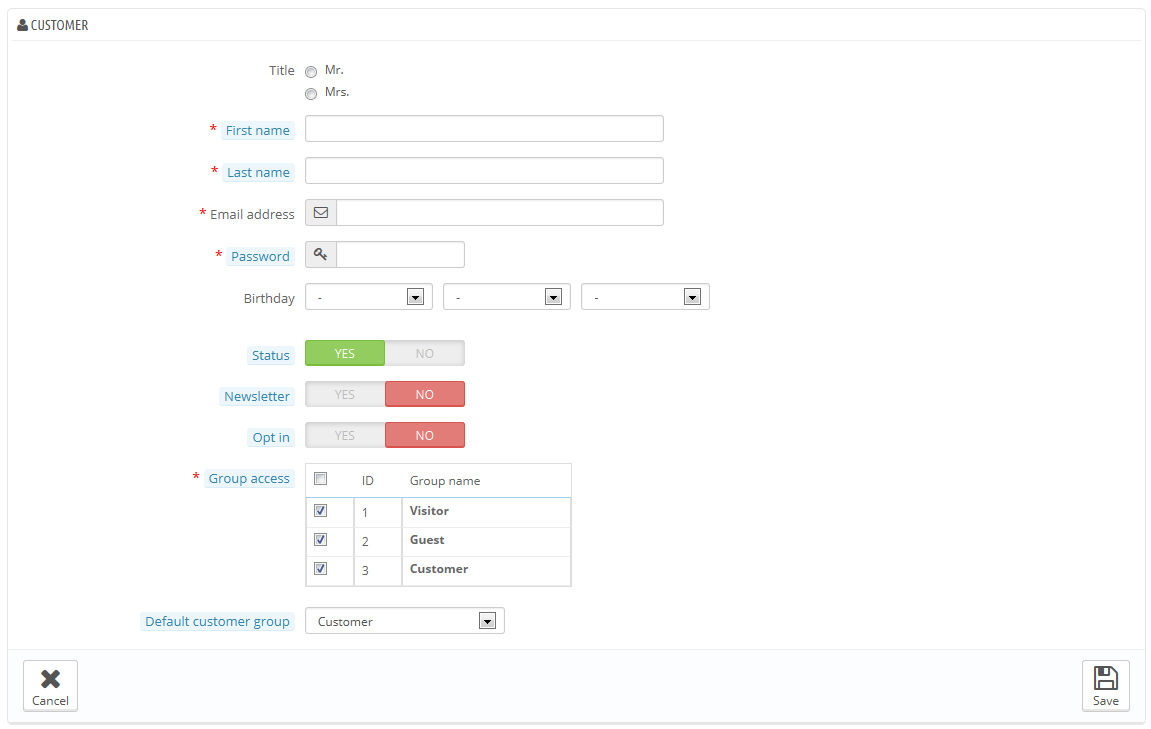
To create a customer account manually, select "Add New". A form appears.
Fill out the customer's information:
- Title. Choose between the ones available, or create another one in the "Titles" page under the "Customers" menu.
- First name, Last name, E-mail address. Those are essential: the names are used in the confirmation e-mails that PrestaShop sends, and the e-mail address is used for log-in.
- Password. Choose a password, at least 5 characters long.
- Birthday. This information can be used for birthday e-mails and temporary discounts.
- Status. You may wish to create an account, but not have it yet active.
- Newsletter. Can be used by the "Newsletter" module, for sending regular information to those customers who requested it.
- Opt-in. Can be used by modules for sending regular partner promotions to those customers who requested it. Do not subscribe a user to these e-mails without their consent, as this is considered spam.
- Group access. Having customer groups enables you to create group discounts. Many other PrestaShop feature can also be group-restricted. You will learn more about group in the "Groups" section of this chapter of the PrestaShop user guide.
- Default customer group. No matter how many groups that customer belongs to, s/he should always have one main group.
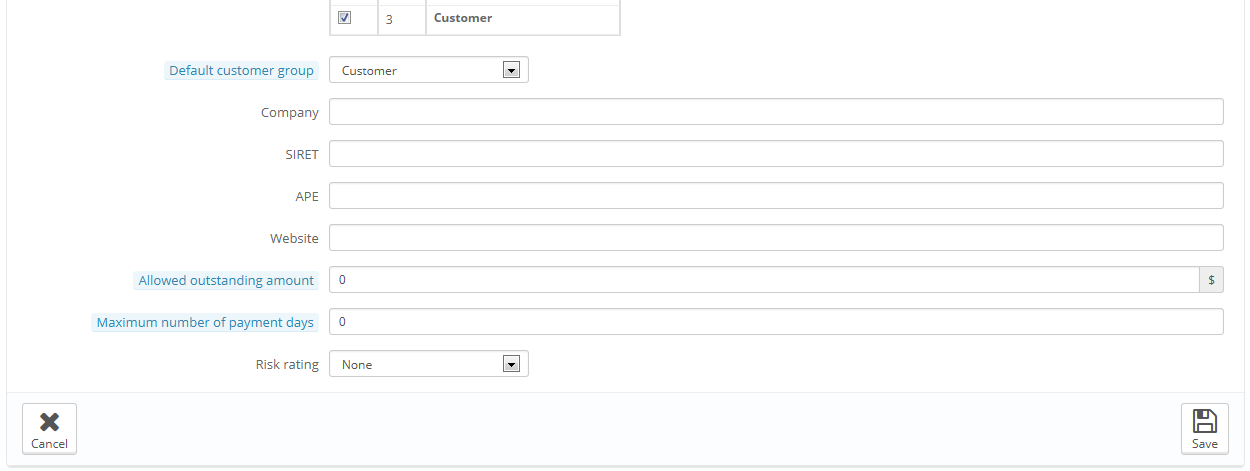
If your customers are mostly companies, you should enable the B2B mode in order to get additional options: go to the "Customers" page of the "Preferences" menu, and choose "Yes" for the "Enable B2B mode" option.
The B2B mode adds a few company-specific fields:
- Company. The name of the company.
- SIRET. Its SIRET number (France only).
- APE. Its principal activity code (Activité principale exercée - France only).
- Website. Its website.
- Allowed outstanding amount. The amount of outstanding money that the company is allowed.
- Maximum number of payment days. The number of days that the company is allowed.
- Risk rating. Your risk rating of this company: Low, Medium or High.
Viewing a Customer's Information
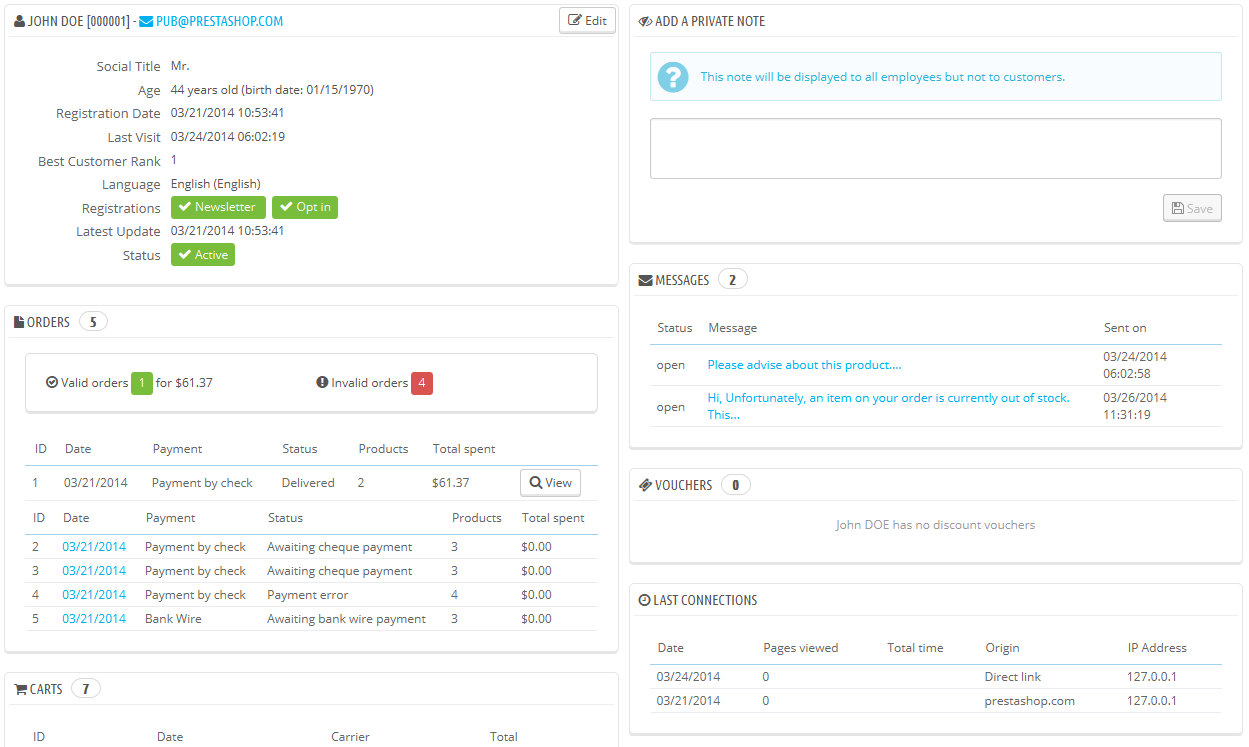
In the case where you would like to have more information on a given customer, you can click on the "view" button, located at the end of the row in the customer's list. A new page appears.
The various sections provide you with some key data on the user:
- Customer information, first and last name, e-mail address, ID, sign-up date, date of last visit, rank.
- Information regarding the subscription to the store's newsletter and subscription to ads from partnering companies, the age, date of last update, and whether or not the account is active.
- Private notes from the store's employees (i.e. you or your team).
- Messages sent by the customer to the shop's team (through customer service).
- The groups to which the customer belongs.
- Summary of the customer's past purchases. Amount spent, type of payment, order status. For more information about each order, click on the icon in the "Actions" column.
- Summary of the products that were ordered by a customer. Among other things, this enables you to know when a customer is very fond of a product, and maybe create a special discount for the 10th purchase. Clicking on a product directs to the order to which that product is tied.
- Registered addresses.
- Available vouchers / cart rules.
- Carts that the customers has created (but not necessarily validated) since sign-up. When your customer is currently on your shop, you can see what is being added to the cart in real time.
- Previous connection to the shop.
Searching for a Customer
Searching for a customer on your PrestaShop shop can be done two different ways.
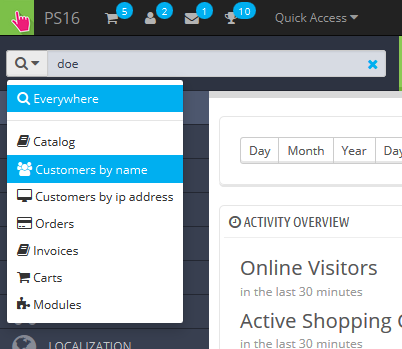
The first method consists of entering the information you have into the PrestaShop search bar, which is found in the top center of your back-office. By selecting "everywhere", "by name" or "by ip address", you can perform a search based on:
- ID. The numbers that is assigned to the customer in the database.
- First or last name. Note that you cannot search for both: choose either "john" or "doe", as "john doe" won't work.
- E-mail address.
- IP address. You can search using the IP of the latest connection to your shop.
The results, if any, are then presented: the list presents you with the users' ID, social title, e-mail, birthday, registration date, amount of orders and whether or not the user's account is active. From there on, you can view the whole user's page, or edit its details.
The second method consists of going to the "Customers" page, and listing all of your customers.
On this page, you can complete the fields at the top of the list, in order to filter it according to the following criteria: ID, social title, first name, last name, e-mail address, age, account status (enabled or disabled), subscription to the newsletter, subscription to partnering ads, registration date, and last connection date. Enter your criteria and click the "Filter" button in the top right-hand corner of the table. You can then sort the list for some of the columns.
Click the "Reset" button to go back to the complete list.


