
Gestionar Atributos de Productos
Los atributos son la base de las variaciones (o "combinaciones" en la interfaz de PrestaShop) de un producto: puede crear variaciones de un producto, si al menos uno de sus atributos cambia.
Debe pensar en los atributos como propiedades de un producto que pueden cambiar entre cada variación, aunque el nombre del producto se mantenga: color, capacidad, tamaño, peso, etc. Puede utilizar cualquier cosa que varíe entre las versiones de un mismo producto, excepto el precio.
La diferencia entre un atributo y una característica depende del propio producto en sí. Algunos productos pueden compartir la misma propiedad, siendo la primera utilizada para la construcción de variantes de productos, y la otra como característica invariable.
Por ejemplo, un cliente puede comprar una variación del iPod basada en los atributos (color, capacidad del disco), pero no en las características (peso, tamaño).
Del mismo modo, otra tienda podría vender variaciones de camisetas basadas en los atributos (color, tamaño, género), pero no en las características (peso).
Los atributos son configurados sobre la base de un producto, desde la página "Productos" bajo el menú "Catálogo". Pero primero debe registrarlos en su tienda utilizando la página "Atributos y Valores" bajo el menú "Catálogo".
Esta página presenta una lista de todos sus atributos registrados actualmente. Puede editar o eliminar cada uno de ellos utilizando los botones de acción disponibles a la derecha de la tabla, o mostrar sus valores haciendo clic en la opción "Ver" que abrirá una nueva tabla para presentarlos en pantalla.

También puede establecer el orden de presentación de los atributos en el front-office haciendo clic en los iconos de flecha, o arrastrando y soltando cada fila una vez se encuentre posicionado el cursor del ratón sobre la columna "Posición".
Crear un nuevo atributo
Para añadir un atributo, o en otras palabras, añadir un grupo de posibles variaciones (colores, capacidad, material, etc.), haga clic sobre el botón "Añadir nuevo atributo". Una nueva página aparecerá en pantalla.
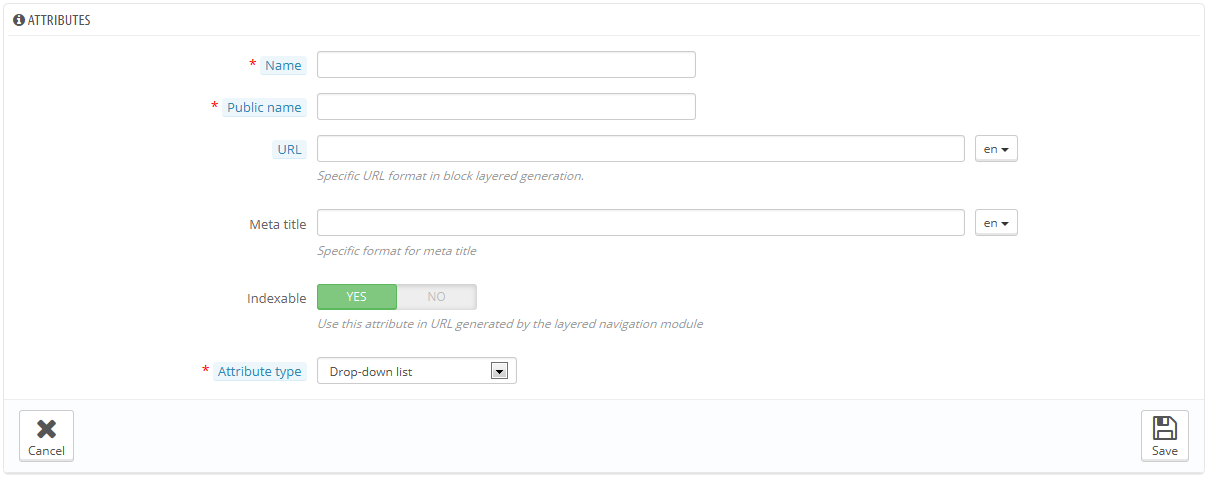
Rellene el formulario:
- Name. The exact description of the attribute. This needs to be short but precise, so as to not confuse it with another attribute.
- Public name. The attribute name, as displayed to the customers on the product page. Since some attributes might have the same name for varying content, this field enables you to still present it correctly within the product's context, while being able to easily tell an attribute from another with a similar name but different meaning.
- Attribute type. Enables you to choose whether the product's page should display this attribute's values as a drop-down list, a radio button list, or a color picker.
Three more options are available when you enable the Layered Navigation Block module. They are not strictly tied to the layered navigation: they provide a direct URL to each of a product's variations. This way, not only is the customer able to send a correct link to a friend, but this also helps enhance your search engine placement.
- URL. The word to use in the URL. By default, PrestaShop uses the attribute's public name.
- Meta title. The word to use in the page's title. By default, PrestaShop uses the attribute's public name.
- Indexable. Whether search engines should index this attribute or not.
The customer can get the URL simply by clicking on an attribute from the product sheet: the URL will change to add a final detail, for instance #/color-metal or #/disk_space-16gb/color-green.
The layered navigation generator does make use of these too, hence the description text "Specific URL format in block layered generation" and "Use this attribute in URL generated by the layered navigation module".
Save your new attribute to return to the attributes list. You must now add values to your attribute.
Creating a new value
Click on "Add new value". A new page appears.
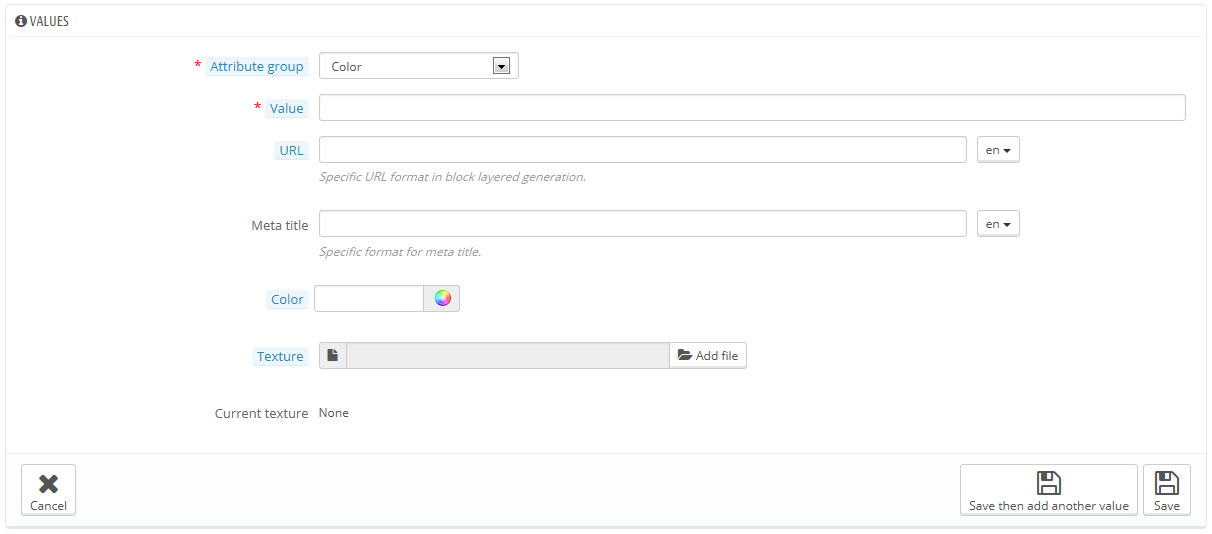
Fill out the form:
- Attribute type. From the dropdown list, select one of the available attributes.
- Value. Give a value to the attribute: "Red", "16 Gb", "1.21 gigowatts"...
The next fields are only shown if the attribute is a color type.
- Color. If the attribute is a color, you can enter its value in HTML color code (i.e. "#79ff52" or "lightblue"), or use the color picker to precisely show the correct hue.
- Texture. If your product does not use a solid color but rather a textured one (i.e. tiger stripes), you can upload a small image file that will be displayed on the product's page. Note that this will replace the HTML color from the field above. Click on the "Save" button is order to start the upload.
You can also use this option to let the customer choose color variety from a picture of your product rather than a color. How it is displayed on the front-end depends on the theme you are using... - Current texture. Once you have uploaded a texture file, it is displayed in this section as a reminder.
You can add more values for the same attribute type by saving your changes with the "Save then add another value" button.
Two more options are available when you enable the Layered Navigation Block module. They are not strictly tied to the layered navigation: they provide a direct URL to each of a product's variations. This way, not only is the customer able to send a correct link to a friend, but this also helps enhance your search engine placement.
- URL. The word to use in the URL. By default, PrestaShop uses the value's name.
- Meta title. The word to use in the URL. By default, PrestaShop uses the value's name.
The customer can get the URL simply by clicking on an attribute from the product sheet, and the URL will change to add a final detail, for instance #/color-metal or #/disk_space-16gb/color-green.
The layered navigation generator does make use of these too, hence the "Specific URL format in block layered generation" description text.
Once your attributes are in place and their values are set, you can create product variations (or "combinations") in each product's "Combinations" tab, from the "Products" page under the "Catalog" menu.