...
A PrestaShop module consists of :
...
- One file for PrestaShop 1.4:
logo.gif, 16*16 pixels. - One file for PrestaShop 1.5:
logo.png, 32*32 pixels.
...
a main PHP file with as many other PHP file as needed, and all the image and TPL files necessary to display the information.
Let's see an example with PrestaShop's blockuserinfo module:
...
Modules can be made as configurable as necessary; the more configurable it is, the easier it will be to use, and thus will be able to address the need of a wider range of users.
One of the main interest advantages of a module is to add functionalities to PrestaShop without having to edit its core files, thus making it easier to perform an update without having the transpose all core changes. Indeed, you should always strive to stay away from core files when building a module, even though this can prove hard to do in some situations...
...
A module is made of a lot of files, all stored in a folder that bears the same name as the module, that folder being in turn stored in the /modules folder at the root of the main PrestaShop folder: /modules/name_of_the_module/.
/views/templates/css | Sub-folder for CSS files used. | If the module needs to work with PrestaShop 1.4, the CSS files should be placed in a /css folder at the root of the module's folder. |
/views/templates/js | Sub-folder for JavaScript files. | If the module needs to work with PrestaShop 1.4, the JavaScript files should be placed in a /js folder at the root of the module's folder. |
/views/templates/img | Sub-folder for image files. | If the module needs to work with PrestaShop 1.4, the image files should be placed in a /img folder at the root of the module's folder. |
Default files and folders for a PrestaShop 1.5 module:
- "Bootstrap" Main file:
name_of_the_module.php. This PHP file should have the same name as its root folder. - Cache configuration file (generated by PrestaShop):
config.xml - Module-specific controllers, all in the
/controllerssub-folder - Class-overriding code, all in the
/overridesub-folder (automatic install/uninstall using copy or merge) .- View files: JavaScript, Modelsimages, CSS files, template files, etc. They can be placed in folders within the module's main folder:
/views/csssub-folder folder for CSS files. If the module needs to work with PrestaShop 1.4, the CSS files should be placed in a/cssfolder at the root of the module's folder./views/imgfolder for image files. If the module needs to work with PrestaShop 1.4, the images files should be placed in an/imgfolder at the root of the module's folder./views/jsfolder for JavaScript files. If the module needs to work with PrestaShop 1.4, the JS files should be placed in a/jsfolder at the root of the module's folder./views/templates/adminsub-folder for JavaScript filesfiles used by the module's admin controller./views/templates/frontsub-folder for files used by the module's front controller./views/templates/hookshooksub-folder for files used by the module's hooks
- 16x16 module logo:
name_of_the_module.jpg(JPG format) - 32x32 module logo:
name_of_the_module.png(PNG format)- .
- Module-specific controllers, all in the
/controllerssub-folder. - Class-overriding code, all in the
/overridesub-folder (automatic install/uninstall using copy or merge). - Two icon files representing this module in the back-office.
- One file for PrestaShop 1.4:
logo.giforlogo.jpg, 16*16 pixels. - One file for PrestaShop 1.5:
logo.png, 32*32 pixels.
- One file for PrestaShop 1.4:
- Translation files:
fr.php,en.php,es.php, etc. From v1.5 onward, all these files can be placed in the/translationssub-folder. - Optional: in a
/themes/[theme name]/modulesfolder, a folder with the same name as the module, containing.tpland language files if necessary. This last folder is essential during modifications of existing module, so that you can adapt it without having to touch its original files. Notably, it enables you to handle the module's display in various ways, according to the current theme.
Creating a first module
Let's create a simple first module; this will enable us to better describe its structure. We will call it "My module".
...
This checks for the existence of a PrestaShop constant, and if it does not exist, it stops the module from loading. The sole purpose of this is to prevent alicious malicious visitors to load this file directly.
...
- 'name' attribute. This attributes serves as an internal identifier, so try your best to make it unique, without special characters or spaces, and keep it lower-case. In effect, the value MUST be the name of the module's folder.
- 'tab' attribute. The title for the section that shall contain this module in PrestaShop's back-office modules list. You may use an existing name, such as
seo,front_office_featuresoranalytics_stats, or a custom one. In this last case, a new section will be created with your identifier. We chose "front_office_features" because this first module will mostly have an impact on the front-end.Here is the list of available "Tab" attributes, and their corresponding section in the "Modules" page:
"Tab" attribute Module section administrationAdministration advertising_marketingAdvertising & Marketing analytics_statsAnalytics & Stats billing_invoicingBilling & Invoices checkoutCheckout content_managementContent Management emailingE-mailing exportExport front_office_featuresFront Office Features i18n_localizationI18n & Localization market_placeMarket Place merchandizingMerchandizing migration_toolsMigration Tools mobileMobile othersOther Modules payments_gatewaysPayments & Gateways payment_securityPayment Security pricing_promotionPricing & Promotion quick_bulk_updateQuick / Bulk update search_filterSearch & Filter seoSEO shipping_logisticsShipping & Logistics slideshowsSlideshows smart_shoppingSmart Shopping social_networksSocial Networks - 'version' attribute. The version number for the module, displayed in the modules list. It is a string, so that you may use such variation as "1.0b", "3.07 beta 3" or "0.94 (not for production use)".
- 'author' attribute. This is displayed as is in the PrestaShop modules list.
...
- The
need_instanceflag indicates whether to load the module's class when displaying the "Modules" page in the back-office. If set at 0, the module will not be loaded, and therefore will spend less resources to generate the "Modules" page. If your module needs to display a warning message in the "Modules" page, then you must set this attribute to 1. ps_versionversions_compliancyis new since PrestaShop 1.5. It clearly indicates which version of PrestaShop this module is compatible with. In the example above, we explicitly write that this module will only work with PrestaShop 1.5.x, and no other major version.dependenciesis new since PrestaShop 1.5. It clearly indicates that the module needs another module to be activated in order to work properly. Your module could rely on features brought by this other module, or it might simply be a helpful addition which would make no sense with that other mode disabled. Use the module's folder name as identifier. In the example, we require the activation of the Blockcart module.
...
These lines respectively assign:
- a A name for the module, which will be displayed in the back-office's modules list.
- a A description for the module, which will be displayed in the back-office's modules list.
- a A message, asking the administrator if he really does want to uninstall the module.
- a A warning that the module doesn't have its
MYMODULE_NAMEset yet (this last point being specific to our example, as we will see later).
...
It is possible to expand the install() method as much as needed. In the following example, we perform the following tasks during installation:
- check Check that the module is indeed installed.
- check Check that the module is tied to the
leftColumnhook. - check Check that the module is tied to the
headerhook. - create Create the
MYMODULE_NAMEconfiguration setting, setting its value to "my friend".
| Code Block |
|---|
public function install()
{
  if (Shop::isFeatureActive())
    Shop::setContext(Shop::CONTEXT_ALL);

  return parent::install() &&
    $this->registerHook('leftColumn') &&
    $this->registerHook('header') &&
    Configuration::updateValue('MYMODULE_NAME', 'my friend');
  }
} |
If any of these line lines fail, the installation does not happen.
...
There are many more, such as getInt() or hasContext(), but these four are the ones you will most use.
As you can see, this in a very useful and easy to use object, and you will certainly use in many situations. Most modules use it too for their own settings.
| Info | ||
|---|---|---|
| ||
By default, all these methods work within the confines of the current store context, whether PrestaShop is using the multistore feature or not. However, it is possible to work outside of the current context and impact other known stores. This is done using three optional parameters, which are not presented in the list above:
By default, these three parameters use the values of the current context, but you can use them to target other stores. Note that it is not recommended to change the default values of these variables, even more so if the module you are writing is to be used on other stores than your own. They should only be used if the module is for your own store, and you know the id and shop group of all of your shops. |
You are not limited to your own variables: PrestaShop stores all its own configuration settings in the ps_configuration table. There are literally hundreds of settings, and you can access them just as easily as you would access your own. For instance:
...
Note that when using updateValue(), the content of $value can be anything, be it a string, a number, a serialized PHP array or a JSON object. As long as you properly code the data handling function, anything goes. For instance, here is how to handle a PHP array array using the Configuration object:
...
The Shop object is a new addition to PrestaShop 1.5, which helps you manage the multistore feature. We will not dive in the specifics here, but will simply present the two method methods that are used in this sample code:
...
The icon file must respect these requirements:
- It must be placed on the module's main folder.
- In order to work with PrestaShop 1.4:
- 16*16 image.
- GIF format.
- Named
logo.gif. - Tip: FamFamFam's free Silk icon set is probably the best there is http://www.famfamfam.com/lab/icons/silk/.
- In order to work with PrestaShop 1.5:
- 32*32 image.
- PNG format.
- Named
logo.png. - Tip: There are many free 32*32 icon libraries available. Here are a few: http://www.fatcow.com/free-icons (very close to the FamFamFam one) orhttp://www.jonasraskdesigniconarchive.com/downloads/downloadsshow/danish-royalty-free-icons-by-jonas-rask.html (Danish Royalty Free),
Appearance in the "Modules" page
Now that all basics are in place, reload the back-office's "Modules" pages, in the "Front-office features" section, you should find your module. Install it (or reset it if it is already installed).
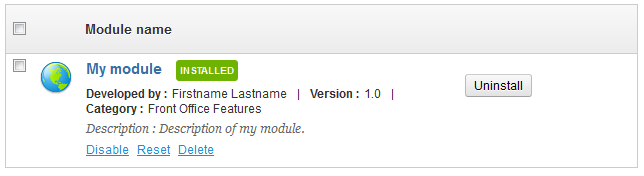
On installation, PrestaShop automatically creates a small config.xml file in the module's folder, which stores the configuration information. You should be very careful when editing by hand (see below).
...
| Code Block |
|---|
public function install()
{
  if (Shop::isFeatureActive())
    Shop::setContext(Shop::CONTEXT_ALL);

  return parent::install() &&
    $this->registerHook('leftColumn') &&
    $this->registerHook('header') &&
    Configuration::updateValue('MYMODULE_NAME', 'my friend');
  }
} |
As you can see, we make it so that the module is hooked to the "leftColumn" and "header" hooks. In addition to this, we will add code for the "rightColumn" hook.
...
| Code Block |
|---|
public function hookDisplayLeftColumn($params)
{
  $this->context->smarty->assign(array(
      array(
          'my_module_name' => Configuration::get('MYMODULE_NAME'),
          'my_module_link' => $this->context->link->getModuleLink('mymodule', 'display')
      )
  ));
  return $this->display(__FILE__, 'mymodule.tpl');
}

public function hookDisplayRightColumn($params)
{
  return $this->hookDisplayLeftColumn($params);
}

public function hookDisplayHeader()
{
  $this->context->controller->addCSS($this->_path.'css/mymodule.css', 'all');
} |
...
In the transplantation form:
- find Find "My module" in the "Module" drop-down list.
- choose Choose "Left column blocks" in the "Hook into" drop-down list.
- Save.
...
This is just regular HTML code... except for a few Smarty calls:
the The
{l s='xxx' mod='yyy'}call is PrestaShop-specific method that enables you to register the string in the module's translation panel. Thesparameter is the string, while themodparameter must contain the module's identifier (in the present case, "mymodule"). We only use this method once here for readability reasons, but in practice it should be used on all of the template's strings.- the The
{if},{else}and{/if}statements are Smarty conditionals. In our example, we check that the$my_module_nameSmarty variable exists (using Smarty'sisset()function) and that it is not empty. If it goes well, we display the content of that variable; if not, we display "World", in order to have "Hello World". - the The
{$my_module_link}variable in the link'shrefattribute: this is a Smarty variable that we will create later on, which will point to PrestaShop's root directory.
...
As you would expect, we have to create a template file in order to use the theme's style. Let's create the display.tpl file, which will contain the basic "Welcome to my shop!" line, and will be called by display.php. That display.php file will be rewritten into a front-end controller in order to properly embed our basic template within the theme's header, footer, columns, etc.
...
- A front-end controller must be a class that extends the
ModuleFrontControllerclass. - That controller must have one method:
initContent(), which calls the parent class'iniContentinitContent()method... - ...which then calls the
setTemplate()method with ourdisplay.tplfile.
...
Save both files in their respective folders, and reload your shop's homepage, then click on the "Click me!", and voilà ! You have your link. With just a few lines, the end result is already much better, with the "Welcome" line neatly placed between header, footer and columns!
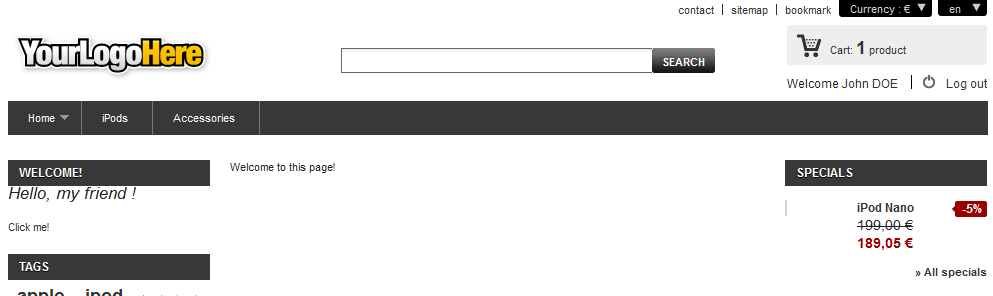
It is only a first step, but this gives you an idea of what is possible if you follow the templating rules.
...
| Code Block |
|---|
public function displayForm()
{
    // Get default Language
    $default_lang = (int)Configuration::get('PS_LANG_DEFAULT');

    // Init Fields form array
    $fields_form[0]['form'] = array(
        'legend' => array(
            'title' => $this->l('Settings'),
        ),
        'input' => array(
            array(
                'type' => 'text',
                'label' => $this->l('Configuration value'),
                'name' => 'MYMODULE_NAME',
                'size' => 20,
                'required' => true
            )
        ),
        'submit' => array(
            'title' => $this->l('Save'),
            'class' => 'button'
        )
    );

    $helper = new HelperForm();

    // Module, Tokent	oken and currentIndex
    $helper->module = $this;
    $helper->name_controller = $this->name;
    $helper->token = Tools::getAdminTokenLite('AdminModules');
    $helper->currentIndex = AdminController::$currentIndex.'&configure='.$this->name;

    // Language
    $helper->default_form_language = $default_lang;
    $helper->allow_employee_form_lang = $default_lang;

    // titleTitle and Toolbartoolbar
    $helper->title = $this->displayName;
    $helper->show_toolbar = true;        // false -> remove toolbar
    $helper->toolbar_scroll = true;      // yes - > Toolbar is always visible on the top of the screen.
    $helper->submit_action = 'submit'.$this->name;
    $helper->toolbar_btn = array(
        'save' =>
        array(
            'desc' => $this->l('Save'),
            'href' => AdminController::$currentIndex.'&configure='.$this->name.'&save'.$this->name.
            '&token='.Tools::getAdminTokenLite('AdminModules'),
        ),
        'back' => array(
            'href' => AdminController::$currentIndex.'&token='.Tools::getAdminTokenLite('AdminModules'),
            'desc' => $this->l('Back to list')
        )
    );

    // Load current value
    $helper->fields_value['MYMODULE_NAME'] = Configuration::get('MYMODULE_NAME');

    return $helper->generateForm($fields_form);
} |
...
- Using the
Configuration::get()method, we retrieve the value of the currently chosen language ("PS_LANG_DEFAULT"). For security reasons, we cast the variable into an integer using(int). In preparation for the generation of the form, we must build an array of the various titles, textfields and other form specifics.
To that end, we create the$fields_formvariable, which will contain a multidimensional array. Each of the arrays it features contains the detailed description of the tags the form must contain. From this variable, PrestaShop will render the HTML form as it is described.
In this example, we define three tags (<legend>,<input>and<submit>) and their attributes using arrays. The format is quite easy to get: the legend and submit arrays simply contain the attributes to each tag, while the input contains as many<input>tags are needneeded, each being in turn arrays an array which contain contains the necessary attributes. For instance:Code Block 'input' => array( array( 'type' => 'text', 'label' => $this->l('Configuration value'), 'name' => 'MYMODULE_NAME', 'size' => 20, 'required' => true ))...generates the following HTML tags:
Code Block <label>Configuration value </label> <div class="margin-form"> <input id="MYMODULE_NAME" class="" type="text" size="20" value="my friend" name="MYMODULE_NAME"> <sup>*</sup> <div class="clear"></div>
As you can see, PrestaShop is quite clever, and generates all the code that is needed to obtain a useful form.
Note that the value of the main array is actually retrieved later in the form generation code.- We then create an instance of the
HelperFormclass. This section of the code is explained in the next section of this chapter. - Once the
HelperFormsettings are all in place, we generate the form based on the content of the$fields_formvariable.
...
Our example uses several of HelperForm's attributes: they need to be set before we generate the form itself from the $fields_form variable.:
$helper->module: requires the instance of the module that will use the form.$helper->name_controller: requires the name of the module.$helper->token: requires a unique token for the module.getAdminTokenLite()helps us generate one.$helper->currentIndex:$helper->default_form_language: requires the default language for the shop.$helper->allow_employee_form_lang: requires the default language for the shop.$helper->title: requires the title for the the form.$helper->show_toolbar: requires a boolean value – whether the toolbar is displayed or not.$helper->toolbar_scroll: requires a boolean value – whether the toolbar is always visible when scrolling or not.$helper->submit_action: requires the action attribute for the form's<submit>tag.$helper->toolbar_btn: requires the buttons that are displayed in the toolbar. In our example, the "Save" button and the "Back" button.$helper->fields_value[]: this is where we can define the value of the named tag.
Finally, after all is set and done, we can call the generateForm() method, which will take care of putting it all together and, as its name says, generate the form that the user will use to configure the module's settings.
Here is the rendition of the form as it is presently written – which you can see by yourself by clicking on the "Configure" link for the module in the back-office:
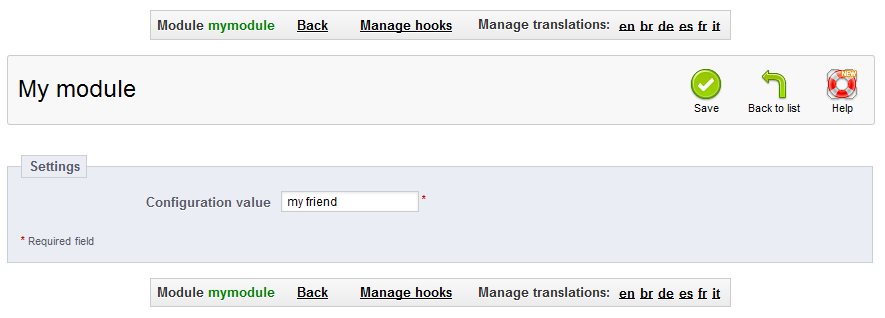
Change the value to whichever you like, click on the "Save" button, then go reload the homepage: your module is indeed updated with the new string!

Module translation
...
Strings in TPL files will need to be turned into dynamic content, which Smarty will replace by the translation for the chosen language. In our sample module, the file mymodule.tpl: file...
| Code Block | ||||
|---|---|---|---|---|
| ||||
<li>
  <a href="{$base_dir}modules/mymodule/mymodule_page.php" title="Click this link">Click me!</a>
</li>
<!-- Block mymodule -->
<div id="mymodule_block_left" class="block">
  <h4>{l s='Welcome!' mod='mymodule'}</h4>
  <div class="block_content">
    <p>Hello,
       {if isset($my_module_name) && $my_module_name}
           {$my_module_name}
       {else}
           World
       {/if}
       !
    </p>
    <ul>
      <li><a href="{$my_module_link}" title="Click this link">Click me!</a></li>
    </ul>
  </div>
</div>
<!-- /Block mymodule --> |
...
| Info | ||||||
|---|---|---|---|---|---|---|
| ||||||
As we can see, the basis of template file translation is to enclose them in the Here is the original code:
As you can see, we need to get the "Hello World" string translatable, but also to cater for the fact that there is a variable. As explained in the "Translations in PrestaShop 1.5" chapter, variables are to be marked using Making "Hello %s!" translatable words in easy: we just need to use this code:
But in our case, we also need to make sure that the %s is replaced by "World" in case the "my_module_name" value does not exist... and we must make "World" translatable too. This can be achieved by using Smarty \
|
...
This way, strings can be directly translated inside PrestaShop:
- go Go to the "Translations" page under the "Localization" menu,
- in In the "Modify translations" drop-down menu, choose "Module translations",
- click Click the flag of the country of which language you want to translate the module into. The destination language must already be installed to enable translation in it.
The page that loads displays all the strings for all the currently-installed modules. Modules that have all their strings already translated have their fieldset closed, whereas if at least one string is missing in a module's translation, its fieldset is expanded.
In order to translate your module's strings (the ones that were "marked" using the l() method), simply find your module in the list (use the browser's in-page search), and fill the empty fields. The destination language must already be installed to enable translation in it.
![]()
Once all strings for your module are correctly translated, click on the "Update translation" button at the top.
...
Now that we have a French translation, we can click on the French flag in the front-office, and get the expected result: the module's strings are now in French.
![]()
They are also translated in French when the back-office is in French.
| Tip |
|---|
The translated strings can only be taken into account by the PrestaShop tool, the PHP and TPL files have to be located at the root of the module's folder. |
![]()
Troubleshooting
If your module does not work as expected, here are a few ways to find help.
PrestaShop official forum
Join our forum forums at http://www.prestashop.com/forums/, and search for an answer using the relevant keywords. If your search needs refining, use the advanced search form. And if your search doesn't yield anything useful, create a new thread, where you can be as wordy as necessary when writing your question; you will need to register first.
...