| Section | ||||
|---|---|---|---|---|
|
Table of content
| Table of Contents | ||
|---|---|---|
|
...
Managing Shipping
How you choose to ship your products is a key element to the management and success of your store. You must account for the great variety of available methods, which can mix carriers, regional and international taxes, package weight and the price of a product itself. Luckily, PrestaShop makes it easy for you to handle it all in just a few screens.
To configure your shopA product's shipping , head to the "Shipping" tab of your Back Office.
Right from the Shipping page, you can set some global options.
...
price is basically calculated using either of two methods: the total price of the order, or the total weight of the order. This is how most carriers calculate their shipping fees, and this is why you should fill-in the weight setting when creating a product in the catalog, and also why you absolutely must indicate the per-weight and per-price costs for each carrier in the "Carriers" page.
| Info |
|---|
PrestaShop computes shipping price according to a system of either weight ranges or price ranges. That system can only work for one or the other of these types of range. |
The shipping settings work closely with the local settings of your PrestaShop installation. While in PrestaShop 1.4 some of these settings were also found in the "Shipping" menu, in version 1.5 all local settings have been moved in a new menu, named "Localization". This is where you will be able to edit geographical zones, countries, currencies, etc. Therefore, make sure to have a serious look at the "Localization" menu, which is explained in the next chapter of this guide, "Understanding Local Settings". For instance, in order to create a complete carrier in PrestaShop, you must have clearly defined your geographical zones before; this is done in the "Zones" page under the "Localization" menu.
The way carriers are created in PrestaShop was completed reworked in version 1.5.5.0, with a new Carrier Wizard.
Shipping
The more general settings of you shop's shipping configuration are found in the "Shipping" page, under the "Shipping" menu.
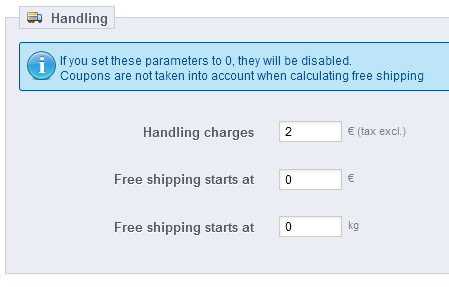
This page provides global handling settings:
- Handling charges. Enter the per-order handling expenses, which will be added to the final purchase price. This is separate from your shipping costs: it is really the cost of you or your employee having to fetch the products, package them and have them shipped. If there is no such cost, leave it at 0.
- Free shipping starts at (currency) and Free shipping starts at (weight). Enter the price or weight after which your customers will receive free shipping. A For instance, you might choose to offer free shipping when the order exceeds $250. A message will appear to your customers indicating how much more money they need to spend in order to receive free shipping.
If you don't want do not want to offer free shipping and you do not want this message to appear, type 0 into the fields. - Billing. Choose whether you are calculating the shipping costs by total weight or price.
The "Fees" section enables you to see the shipping fee for each of the carriers added to your store.
- leave these values at 0.
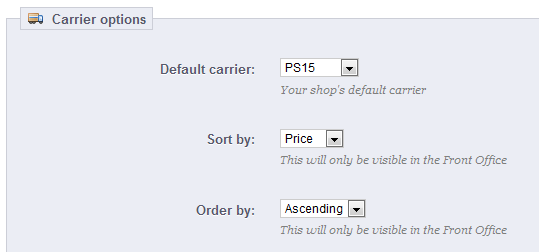
The "Carrier options" section gives you access to 3 settings, which impact the front-office in order to help the customer make a choice:
- Default carrier. If you have more than one carrier in your system, you might want to promote one to your customers. Besides the carriers themselves, this drop-down list has two contextual options:
- Best price. Depending on the amount of the order, on its weight and its delivery zone, PrestaShop will choose the cheapest price for the customer.
- Best grade. Speed grades make it easier to identify the fasted carriers. PrestaShop will display the carrier which, within the context of the order, will have the shortest shipping delay.
- Sort by. When customers are presented with a choice of carriers, you can choose to either sort the list by shipping price or by their position, as set in the carrier list on the "Carriers" page.
- Order by. This enables to set the order in which the carriers are sorted:
- If sorted by shipping fee and with an ascending order, then carriers will be displayed from the cheapest to the most expensive.
- If sorted by position and with a descending order, then carriers will be displayed from the top position of the list, to the bottom position.
Carriers
You must have carriers added to your store PrestaShop installation – that is, a clear indicator of who will deliver the productyour products. It might be just yourself or your shop (for instance if you are selling downloadable products, or only work locally), but as soon as you are actually sending packages using stamps and a 3rd-party delivery service integrated with PrestaShopsuch as your local postal service, or FedEx, UPS and such, then you must have their details added to your storeshop's database. This will enable you and your customers to better choose which carrier to use, based on their delivery ranges, fees and delivery dates.

The "Carrier" page presents you with a list of all your current carriers. From there, you can directly change their status, indicate that why of shipping is free or not, and change their position when presented to customers.
By default, you only have one carrier two carriers in your database: your own store. It's
- Your own shop: This represents your physical store, where customers can supposedly come and pick up their products themselves. It has no price range or weight range set.
- "My carrier": This is a sample carrier and should not be used in production. It has one price range (from $0 to $10,000) and one weight range (from 0 kg to 10,000 kg).
It is up to you to remove these default carriers and add new carriers ones for your customers. We At the very least, you should edit the "My carrier" carrier and replace its data with that of a real carrier: name, details, and ranges.
Creating a New Carrier
In this section, we are going to create a sample complete carrier, from A to Z, using the Carrier Wizard. Note: You can create as many carriers as you wish.
If one carrier has different shipping services, you should create as many carriers in PrestaShop, and differentiate them with their names.
| Note |
|---|
The Carrier Wizard is only available for PrestaShop 1.5.5.0 and above. If you are using an older version (between v1.5.0.0 and v1.5.4.1), you do not have a carrier wizard to use, but regular forms. Read the documentation for this in "Older interface" section below. |
Many of the details asked by PrestaShop's forms should be provided by your carriers once you have set up an account or are under contract with them directly. Check with them in order to make sure everything is configured correctly.
Creating a New Carrier
Click on the "Carriers" sub-tab, and To create a new carrier, click on the "Add Newnew" button in the "Carriers" page.
This will open the Carrier Wizard on the first of its four panels.
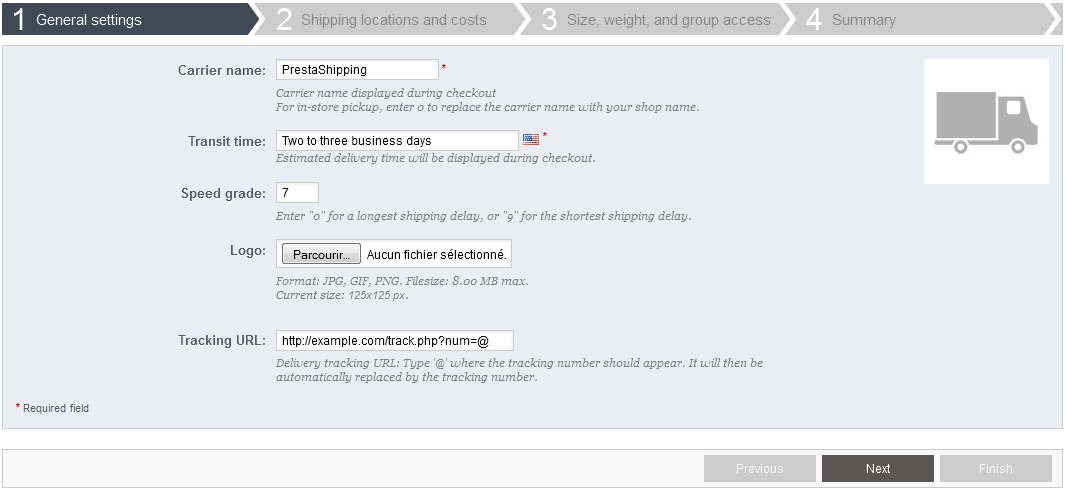
Panel 1: General settings
This is where you describe the carrier, giving information that the customer will need in order to recognize and choose the carrier he prefers.
Let's examine all of the information you need to enter:
- Company. Fill out this field with the name of your carrier and/or a Carrier name. The name is public, so you should use the official name. If you have create one PrestaShop carrier per shipping services from a single carrier, the name will help you differentiate them.
You could also add a description of the service (for . For instance, you could fill in "PrestaPost PrestaShipping – 500 lbs and over")Logo. Add a logo so that your customers can easily choose between different carriers..
You must add a name in order to - Transit time. The estimated time it takes this carrier to deliver your products, written in plain language. This is displayed to customers during checkout. It will help them select their carrier according to the amount of time they want are willing to wait to receive their shipment. Customers can often accept to pay more for a faster carrier.
You must fill this field in all the available languages, especially the default one. - Speed grade. Since the "Transit time" field can contain any text, it cannot be used to compare the carriers' transit times. The "Speed grade" setting enables you to give the carrier a grade, from 0 (very slow) to 9 (very fast). This is then used to sort carriers by their speed grade, and help customers choose the one they prefer.
- Logo. Having a logo helps customers choose between different carriers more easily. PrestaShop will resize your image in order to fit in the order form.
The logo will appear in each panel of the Carrier Wizard, as a reminder of which carrier you are editing/creating. - Tracking URL. This field must be filled with the tracking URL provided by your carrier (if there exists one). For example, France's postal service (La Poste) offers this URL:
http://www.colissimo.fr/portail_colissimo/suivreResultat.do?parcelnumber=@. When customers select finish their carrierpurchase, they will be sent the URL that you enter into this field, which they can click to track their delivery. - Zone. Indicate the customer's zones in which this carrier is available (the zones where the carrier can make deliveries).
- Group Access. Select which customers groups will have access to this carrier.
- Status. Include or exclude this carrier in your shop's list of carriers.
- Shipping & handling. Include the shipping & handling costs in the carrier's price
- Tax. Indicate if this carrier requires a tax in order to deliver to a certain zone.
- Shipping & Handling. Include or exclude shipping & handling costs in this carrier's price.
- receive that URL with the "@" replaced by the tracking number provided by the carrier, making it possible to click that link and see where the delivery process is at.
Click "Next" to reach the second panel.
Panel 2: Shipping locations and costs
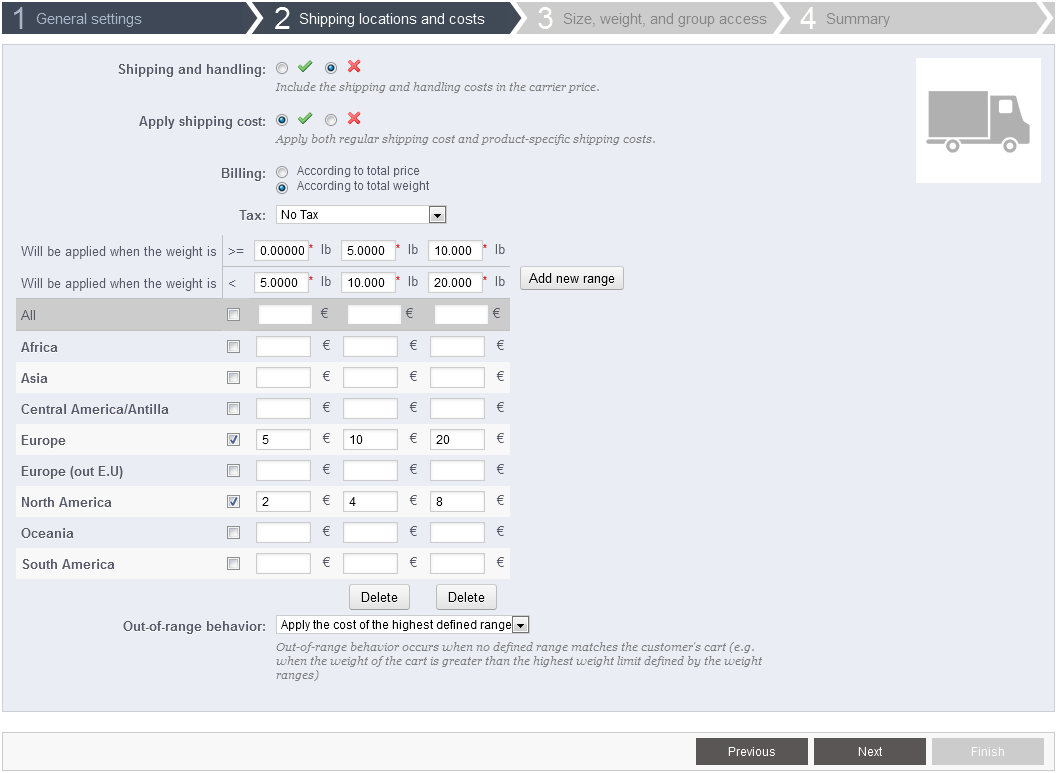
First, this panel presents a handful of settings:
- Shipping and handling. Include or exclude shipping & handling costs in this carrier's price, as set in the "Shipping" page.
- Apply shipping cost. If enabled, the final order price will include both the carrier's regular shipping fee, along with specific per-product fees, if there are any.
If disabled, the final order price will only include the product's shipping fee – making this carrier basically free.
Per-product fees are configured on each product's "Shipping" tab, with the "Additional shipping cost (per quantity)" field. - Billing. Choose whether you want to calculate the shipping costs by total price or total weight. This depends on the way your carrier handles billing, so make sure to check their documentation about this.
- Tax. Indicates if this carrier requires a local tax in order to deliver, and if so, which one. The tax must already exist in PrestaShop (which can be done in the "Taxes" page of the "Localization" menu).
Then comes the important part: the creation of the carrier's range. This is a very important step, as PrestaShop needs this information to present the customer with carriers which can actually deliver the ordered package. Indeed, depending on the order's total price or total weight, some carrier options will not be available while others will only appear at a certain value. You must be very precise when filling these values, and preferably those suggested by each carrier's documentation.
This is where the whole Carrier Wizard takes its name. Here, you will build your carrier's price or weight ranges (depend on your choice for the "Billing" option above), one range after the other, applying your prices for each zone along the way.
For each range, you only need a couple of steps:
Fix the lower and upper limits of the range you are creating. Depending on the "Billing" choice, it will display either "Will be applied when the price is" or "Will be applied when the weight is" for the lower limit, and either "Will be applied when the price is" or "Will be applied when the weight is" for the upper limit.
Note Note that the lower limit inclusive (>=) whereas the upper limit is exclusive (<). This means that a range's upper limit can have the same value as the next range's lower value, as the two will not overlap.
- Fill in the prices. As soon as both lower and upper limits are filled, PrestaShop makes the "All" field available to edit. This is a special field: any value you enter in it will be copied into the field for all the available geographical zones, without any action on your part. You can then edit the value of each zone field separately.
Check the checkbox for each zone the carrier delivers to at this range. If this carrier does not make deliveries in a given geographical zone for this current range, make sure to uncheck its checkbox. - Create the range. Click the "Add new range" button. PrestaShop will add a new column of zone fields. Start again by fixing the lower and upper limits of this range, then filling the prices per zone.
| Note |
|---|
The weight and price units are the default ones for your PrestaShop installation, and the ones your products use. You can change these units "Localization" page of the "Localization" menu. |
Finally comes one final option:
- Out-of-range behavior. In case you have left out a range for an orderthe chosen carrier has not set shipping cost for the required zone or weight, you can indicate how the software PrestaShop should react. You have two options:
- If the software doesn't find the range it needs, it will take the largest configuration and apply these conditions.
- Otherwise, it will not offer this carrier because it Apply the cost of the highest defined range. PrestaShop will take the most costly range and apply its conditions.
- Disable carrier. PrestaShop will not suggest this carrier, since it probably cannot deliver this order.
- Finally, save your newly-created carrier.
Here is an example of out-of-range behavior: Let's say you have set up a weight range from 0 to 10 lbs. Your customer wants to place an order that is 15 lbs., and no behavior has been configured for this weight. By choosing "Apply the cost of the highest defined range", PrestaShop will apply the price conditions that you have set up for orders from 5-10 lbs. If you choose "Deactivate the carrier", then this carrier will not be offered to the customer in this case.
States
By "States", PrestaShop calls first-level administrative divisions of a country. In the United-States, they are called states; in Italy, it's regioni (singular: regione); in France, it's régions (regions); in the United-Kingdom, it's regions. By default, PrestaShop provides you with a set of states: the 50 US states, the 13 Canadian provinces and territories, 24 Argentinian provincias, and 110 Italian province (singular: provincia).
Having states properly defined in your database helps better represent the delivery possibilities of your carriers. It is therefore important to enter all of a given country's administrative divisions if they are important to your carriers. You can find a list of such divisions on this Wikipedia page.
Note: the PrestaShop address form currently only lists states are available for the customer to choose. Therefore, make sure to use a sensible list when adding content to your states list. That is the reason why, for instance, the list contains Italian province rather than regioni.
Let's create a new state. Click "Add New" to get to the creation form.
- Enter the name of the state.
- Enter its ISO-3166-2 code:
- Go to this Wikipedia page
- Click the state's country two-letter code (in the "Entry" column of the main table),
- On that page, find the state's code (it should be in a list on the page, or in the text for the smallest countries),
- If there is one, remove the country's prefix in order to keep the code under 4 characters. For instance, the full ISO 3166-2 for Devon, in the United Kingdom, is "GB-DEV". Simply use "DEV" as the state's ISO code – it already is attached to the country using PrestaShop's "Country" drop-down menu (see next step).
- Indicate its country using the drop-down menu.
- Indicate its geographical zone using the drop down menu.
- Choose its status.
- Save.
Country
PrestaShop must know all existing countries in order for customers to clearly indicate their own.
At the bottom of the page, you can set the default country for your shop.
Normally, PrestaShop comes with all current countries in the database. But in the scenario that new ones appear, you would need to add a new country. Click "Add New" to do so.
- Enter the name of the country that you would like to add.
- Enter its ISO-3166 code, which you can found on the official ISO page.
- Enter its international call code, which you can found on this Wikipedia page.
- Indicate its default currency. You can use your shop's default currency (as set in the Payments > Currencies sub-tab), or one of the other default currencies. Remember that if needed, you can add a new currency to your shop using that sub-tab.
- Indicate its zone, the world's subregion to which this country is attached. If necessary, you can add new zones using the Shipping > Zones sub-tab.
- Indicate whether a user signing up with the address must give a zip code or not.
- You may also give more detail on the format of the postal code (or zip code). If you don't put anything, PrestaShop won't verify the validity of the zip code when given a new address for this country.
- Use the following codes for the postal code: "L" for a letter, "N" for a number and "C" for the country's ISO code (the one which you entered in the ISO field above).
- You can rely on this Wikipedia page if you do not know the postal code format. Make sure you do NOT copy/paste the notation from Wikipedia, but to adapt it! For instance, Wikipedia indicates "AAA 9999*" for Malta, so the notation for PrestaShop becomes "LLL NNNN" (without the final *).
- Give details about the address layout. You can click on the various helper links on the side of the text-field in order to add more fields. In live usage, they are automatically replaced by PrestaShop with the data from the customer's account.
- Enabled or disabled it. A disabled country will not be offered as an option when your customers want to register and create an account.
- Indicate if it contains "states". This adds a new field to the PrestaShop address form. Note that "states" can be regions, provinces, departments... anything that makes sense to that country's postal service.
- Indicate if the country needs a Tax Identification Number, and if its tax label should be displayed or not.
- Save: you're done creating a country!
Zones
PrestaShop's zones are a list of the world's subregions. It helps categorize countries.
If needed, you can create more zones, by clicking, as usual, on "Add New".
All you need is a name and a status.
Price Ranges
With PrestaShop, you can add a unique shipping & handling price to each total purchase price range.
Click "Next" to reach the third panel.
Panel 3: Size, weight and group access

This panel presents two sets of options:
- Maximum package height/width/depth/weight. You can now indicate the minimum and maximum package height and weight, which are an essential part of choosing a package carrier. The value is to use the default weight and dimension units, as set in the "Localization" page of the "Localization" menu.
- Group Access. You might want only some user groups to be able to use a carrier. This option serves this purpose.
Click "Next" to reach the fourth and final panel.
Panel 4: Summary
This last panel gives you an overview of your settings for this carrier.
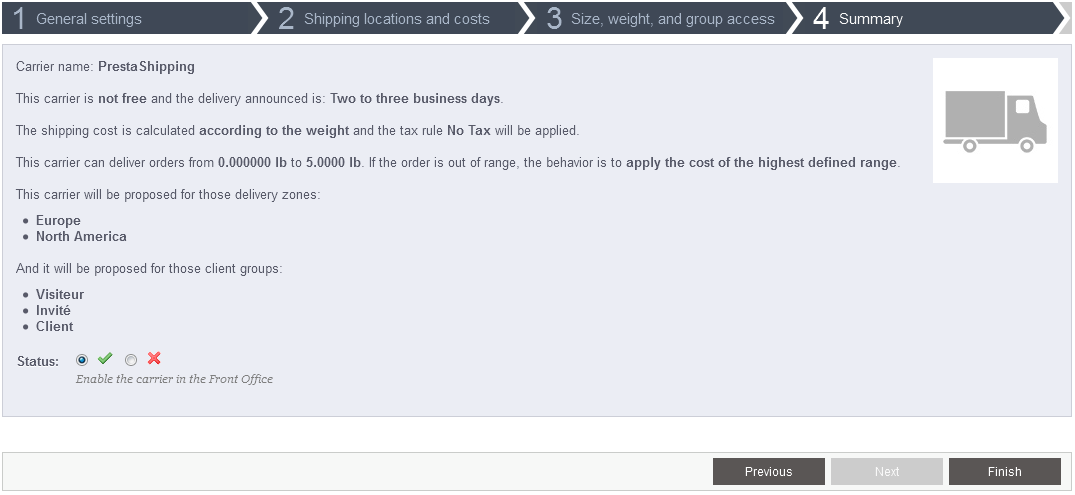
If some settings are wrong, you can go back to any previous panel by either using the "Previous" button, or directly clicking on the panel's tab.
If you want to save this carrier as a draft for now then come back to it later, disable the carrier using the "Status" option at the bottom of this final panel.
Either way, click on the "Finish" button to save your work, and create the carrier.
| Info |
|---|
When using PrestaShop in multistore mode, another panel is available, and the panel order changes slightly:
All the panels are as described above. The new one, "MultiStore", makes it possible for you to limit this carrier to a selection of your stores. |
Older interface (PrestaShop 1.5.4.1 and earlier)
The "Shipping" menu has changed a lot in version 1.5.5.0 of PrestaShop: the Carrier Wizard appeared, the "Weight ranges" and "Price ranges" pages disappeared (merged into the Carrier Wizard), and section of the "Shipping" page were removed.
Shipping
Up until version 1.5.4.1, the "Shipping" page featured two additional sections: Billing and Fees. Both have been merged into the new Carrier Wizard, along with the "Weight ranges" and "Price ranges" pages.
For those who are still using a version below 1.5.5.0, here is the documentation for these sections of this page:
- Billing. Choose whether you are calculating the shipping costs by total price or total weight. This is the default settings, which can be superseded by each carrier setting.
- Fees. View and edit the shipping fee for each of the carriers added to your store. See below.
That last portion of the page is extremely important, as this is where all your shipping settings come to meet, and where you enter the actual shipping fees. After you have created carriers, price ranges and weight ranges in their respective pages, this seemingly harmless section will be the tool to use to make them all work in conjunction with an actual price.
Assigning Shipping Fees to a Carrier's Zones/Ranges
| Warning |
|---|
Having correct shipping fees is very important, so make sure not to skip this setting – unless of course if you only sell downloadable products. |
Once you have created all your carriers and set all the weight and price ranges for these carriers (with the "Carriers", "Price Ranges" and "Weight Ranges" pages under the "Shipping" menu, which are fully explained later in this chapter), it is high time to set their shipping fees per zone/range.
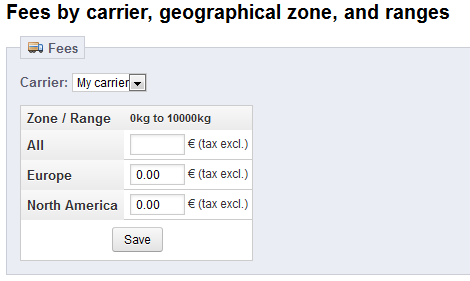
When selecting a carrier in the drop-down menu, PrestaShop displays a table with all the weight ranges and geographical zones that were set for this carrier, along with the shipping fee for each, tax excluded.
| Tip |
|---|
Carrier's weight ranges are set in the "Weight ranges" page of the "Shipping" menu. Carrier's geographical zones are set in the carrier's own setting form, in the "Carriers" page of the "Shipping" menu. Both ranges and zones must be configured in their respective pages in order to have this fee assignment tool work properly. |
The default value is "0.00", which is certainly not what you will want to leave as this pretty much means "free shipping, whatever the weight". You must therefore precisely set the shipping fees for each zone and range, as provided by the carrier itself, or as estimated by you. For instance, if you are sending packages from the US, the fee to Europe might be double or triple the domestic fee.
An empty field has a real impact on the availability of the carrier in the matching zone:
- If the fee per range is the same for all zones, simply fill the field for the "All" row, and leave the others empty.
- If the carrier does not ship to a certain zone for a given range, leave that field empty.
If the selected carrier does not have any range set, PrestaShop will let you know with the message "No ranges set for this carrier". You then must create at least one weight range for this carrier, or else you will not be able to set its shipping fees.
You must perform this for all of your carriers: click the tool's "Save" button when you are done entering your fees for the selected carrier, then choose another carrier in the dropdown list in order to set that carrier's fees for its own range and zone settings.
Creating a New Carrier
In this section, we are going to create a complete carrier, from A to Z. You can create as many carriers as you wish.
If one carrier has different shipping services, you should create as many carriers in PrestaShop, and differentiate them with their names.
Many of the details asked by PrestaShop's forms should be provided by your carriers once you have set up an account or are under contract with them directly. Check with them in order to make sure everything is configured correctly.

Let's examine all of the information you need to enter:
- Company. The name is public, so use the official name. You could also add a description of the service. For instance, you could fill in "PrestaPost – 500 lbs and over". If you have create one PrestaShop carrier per shipping services from a single carrier, the name will help you differentiate them.
- Logo. Having a logo helps customers more easily choose between different carriers. PrestaShop will resize your image in order to fit in the order form.
- Transit time. This is displayed to customers during checkout. It will help them select their carrier according to the amount of time they are willing to wait to receive their shipment. Customers can often accept to pay more for a faster carrier.
- Speed grade. The "Transit time" field can contain any text, and thus cannot be used to compare the carriers' transit times. The "Speed grade" setting enables you to give the carrier a grade, from 0 (very slow) to 9 (very fast). This is then used to sort carriers by their speed grade, and help customers choose the one they prefer.
- URL. This field must be filled with the tracking URL provided by your carrier. For example, France's postal service (La Poste) offers this URL: http://www.colissimo.fr/portail_colissimo/suivreResultat.do?parcelnumber=@. When customers select their carrier, they will be sent the URL that you enter into this field, with the "@" replaced by the tracking number provided by the carrier.
- Zone. Not all carriers can deliver worldwide. Indicate the geographical zones in which this carrier is available (the zones where the carrier can make deliveries). You can add more zones using the "Zones" page under the "Localization" menu. Note that the "Europe (out E.U)" zone groups European countries which are not part of the European Union, such as the Vatican, Switzerland, Andorra, Monaca, Norway...
- Group Access. You might want only some user groups to be able to use a carrier. This option serves this purpose.
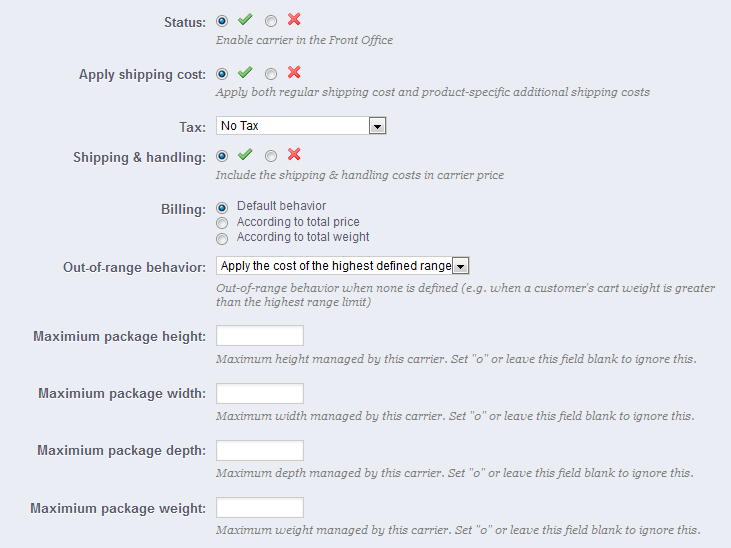
- Status. Include or exclude this carrier in your shop's list of carriers.
- Apply shipping cost. If enabled, the final order price will include both the carrier's regular shipping fee, along with specific per-product fees, if there are any. If disabled, the final order price will only include the regular shipping fee.
Per-product fees are configured on each product's "Shipping" tab, with the "Additional shipping cost (per quantity)" field. - Tax. Indicates if this carrier requires a local tax in order to deliver.
- Shipping & Handling. Include or exclude shipping & handling costs in this carrier's price.
- Billing. When billing a customer for the shipping service, PrestaShop can apply one of two behaviors. The default behavior is set in the "Shipping" page, under the "Shipping" menu, but you can change that setting on a per-carrier basis thanks to this option.
- According to total price. The shipping bill depends on the total order price.
- According to total weight. The shipping bill depends on the total order weight.
- Out-of-range behavior. In case the chosen carrier has not set shipping cost for the required zone or weight, you can indicate how PrestaShop should react. You have two options:
- Apply the cost of the highest defined range. PrestaShop will take the most costly range and apply its conditions.
- Disable carrier. PrestaShop will not suggest this carrier, since it probably cannot deliver this order.
- Maximum package height/width/depth/weight. New to PrestaShop 1.5. You can now indicate the minimum and maximum package height and weight, which are an essential part of choosing a package carrier. The value is to use the default weight and dimension units, as set in the "Localization" page of the "Localization" menu.
- Shop association. Only displayed in multistore mode. You can make so that this carrier is only available to a selection of your shops.
Here is an example of out-of-range behavior: Let's say you have set up a weight range from 0 to 10 lbs. Your customer wants to place an order that is 15 lbs., and no behavior has been configured for this weight. By choosing "Apply the cost of the highest defined range", PrestaShop will apply the price conditions that you have set up for orders from 5-10 lbs. If you choose "Deactivate the carrier", then this carrier will not be offered to the customer in this case.
Price Ranges
Carriers can be set to accept orders within a given price range. For example, if you want orders between $1 and $15 to be sent by the US Post Office with a special rate, create a price range from 1 to 15, and set it to "US Postal Service".
Weight Ranges
The process for defining weight ranges is exactly the same as that of defining price ranges.
For Put together, ranges should fill the entire prices spectrum, up to your most expensive possible order.

Creating a Price Range
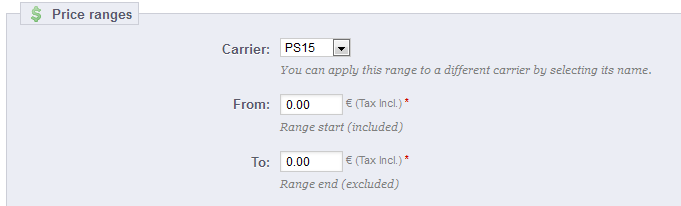
The form that opens when click on the "Add new" button is very simple:
- Carrier. Choose which carrier you are creating a range for.
- From. The lowest value of the range.
- To. The highest value of the range.
Remember that you can create as many ranges per carrier as needed, so if a carrier can handle more than one, but each in a different way, you should create the complete set of ranges.
| Tip |
|---|
Make sure to have the ranges overlap! Therefore, the "To" value of a range should be equal to the "From" value of the next one. For instance, if one range ends at $20, the next one should start at $20 too. Likewise, if you have to add a range before one that starts at $20, the new one should end at $20. |
Weight Ranges
Carriers must be set to accept orders within a given weight range. For example, if you want orders between 1 lbs and 15 lbs to be sent by the US Post Office with a special rate, create a weight range from 1 to 15, and set it to "US Postal Service".
Ranges should fill the entire weight spectrum, up to your heaviest possible order.
A carrier should have at least one range. In that case, as you cannot set an infinite maximum weight, set it to an abnormal number, such as 10,000.00 kg.

Creating a Weight Range
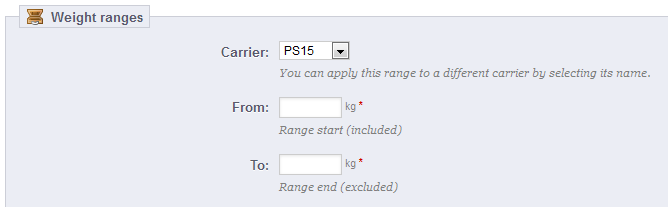
The form that opens when click on the "Add new" button is very simple:
- Carrier. Choose which carrier you are creating a range for.
- From. The lowest value of the range.
- To. The highest value of the range.
Remember that you can create as many ranges per carrier as needed, so if a carrier can handle more than one, but each in a different way, you should create the complete set of ranges.
| Tip |
|---|
Make sure to have the ranges overlap! Therefore, the "To" value of a range should be equal to the "From" value of the next one. For instance, if one range ends at 20 kg, the next one should start at 20 kg too. Likewise, if you have to add a range before one that starts at 20 kg, the new one should end at 20 kg. |
Once the ranges are determined and allotted to a carrier, you can define the shipping and handling for each range. Go to the first page of the "Shipping" tabmenu, and fill out the table found at the bottom of the page. Here we have taken as an example the bill according to the total weight of the order.
| Section | ||||
|---|---|---|---|---|
|